Thursday, October 5, 2017

Eileen Hull Sizzix Die Fall-idays

This month Eileen Hull's Inspiration Team is making projects for Fall-idays -  creations using Eileen's Sizzix Dies with any holiday theme!

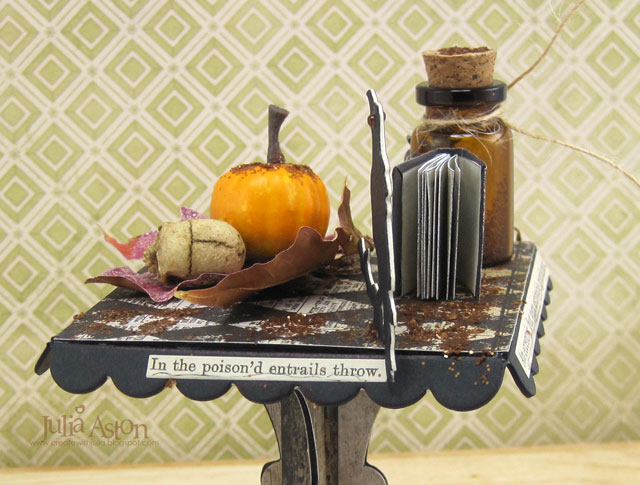
I used her Cup Cake Stand and turned it into a spooky apothecary table from a witches laboratory for Halloween!
 Here are the pieces of the Cup Cake Stand die that I cut out of Little Sizzles Black matboard (I didn't end up using the banner piece at the top there).  I also cut out a square of DP for the table top and 4 pieces of DP to cover the legs, front and back.  DP is from Tim Holtz Paper Stash Materialize.
Then I gathered items to put on the table knowing I wanted it to be for Halloween
Several things from Idea-ology - Skull, Adornment spider, Clipping Stickers/Halloween, and Pumpkin Pieces.  I also made a tiny Poisons in the Nature book using this sheet from Ever After Miniatures Etsy shop - you cut out the pieces, fold up the pages, glue, make the cover and adhere the pages in the cover. (you can see a tutorial of another book from another Etsy company that I made here)   I embossed a real fall leaf I picked up when I was taking a walk using Versamark ink and 2 Adirondack Embossing Powders - Cranberry and Tan.  I cut the raven using Tim's Movers and Shapers Mini Cat and Raven die.
I used a black Sharpie to color the white that showed up on the creases of the matboard.  I added and Idea-ology Apothecary Vial to the table filling it a third of the way with Tarnished Brass Distress Glitter.  Then I adhered some of the glitter to the table, the leaf, the pumpkin and the cork on the bottle.  I tied a spider to a piece of twine and knotted it around the bottle.
I added red Tiny Twinkles to the skulls eye sockets and orange ones for the ravens eyes (front and back).  The Miniature Poison Book is just placed on the table so it can be taken off and looked through!
I put Clipping Stickers/Halloween on each side of the table edge.

I love how this came out and think it will make a great Halloween decoration for table, window sill, desk or shelf!

Please check out Eileen's blog all month for more Fall-iday inspiration!

I'm linking my project to:
Country View Challenges - Autumnal Hues


Paper:  Little Sizzles Black Matboard - Sizzix, Paper Stash Materialize/Tim Holtz
Ink:  Versamark
Accessories:  Eileen Hull Cup Cake Stand and Pennant Die - Sizzix, Mini Cat and Raven Movers and Shapers Die - Tim Holtz/Alterations, Ideaology Skulls, Clipping Stickers/Halloween, Apothecary Vials, Adornments Halloween (Spider), Pumpkin Pieces,  Miniature Poison in the Nature Book - Ever After Miniatures Etsy Shop, real leaf,  Tan and Cranberry Embossing Powders - Adirondack, twine, Tiny Twinkles - Taylored Expressions, Tarnished Brass Distress Glitter - Ranger, black Sharpie marker, Black Stabilo Pencil.

Tuesday, October 3, 2017

Oh Christmas Tree

Chipping away at my Christmas card supply for this  year -  I made this one for two challenges.
The Technique Lovers challenge over at Splitcoast was to try Acrylic Resist. 
I embossed the Tall Pines by Tim Holtz onto a white panel.  Then I brushed over the panel with Weathered Wood Distress Paint and let it dry.   Next, I sanded over the raised trees to remove the paint and then sponged over the trees with Ranger Distress Frayed Burlap.  The paint resists the ink where it hasn't been sanded.  I stamped the sentiment in the corner and added blue Tiny Twinkles to the trees.

I'm also joining in on the Merry Monday Challenge
add a Christmas Tree to your card.

Stamps: Oh Christmas Tree - Rubber Soul
Paper: white, black - PTI
Ink: Ranger Distress Frayed Burlap, Hero Arts Black
Accessories: Tall Pines Embossing Folder - Tim Holtz/Alterations/Sizzix, Tiny Twinkles - Taylored Expressions, Tombow Glue, mini sander - Ranger, Ranger Distress Weathered Wood Paint, paint brush

Monday, October 2, 2017

Love in the Heart

I have a box of cards I keep in the closet so I always have a card for any occasion - and occasionally I sell them to friends as well.   I needed a few more the the "Wedding" section and so made this card.
I used an older die from MFT - Heart full of Love - that's no longer on their website and a new to me die for the scalloped edge - Notes: Scalloped A2 Vertical die from PTI for the front panel.
It was so easy to put together that I made 4 of them while I had the supplies out on my work table!

I'm linking my card to:
where we were to look at the Beau-Coup web site - I was inspired by these simple coasters. in the wedding section

Paper: Brushed Gold - SU, White - PTI
Accessories: Notes: Scalloped A2 die - PTI, Heart Full of Love Die - MFT (retired)

Sunday, October 1, 2017

October CAS Mix Up Challenge - Layering Stencils

It's October 1 and time for a new CAS Mix Up Challenge -  and this month I am the hostess!  Here is my challenge to you!
There are links to several YouTube Videos of ways to layer stencils so be sure to check those out!
For my card I used stamping, layering of stencils, a die cut frame and sequins!
Here are two photos showing my stencil layers -  first I sponged over this pretty Shower of Flutters stencil from Stamplorations using Ranger Distress Wilted Violet.  It's a negative stencil so the color goes on the background and leaves the buterflies with no color.
I laid the Tim Holtz/Stampers Anonymous mini grid stencil over the butterflies and sponged with Ranger Distress Milled Lavender.
I cut my panel into two pieces to keep my card CAS and was able to make two similar cards.
The second card has a slightly larger stenciled panel and so it covers the sides of the dotted die cut framing.  
(a funny optical thing with this butterfly stencil - I find if I focus my eye on the purple -  I can lose the butterflies and it almost looks like a map of a coastline with inlets and lakes?!? then if I look directly at one of the butterflies - they come back!)
So please join us and show us how you layer stencils on your CAS cards!  See all details and the link up over at the CAS Mix Up blog here!  You have until October 24th!


Stamps:  Keep It Simple: Birthday II - PTI
Paper:  white - PTI
Ink:  Ranger Distress Milled Lavender and Wilted Violet, True Black - PTI
Accessories:  purple sequins - a gift from Loll,  Shower of Flutters Stencil - Artplorations/Stamplorations, Mini Grid Stencil - Tim Holtz/Stampers Anonymous, Mix and Mat Flourishes die - PTI.

Thursday, September 28, 2017

Triple Boo!

I'm back today with a Halloween Card.  Clean and Simple -  and triple scary!
I was going to use just one spider on the web (there are two dies here both from Memory Box - the web and the spider) but I cut several spiders as I was making multiple cards.  So - I thought how much more creepy this would be with 3 spiders on the web -  and it is, don't you think???  
I'm getting the shivers just looking at it again!!
I've used the spider die before and I've had the web for just as long 
(4-5 years?! these are both so old Memory Box no longer has them on their site) 
but somehow I never used the web die.
The spiders bodies are popped up on foam dots and the top of their 'string' is glued to the web.  I added orange Tiny Twinkles for eyes just to make them even MORE creepy!  The sentiment is white embossed on black and popped up on foam dots as well.  The panel is white linen so has a little texture to it but you really can't see it in the photo.

Which is why I love Darnell's NBUS challenge
it makes us look at what we have stashed away, get it out and use it!
 I'm also linking my card to:


Stamps:  Boo - Amuse
Paper:  White, Fresh Snow Linen, True Black - PTI
Ink:  Versamark
Accessories:  Creepy Web Die, Dangling Spider Die - Memory Box, foam dots, Tombow Blue, Tiny Twinkles - Taylored Expressions, white embossing powder.

Wednesday, September 27, 2017

In Thanks for Fall Leaves

I've been busily making both Halloween and Thanksgiving cards to sell at our October Church Fair.  I love how I can sit down and stamp all day if I want to, now that I'm retired!  
Today I have a Thanksgiving card to share.
I used my brandy-new Mix and Mat - Pinked Edge Die that has this beautiful leaf cut out in the middle of it.  I cut it out of Arches Watercolor paper and then colored it by rubbing Distress Inks on my craft mat, spritzing the inks with water, and dragging and pouncing the die cut panel in the colors.  
I layered it to a panel of Brown Kraft Core Coredinations paper that I sanded to reveal some of the Kraft Core.  I embossed the sentiment in gold on a strip of vellum and attached it over the panel with small brads.
 Tomorrow I'll be back with a Halloween Card!

I'm linking my card to:
 this is the first time I've used the pinked edge leaf die


Make My Monday - Autumn Colors

Stamps:  Peace and Plenty - Waltzingmouse (no longer available)
Paper:  Arches Watercolor Paper, Rustic Cream, Vellum - PTI, Brown Kraft Core - Core-dinations.
Ink:  Versamark, Ranger Distress Barn Door, Spiced Marmelade, Crushed Olive, Gathered Twigs.
Accessories:  Gold embossing powder, heat tool, small brads, mini sander - Ranger, nonstick craft mat.

Tuesday, September 26, 2017

Fourth Sneak Peek of Book Club Dies from Eileen Hull/Sizzix

Every Tuesday in September, Eileen Hull's Inspiration Team will be showing sneak peeks of the fun new Book Club Dies that will be coming out in the fall  -  we just want to get you excited now and will show more details about our projects just before the dies are released!

One word that sums up the new Sizzix Book Club collection is VERSATILE! 
Eileen is happy to introduce new Three-in One dies- dies that serve multiple purposes to fit into every area of your life. 

There are three new ScoreBoards dies for sturdy project bases and three die sets to embellish them. Each die may be used in many ways- on books, cards, gift boxes, home decor projects, and for storage and organization.

Imagine a die that can create a box, a book and a frame all on one die- we have that! Come explore the Book Club collection with the Inspiration Team and let us know which one is your favorite! Releasing this fall...
Today I'm previewing my project using Eileen's Sizzix Card Box Planner Storage and Organizer die.  I made a holder to put Christmas cards in either for those received - or to give cards as a gift to someone!
I also used Eileen's Sizzix Flower Heart and Soul Die to decorate the sides.
So that's it!  I hope it whets your whistle - and you'll be looking forward to seeing more details here in the fall!
Check out Eileen's Blog for the full gathering of the team's project sneaks each week in September!