Monday, July 19, 2021

Grand Slam Birthday Truck

 All this month, Eileen Hull's Design Team members are creating using her new Chapter 3 dies.  Today I have a project to share using her wonderful new Truck Box Die and I also used the large circle die from her Ornament Box die for the giant baseball I put in the truck!

Wouldn't this be a fun gift box for a baseball players' birthday?! 

The inside box measures about 6" x 1 1/4" x 1".

I filled my truck box with mints, but you could put in a gift card, cash, or small presents!
The sentiment stamps are from 7th Inning Stretch by Papertrey Ink but are now retired.


Here's how I put it together.
I die cut all the truck pieces twice out of matboard.  Then I cut two of the truck piece out of Rinea Star Struck red foil paper - cutting both pieces at once being sure the fronts of each piece of foil were facing each other so the right side would show when adhered to the truck piece.  
I got the baseball image from the computer and just sized it to 3", printed them on white cardstock and die cut them with Spellbinders Circle dies. 
I had printed some smaller baseballs as well as I wasn't quite sure how I was going to use them on the truck at that point.
I glued the truck sides to the box piece and held it with clothespins until it dried.
Then I glued the foil paper to each side of the truck
I glued the end pieces of the box to each end - again holding the glued tabs with clothespins.
I drew baseball stitching on the tire 'hub caps'.
I blackened the 'tires' by pressing them into a black ink pad.  Then glued the hubcaps on top and glued them to the truck body being sure the 'stitching' on the hubcaps were all pointing forward.
I glued the die cut baseball images onto the matboard circles I cut using Eileen's Ornament Box die.  They are about 3" diameter.  
I adhered the large baseballs to each side of the truck bed with a strip of foam tape so it held them slightly away from the outside of the truck.  See the foam strip on one of the sides below.
Then I pressed the baseballs onto the foam tape.
I used Versamark pressed onto the fender pieces to adhere Eileen's Polished Silver Molen Dimensions Powder.  I had to keep adding powder to the piece as I heated it, as some of the powder blew away when I used my heat tool to melt it but I finally got good coverage after several layers. 
 (I solved the problem below when I embossed the doors and end panels!)
I glued the fenders over the tires.  I was happy with all the 'dings' as I liked my truck looking used and well loved!
After I had embossed the fenders, I decided to use the cut out of the window for a door panel and I wanted to emboss them with the same molten powder -  this time I used my Emboss It Dabber as it puts a thicker coat of Versamark on the piece and holds this chunky powder better.  
It worked perfectly with one coat!
I cut a piece of vellum paper to fit behind each of the truck windows and glued them in place.  I glued the 'door' piece I made from the cut out of the window (and embossed as shown in the above photo) just below the window.
I die cut two more pieces of the end panel of the box, cut off the tabs and embossed them using the Emboss it Dabber and the Molten Dimensions
I clued the panels over the front and back ends of the box just to give it a more finished look.

The giant baseball in the back of this truck really cracks me up every time I look at it!  
It came out just as I had envisioned it - which doesn't always happen!

Eileen has posts on her blog every Wednesday sharing the projects from the Design Team members using her new Chapter 3 dies this month.  You can check it out here.

I'm also linking my truck box to:
Creatalicious Challenge -  Anything goes - optional travel/transport

Simon Says Wednesday Challenge - Simon Says Emboss it.


Stamps: 7th Inning Stretch - Papertrey Ink.
Paper: Little Sizzles white Matboard - Sizzix, Red Star Foil - Rinea, Vellum and white paper - Papertrey Ink.
Ink: Obsidian - Altenew, Emboss it Dabber - Ranger, Versamark.
Accessories: Truck Box Die, Ornament Box Die - Eileen Hull/Sizzix, circle die - Spellbinders, baseball image from computer, Micron 01 black pen - Sakura, Fude Ball 1.5 red marker - Ranger, foam tape, heat tool, Polished Silver Molten Dimensions Embossing Powder - Eileen Hull/Emerald Creek, Ultra Bond Adhesive - iCraft.

Thursday, July 15, 2021

July Mid-Month Reminder - CAS Christmas Card Challenge - Poinsettias

 Just a reminder you still have time to link up your CAS Christmas Card Challenge poinsettia card!  Mr. Linky is open through 7/24!

Here's my reminder card.  It's 4 1/4" square.

I pulled out an old Nestabilities/Spellbinders Layered Poinsettia die set, die cut the pieces and then embossed them using an Impression Pad and Silicon Rubber pad with my Big Shot (the dies have the design on them but don't show up unless you run them through again with the two pads).  I die cut the background frame using Cross Stich Nesting Squares from Tutti Designs and layered it over a slightly larger square of Brushed Gold paper
I put a foam dot in the center of each of the poinsettia layers so it is really dimensional.  I added a red rhinestone to the center of the bloom for a touch of color.

I made a second card very similar to the first but used shiny metallic gold paper, less layers of the poinsettia and framed it with pieces cut using Nordic Circle Dies from The Greetery. 
This is also 4 1/4" square.
You get quite a different look using brushed gold paper and metallic gold paper - both are pretty I think!


So please join us at CAS Christmas and use a poinsettia on your CAS Christmas design!  
You have until 7/24!


1st Card
Paper:  Brushed Gold - SU, white - PTI
Accessories:  Layered Poinsettia - Spellbinders, Cross Stitch Nesting Squares - Tutti Designs, foam dots, red rhinestone, Impression Pad, Silicon Rubber Pad - Sizzix

2nd Card
Paper:  White - PTI, metallic gold paper pad - Joann.
Accessories:  Layered Poinsettia - Spellbinders, Nordic Circle Dies - The Greetery, foam dots, red rhinestone, Impression Pad, Silicon Rubber Pad - Sizzix

Monday, July 12, 2021

A Wreath for Summer

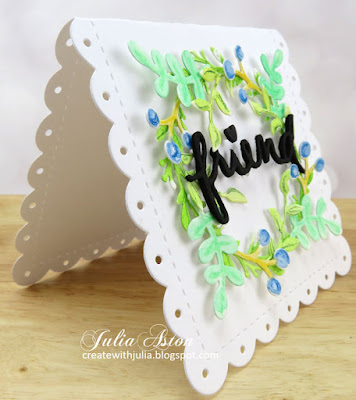
 Today I'm sharing a tutorial for the summer wreath card I made using Eileen Hull's newly released Wreath and Snowflake Thinlit Dies.   I wanted to show that you can use a seasonal die and make a non-seasonal project with it.   

I made a summertime wreath card.


Here are the dies that come with the set.

First I die cut the wreath base and 4 cuts each of the 2 leaf dies and the berry die in the set.  I cut them out of watercolor paper as I wanted to watercolor the pieces.
I used 3 different greens for the foliage pieces and  tan and blue for the berry stems.
Here they are all painted. I just brushed lightly over them, leaving some small open spaces with no paint.
I let them dry (they dried quickly but you can use a heat tool to speed it up just don't blow them all off your table!).  Then I added a little detail with like-color watercolor pencils.  It makes them look more dimensional.
I laid down the wreath, then added one of each kind of stem, just gluing the bottom of each one , tucking the stem of  the next one under the previous stem.  I glued some stems turning to the outside of the wreath and some turning to the inside of the wreath - so the circle isn't clearly defined and actually looks like a square!
Just gluing the base of each stem makes the tops stick up and add more dimension to the wreath.
I die cut the card base and adhered the wreath using foam dots.  I die cut the friend from Eileen's older Floral Arch and Words die set, attaching it to the wreath at the f and d and put a small piece of a foam dot under the e in the middle to hold it up.  I also added a black clay heart to dot the eye - also up on a tiny bit of foam dot!

My card is 3 3/4" square.

So take a look at your seasonal dies and think of ways to get more mileage out of them by using them for another time of year!    
Eileen will have posts on her blog every Wednesday for the month of July showing how her Design Teams use her new Chapter 3 Dies for all different seasons!  


Paper:  Water Color Paper - Canson Cold Press
Accessories:  Wreath and Snowflake Thinlit Dies, Floral Arch and Words Thinlit dies - Eileen Hull/Sizzix,  Noted: Scalloped Square Die - PTI, Winsor Newton Water Color Paints, Prismacolor Water Color Pencils - Dark Green, True Green, Copenhagen, Sunburst Yellow, black fun foam, foam dots, Black Tuxedo Clay Heart - Honey Bee Stamps.

Sunday, July 4, 2021

Snow Drop Sympathy

Every month I have all good intentions of joining in on the CAS Mix Up Card Challenge - and the days go by.......  well, this month , the challenge is using Alcohol Inks on vellum which really intrigued me so I got right down to it!

I found some Linen Vellum from PTI on my shelves and thought that might add a little texture to the background - but it didn't really show through the inks.   I swished the Alcohol Inks on 4 panels before I was happy with any result!   You just really cannot control the inks - they just do what they want pretty much!
I used some new AI's that I recently purchased -  Cloudy Blue, Moss, Snow Cap Mixative and Alcohol Blending Solution.

I dropped some of the blue onto the vellum, then some Snow Cap into the middle of the drops, tilted the paper back and forth to make it run, added some Alcohol Blending solution to make it more watery and repeated all those steps with some drops of Moss!  The Snow Cap is really chalky and dried slowly, such that I hit it with my heat tool so I could get on with putting my card together!

I die cut the Snow Drops (Alexandra Renke) out of water color paper that I had put a double sided adhesive sheet on the back of, so when I had the die cut pieces there was already adhesive on the back and I didn't have to add glue to all the thin strips of stem.    I adhered them to the vellum panel.

I die cut a white panel using Crimped Frames from the Greetery and trimmed down my vellum panel to fit inside the crimping.    I adhered that to a white card base, stamped the sympathy sentiment on a sentiment strip and layered it over the panel with foam dots.

So finally -   I have a card to link to the CAS Mix Up Card Challenge!   
I used AI's on Vellum, stamping and die cuts.


Stamps:  Simple Strips: Sympathy - Taylored Expressions.
Paper:  White, Linen Vellum - PTI, Water color paper - Canson Cold Press.
Ink:  True Black - PTI
Accessories:  Stick It Double Sided Adhesive Sheets, Snow Drops Die - Alexandra Renke, Crimped Frames - The Greetery, Simple Strips Dies - Taylored Expressions, foam dots, Ranger Alcohol Inks - Cloudy Blue, Moss, Snow Cap Mixative, Alcohol Blending Solution, foam dots.

Saturday, July 3, 2021

July CAS Christmas Card Challenge - Poinsettia

 Welcome to July! and the newest CAS Christmas Card Challenge -  only 5 months to Christmas - let's make those cards!    Linda is our lovely hostess this month and she wants to see poinsettias!

And here is my card.
I gold embossed the image from an older PTI set onto watercolor paper (as I thought I was going to watercolor it!)  then, mid flight, I decided to leave it CAS and simply frame it in gold!  The frame is Stitched Rectangle Scallop Frames from MFT and I used two of the frames together and popped them up on foam dots over the image.  I put the sentiment inside wanting to leave this pristine on the outside.

So please check out this month's challenge over at the CAS Christmas Blog where you will find lots of poinsettia inspiration from the rest of the Design Team as well as our lovely July Guest Designer, Sandra!


Stamps: Botanical Blocks IV - PTI
Paper: water color paper - Canson Cold Press, Gold Parklane Paper Pad - Joann, White - PTI.
Ink: Versamark
Accessories: Gold embossing powder, heat tool, foam dots. Stitched Rectangle Scallop Frames - MFT.

Friday, July 2, 2021

June Card Chain Challenge Reveal

 Today I'm sharing the card I made for the June Card Chain Challenge.    

I sent this card to Janis in Idaho and I received a card from Alex in Germany!    Check out this monthly challenge and join in!  All the details about how it works are there.

I used the suggested sketch this month (although I turned it upside down) and the theme of friendship.


The peaches are from Print Shop: Peachy Keen from The Greetery.  The sentiment is from Opposites Attract - also from The Greetery.  The tufted embossed background was made with an EF from Stampin'Up and the strips are washi tape.  One peach is up on foam dots.

It's  fun to send and receive cards from around the world each month!


Stamps: Print Shop: Peachy Keen, Opposites Attract - The Greetery
Ink: Chamomile, Coral Berry, Olive, Fresh Leaf - Altenew, True Black - PTI
Paper: White - PTI
Accessories: Print Shop: Peachy Keen Dies - The Greetery, Tufted Embossing Folder - Stampin'Up, foam dots, Washi tape - Freckled Fawn and Michaels.

Thursday, July 1, 2021

Eileen Hull Sizzix Chapter 3 Dies Blog Hop - 3D Ornament Die

 Today I'm joining in a Blog Hop with Eileen Hull's other Inspiration and Educator Team members showing off her new Chapter 3 dies.  The 3 dies are:  Truck Box Bigz Die (that goes perfectly with her recently released camper trailer!),  Wreath and Snowflake Thinlits dies and Box Ornament.


I used her 3D Box Ornament Bigz Die to create a Graduation Gift Box that I slipped a gift card into. 

A non-seasonal use for a seasonal die!  

I also used the star die from her new Wreath and Snowflake Thinlits die set on this project.
This gift box went together very quickly!
I die cut the ornament pieces out of Kraft Stock Metallic 3 paper from Tim Holtz.  It's about the weight of card stock - not as heavy as matboard.  
You may have to use a double layer of the paper when cutting the box sides piece, as the score line may cut through the first piece as the paper is thinner than matboard would be.  
You can, of course, use matboard and cover it with DP.
I silver embossed a beautiful Stars Texture Stamp from Motive Stamps on the front and back panels and silver embossed the sentiment (retired PTI) on a strip of white card layering it over the front panel.  I also adhered the crescent shape from the die along the top and bottom of the front as well as the stars.
The sentiment says:  Reach for the Stars and Achieve Your Dreams
Here's a view of the back.
I put a gift card in the box but you could put in a small gift, money (!) or candies as well.
One quick and easy photo of putting this lovely ornament box together.   Simply fold the middle piece along the score lines, put ScorTape along the tabs and press it onto the front and back panels!  
I did cut a tiny bit straight across the bottom of the ornament to prevent it from rolling.

There is a GIVEAWAY too! Leave a comment on each of the designers' blog posts and you will be entered to win one of the new dies! 

  Here's the list of the Team members participating:

Julia Aston  You are here!

Eileen is also hosting a FB live at 12 noon ET July 1st on FB Eileen Hull Designs to reveal her new dies and sample projects.  An additional die will be given to someone who attends and comments at the Release Party Facebook Live.

A busy day!   You can also view the video on her FB later if you miss it.


Graduation Gift Box
Stamps: Stars Texture Stamp - Motive Stamps Nellies Choice, Star Gazer Additions - PTI (retired)
Ink: Versamark.
Paper: Kraft Stock Metallic 3 Gold - Tim Holtz/Idea-ology, white - PTI.
Accessories: 3D Box Ornament Bigz Die, Wreath and Snow Flake Thinlits dies - Eileen Hull/Sizzix, Silver embossing powder, heat tool, ScorTape, white basket shred.