
Eileen Hull's Inspiration Team is continuing to create with her new Chapter 2 Sizzix Dies - Tiny Book and Tiny Book Case.
In the past, I have made small photo albums for each of my grand nephews and nieces and they love to look through them when they come to visit.
Recently, when Madelyn was looking through her book she said 'Look! There's a photo of me on a horse! Can I take this book home?" She had obviously forgotten the occasion when the photo was taken and wanted a book she could look at over and over at her own home.
So .... Eileen's new dies gave me the perfect inspiration to create another book for Madelyn that I will give to her on her 6th birthday in April and she can keep at home to look at whenever she wants to!
Here are photos of the Tiny Book Case decorated in colorful bright papers (Madelyn LOVES Pink). I personalized the little closure with an M and added a Metallic Stickers/Quotations that describes Madelyn to a T - fearless!

Here's a view from the back

Just remove the elastic cord and we find the Tiny Book inside. I tied a piece of ribbon around the book so it's removed easily from the Tiny Book Case

I adhered some patterned paper on the inside of the flap and along the tab edges that show above the bottom flap.

I personalized the binding with her name made with my Brothers Label Maker.

I put a photo of Madelyn on the front and back covers as well as on all the pages inside.


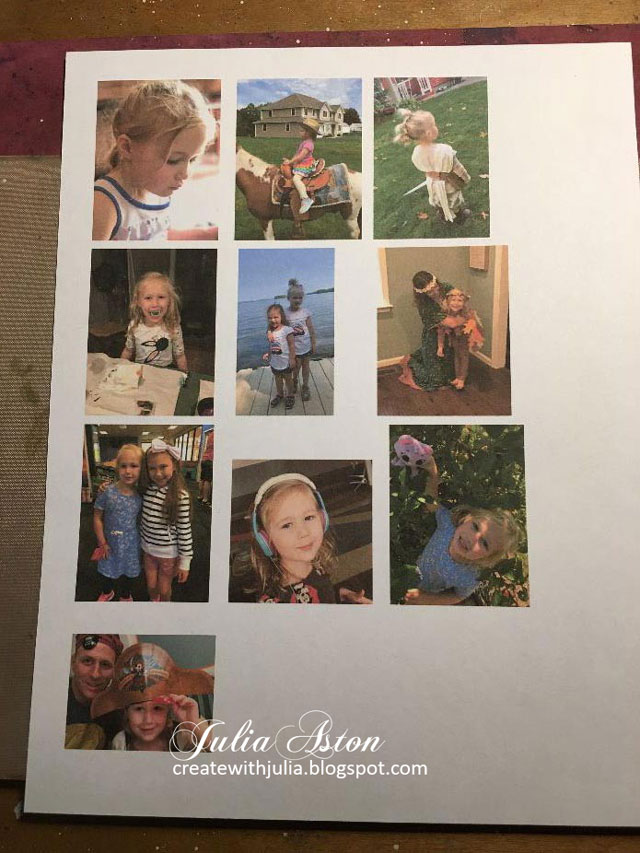
Here are all the photos on the pages. I show below how I resized them. I printed them on a piece of white card so they almost look like paintings without the gloss of photo paper.


How I put this together.
First I gathered 10 photos of Madelyn over the past year or so that I had saved on my computer. Working in Micro Soft Office Word, I created a document with narrow margins and inserted one photo at a time. I clicked on each photo to change Size/Position, resizing each photo to 2.5" height and clicking ok - as long as the width was 2" or less it would fit the pages of the book. This resizing worked for most of the photos I chose. If the photo was an odd size - I'd resize the width to 2" first and as long as the height was less than 2.5" it would fit the page (see middle photos on 2nd and 3rd rows and photo on last row). Then I just hand cut the photos leaving a 1/8" border around each photo.
I die cut the Tiny Book out of white matboard. Then I cut strips for the pages out of a piece of 12"x12" Bazzil dotted paper. I cut two strips 2 7/8" x 10 5/8" and then scored each strip at 2 1/8", 4 1/4", 6 3/8" and 8 1/2" and folded them fan-fold on the score lines creasing with a bonefolder

I glued one strip to the other to make one long strip. I'll be gluing the ends to the cover so they need to be an 'up' fold so I cut off one piece on the right end as shown below.

Then, leaving the end pieces clear, I put glue on 3 sections as shown and pressed the pieces together

Here's how it looks at this point - 2 end panels to attach to the cover and 3 glued together pages.


Using the Tiny Book Die - I cut a piece of patterned paper to adhere over the cover. There is always a little shrinkage of the paper you cover a book with if you use one piece of paper. When you fold on the score lines it pulls the paper back a bit. If I had thought about it - I could have hand cut the cover and made it a little bit wider than the cover - but I'm happy with this clean line.

I added a piece of Red Line Tape on the inside binding of the cover, but I don't think I really needed it. Gluing the end pages will hold the pages inside the cover.

I added glue to the covers and some over the center section where the pages are and I pressed it inside the Tiny Book

I die cut the Tiny Book Case out of matboard and then cut pieces to fit the sections (remember to think of which way is up if you are using a paper with a direction like the hearts below. I didn't cover the tabs where I will be putting Red Line Tape when I put the Case together.

I used 3 separate pieces of paper to cover the Book Case to avoid some of the pulling back when I bend on the scorelines. I always start bending as soon as I've adhered the glued pieces to help ease the paper over the bends. If you wait until the glue dries completely it can cause the paper to tear.

I die cut the little tab piece out of matboard and patterned paper and knotted a piece of white elastic cord through each end. This will hold the Tiny Book Case closed. I tied a piece of wrinkled seam tape around the book using a single knot before inserting it so it's easy for Madelyn to pull the book out.
I'm pretty sure she is going to love her fun Tiny Book Case and Tiny Book with pictures just of her!

Please check out Eileen's blog every Wednesday to see what new creations the Inspiration Team have made using Eileen's wonderful Sizzix Dies!
I'm linking my Tiny Book Case and Tiny Book to:
Mini Album Makers

The Crafter's Cafe Challenge
Anything Goes

Mini Album Makers

The Crafter's Cafe Challenge
Anything Goes


Stamps: Fresh Alphabet - Papertrey Ink
Paper: Little Sizzles Matboard - Sizzix, white card stock - PTI, Playful Patterns: Valentine - Taylored Expressions Dotted Pink - Bazzil
Ink: Obsidian - Altenew
Accessories: Tiny Book and Tiny Book Case Dies - Eileen Hull/Sizzix, white elastic cord, Metallic Stickers/Quotations - Tim Holtz/Idea-ology, photos printed from computer, wrinkled seam tape Tombow Glue, red line tape.
6 comments:
This is simply amazing, Julia! Thank you so much for entering our challenge at The Crafter’s Café with this lovely creation. Looking forward to see you again next challenge.
Regards,
Mia
Designer for The Crafter’s Cafe
craftartista.blogspot.com {My Blog}
An amazing micro journal, beautifully crafted and thank you for showing us your technique. Thanks ksfor joining us at the Crafter's Cafe.
A wonderful gift for Madelyn, Julia, and one I believe she'll treasure!
Just so adorable Julia- she will love it! Great tutorial!
She is going to absolutely love it!! This is darling Julia. =)
This really is such a sweet project! I bet she loves it!
Post a Comment