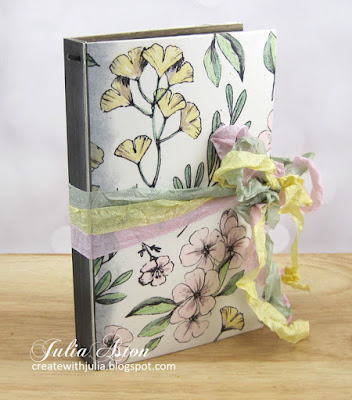
Just in time for spring! I have a Flower Pocket Notebook to share using Eileen Hull's versatile Pocket Notebook Sizzix die.
My mother always kept a small flower garden by the edge of our driveway where there was full sun. I grew up helping her in this little garden, planting, weeding and watering. To this day, I love working in my own gardens thanks to my mother's early teaching.
This was the inspiration for the cover of my Pocket Journal and although I left the pages blank, I will probably fill them with photos of my garden, garden poetry, or maybe notes about what I'm planting.
First, I'll show you my finished Pocket Notebook and then a photo tutorial of how I put it together.
It's a lovely size - 4 1/4"x 6 3/4". Mine is 3/4" deep but you can make it deeper- I removed some of the binding since I only added 2 signatures as you will see below in my tutorial.
I used 3 colors of wrinkled seam tape for the simple closure, tying them in a big loopy bow.
The ribbons match the colors I used in coloring the cover.
There are two signatures of 4 pages each, folded in half and held in with black elastic cord.
The woodgrain on the inside covers continue the feel of the outdoor garden.
I adhered the ribbons to the binding with some ScorTape so they wouldn't fall away from the notebook when opened.
Here are some photos of the easy process of putting this notebook together.
I die cut two covers out of Little Sizzles Mat Board. Then I sponged the outside binding areas with Black Soot Distress Ink.
I adhered a piece of 7" wide Botanical Rhapsody washi tape from Altenew on the fronts of both covers cutting it large enough to wrap it around the edges to the inside to be sure the washi tape doesn't lift off. Then I colored in the flowers and leaves on this black and white washi tape with Copics.
The Copics give it such a nice soft coloring. I dried the covers briefly with my heat tool.
You can compare the difference of just black and white on the left and colored on the right.
I didn't want a really wide notebook (mine is 3/4") - so I cut off one section of the binding on each cover as shown.
I adhered some wood grain patterned paper to the inside covers. I cut the paper using the die so they are just the right size and also have the holes in the correct places.
I layered the bindings over each other, matching up the holes and glued them in place. I put the elastic down through a hole on the bottom right, back up the hole on the bottom left, up the inside of the binding, down through the hole on the top left, and back up through the hole on the top right.
Then I knotted the two ends.
There are many ways to string a journal to hold the signatures in. This is just one way. It looks very clean on the outside using this method.
I cut 8 pieces of watercolor paper 8"x 6" and folded them in half so each page is 4"x 6". I made two signatures of 4 folded pages. I took each signature and slipped it under one of the cords in the middle of the pages
Here you can see the two signatures held in with the elastic. You can easily add more pages just by slipping them under the elastic.
A very easy process to create a lovely Pocket Journal using any theme!
Paper: Little Sizzles Matboard - Sizzix, watercolor paper - Canson, Marble Paper Pad - JoAnn.
Ink: Ranger Distress Black Soot.
Accessories: Pocket Notebook Die - Eileen Hull/Sizzix, 7" wide Botanical Rhapsody washi tape - Altenew, Copics G28, YG17, Y17, RV21, black elastic cord, wrinkled seam tape, Tombow Glue, ScorTape.


