Thursday, October 31, 2019

A Vintage Journey - November Challenge Window on Your World

Welcome to November! This month's A Vintage Journey Challenge has just been posted. (AVJ is based in Great Britain so it is 5 hours ahead of us here on the East Coast of the USA) 
Deb is our fearless leader this month and her challenge is "Window on Your World".

Here's her description of the challenge:  
This month we would like to see some kind of window or tunneled element in your creations. Think hollowed out books, multiple layers with openings to see what has gone before, hidden flaps or windows that when opened reveal a secret element. Just remember to create in one of our preferred styles of vintage, shabby, mixed media, art journaling, industrial, timeworn or steampunk.

For my project, I created a window into a  magical snowy white forest - complete with a little deer and several cardinals!
I used the largest Vignette Box to house my layered dimensional scene.
I tucked a couple of battery operated tea lights inside to help illuminate the scene inside.
Here it is with the lights shut off - hard to get a good photo of it being lit up, but you get the idea, right?
 The Vignette Box was not deep enough for the tea lights - so I started gluing coffee stirrers on all the edges to build it out.
When I got to 10 layers - it was deep enough to hold the tea lights within the scene!
All the dies are from the Holiday Shadow Box set from Sizzix.
(accept for the lacey edge die that I didn't end up using anyway!)
I embossed everything in Eileen Hull's White Wonder Molten Dimensions Embossing powder from Emerald Creek -  it leaves a wonderful thick bumpy layer.  I did not emboss the snowflakes, they are too small and detailed so I just left them as plain white card stock.
Then I started layering my scene inside.  The die cut pieces all have tabs on the bottom (to be able to create a dimensional scene) so I adhered some of them into the middle of the box using the tabs.  Some I cut down and attached to the back with foam dots. I had to cut down the outside die cut frame piece to fit the smaller height of the box and so adhered one of the hillsides directly to the front to cover the bottom edge.
The sweet little cardinals stamps and dies are from the Fence Line Winter sets from Papertrey Ink.
I adhered Tim Holtz Natural Red/Cream Trimmings to cover the layers of coffee stirrers on the front edge of the box!
A pretty window scene decoration for Christmas!
(although I can't display it until after Thanksgiviing - per my mother's rules!!)
You'll find lots of inspiration from the other Creative Guides over at A Vintage Journey.  Please show us your window on the world!  You have all month to enter!

I'm also linking my project to:

Anything Goes.

Stamps:  Fence Line Winter - Papertrey Ink.
Paper:  White cardstock - Papertrey Ink, Red Kraft Core Core-dinations.
Ink:  Versamark, True Black, Pure Poppy - Papertrey Ink
Accessories:  Holiday Shadow Box Dies - Sizzix, Largest Vignette Box - Tim Holtz/Idea-ology, coffee stirrers - Starbucks, battery Tea Lights - Amazon, White Wonder Molten Dimensions Embossing Powder - Eileen Hull/Emerald Creek, Trimmings/Natural Red/Cream - Tim Holtz/Idea-ology, ScorTape Tombow Glue

Tuesday, October 29, 2019

Another Pocket Notebook Journal!

Today I'm sharing another monthly post as a member of Eileen Hull's Inspiration Team.  Every Wednesday some of the team will be posting projects on Eileen's Blog with links back to our own blogs so you can see how we made our projects using Eileen's dies.
 
Again, I used her newly released Pocket Notebook Die.  This fun die creates a smaller journal - 6 3/4" x 4 1/2" and the spine can be adjusted from 3/8" to almost 2" depending on how many pages you want to have in it!  If you wanted to slip this into your pocketbook, you'd probably make the binding the smallest 3/8".

This Pocket Notebook went together quickly and easily! That's the great thing about all of Eileen's journal dies - you can decorate them simply or elaborately.  The inside pages can also be plain or decorated with patterned papers and/or ephemera!

I die cut the notebook out of Little Sizzles Matboard.  I decorated the covers with patterned paper of this beautiful palm tree lined, sun drenched tropical beach! 
I die cut the little beach hut out of matboard using Eileen's House Ornament Die .  I die cut the window frame for the window out of dark orange Core-dinations paper using a die from Eileen's House Pocket Die (which just happens to fit the window on House Ornament die!)
I thought the little beach hut fit perfectly on this beautiful beach!

I covered the hut with birch wrapping paper that I purchased at Pier 1 Imports last Christmas season (Sadly, I haven't seen the paper there since.)and sponged around the edges with Ranger Distress Ground Espresso.  I adhered tiny seashells, on foam dots, that I picked up on the beach while on vacation at Sanibel Island, FL several years ago.  The 'wander' is from Eileen's Journaling Words die set.
I used orange twill ribbon for both the signature binding and the closure tie (which I knotted through the binding).  Two more signatures can be added to this as I made the binding the full 2" wide.
I colored the inside of the covers using Sunshine Blends 2 ink that I put on my craft mat, spritzed with water and dabbed on with a sponge.
This would be a great little notebook to record your activities on a tropical vacation!
Please check out Eileen's blog every Wednesday to see all the lovely projects her Inspiration Team create using Eileen's versatile Sizzix Dies!

Paper:  White Little Sizzles Matboard - Sizzix, DP Electric Jungle Paper Pad - DCWV, orange paper - Kraft Core-dinations, birch wrapping paper - Pier 1 Imports,  white cardstock for pages.
Ink:  Blends 2 Sunshine - Color Box
Accessories:  Pocket Notebook Die, House Ornament Die, Journaling WordsThinlit dies, House Pocket Die - Eileen Hull/Sizzix, Orange Zest Twill Ribbon - PTI, foam dots, red tape, small seashells, craft mat, water mister, sponge, Zutter Corner Rounder.

Friday, October 18, 2019

Mid Month CAS Stencil Card Stencil Reminder - Patterned Paper

I'm here today to remind you that you wanted to join in on the CAS Stencil Card Challenge this month - you did tell me that, right?!  AND you still have time!   Mr. Linky is open through Oct 24th! 
Loll, our October Hostess, wants us to stencil over patterned paper - easy peasy right?!    
For my reminder card I made another Halloween card (we're having a sale at my church soon!)
I used another piece of patterned paper from Abandoned Paper Stash paper pad by Tim Holtz/Idea-ology for my background (I used a more subdued one on my first challenge card) - there are so many beautiful papers in it!  
I laid my Cats Stencil from Stencil Girl over the panel of PP and spread a thin layer of Wendy Vecchi Black Embossing Paste over it with a plastic palette knife.  I removed the stencil and let the panel dry (clean your stencil right away!). I layered the panel over a black panel, then onto a white panel and slightly larger black panel.   I added 3 Halloween Clippings Stickers for the sentiment and stamped Boo to You inside!

Please join us over at CAS Stencil Card Challenge and show us how you stencil over patterned paper! 

Paper:  White, True Black - PTI,  DP Abandoned Paper Stash - Tim Holtz/Idea-ology.
Accessories:  Wendy Vecchi Black Embossing Paste - Stampers Anonymous, Cats Stencil - Stencil Girl, plastic palette knife, Clippings Stickers Halloween - Tim Holtz/Idea-ology.

Tuesday, October 15, 2019

My October Post for Eileen Hull's Blog

Today I'm sharing my monthly post as a member of Eileen Hull's Inspiration Team.  Every Wednesday some of the team will be posting projects on Eileen's Blog with links back to our own blogs so you can see how we made our projects using Eileen's dies.
 
Today I'm using her newly released Pocket Notebook Die.  This fun die creates a smaller journal - 6 3/4" x 4 1/2" and the spine can be adjusted from 3/8" to almost 2" depending on how many pages you want to have in it!  If you wanted to slip this into your pocketbook, you'd probably make the binding the smallest 3/8".
I cut pages out of Newsprint for the 3 signatures inside.  I will use this Pocket Journal to write down random thoughts that come to me day to day, maybe a sketch, a poem, or even a prayer, so I just wanted plain clean pages.
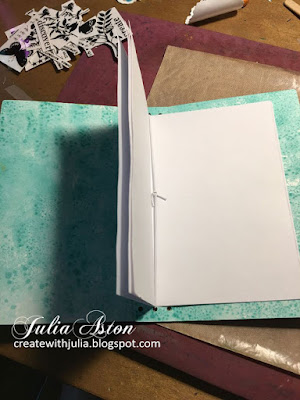
I used one of the 2 additional smaller pieces that is on the die (see below photo) to hold the suede cord closure - the pieces can be used for latches or pen holders - or whatever you think they should be used as!  
 I adhered the piece to the journal binding with a brad that went through the hole already cut on the center of the binding.  I knotted the cord through the 2nd hole on the piece.
I then wrapped the cord around to the front cover and pulled it through the hole on the other end of the latch piece - then I just wove the cord back around itself  to hold it closed for easy opening and closing!

Here's how it all started.  I die cut two covers for the journal.  I inked the inside of each cover using Blends2 Ebony Ink that I dropped onto my craft mat and then spritzed with water.  I used a sponge to pounce the color on - I love the marbled effect it gives!
The two finished covers.
I dried the covers with my heat tool, flipped them over and sponged along just the edges of the fronts of each cover.
 (I added panels to the fronts so I didn't need to ink the whole area.)
 I made textured panels for the covers using black card stock and the Woven 3-D Textured Impressions Embossing Folder from Sizzix.  I sprayed the card stock with water first so it created a nice deep impression when embossed.
I adhered the embossed panels to the matboard covers using ScorTape to be sure it held given the deep texture of the 3D embossing! I trimmed the outside corners of the embossed panels with my corner rounder to fit the shape of the die cut.
I also used the 3-D Impresslits Mini Scallops for trim on the top and bottom edges of the covers to give it a nice finished look.
I adhered the bindings together using ScorTape for a secure hold.  
I made my binding the full ~2" wide.
I knotted the pieces of black elastic cord through the holes in the bindings to hold the 3 signatures.
Here's how the cords look on the outside.
I then slipped each folded signature through a cord.
Here's a view of the 3 signatures.  A lot more pages could be added to this Pocket Journal!
I adhered Quote Chips to my cover for the title.
I hope you have enjoyed seeing how I put my Pocket Notebook together.
 Please check out Eileen's blog every Wednesday to see the teams projects using her current (some mixed with older) Sizzix dies!

I'm linking my Pocket Notebook to:
Paper:  white Little Sizzles Matboard - Sizzix, Black card stock - Papertrey Ink, Newsprint Paper - Wendy Vecchi/Stampers Anonymous.
Ink:  Ebony Blends2
Accessories:  Pocket Notebook Die - Eileen Hull/Sizzix, Woven 3D Textured Impressions Embossing Folder - Sizzix, 3D Impresslits Mini Scallop - Tim Holtz/Sizzix, Quote Chips - Tim Holtz/Idea-ology, Black Tie Brad - Bazzill Basics, Black Faux Suede Cord - Walmart, black elastic cord - JoAnn,  Corner Rounder - Zutter.

Friday, October 4, 2019

October CAS Stencil Card Challenge - Patterned Paper

Well, here we are into October already!  And today the new CAS Stencil Card Challenge has been posted!   Loll is our fearless hostess this month and she wants us to stencil over patterned paper!
How fun and easy is that?  
I pulled out my newly purchased Abandoned Paper Stash paper pad from Tim Holtz/Idea-ology to make a Halloween card.  I cut a rectangle out of the paper and adhered it to a white panel.
I laid the Wild Flowers stencil from Crafters Workshop over the panel positioning it so it extended off the patterned paper.  I spread Wendy Vecchi Black Embossing Paste thinly over the stencil with a palette knife.   I removed the stencil and let the paste dry on the panel (wash your stencil right away!).   I added Halloween Clippings Stickers from Tim Holtz/Idea-ology, some black enamel dots and stamped a bat on the side!

So please join us this month at CAS Stencil Card Challenge and show us how you use your stencils over patterned paper! 

You'll find lots of inspiration from the Design Team as well as our talented October Guest Designer, Gundi, over at the blog.

Stamps:  Midnight Feast - Waltzingmouse (retired)
Paper:  White, True Black - PTI, DP Abandoned Paper Stash - Tim Holtz/Idea-ology.
Ink:  True Black - PTI
Accessories:  Mini Wild Flowers Stencil - Crafters Workshop, Wendy Vecchi Black Embossing Paste,

Thursday, October 3, 2019

Eileen Hull - Pocket Notebook Release Party Blog Hop!

Today, as a member of her Inspiration Team - I'm joining Eileen Hull's Pocket Notebook Release Party Blog Hop where everyone is showcasing her brand new Pocket Notebook die!

Welcome to the Pocket Notebook Release Party! This is Eileen Hull’s newest book die with Sizzix. On the die, you get all of the pieces you need to make an entire book- the cover, pages, latch and pen loop! The Pocket Notebook measures 6 3/4” x 4 1/2” with a spine that can adjust from of 3/8” to almost 2”! String it with elastic, hemp, ribbon or twine. So many options for this fun die!
Eileen’s Inspiration and Educator teams have combined to show us their amazing Pocket Notebook ideas. Please follow the Blog Hop (links below) to see all of the fabulous projects, techniques and videos!
I made a journal with blank pages inside to record creative ideas, sketches or thoughts!

I die cut the Pocket Notebook out of white mat board.  I sponged the outside covers with Color Box Blends 2 Sunshine ink mixed with water on my craft mat.
I used the same technique on the inside covers but used Blends 2 in Bay.
I die cut most of the flowers from Eileen's Stitchy Flowers and Leaf die set out of double sided Foam Adhesive sheet.
I removed the backing from one side of the die cut pieces and laid them on Deco Foil and Flock Transfer sheets in Blue Diamond, Sunshine Yellow and White latte.
I ran the pieces through my Big Shot.
I peeled the pieces off the flock sheets and had wonderfully flocked flowers!
I removed the backing and layered the flower pieces together.
I did the same process with the 'journal' word from Eileen's Journaling Words die set.


Then I adhered the flowers and word to the cover.  I also added lots of Botanical Remnant Rubs.  I punched a 2nd hole in the middle of the binding and wove a piece of wrinkled seam tape through the holes to use as a closure for my journal.
I only added one signature to this journal at this point.  I simply knotted a piece of white elastic cord through the center hole. 
I cut pieces of white card stock for the signature being sure they fit within the holes at top and bottom.  I can add more pages and two more signatures to this journal when needed.
A finished view with the seam tape closure untied.
You'll find the links to everyone joining the blog hop both below and on Eileen's blog.

Eileen will be doing a Facebook Live at 4 pm Eastern time today (Oct 3, 2019) (Eileen Hull Designs) with a couple of special guests to talk about the new die and she will show even more samples using this fun Pocket Notebook die.  There will also be a giveaway on FB.

There are also two GIVEAWAYS- the Pocket Notebook die and a gift certificate for Eileen’s Etsy store. To enter to win, leave a comment on each of the blog hop posts. Winners will be announced on Tuesday, October 8 on Eileen’s Facebook Live show.

Thanks for hopping along with us today!

Julia Aston(you are here)
 
Accessories:  Pocket Notebook Die, Stitchy Flowers and Leaf die, Journaling Words Dies - Eileen Hull/Sizzix, Little Sizzles white Matboard - Sizzix, Eileen Hull Color Box Blends 2 Sunshine and Bay, Eileen Hull Foam Adhesive - Thermo Web, Deco Foil and Flock Transfer Sheets Sunshine Yellow, White Latte Blue Diamond - Thermo Web, Remnant Rubs Botanical - Tim Holtz/Idea-ology, black enamel dots, Altenew, Wrinkled seam tape, white elastic cord, sponge, water mister, craft mat.