Friday, April 24, 2020

A Socially Distant Hug

Those of us living through this pandemic will certainly never forget it and we'll be telling the stories to our children and grandchildren about schools and shops closing and having to stay at home, and not being able to find toilet paper!

There are also many products we can purchase having to do with these times and the fun stamp and die set, Hang In There, recently released by Honey Bee Stamps is one of those things.
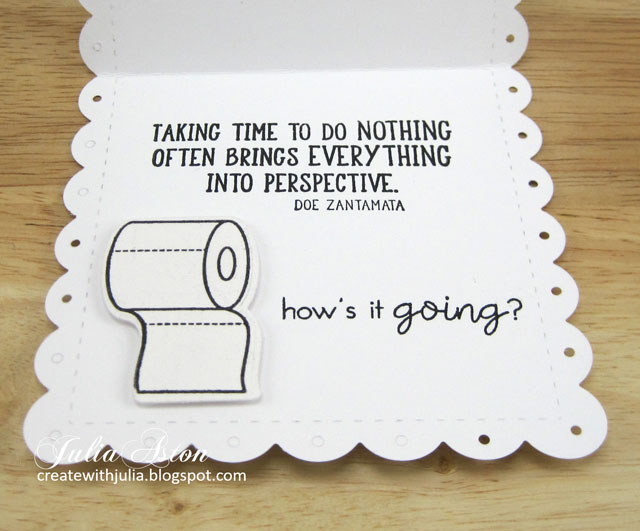
Inside, I couldn't help myself, I had to use the fun toilet paper roll included with the set.  
The quote sentiment is from Impression Obsession and the How's it Going stamp is from PTI.  
The roll of TP is popped up on foam dots. 
The pretty floral papers are from the Spring Fling 6x6 Paper Pack from Lawn Fawn.
 The bunnies are colored with Copics and popped up on foam dots.
I made 8 of these cards and have sent them to some people in my church - just to keep in touch while we are not able to meet on Sundays.

I'm linking my card to:

My scallop edge has dots in it, and there are dots in the DP as well as the cheeks of the bunny!

Simon Wednesday Challenge

Inspired by the cover florals and there are always bunnies in gardens!

Style - Clean and Simple


Stamps:  Hang in There - Honey Bee Stamps,Taking Time - Impression Obsession, Ways to Say: Hello - PTI
Paper: Strathmore Bristol Smooth Surface, White - PTI, DP Spring Fling 6x6 paper pad - Lawn Fawn
Ink: Obsidian - Altenew
Accessories:  Noted: Scalloped Suare die - PTI, Hang In there dies - Honey Bee Stamps, Copics RV21, W2, RV23, foam dots

Monday, April 20, 2020

Sometimes Prayer is the Only Gift - Eileen Hull's Chapter 2 Dies - Tiny Book Case and Tiny Book

This is another project I made earlier for Eileen Hull to take to Creativation in January showcasing her just released Tiny Book and Tiny Book Case dies.  My theme for this one is a book of prayers and Bible Verses.

 It certainly speaks to the times we are living through these months.
I used the tag from Eileen's Credit Card Sleeve and Tag die set for the cover.

I covered the Tiny Book Case with patterned paper .
I added a little rectangle of the paper on the top of the inside tab that is exposed above the bottom panel of the box.
and gold embossed the edge of the front flap and the tag using Eileen's Golden Rod Molten Dimensions Embossing Powder.
I looped a piece of gold elastic cord through the tag to use as a closure for the case.
I also tied a piece of the gold elastic cord around the Tiny Book inside so it was easy to remove the book by pulling on the knotted end.
I made the face using Model Magic from Crayola and a mold from Sculpey.
 I adhered the face to the corner of the front of the Tiny Book Case.
 I embossed the edges of the Tiny Book cover with the Molten Embossing Powder

I stamped various Bible Verses and prayers on white card stock and sponged the edges with Tattered Rose Distress Ink.
Here are all the pages.
The back of the Tiny Book
For the pages, I cut a panel of patterned paper 11" x 2 7/8" and scored it at 2 1/4", 4 1/2", 6 3/4" and 9".  I cut another strip 9" x 2 7/8" scoring at 2 1/4", 4 1/2" and 6 3/4".  I cut another panel
I adhered one piece to the other to make one long piece, see the glue on the right hand piece, I adhered the left piece over it.
Leave the end pieces free, and glue the pages together under the 'hills'.
It ends up looking like this.


A sweet gift of comfort for a friend or relative who is going through a difficult time.
Be sure to check out Eileen's blog every Wednesday in April where she will gather the Inspiration Teams projects using her sweet new Tiny Book Case and Tiny Book dies!


Stamps:  His Mercies, Make Them Possible, Deuteronomy 28:6, She is Clothed 1 John 3:18 - Rubbernecker Stamps, Beautiful Blessings - Papertrey Ink, Sometimes Prayer - The Stamp Pad Co.
Paper:  Little Sizzles Matboard - Sizzix, white card stock - PTI, Pattern Paper - Modern Metallic 12x12 Pad - DCWV.
Ink:  True Black - PTI, Hero Hues Black, Versamark, Ranger Distress Tattered Rose.
Accessories:  Tiny Book Case Die, Tiny Book Die, Credit Card Sleeve and Tags - Eileen Hull/Sizzix,  Golden Rod Molten Dimensions Embossing Powder - Eileen Hull/Emerald Creek, Red Line Tape, Tombow Glue, Gold elastic cord, Cropadile, Sculpey Face Mold, Crayola Model Magic Air Dry.

Wednesday, April 15, 2020

April Mid Month Reminder - CAS Watercolour and CAS Stencil

I'm here today with my April mid-month reminder cards for both CAS Watercolour and CAS Stencil!
I used the Exotic Tulip stamp set from Altenew which has 3 layers of stamps for each tulip - I just used one of the detail bud tulips and a stem here.  I mixed yellow water color paint with water and brushed it right on the stamp and stamped it 3 times using my Misti
Here I'm showing how I place the clean stem on the panel where I wanted it to stamp
And here I've brushed over the stem with watery green paint, which I then flipped the Misti cover over onto the card panel and pressed down.
 I added some white watercolor splatter and 3 Frosted Flower Sequins from Honey Bee Stamps and adhered the panel to a white card base..

Here is my reminder card for Cathy's challenge to use Gilding Flakes with Stencils.  I was so excited to learn ways to use Gilding Flakes this month!
Look at the gorgeous mix of colors in these Autumn Leaves Cosmic Shimmer Gilding Flakes!
I used Matte Gel for the adhesive, spreading it over a panel of black card stock with a plastic palette knife.
I carefully removed the stencil from the panel- not wanting to disturb any of the gel.
 I waited just a couple of minutes before placing the panel onto a piece of computer paper inside a pizza box (to contain all the flying gilding flakes!) and covered the panel with Autumn Leaves Cosmic Shimmer Gilding Flakes. 
 (if you wait too long, the gel will dry and the flakes won't adhere to it)
I laid another piece of computer paper over the panel and pressed down with my hand over the whole panel to press the flakes into the gel.  I removed the top piece of computer paper and left the panel to dry for several hours. (you can leave it over night)
I used a sponge to rub over the panel to remove the loose gilding flakes and was left with a beautiful panel of stenciled gilding!  You can really scrub with the sponge to get the flakes off the black spaces as the gilding is really stuck to the gel and won't get rubbed off.  I put the brushed off flakes back into the jar of Gilding Flakes to use again later. 
(Don't put any flakes that are sticky with adhesive back in the jar.)
I die cut the panel with an older Movers and Shapers Mini Cabinet Die from Tim Holtz.  I adhered the die cut piece to a black panel and cut around it leaving just a small edge of black showing.  I stenciled lightly on a white card base using Antique Linen Distress Ink through the same AALL and Create Stencil and adhered the gilded panel over the stenciling.  I gold embossed the sentiment on an MFT die cut sentiment strip and adhered that over the panel with foam dots.

 You have until 4/24 to link up your cards to either challenge - so please join us!

See the CAS Watercolour Challenge here.     See the CAS Stencil Challenge here.


I'm linking my tulip card to:
My tulip card is Clean and Simple


Watercolor Card
Stamps:  Exotic Tulips - Altenew, Sentiment Staples: Birthday - PTI
Paper: Water color paper - Canson, white - PTI
Ink:  Obsidian - Altenew
Accessories:  watercolor paints yellow, green and white


Happy Anniversary Card
Stamps:  Hero Arts
Paper:  True Black, Whi - PTI
Ink:  Versamark, Ranger Distress Antique Linen.
Accessories:  Stencil #58 Autour de Mwa - Aall and Create, Autumn Leaves Cosmic Shimmer Gilding Flakes, 3D Matte Gel Transparent - Finibar/Art Basics, Movers and Shapers Mini Cabinet Die - Tim Holtz/Alterations, Sentiment Strip Dies - MFT, Gold Embossing Powder, foam dots, sponge.