Thursday, October 16, 2014

Final Post on the eclectic Paperie Blog

We have had a fabulous run as members of the eclectic Paperie Design Team and wish to thank you all for your interest and support over the years. With the eP blog coming to a close at the end of the month, we all wanted to do something special to celebrate the fabulous friendships, tons of inspiration from other team members, from Kim, and from all those who participated in our challenges. Each of the current DT members is taking a day to post some of her favorite makes from her time on the eclectic Paperie team. We hope you enjoy the look back.

Needing more time for her young family, Kim has made the decision to close her brick and mortar shop as well as eclectic Paperie on line -  there are great bargains on the web store (30% off!) so you should go shopping!

I hope you'll take a peek at my post over on the eP blog today.


Tuesday, October 14, 2014

Waltzingmouse October Pajama Party

If you are looking for my Creations by AR post - please scroll down or click here.

It's the 14th of the month and time for another Waltzingmouse Pajama Party!  whoo hoo!!
 Claire posts the challenges for the party on her blog the 1st of each month - so you have plenty of time to create for the challenges and get them linked up on the 14th!  Here are the challenges for tonights' Pajama Party.

1. Texturize it -   use something OTHER THAN embossing folders to create texture

 I used embossing paste and a Stripes stencil to create texture on the background panel of this Halloween card.  I used stamps from Peek a Boo Sentiments and Boo & Friends (star).  The photo is of my grandnephew Landon peeking through the 'face' of a wooden witch at a local farm.  I thought the embossing paste stripes background echoed the witches hair and broomstick bristles quite nicely!
Here's a close up where you can hopefully see the texture of the black embossing paste better.
 2. Snow is falling - Make a project featuring snow

 I used Frosty in the Pines and Alpine Christmas for my Snow is Falling card.  I added a dot of Crystal Ice Stickles to the center of each of the largest snowflake stampings for a little sparkle.

3. Old Pajamas -  Make a project using any of your older Waltzingmouse Christmas sets

I used stamps from last year's release - Yonder Star - for my Old Pajamas card.  I used the Picot Panel Die for my sentiment panel cutting it in both patterned paper and in green card stock.  I put the green border piece with the patterned paper center.  I stamped the stars on the background panel and added brown sequins.
 Here's what I stamped on the inside from the same set.

4. Bedtime Story Sketch - I didn't get a card made for the sketch this month -  but it's a lovely one!
Links for all of the challenges will remain open for 24 hours
The PJ party winner will be announced at 11.45pm on the 15th Oct.

Here are the Rules
• You don't have to use Waltzingmouse Stamps to play along, but it will make us especially happy if you do!
• You can enter each challenge as many times as you like, using separate cards and separate links, but you cannot enter any one card in more than one challenge!
• Links should take folks directly to the blog post/spot where we can see/comment on your challenge entry.
• Please mention our PJ party and challenge on your blog or gallery post(- you are welcome to grab the PJ logo or sketch graphic and add those to your blog if you like)
  • You do not need to enter every challenge, but the more entries you have the better change of winning the prize!
Prizes
We will have one overall winner chosen at random from the 4 challenges. The prize winner will receive £30GBP store credit for Waltzingmouse Stamps.

SEE ALL THE DETAILS ON HOW TO WIN and the link up for your cards OVER AT CLAIRE'S WMS BLOG.
We hope you'll join us at the party!  You've got 24 hours to link up!

Best Witches card
 Stamps:  Peek a Boo Sentiments, Boo & Friends - Waltzingmouse
Paper:  White, Canyon Clay - PTI
Ink:  Archival Jet Black
Accessories:  Wendy Vecchi Black Embossing Paste, Stripes Stencil - Tim Holtz/Stampers Anonymous, Large Star die - Boo & Friends Witch, 2 smaller star dies - Boo & Friend Boo Die sets - Waltzingmouse, Curly Label punch - SU, photo, color printer, rhinestones - Kaiser Craft.
Snow Card
Stamps:  Frosty in the Pines, Alpine Christmas - Waltzingmouse
Paper:  White, Terracotta Tile - Papertrey Ink, Tempting Turquoise - SU
Ink:  Memento Bamboo Shoots, Rhubarb Stalk, Teal Zeal, Bahama Blue, Jet Black
Accessories:  Crystal Ice Stickles.
Holiday Howdy Card
Stamps:  Yonder Star - Waltzingmouse
Paper:  Certainly Celery - SU, Rustic Cream - PTI, DP My Minds Eye/Cowboy
Ink:  Archival Potting Soil
Accessories: Picot Panel  Die set - Waltzingmouse, Glue N Seal - Ranger, Chocolate Sundae Sequins - My Craft Spot. 


Creations by AR Oct Release - Armoire and Fragrance Bottles

Welcome all to Adella's Creations by AR October Release.  The Design Team is celebrating the release with a blog hop - where you will find unlimited inspiration for using these wonderful new templates.  The templates are called Card Armoire and Fragrance Bottle Set.  
The armoire is a wonderful little wardrobe container big enough so that you can use it to store your stash of cards in (or many other things as well!)  There are two fragrance bottles in the 2nd template - one a more masculine style and one feminine.  They open to reveal a little compartment where you can put a gift card or small gift item!
I've got lots of photos to share so you can see all views of these creatively designed new templates.  I decided to go very vintage in my design - and did that by using papers from Tim Holtz Idea-ology Paperstash Crowded Attic and Destinations.

Here's the front view of the armoire with the doors closed.
The top piece lifts up (hinged on the back) to release the tops of the doors so you can open the armoire.
The papers I used are double sided - so when you open the armoire all the way up -  you can see the fun vintage images inside
I placed 5 cards with envelopes inside my armoire -  and there is still room for about 5 more!
Here's the view from the back - nice and finished off!
and a close up of the handles -  I used two Hitch Fasteners from Idea-ology - I had just purchased them at Joann's a week or so ago - and they were perfect for my door nobs!
An interesting side note -  this piece of patterned paper I used for the armoire panels and my fragrance bottle is all old vintage adertisements - and they are all from Eastern Massachusetts - where I live -  Salem, Marblehead, Wenham, Boston (thought that was kind of fun!)

Today I just made the masculine style fragrance bottle to go with my masculine armoire. There is a feminine style in the template package as well which I'm sure you will find a sample of on other of the DT's blog posts.
 I used a Word Band from Idea-ology that I first dabbed with Ranger Scattered Straw Distress Paint - heated with my heat tool to dry and then dabbed it with Antiqued Bronze Distress Paint and heated again - it left this wonderful rusted look. I looped a piece of Idea-ology Linen Ribbon through the ends and pulled apart the ends of ribbon - I love how much texture you get when you pull the ends.  I had also inked the ribbon with Vintage Photo Distress Ink.  Now the sentiment engraved on this Word Band says "life is about creating yourself"  but I just noticed that the 'cr' in creating doesn't show as clearly as the other letters so that makes it a rather odd sentiment!  I think I'll scrape it a little so the cr shows up better before giving this to someone!!
When you lift off the clever little bottle top - the sides of the bottle open to reveal this box inside
The template also includes a piece to slip inside the box that has a slot so you can use it for a gift card.  Or you don't have to put that piece in and you can use the box for a small gift!
I hope I have inspired you with my vintage creations.  
 
For more inspiration please check out the rest of the Design Teams blogs linked below!
1. Adela: Owner/designer
2. Lyn
3.  Julia Aston: - Me!
4.  Sue Kment
9.  Lori Brown 

As usual, there are prizes to be won and here are the details from Adela:
PRIZES:
Two random winners will be chosen from comments left on designers' blogs and on AR FB Page
Winner #1 will receive the Card Armoire
Winner #2 will receive the Fragrance Bottle Set

HOW TO QUALIFY TO WIN:
Leave comments
• On each DT blog
• AR FB: https://www.facebook.com/pages/Creations-by-AR/154314751303824

Comments accepted until Friday, Oct 17, 12:00 noon Eastern
One random winner will be announced Oct 18 at the two locations below:
AR FB: https://www.facebook.com/pages/Creations-by-AR/154314751303824
AR Website:  http://creationsbyar.com

Armoire
Paper:  Tim Holtz Idea-ology Paper Stash - Destinations and Crowded Attic
Accessories:  Scotch Quick Dry Adhesive, Hitch Fasterners - Idea-ology/Tim Holtz, Template from Creations by AR, Silhouette Cameo

Cologne Bottle
Paper:  Tim Holtz Idea-ology Paper Stash - Crowded Attic
Ink:  Ranger Distress Vintage Photo
Accessories:  Ranger Distress Paint - Scattered Straw and Antiqued Bronze, Word Bands and Linen Ribbon - Idea-ology/Tim Holtz, Template - Creations by AR, Silhouette Cameo, Scotch Quick Dry Adhesive.

Friday, October 10, 2014

Thursday, October 9, 2014

Fusion Card Challenge - October 9th

Welcome to another Fusion Challenge!  Even though we are settling into fall and thinking of falling leaves here in the Northern Hemisphere -  our inspiration photo gives us a last breath of summer and a reminder of beautiful gardens of flowers!
This time - I was inspired completely by the photo -  I've had the Sizzix Flower Die - Build a Lilac for more than a year - and haven't run it through my Vagabond ONCE  - so this photo was the impetus for me to do just that - and here's my card.  I didn't shape it or color it like a lilac blossom -  I used the white and blue from the photo for the blooms.
And layered them over a die cut branch using my Alterations Bird Branch die - almost completely covering the branch with the flowers - you can see little peeks of brown if you look closely!   I used Coredinations papers that have a nice texture to them and I pounced Broken China Distress ink over the white blossoms.  I used my 1/4" hole punch for the centers of each blossom - punching them out of yellow glitter cardstock from Michaels.  I used Chit Chat Stickers for the sentiment - and stamped a Happy Birthday sentiment inside.
I made the barnboard background by scoring a panel of white cardstock - then dragging Weathered Wood and Brushed Corduroy Distress inks over it.  This technique makes a great barnboard look I think!
I knotted pieces of Linen Ribbon and Bakers Twine around the stem of the branch.
I'm also entering this card in the Mixed Media Monthly Challenge - to use ribbon, Twine and/or Fiber.
So what has inspired you for this Fusion Challenge??  The photo, the sketch - or will you combine them both??  I can't wait to see what you link up over at the challenge!  You'll find all the details here.

Here are the links to the Fusion Design Team -  where you will find lots of delicious inspiration!


Stephanie Severin

Paper:  White - Coredinations, blue & Green - Ranger Distress Cordinations, yellow glitter card stock - Michaels.
Ink:  Ranger Distress - Weathered Wood, Brushed Corduroy, Broken China
Accessories:  Idea-ology Linen Ribbon, Ocean Bakers Twine - The Twinery, form dots, ScorPal, Sizzix Flower Die - Build a Lilac, Alterations Bird Branch Die.

Tuesday, October 7, 2014

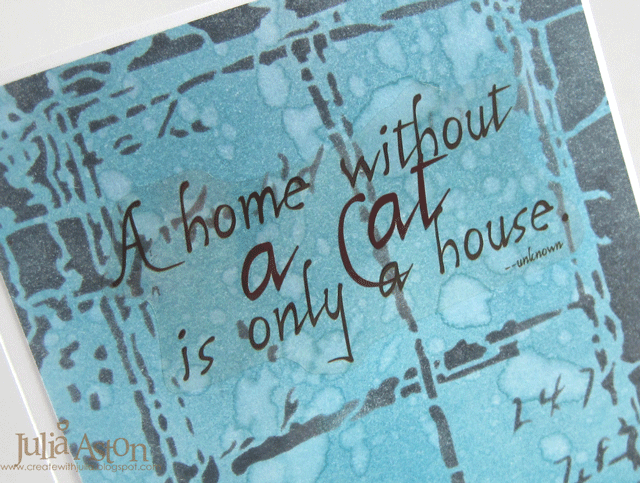
A Home Without a Cat

I haven't had time lately to participate in many of the blog challenges I usually make cards for - I've been working on some Design Team Projects, and also just felt the need to sit and read a book in the evening! (I'm currently on book 5 of the Outlander series and CAN'T put them down!).  But today I was able to make a card that fit 4 challenges -  AND it's still CAS!  Woot! Woot!!
I recently bought several really cool stencils from Stencil Girl - and I've used two of them on this card -  Window Ledger and Cats. First I used Archival Watering Can Ink on the Window stencil  over white card stock.  Next I stenciled the cat with Archival Orange Blossom Ink.  Then I sponged over the whole thing with Ranger Distress Broken China.  Distress Inks react with water and Archival Inks don't - so when I flicked water onto the panel -  splatter formed on the blue background but not the widow frame or cat.
The sentiment is a sticker from EK Success that I've had for ages - so glad to finally use it and it worked perfectly with this stencil
Here are the challenges I'm linking this card to:
Words 2 Scrap By -  Paved with Paw Prints
Addicted to CAS - Code Word Stencil
CAS ology - Cue Card - Splatter
Virginia's View Challenge - Clean and Simple.

Paper:  White - PTI
Ink:  Archival Orange Blossom and Watering Can, Ranger Distress Broken China
Accessories:  Stencils Window Ledger and Cats - Stencil Girl, Sticker - The Cat's Meow EK Success

Sunday, October 5, 2014

A Happy Birthday Heavy Metal Box for my son.

Today we took my son Josh and his girlfriend, April, out to eat for his 37th birthday (which was actually last weekend).  I always give him money - as that's what he likes most - so he can use it as he wishes - but I always put it in a homemade card.  This year I was inspired by the A Vintage Journey Heavy Metal Challenge for my design of Josh's gift container.  I made a box to hold the monetary gift.  For the challenge you can use any form of metal - paper, paint, Idea-ology  pieces and it has to be in the "Tim Holtz" style.
 Here are some photos of the steps I took to create this box.  Using Little Sizzles Black Mat Board - I die cut two pieces for the box using the Sizzix Block/Cube/Bank 3D die.  Then I masked each piece with Eclipse tape. 
I then stenciled the sides with Tim's Dot Fade, Stripes and Lattice Work Stencils using Brushed Pewter Distress Paint -  the paint, being more liquid than ink, ran a bit behind the stencils but I like the look it gives!
Then I went to work adding stampings and metal to the sides.  Here's how the decorated panels look before putting the two pieces of the box together.
Here is a close up of the top of the box.  My son was in the Army for about 8 years right out of High School.  He had hoped to make the military his career -  but he was shot (by a civilian in a robbery) while he was stationed at Ft. Bragg, NC - and had to be discharged on disability.  He was left blind in one eye, with a bullet lodged in his neck near his spine, suffering from nerve headaches and a good dose of PTS, but otherwise in good pretty good shape considering - and thankful to be alive. This all happened over 14 years ago.  He now works in a motorcycle shop and riding is his passion - so heavy metal is a good theme for him!  I chose the LUCKY Heart Charm for the top of his box -  as he was blessed to have survived when he was shot - he also has a tattoo of the word on his arm and it's his biker name amongst his friends.  I painted the Clock Key and Time Piece with the Brushed Pewter Distress Paint and used a wire pin to attach the Heart Charm.
 On the front panel I adhered  Mirrored Stars along with a sentiment and frame from Saying Stuff from Stampers Anonymous which I Black Sparkle embossed on Brushed Silver card stock.
I painted a Word Band with the same Distress Paint, wove a piece of Tinsel Twine through it and adhered it to the box with Glue N Seal.  I embossed this sentiment (Keep Cool and Bike On) from Jillian Vance Designs on silver, punched it out and adhered it with a foam dot.
More Tinsel Twine knotted through a Philosophy Tag painted with the Distress Pewter.  This sentiment is from Classics #16 Stampers Anonymous.  Again - embossed with Black Sparkle on silver card stock - I hand cut around the sentiment and adhered it with foam dots.
Another sentiment from Live to Ride set by Jillian Vance Designs - and two Sprocket Gears painted with the Distress Paint.
I'm happy to say he liked his Birthday Gift Box (along with a check and 4 Reeses Peanut Butter cups inside)!
I'm also linking this to the Mixed Media Monthly Challenge #5 - Ribbon, Twine and Fiber -  I used Fiber!

Stamps:  Live to Ride - ajillianvancedesigns, Saying Stuff and Classics #16 - Stampers Anonymous
Paper:  Little Sizzles Black Mat Board - Sizzix, Brushed Silver - SU
Ink:  Versamark
Accessories:  Black Sparkle Embossing Powder - Ranger, Ranger Distress Paint - Brushed Pewter, foam dots, Glue N Seal - Ranger, ScorTape, Idea-ology Time Pieces, Clock Keys, Word Bands, Tinsel Twine, Sprocket Gears, Philosohy Tags, Wire Pins, Heart Charms, Mirrored Stars, Die - Block/Cube/Bank 3D - Sizzix, Tim Holtz Stencils - Stripes, Latticwork, Dot Fade.