Tuesday, September 1, 2020

Life is Better Around the Campfire

This month Eileen Hull's Inspiration Team is creating Celebrate the Great Outdoors projects using her dies. 

For my project I've created a vignette of a Camp Site - using her retired (unfortunately!) Travel Trailer  Die. (you may find it on Ebay or Amazon).  I used her House Pocket die for the windows and door on the trailer and her Gift Box Scalloped Die to make the base and back piece of the scene.    

I have tons of photos I'm excited to share.

Here first, are views of my finished camp site.


Here are some photos of how I put it together. 
I die cut the pieces of the trailer out of Sizzix Mixed Media Board as well as Kraft Stock Metallic Paper from Tim Holtz.  I trimmed off the tabs on the silver pieces as they are just glued to the inside of the trailer.  I sanded the silver to make it a little less shiny.


 I cut additional 'tires' out of black cardstock and punched smaller circles of silver for hubcaps.  Then I adhered the tires on the inside of the trailer as shown below.


 Here it is from the front, you can see the tires


 I folded up the tabs and adhered one end to the trailer as shown, curving it to fit the edge.


I pressed  down on the top until the glue took hold.


Here it is with both sides adhered.  Then I put glue on the top tabs and pressed the other side of the trailer onto the tabs, adjusting them to the edge before the glue dried.
 

  Then I adhered the piece with the trailer hitch to the bottom
and here's the little trailer all ready to have it's windows or other decorations put on.

I die cut windows and a door out of silver metallic paper using Eileen's House Pocket Dies.  They are a perfect size for the trailer, but I could have just cut squares and rectangles if I didn't have these dies
I placed a piece of tape behind the windows and die cut more windows out of a light blue paper (it looks white here) I placed the blue 'glass' inside the frames held by the tape, then trimmed the tape off any edges.

I thought it would be nice to make a step up into the trailer and after fiddling around with a piece of silver metallic paper, I came up with this simple design

Here's a view from the side

And here it is on the trailer.  I glued the 1/4" end piece to the bottom of the trailer under the door.

I used Eileen's Gift Box Scalloped Edge die to create the base and back board for my scene.  I cut 3 of the box sides out of matboard and covered them with paterned paper. I wanted the front piece to be the sandy beach and the lake (or ocean) that the campsite was on.  I taped the two bottom pieces together with packing tape and then decided to add a full piece of cardboard to it for extra support.  I glued the bottom edge of the back piece onto the grass piece angling the sides in to create an enclosure.

I die cut trees from Tim's Village Landscape Sizzix Die and painted them with watercolor paints.  I die cut a camp fire and a coaster to put under the steps so no sand would get tracked into the trailer! (I ended up using a different piece of DP for my final mat.


To add a little dimension to my scene, I added some stones to the waterline, a deer and mushrooms around the trees, and I brushed Crackle Accents over the waves.   I removed the trailer for these photos so you could see the background.  The image panels are from Forest/Stamperia, the sentiment is from Taylored Expressions.

The white rocks are Art Stones from Prima and worked perfectly along my shore line.
The fire pit was made by die cutting two circles out of black fun foam and then cutting them again with a slightly smaller circle die and gluing the two pieces together.   The fire is a die from Taylored Expressions.  The mushrooms and flowers are from Field Notes Ephemera Snippets Pack from Tim Holtz.
I would love to be staying in this sweet little trailer right on the water!


You can see the crackle on the waves below.


I hope you have enjoyed seeing my little campsite - I really had fun creating it.   

Please check out Eileen's Blog every Wednesday in September to see what the rest of the Inspiration Team has come up with for our Celebrate the Great Outdoors projects!


Stamps:  Paddle Out - Taylored Expressions.

Paper:  Mixed Media Board, White Little Sizzles Matboard- Sizzix, True Black, Pure Poppy, Dark Chocolate, Orange Zest - PTI, Kraft Stock Metallic Silver - Tim Holtz/Idea-ology, Clouds and Grass Paper Pad - Joann, Cottage Stripes and Dots Paper Pad - Memory Box,  Beach Vibes Paper Pack - Honey Bee Stamps, River Rock Paper Pad - Provo Craft.

Ink:  Obsidian - Altenew

Accessories:  Travel Trailer Die, House Pocket Die, Gift Box Scalloped Edge Die - Eileen Hull/Sizzix, Circle Nestabilities, S'more than a Feeling Die - Taylored Expressions, Coaster Die - The Greetery, Bigz Die Village Landscape - Tim Holtz/Sizzix, plastic deer from stash, Neutral Candy Dots - SU, Black fun foam, Art Stones - Prima, Crackle Accents - Ranger, Beacon 3 in 1 Glue, Packing tape, Kuretake Water color paints, Ultra Bond Adhesive - iCraft.

Saturday, August 15, 2020

Mid Month Reminder - August CAS Christmas Card Challenge - 12 Days of Christmas

I'm here today with my Mid Month Reminder for the August CAS Christmas Card Challenge.
I used a different stamp from the same stamp set as my first challenge card -  another partridge in a pear tree design from the retired set Scandi Doodle Christmas by Waltzingmouse. 
I gold embossed the image onto watercolor paper cut with a Stitched Mats Circles die from Lil Inker Designs and then water colored it with my Kuretake paints. It's so easy to watercolor when an image is embossed - the paint stays inside the embossed 'lines' as long as you don't have too much water on your brush!
I layered  the circle to a Nordic Frame from the Greetery and then onto a white card base.
We hope you will join us at CAS Christmas Card Challenge -  you can link up your card through August 24th!

I'm also linking my card to:
Jingle Belles: Cardstock Christmas

Use Fall Colors

Anything Goes


Stamps:  Scandi Doodle Christmas - Waltzingmouse (retired)
Paper:  white - PTI, Watercolor paper - Canson.
Ink:  Versamark
Accessories:  Stitched Mats Circles Dies - Lil Inker Designs, Nordic Frames - The Greetery, Kurtake Water Color Paints, paint brush, water, Gold Embossing Powder - Ranger.

Tuesday, August 4, 2020

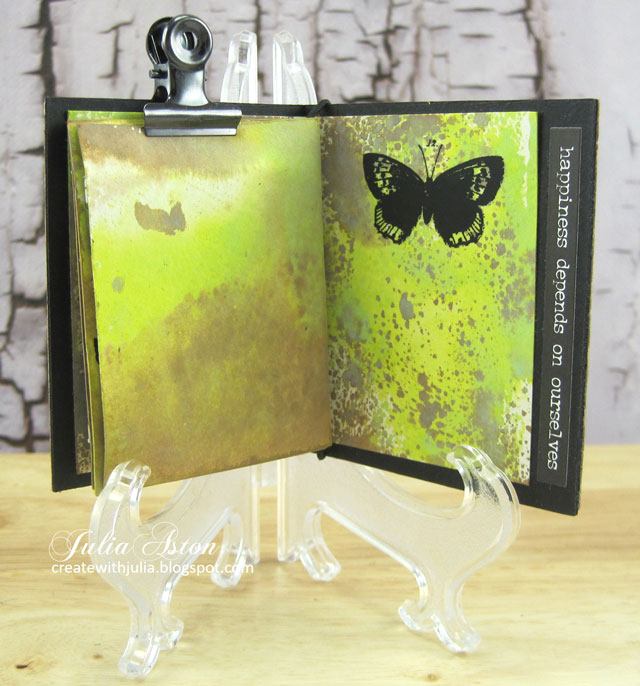
Tiny Book - Junk Journal

For August, Eileen Hull's Design Team is making Junk Journals focusing on embellishing the pages.  I used her Tiny Book Die to make my journal and I decorated the pages with recycled cardboard slide frames,  a fun technique I learned from this YouTube Video.
I used a piece of Belagio Cork Fabric for the cover and for the slide on the cover.
I covered and decorated a recycled slide for each page, adding various Chat stickers and rub ons to the pages.
I colored the Paper Dolls with Ranger Distress Markers.
I left the slide below uncovered since it was red and went with my patriotic theme.
I left the last pages blank accept for a butterfly rub-on and a Small Talk Sticker
The Sizzix Hinge Clip was just the right size to use as a closure for my Tiny Book Junk Journal!
I learned how to do the slides on this YouTube video. 
 She used slides that you could easily separate the front and back.  
The front and back frames of my slides  (old slides inherited from my parents attic) were glued together.  The only issue with this would be if I wanted the back to be clean, but I attached the slides to a page so it didn't matter for me.  
First you just push out the negative - it comes out easily.
Then I cut a piece of what I wanted to cover the slide with (I used Balagio Cork Fabric and Tim's Floral Collage Tissue Paper).  I adhered the slide to the material and clipped the corners as shown.
I put glue on the flaps and folded them onto the slide.
I cut the fabric covering the slide opening with an x-acto knife, corner to corner.
Added glue and folded them over the slide frame.
If you had a slide that easily separated - you would then glue the back of the slide back on, covering the material.
 Here's the back of a slide covered with the Floral Collage Tissue Paper (with the negative adhered onto the front of the slide cover)
And here's your covered slide frame!
After I covered the slides, I adhered the negative back onto the front so the sprockets show,  you can also adhere it to the back - if you don't want to see the sprockets.  For my cover - I didn't use the negative at all - I just let the book cover show through.
 
These are the 5 slides I made for my journal 
(the one used on the cover - top left  wasn't covered yet!)
Three are covered with Tim Holtz Floral Collage Tissue Paper and one is left uncovered as I liked the red!
I die cut the Tiny Book out of Matboard that I had adhered a piece of Belagio Cork to using a sheet of ScorTape. 
I show two pages below, but actually ended up using 3 pages - cut 4 1/2" x 2 3/4" scored at 2 1/4".
I colored the pages using Distress Oxide Inks in Twisted Cintron and Frayed Burlap, rubbing the inks on my craft mat, spritzing with water and then pressing the pages into the inks.
I looped a black elastic cord through the center of the 3 stacked pages and knotted it on the outside of the binding.
 The binder clip holds the book closed nicely.
My Tiny Book - Junk Journal is a small 2 1/4" x 3". 
 Please check out Eileen's Blog every Wednesday in August to be inspired by the rest of the Design Teams Junk Journals!  

You'll also find inspiration with Eileen on her twice weekly Facebook Live shows at Eileen Hull Designs – Tuesdays at 6:00 pm EST and Thursdays at 4:00 pm EST. Become a member of the Eileen Hull Fan Club-  a friendly, talented and encouraging community of crafty folks. 
You can also find Eileen on Facebook, Instagram and Pinterest.

I'm also linking my Tiny Book to:
Anything Goes


Paper:  Black Matboard - Sizzix, Rustic Cream and Midnight Blue Cardstock - PTI.
Ink:  Ranger Distress Oxide Twisted Cintrol and Frayed Burlap.
Supplies:  Tiny Book Die - Eileen Hull/Sizzix, old slides that were my dad's, Paper Dolls, Small Talk Occasions, Floral Collage Paper, Big Chat Stickers, Quote Chips, Remnant Rubs Special Delivery and Botanicals, Industrious Stickers:Borders, Hinge Clip - Tim Holtz/Idea-ology, Belagio Cork Fabrics, black elastic cord, Beacon 3 in 1 Glue, iCraft Ultra Bond Adhesive, Ranger Distress Markers Worn Lipstick, Ripe Persimmon, Forest Moss, Carved Pumpkin Tea Dye, Stormy Sky, Brushed Corduroy, Spiced Marmalade, Pumice Stone, Spun Sugar, Peeled Paint, ScorTape 6x6 sheet, black Stabilo Pencil, Gold Stargazer Star Confetti - Honey Bee Stamps, star punch - Sizzix.

Monday, August 3, 2020

August CAS Christmas Card Challenge - 12 Days of Christmas

 Here we are in the Dog Days of Summer and what better way to try and cool off than by making a Christmas Card??!!   The August CAS Christmas Card challenge has just been posted and Susan our creative hostess this month has chosen The 12 Days of Christmas as her theme.  You'll find her description of the challenge over at the Blog
(you don't have to have the EXACT images from the 12 Days!)
I just happened to have a partridge in a pear tree image from the retired set Scandi Doodle Christmas by Waltzingmouse.  I simply embossed the image in gold and framed it using Halfsies Dies from The Greetery.
I also gold embossed the sentiment from O Holy Night by PTI on the inside.
So, if you'd like to cool off with the CAS Christmas Card team, our lovely August Guest Designer Meg,    and get a jump on your Christmas cards, please stop by the CAS Christmas Card blog for some 12 Days of Christmas inspiration!

I'm also linking my card to:
Anything Goes


Stamps:  Scandi Doodle Christmas - Waltzingmouse (retired), O Holy Night - PTI.
Paper:  White - PTI
Ink:  Versamark
Accessories:  Halfsies Dies - The Greetery, Gold Embossing Powder - Ranger.

Saturday, August 1, 2020

Purrfect

Today I have a card to share that I made for three challenges.
The cat and sentiment are from a set called Kit'n Caboodle from Papertrey Ink.  I embossed the background with Weathered Embossing Folder from Taylored Expressions.  The cat is popped up on foam dots above the sentiment 'shelf'.

Here are the challenges I was inspired by:

I was inspired by this dress from Miss Vogues website

for my sketch


Stamps:  Kit' N Caboodle - Papertrey Ink
Ink:  True Black - PTI, Hero Hues Sea Salt.
Paper:  white, True Black, Fine Linen - PTI
Accessories:  Kit'N Caboodle Dies - PTI, Weathered embossing folder - Taylored Expressions, Sentiment Strip dies - Neat and Tangled, Lacy Edge die - unknown, foam dots.