Monday, June 12, 2017

Green Lattice Birthday

I used several techniques on today's birthday card.
First, I laid my Tim Holtz Latticework Stencil over a panel of Arches Watercolor paper.  Then I sprinkled over the stencil with Leaf Green Brusho powder.  I spritzed water over the stencil and the Brusho exploded into this wonderful mix of green colors!

I dried the panel with my heat tool and added gold tape along the top and bottom.  I black embossed the happy and die cut the birthday out of white card.  I added 3 red rhinestones and adhered the panel to a white card base.

I'm linking my card to the following challenges:


 (inspired by the dish and colors)
 We're in a heat wave - so I'm going to go sit by the fan now!
(no, we didn't put our window air conditioners in yet)


Stamps:  Studio Calico - Limited Edition
Paper:  Arches Watercolor, White - PTI
Ink:  Versamark
Accessories:  Wonderful Words Birthday Die - PTI, gold tape - From the Make it Market Letterpress kit -  PTI, Latticework Stencil - Tim Holtz/Stampers Anonymous, Leaf Green Brusho, red rhinestones - Michaels.

Sunday, June 11, 2017

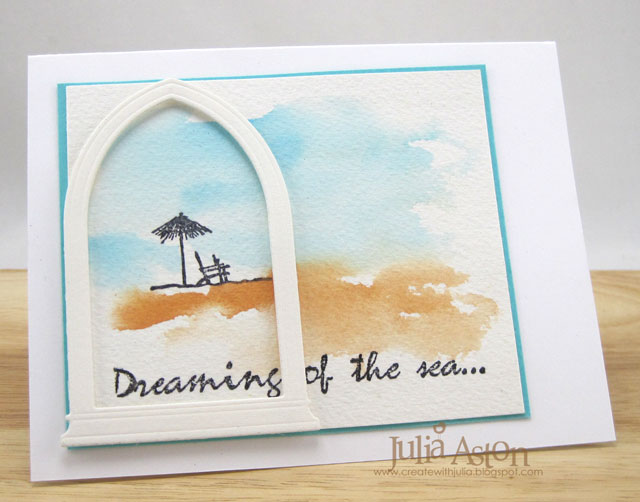
Dreaming of the Sea in Watercolor

I've been wanting to play along with this month's CAS Watercolor challenge given the fun seasonal theme!
And today (a 90 degree day here!)  I finally got up to my craft room and sweat out a card! It made me cooler just thinking about sitting on this sweet little chair at the ocean!
First, I stamped the image and sentiment in Archival Jet Black ink onto a panel of Arches Watercolor paper and dried it with my heat tool to be sure it was set.  Then I brushed water over over the panel, then brushed on the blue and tan watercolors.

I layered the watercolor paper to a slightly larger Hawaiian Shores panel and layered that onto a white card base.   Then I die cut the Gothic Window out of watercolor paper and layered it with foam dots to frame the image (and luckily it fit between the words of the sentiment!)

I'm also linking my card to:
Stamps:  Skyscapes - Stampendous, sentiment unknown.
Paper:  Arches Watercolor, White & Hawaiian Shores - PTI
Ink:  Archival Jet Black
Accessories:  watercolor paints, paint brush, water, Small Gothic Window Die - Poppy Stamps, foam dots.

Tuesday, June 6, 2017

Eileen Hull Sizzix Inspiration Team - collaborating with Stampotique!

This month Eileen Hull's Sizzix Inspiration Team is joining with Stampotique!   We were happily supplied with 6 Stampotique stamps of our choice - so you will see lots of variety over on Eileen's blog every Tuesday in June!

For my first project -  I used Eileen's Tea Cup 3D die, Stitchy Flower and Leaf Thinlit dies, and the flower from her House Pocket Die.
I die cut all the teacup pieces out of White Little Sizzles Matboard.  I then cut 2 tea cups and athe saucer out of paper from Eileen's Heart Felt Paper Pad.     I stamped 3 Girls on one side of the tea cup and Spider Grass and Good Things sentiment on the back teacup using Archival Black Ink.  
I sponged the edges of all the pieces using Eileen's Color Box Clear Snap Blends Hydrangea ink - so easy with the sponge applicator as part of the ink holder!
I covered the tea bag tag (part of the Tea Cup die) with more paper from the Heart Felt Paper Pad and a felt heart cut from Eileen's House Pocket die set.  I looped a piece of twine through the hole and attached the loose ends on the inside of the cup.  I stamped the Good Things sentiment and Spider Grass stamp using Archival Jet Black ink, coloring the Spider Grass with a light green Zig Clear Color brush and added light blue Tiny Twinkles..
I sponged an oval on the center of the saucer using the Hydrangea Color Box Blend ink and tied a 4 loop bow around the handles using white wrinkled seam tape
I die cut flowers and leaves from Eileen's Stitchy Flower and Leaf thinlits using Olive and Aqua Kunin Felt.  I pinched one end of each leaf together and added a dot of hot glue to each for a little curl, adhering them to the saucer at the bottom of the teacup with hot glue.
I added more blue Tiny Twinkles on the backs of the girls for a little sparkle and a larger blue rhinestone to the center of the flower.  I love this sentiment that is part of the 3 Girls stamp -  "Life is nothing without Friendship - Cicero". it reminds me of old family photos we have of my sister and me at the beach or lake with friends.
Sometimes I like to dunk biscotti in my tea - so I thought that might be a nice gift to put inside my teacup if I was giving this to someone!
I hope I have inspired you to check out all the fun stamps over at Stampotique as well as all of Eileen Hull's wonderful Sizzix Dies!

I'll be back next Tuesday with another joint project -  and you will find all of the Inspiration Teams' projects over at Eileen's blog during the month of June!

I'm also linking my project to:
Stamps and Stencils
Words with Meaning

Mixed Media Monthly
#36  Put a Stamp on It

Stampotique Flower Challenge SCD275

Stamps:  3 Girls, Good Things, Spider Grass - Stampotique
Ink:  Archival Jet Black,  Hydrangea Color Box Blends
Paper:  White Little Sizzles Matboard,  Heart Felt Paper Pad - Sizzix
Accessories:  Tea Cup 3D Die, Stitchy Flower and Leaf Thinlits, House Pocket Die - Eileen Hull/Sizzix, Olive and Aqua Kunin Felt, light Green Zig Marker, twine, foam dots, Tombow Glue, hot glue gun, Tiny Twinkles - Taylored Expressions, rhinestone - Kaiser Craft, white wrinkled seam tape - Prairie Bird Boutique Etsy Shop.

Saturday, June 3, 2017

Inspired by Tim

I made this tag for today's Inspiration Challenge over at Splitcoaststampers - Audrie asked us to check out Tim Holtz Inspiration Pinterest Board.   I made a tag inspired by this tag

I made mine in a summer theme rather than winter - but used many of the techniques Barbarayaya used - remnant rub resist, spraying with stains, layering an image over the tag.
  I started with a plain manila tag and added some Idea-ology Remnant rubs (Elements and Botanicals) -  Then I placed the tag inside a used pizza box (to contain the spraying!) and sprayed over it with Ranger Distress Stains in Broken China, Antique Linen, twisted Cintron and Salty Ocean - drying it with my heat tool, flicking it with water, adding more stain, till I was happy with the look.  I wiped the stain off the Remnant Rubs (they resist the stain) and then I dried it thoroughly with my heat tool.
I stamped a design stamp from Tim's Classics #3 set on the right side of the tag in Archival Jet Black Ink and sponged around the edges of the tag with Ranger Distress Ground Espresso Ink.  I stamped the dragonfly from Tim's Classics #1 set on a piece of rustic cream card using Archival Jet Black Ink. I cut out the dragonfly and colored it with Ranger Distress Markers - Broken China on the wings and Old Paper on the body.  I sponged the edges with  with Ground Espresso and layered it over the tag with foam dots.
I die cut the 'summer' from Handwritten Vacation dies out of  blue and green Kraft Core Core-dinations paper that I lightly sanded.  I put the die green word inside the negative blue die cut and layered it over the tag with foam dots.
To finish off my tag -  I added green Glitter Gems from Michaels, looped a piece of Linen Ribbon through the tag hole and pined on a Philosophy tag that I colored over with a weathered wood Distress Crayon.
I'm also linking my tag to:
(my Summer is an embedded die cut)
#36  Put a Stamp on It


Stamps:  Classics #1 and Classics #3 - Tim Holtz/Stampers Anonymous
Paper:  #8 Manila Tag - Ranger, True Black and Rustic Cream - PTI, Kraft Core Core'dinations.
Ink:  Archival Jet Black, Ranger Distress Ground Espresso
Accessories:  Idea-ology Remnant Rubs Elements and Botanical, Linen Ribbon, Philopsphy Tag, Loop Pin,  Ranger Distress Spray Stains Broken China, Antique Linen, Twisted Cintron, Salty Ocean,  Ranger Distress Markers Broken China and Old Paper, Ranger Distress Crayon Weathered wood, Foam dots, Handwritten Vacation Thinlits Dies - Tim Holtz/Sizzix, Glitter gems - Michaels.

Thursday, June 1, 2017

June A Vintage Journey Challlenge - Canvas

Welcome to June and the newest A Vintage Journey Challenge!  This month Nikki is our hostess and she would like us to work with canvas -  here is the challenge in her own words:

Let's work with canvas this month in our vintage; shabby; mixed media; art journaling, industrial, timeworn or steampunk style. It doesn't matter how as long as some canvas is a dominant feature of your project.  Perhaps you may use a canvas in the traditional way or use the reverse to create a shadow box? Canvas boards are fabulous to work on or perhaps you have some canvas sheets which can be cut and adhered to another surface.

I attended my 11 year old Goddaughter Eden's dance recital last week - and wanted to give her something special to remember the day. 
(she was in 10 of the dances performed, can bend over backwards to the floor from standing, do cartwheels across the floor and do full splits! in other words - she is an AWESOME dancer!)

So I made this little 2 1/2" x 3 1/2" canvas for her along with a little easel to display it on!
I have a few photos to share on how I put this together.  My design evolved as I pulled out things I wanted to use on it.  I thought she would like purple and blue colors - so I sponged Wilted Violet and Broken China DOX inks over the canvas.  I flicked water  with my fingers over the inks and dried with my heat tool.   
I colored the dress, hat and shoes of the Paperdoll dancer with my Weathered Wood Distress Crayon - rubbing it around with my finger. (it's a very subtle blue, you can see it a bit more on the close up below.)
I sponged the edges and a little on the canvas with DOX Vintage Photo - rubbing it also with my finger to blend.  I adhered a strip of Chatter Design Tape along the bottom using Tombow Liquid Glue to be sure it held on the inked surface.  (I later added another silver sparkly strip under this one)
I punched a tiny heart out of blue Kraft-Core Core-dinations paper and sanded it slightly.
I added a strip of lace from my stash across the top, personalized it with Eden's name using Label Letters and added the cut up Small Talk Sentiment.   I colored the skin on the dancer my Spun Sugar Distress Marker.  Both the dancer and heart are up on foam dots - I used glue on these as well to be sure they stuck to the ink.
Here you can see the silver Chatter Design Tape strip - it really sparkles IRL!   I sponged the tiny flowers with  DOX Vintage Photo.
Here is the canvas from the sides - showing how I wrapped the lace and tapes around to the back and you can see how the things pop up on the surface.

And here are some photos of beautiful dancer, Eden, at her recital.
With her mother just before the event in her first costume of the night (she had 5!)
With her older brother, Destin, after the event.
Eden is a beautiful young woman, inside and out
and she loved her special dancer canvas!

So please join us at A Vintage Journey - and link up your project using canvas!  Can't wait to see what you create! 


Our gracious sponsor this month is Shimmerz Paints.  One lucky winner will receive a $25.00 voucher to spend in their store.
http://www.shimmerzpaints.com

I'm also linking my project to:
Mixed Media Monthly - inspired by the colors in #33  Sweet Inspiration


Paper:  Blue Kraft Core Core-dinations
Ink:  Ranger Distress Oxide Wilted Violet, Broken China and Vintage Photo.
Accessories:  2 1/2" x 3 1/2" Canvas - Michaels, Idea-ology Paper Dolls, Design Tape, Small Talk, Label Letters,  Ranger Distress Crayon Weathered Wood, Ranger Distress Marker Spun Sugar, foam dots, Tombow liquid glue, mini sander - Ranger, water, heat tool, Heart punch - McGill, flowers - Prima.

June CAS Mix Up Challenge - Embossing Paste

The June CAS Mix Up Challenge is posted today!  Loll is our host and this is her challenge:
 For my CAS card I used stamping, white embossing paste with a stencil, and rhinestones.
I have a few photos of how I did the embossing paste panel.  I layered my Bloom Boldly stencil from Stamplorations onto a piece of Hawaiian Shores card stock.  I taped down the edges with blue painters tape so nothing would move as I spread out the paste.
I spread Wendy Vecchi White Embossing Paste over the stencil using a palette knife, layering it on thick to get it all covered, then scrapping off the excess smoothly across the stencil.
I removed the tape, then carefully lifted up the stencil.  I wiped off the excess paste on the stencil immediately and then washed it clean.  I let the panel dry overnight.
I cut my panel into two smaller pieces (~3 3/4" x 3") and was able to make 2 cards!
For this first one, I layered the panel over a white card,  white embossed the sentiment from Off Beat Birthday by PTI onto a black strip and layered that over the panel using foam dots.  
Even though the foam dots and rhinestones have adhesive on them - I added glue to the ones that were over the embossing paste as I have found things stick better over the thick uneven embossing paste if you use glue.
For my 2nd card I left the embossing paste panel open to fully appreciate the texture of the paste and design of the stencil, stamping another sentiment from Off Beat Birthday beneath the panel.
I finished both cards by adding simple blue rhinestones for a little bling!

Please check out the June CAS Mix Up Challenge for inspiration from the rest of the Design Team, videos on various ways to use embossing paste/gel, see our guest designer Marianne's inspired card and check out the rules of the challenge!  Can't wait to see how you use embossing paste or gels!  You have until June 24th to link up!

Also linking my card to:
Seize the Birthday
 Just Us Girls
 House Of Cards
AAA Cards
Time Out Challenge
Flowers and Friends


Stamps:  Off Beat Birthday - PTI
Ink:  Versamark, True Black - PTI
Paper:  white, True Black, Hawaiian Shores - PTI
Accessories:  Bloom Boldly stencil - STAMPlorations/ARTplorations, Wendy Vecchi White Embossing Paste, pallet knife, Rhinestones - Kaiser Craft, foam dots, Tombow Adhesive.