Tuesday, July 8, 2014

Tim Holtz 12 tags of 2014 - July Tag

I had so much fun creating this tag for Tim Holtz 12 Tags of 2014!  Tim uses some really cool techniques on this one - embossing a clear water background panel  - making sand out of various powders and all the fun of summer!   Here is his tag:
I have a ton of Tim Holtz 'stuff' - but I don't have  the main items he used on his tag - so I winged it creating my own slightly different ocean stuff!  Here is my tag -  can you see all the differences?
First off, I didn't have the seahorse/sand dollar die -  so I printed a picture of the seahorse and cut it out to use as a template - and then hand cut it out of chipboard.  I used different Distress Paint colors to paint her - covering the whole seahorse in Weathered Wood and then just dabbing on Bundled Sage and Rusty Hinge to give a more scaly kind of look.  After the ink dried I covered her with Rock Candy Clear Crackle paint.
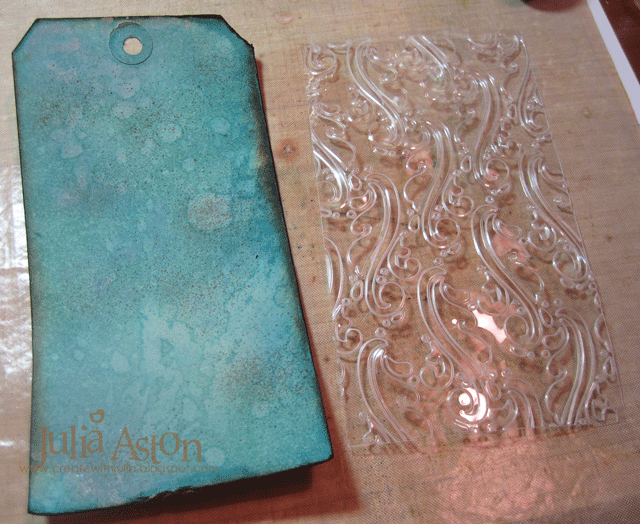
I also did not have the bubbles embossing folder Tim used - so I  used the Sizzix Summer Fun folder that looks like ocean waves with bubbles (thank you, Anne Harmon!).  I used both Weathered Wood Distress Paint and Salty Ocean Distress Ink on my tag rubbing each on my Nonstick Craft mat - spritzing with water and then running the tag through it.  After both colors were on and dried - I spritzed the tag with water.
Since I didn't have the sand dollars for the bottom of the tag -  I decided to use some real shells that I picked up off the beach on a vacation on Sanibel Island, FL several years ago (I knew I'd use them for something!).  I inked them with Versamark and then sprinkled Antique Linen Embossing Powder on them and hit them with my heat tool.  I used the Festive Greenery Sizzlet die for the sea plants - using Coredinations Kraft Core paper that I carefully sanded and inked the edges on after die cutting.
I stapled the clear embossed panel to the tag with my Tiny Attacher.   I added an eye to my little seahorse using Black Enamel Accents.  I adhered the plants and seahorse using glossy accents, bending up some of the tips/leaves of the plants for dimension.  I always back my tags with a black panel cut a little larger than my tag.  I added the Linen ribbon to the top and spread the ends.
 I covered a Word Band with Weathered Wood Distress paint - then rubbed it off with a towel so the paint just remained inside the letters.  I tied the band around my tag with blue Jute String.
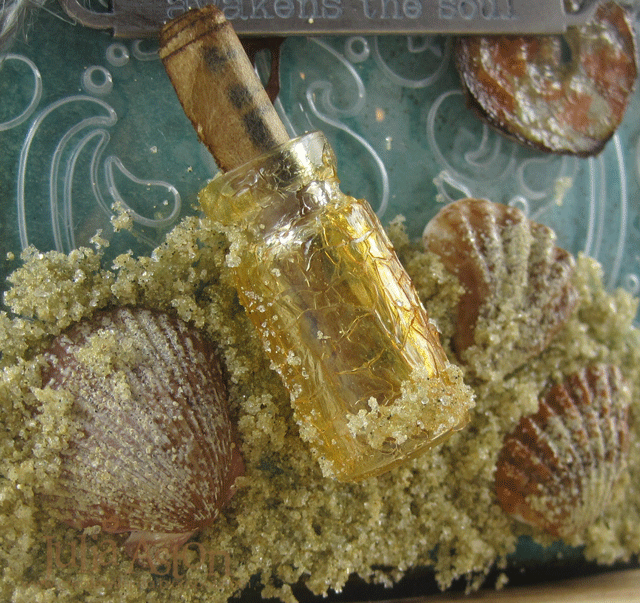
I needed something else in addition to the shells to put into the fun sand that I made by mixing Utee Clear Embossing powder, Antique Linen Distress Embossing Powder, Antique Linen Distress Glitter and Glossy Accents per Tim's recipe.   
So I thought a distressed Corked Vial with a note rolled up in it would do the trick! 
First, I covered the vial with Glue N Seal and let it dry -  then I covered it with Rock Candy Clear Crackle Paint.  After that dried and crackled - I sponged Adirondack Orange Blossom Ink over it.  I added the shells and the bottle to the 'sand' and let it dry. I love how the bottle came out -  and look how REAL that sand looks!!  How cool!
Here is the note I rolled up and placed inside my little vial.  I stamped it with Archival Jet Black Ink on Kraft Glassine paper and clear embossed it.  I distressed the edges and inked them with Gathered Twigs Distress ink, rolled it up tight and slipped it into the vial - ready for someone walking along the beach to find it!!  The sentiment is from the Big Top set.
Everytime I see a seahorse - it reminds me of when our Uncle Charlie sent my sister and I two live seahorses in the mail when we were quite young.  They were miniature ones and came with a tank and instructions on feeding and care.  We called them Hans and Katrina.  They were so fun to watch and we thought it was quite exciting to have them.  You had to have some pieces of coral in the tank as they had to be able to wrap their tails around something or they would die from constantly swimming.   I'm afraid they did not last too long - it was quite hard to keep the salt water regulated properly and very easy to over feed the little things.  Our father was quite upset that his brother had sent them to us because he knew what the result would probably be... my sister and I were sad when they 'passed' and we had to have a proper burial out in the backyard.
THIS pretty little seahorse will live on forever - I'm happy to say!
Are you making Tim's tags each month??  You'll find the challenge here.  There's a new one every first day of the month!

I also posting this over at the Mixed Media Card Challenge this month is Touch of Nature - optional element -Tag  -  and the challenge is open until 7/25 so you still have time to link a project there!

Stamps:  Big Top - Tim Holtz/Stampers Anonymous
Paper:  Shrink Plastic, #8 Manilla Tag, Kraft Glassine - Ranger, Coredinations Kraft Core Nostalgic Collection, Black - PTI
Ink:  Ranger Distress - Evergreen Bough, Gathered Twigs, Salty Ocean.  Archival Jet Black, Orange Blossom.
Accessories:  Idea-ology - Sanding Grip, Word Bands, Tiny Attacher, Jute String, Linen Ribbon, Corked Vials; Ranger Distress Stains - Tumbled Glass; Ranger Distress Marker - Frayed Burlap, Sizzlet Festive Greenery die, Black Enamel Accents - Ranger, shells from Beach, Ranger Distress embossing Powder Antique Linen,  Ranger Distress Glitter Antique Linen, Black Embossing Powder - Stampendous, palette knife, Ranger Spritz Distresser, Ranger Paper Distresser, Ranger Distress Paint - Weathered Wood, Bundled Sage, Rusty Hinge, Summer Fun Embossing Folder - Sizzix, Utee Clear Embossing Powder, Glossy Accents, Glue N Seal, Clear Rock Candy Distress Crackle Paint - Ranger.

Monday, July 7, 2014

A Tag for a Birthday

Today I have a tag to share that I made using several dies.
The tag itself is Stitched Tag from Waltzingmouse.  I used Coredinations Snowcap paper for everything on my tag - it is a textured paper if you look closely.  The Gerbera Daisy die is from MFT and the HAPPY die is from PTI.  I sponged the flower petals with Antique Linen Distress Ink and sponged the flower centers with Ripe Persimmon, Squeezed Lemonade and Salty Ocean Distress inks.  I layered the centers onto the blooms with foam dots and then adhered them to the card - with the blue center flower raised up on a foam dot.  I inked the HAPPY with Salty Ocean and Ripe Persimmon and layered that onto the tag with thin pieces of foam dots.  To finish off the tag - I stamped Birthday -  a partial inking of the Happy Birthday sentiment in Party Animal by Avery Elle - and stapled on the twill ribbon from PTI.

I'm entering my tag in a new challenge I just found -  Tag - You're It!
I'm also entering this in the Moxie Fab Wonderful Word dies Challenge

Then I decided to adhere my tag to a card base - first layering it onto an orange panel die cut with a Stitched Mat Rectangle die from Lil' Inker Designs.
Here's a close up shot of the pretty Gerbera Daisies - I curved the petals up using my bone folder and added black enamel dots from My Mind's Eye to the centers.
I'm entering my card in Virginia's View Challenge #5 - use Die Cuts.
I hope everyone in the US had a lovely 4th of July long weekend -  we had rain from Hurricane Arthur all day Friday - but Saturday and Sunday were glorious summer days -  we were at a wedding on Saturday held at a conference center in the woods in RI.  Here are two pics of the bride and groom.  It couldn't have been a more perfect day -  Wishing you the best in your new life together Mary and Darren!


Reminder:  you have until 7/25 to link up your Mixed Media Card Challenge creation!  This month the Optional element is Tags!

Stamps:  Avery Elle - Party Animal
Paper:  Snow Cap - Coredinations, white and Orange Zest - PTI
Ink:  Ranger Distress - Ripe Persimmon, Squeezed Lemonade, Salty Ocean, Antique Linen.
Accessories:  black enamel Dots - My Mind's Eye, Gerbera Daisy Die - MFT, Happy Die from Tipped Tops Die - PTI, Stitched Tag Die - Waltzingmouse, Stitched Mat Rectangle Die - Lil' Inker Designs, foam dots, mini attacher - Ranger, orange zest Twill - PTI

Sunday, July 6, 2014

Vintage Journey, Our Creative Corner and ePlay

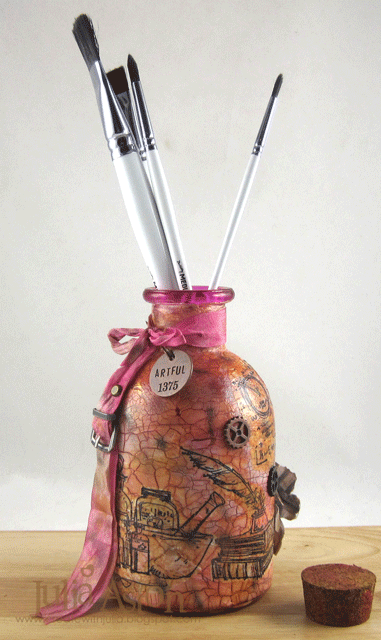
I'm excited to be sharing a project I made for three challenges -  A Vintage Journey - Challenge #9 - to use every stamp in a stamp set (with a Tim Holtz influence),  Our Creative Corner Challenge - Use Home Made Flowers and Hand Dyed Ribbon, and this month's eclectic Paperie ePlay challenge - to alter a bottle.
I decorated a plain rose colored bottle that I got at Michaels for $1.99 - and a possible use for it would be to hold some of my paint brushes on my work table as shown here!
So let me show you how I decorated my plain bottle and how I hit all the points in all three challenges - WARNING - lots of pictures to follow!  I've linked all the products in or at the end of my post.
First, I covered my bottle with Wendy Vecchi Gold Embossing Paste, applying it with my fingers- and let it dry.
 Next I covered the bottle with Wendy Vecchi Crackled Texture Paste - and let it dry.  After it was dry and crackled - I sponged the bottle with Ranger Distress Inks - Picked Raspberry and Gathered Twigs. (no picture of this step!)
 I wanted to place all the images from The Chemist set on my bottle - but I didn't want the images to cover all the crackle and color - so I decided to decoupage it by stamping the images on white tissue paper with Archival Jet Black Ink and then coloring the images with Ranger Distress Stains Frayed Burlap, Bundled Sage, Tumbled Glass and Worn Lipstick (Ink Palette Distress Technique from Tim's Compendium of Curiosities Vol II Page 51) and my water brush.  I wasn't sure if the color would still show after I decoupaged it onto the bottle - so this became my little experiment!
 I cut the images close to the edges and laid them out on my grid paper that I marked roughly with the circumference size of the bottle so I could see how they would fit without overlapping.
 Then I started adhering the images to the bottle by brushing Matte Mod Podge on the bottle, laying the image over it and then brushing the Mod Podge over the tissue paper image - being careful not to get it so wet that the tissue would tear.  Then I let it dry overnight.
 Here are views of the 4 images after the Mod Podge Dried.  At this point I wanted to grunge up the surface a bit and so I added some Wendy Vecchi Gold Embossing paste with my finger randomly around the images.  I also used my Distress Spritzer with a black soot Distress Marker to add a little splatter.  Here's the 1st of 4 images.  You can still see the colors on the images - very faintly!
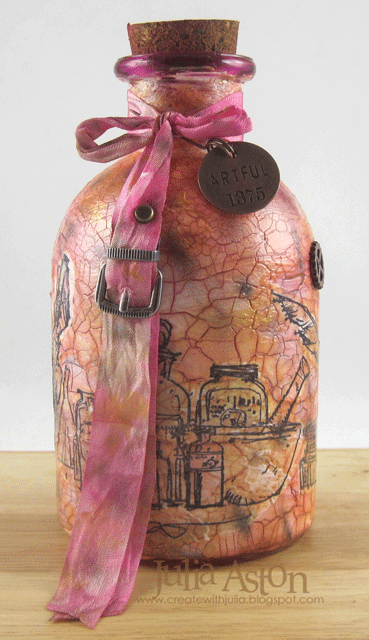
 I adhered a couple of Mini Gears using Glue N Seal.  Here's the 2nd of the 4 images.
 Here's the 3rd of the 4 images.  My hand made flower is below this image and I'll show you that in a moment!
 And finally, the 4th of the 4 images in this stamp set -  the Chemist himself!
 I added a Numeral to his apron - coloring it with Rust Alcohol Ink and Pearl Mixative.  I also stained the cork stopper using Ranger Distress Stains Picked Raspberry and Frayed Burlap.
 Here is my handmade flower.  I had the pieces already made, left over from a project I posted a few weeks ago - so I just had to curve it, color it and layer it.  I rubbed some Frayed Burlap Distress Stain on the petals to grunge it up a bit.  The Gold Berry Flower Center is by Wendy Vecchi/Blossom Bucket.
 I made the flower by layering a piece of Tim Holtz Eclectic Elements fabric to a piece of Wendy Vecchi Art Parts Clearly for Art Modeling Film using Glue N Seal
 Once it dried -  I cut the flowers out of the sheet using my Tattered Florals die.
 The Modeling Film will soften when you use your heat tool on it - so I was able to curve the petals
 And finally - my hand dyed ribbon.  I dyed my Crinkle Ribbon by rubbing Picked Raspberry and Frayed Burlap Distress Stains on my Nonstick Craft Mat - spritzing it with Perfect Pearl Mist - then pulling the ribbon through it - crinkling it up and drying it with my heat tool.
I wanted the ribbon to look masculine to go with the Chemist images - so I tied it with just a small bow - and threaded both tails through an Idea-ology Buckle.  I stuck a Philosophy tag through the bow with a Memo Pin and just let the long tails hang on the side of the bottle.
and finally - I rubbed more of  the Gold Embossing Paste on the ribbon.
Even though this is a rather masculine project -  I think it will be staying on my work table - giving me a lovely artistic container to look at while I create more art!
Ok - I think I'm done now!   SO sorry for keeping you so long!  I hope you'll join in on all three of these inspiring challenges!   A Vintage JourneyOur Creative Corner - and eclectic Paperie ePlay challenge -  go and get creative!


Stamps:  The Chemist - Tim Holtz/Stampers Anonymous
Paper:  White Tissue Paper - from stash.
Ink:  Ranger Distress Picked Raspberry, Gathered Twigs, Archival Jet Black
Accessories:  bottle - Michaels, Glue N Seal - Ranger, Mod Podge Matte; Gold Embossing Paste, Crackled Texture Paste, Art Parts Clearly for Art Modeling Film, Gold Berry Flower Center/Blossom Bucket - Wendy Vecchi; Distress Spritzer, Black Soot Distress Marker - Ranger; Adirondack Pearl Mixative and Rust Alcohol Ink; Ranger Distress Stains Frayed Burlap, Bundled Sage, Tumbled Glass and Worn Lipstick; Perfect Pearl Mist - Ranger; Tattered Floral Die - Tim Holtz Alterations. Eclectic Elements Fabric - Ranger, Idea-ology Mini Gears, Buckles, Philosophy Tags, Memo Pins, Mini Numerals, crinkle ribbon.

Saturday, July 5, 2014

True Love

Today Kent and I are traveling to Rhode Island to the wedding of Darren and Mary -  the youngest son of my friend Flo who was my roommate in college - many years ago!  It's being held at Whispering Pines - a conference center that's part of the University of RI.  The ceremony is scheduled to be held outside - with the reception to follow inside the conference center -  and then a bon fire back outside into the evening. Hopefully Hurricane Arthur has cleared out of the area by then!
So, of course, being a card maker -  I had to make the wedding card we will give them - AND I left it to the last minute - creating it late Thursday night (although I did know what stamp set I wanted to use!).
A cut a panel the size of the front of the card out of Ranger Specialty Paper.  Then I used a technique I saw on Wendy Vecchi's blog here, Archival Ink Brayered Background.  I rubbed Archival Dandelion and Tree Branch ink on my Nonstick Craft Mat, spritzed it with water and then ran my brayer over the inks and ran the breyer over the Specialty Paper panel - it creates a rather watery blended background.  I dried it with my heat tool.  Next I laid a Check Mate stencil by Wendy Vecchi over the panel and sponged over it with Dandelion Archival Ink.  I stamped the wedding couple and sentiment from Wendy Vecchi's stamp set Lovely Art in Archival Jet Black and colored in some of the image with Ranger Distress Markers, Brushed Corduroy, Weathered Wood and Fired Brick.  Next I laid Wendy's  Large Heart stencil mask over the panel and sponged around the edges with Cornflower Blue Archival ink.  To finish off my panel I stamped the border stamp from Wendy's The Beauty of Art set using Watering Can Archival Ink.
 To finish it off I stamped and stenciled on the front of the envelope.  I again used the Check Mate Stencil along with the Create a Wreath stencil.  The stamped sentiment is from an old Cornish Heritage Farms set called Wedding Centers.
I just love the cute vintagey couple - and I love how my card came out - hopefully the bride and groom do to!

Stamps:  Lovely Art and The Beauty of Art - Wendy Vecchi/Studio 490/Stampers Anonymous, Wedding Centers - Cornish Heritage Farms.
Paper:  Ranger Specialty Stamping Paper, white - PTI
Ink:  Archival Dandelion, Tree Branch, Jet Black, Watering Can, Cornflower Blue; Ranger Distress Markers Brushed Corduroy, Weathered Wood, Fired Brick; brayer, stencils:  Check Mate, Large Heart, Create a Wreath - Wendy Vecchi/Studio 490.

Thursday, July 3, 2014

Fusion Card Challenge - July 3rd

If you are looking for my eclectic Paperie ePlay challenge post 'Altered Bottles'- please scroll down!

Thank you all for participating in our last challenge when we joined up with Cas(e) this Sketch - what wonderful inspiring cards you all linked up!  We hope you will be equally inspired by our challenge this week!   Don't you just LOVE the blue and red colors here???!!  Or maybe you just really love the sketch?
Personally -  I have a lot of difficulty using a triangle -  so I'm afraid I just ran with the colors, flowers and stripes in the inspiration photo this time!
I stamped my Pinstripe Backgrounder stamp from Waltzingmouse in black ink on white cardstock - then I sponged the whole panel with Salty Ocean Distress Ink.  I cut the panel with my Stitched Mat Square die from Lil' Inker Designs and layered it onto a white card base.  I got out the Lil' Inker Spring Flowers Die set that I bought quite a while ago and sort of forgot I had (!) and boy - do I love how they look creased and layered!!  I put foam tape between each layer so they really pop up.  I added the sentiment from Whole Lotta Happy from WPlus9 on a  banner cut with my Stitched Sentiment flag die from Lil' Inker.  Then I just added some home made enamel dots (made from Perler Beads)

I can't wait to see how you interpret the challenge this week!   Here are links to see what the rest of the Design Team has created!

Sindu
Stephanie Severin


Remember to link up your card over at the Fusion Card Challenge Blog

And I wish all those in the US - a happy safe 4th of July!  We'll be home watching the Boston Pops and fireworks on TV on the 4th -  and on the 5th we're traveling to Rhode Island to the wedding of my college roommate's son.  

and if you'd like some 4th of July crafty inspiration - click here to see all my past posts for the holiday!


Stamps:  Pinstripe Backgrounder - Waltzingmouse, Whole Lotta Happy - WPlus9
Paper:  White, Pure Poppy - PTI, Pacific Point - SU
Ink:  Archival Jet Black, Ranger Distress Salty Ocean
Accessories:  dies - Stitched Mat Squares, Stitched Sentiment Flag, Spring Flowers Die Set - Lil' Inkers Design, enamel dots - home made from Perler Beads.

July ePlay Challenge - Alter a Bottle


Today I'm the host (for the first time!) of the July eclectic Paperie Blog - ePlay Challenge - and my challenge to everyone is to alter a bottle - glass, plastic, big or small -  take it from plain to WOW!  You have the whole month of July to play along - and if you link up your project you could win a $25 gift certificate from owner Kim - the eclectic Paperie store!

Here is the bottle I altered
and here is how I made it  'WOW'!
 I added some blooms from my garden to my pretty little vase -  Goldenstar and Dianthus.

To see just how I made this beautiful transformation -  please check out my post at the eclectic Paperie blog here.
Here's what I used:
Paper:  Idea-ology Paper Stash 8"x8" Collage
Ink:  Ranger Distress Salty Ocean, Mustard Seed, Gathered Twigs, Adirondack Alcohol Inks Stonewashed, Rust, Lettuce and Alcohol Blending Solution
Accessories:  Studio 490 Wendy Vecchi Silver Embossing Paste and Crackle Texture PasteIdea-ology Fragments/Charms, Linen Ribbon, Industrious Stickers/Borders; Glossy Accents, ScorTape.

Tuesday, July 1, 2014

Mixed Media Card Challenge - Touch of Nature 7/1/14

I am SO excited to share with you that I was chosen to be on the Design Team of this wonderful new monthly challenge - The Mixed Media Card Challenge!  And today is the very first challenge -  
Theme:  Touch of Nature - Optional Element:  Tag.
I went for the Theme and the Optional Element and made a tag/card for my project this month.
And since the main goal of the challenge is to get us to use Mixed Media - I have some photos of how I built my tag using several medias.
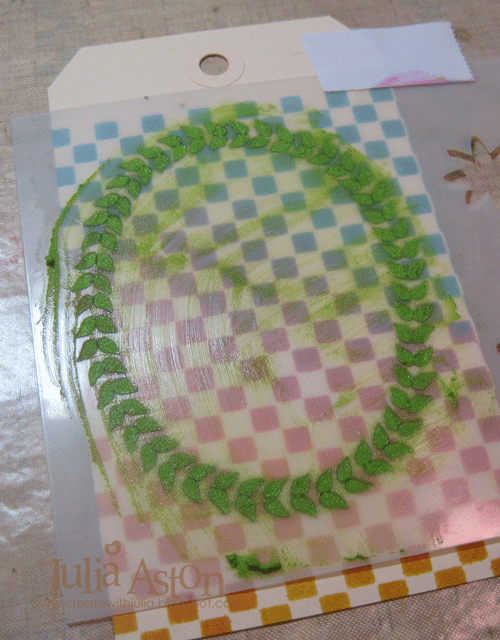
First I inked the Check Mate Stencil from Wendy Vecchi/Studio 490 on the tag using 4 different colors of Distress Inks using my Mini Ink Blenders - these work so nicely on the small openings of the stencils.
Next - I mixed a little Leaf Green Archival ink into some white embossing paste using my pallet knife.
I laid my Create a Wreath Stencil over the tag, holding it in place with some Low Tack Artist Tape and spread on the now-green embossing paste. 
Note:  Wash your stencil, pallet knife and craft sheet immediately - don't let the paste dry as it will be very difficult to remove after it dries.
So here is the base of my tag -  I love how bright the colors look and the raised green wreath looks and feels like soft felt.   At this point, I cut my tag down to 5 1/2" long so that it could be mailed in a regular size A2 envelope.
  I inked the stripes from my Dots and Stripes stencil along the top in black, die cut the flowers from white card stock and the stem from green and then stamped the flowers from Reverse Confetti using the same colors as my checkmate background.  I sponged the edges of the tag and flowers with Mustard Seed.
I layered the blooms over the wreath using foam dots.  I stamped stars from the same stamp set in black randomly around the tag and then spritzed the tag using my Ranger Distress Spritzer and Frayed Burlap Distress Marker. I stamped the 'Feel Better Soon' from PTI on the bottom right corner.
To finish off the blooms I added Glossy Accents to the centers to add a little shimmer.
I layered my tag to a slightly larger piece of black card stock since the back of the tag got a little inky.  I added a white panel for the sentiment and any hand written note I might want to add.
And, once again, a view of my finished Touch of Nature project!
So please check out the Mixed Media Challenge Blog where you will find all the details for this monthly challenge -  all the wonderful inspiration posted there by the Design Team - and where Mr. Linky awaits you to link up your mixed media creation!   You have until July 25th to play.  New challenges will be on the 1st of each month!

Thanks so much for stopping by.  I'd love to hear what you think of my Mixed Media tag!

Stamps:  Healing Touch Sentiments - Papertrey Ink, Petals and Posies - Reverse Confetti
 Paper:  #8 Manilla Tag - Ranger (6 1/4" x 3 1/4"), white and True Black - Papertrey Ink
Ink:  Ranger Distress - Picked Raspberry, Mustard Seed, Spiced Marmelade, Peacock Feathers; Archival Leaf Green (reinker), Jet Black.
Accessories:  White Embossing Paste - Studio 490 Wendy Vecchi, Stencils: Create A Wreath, Check Mate, Dots and Stripes - Studio 490 Wendy Vecchi, Blending tool - Ranger, Glossy Accents - Ranger, Frayed Burlap Distress Marker - Ranger, Distress Spritzer - Ranger, foam tape, Petals and Posies Dies - Reverse Confetti.
Paper