Monday, September 16, 2013

Waltzingmouse Sept Sneak Peek Day 1 Art Deco!

Welcome to the first day of the Waltzingmouse Sept Sneak Peeks!  Claire has 8 new wonderful stamp sets being released on Thursday Sept 19th.

Today we are showing Putting on the Ritz, Art Deco Backgrounders and Opera Tags Christmas.
First I have 2 projects to show you using Art Deco Backgrounders and Putting on the Ritz.   Here's a fun little tote I made from a template.  I stamped the background on the front and back panels before assembling the tote. The tote measures 5 1/4" x 5 1/2" x 2 1/2" so A2 size cards will fit in perfectly or a nice sized gift!
 There's a little pocket that you place on the inside that I stamped with the same background - you can slip a gift card inside the pocket.
There's also a little coin purse to hang on the outside.
I closed the flap with a piece of Velcro.
Next I made a card using both backgrounds from the backgrounder set and two more of the sentiments from Putting on the Ritz.
I die cut a Polaroid frame out of black sparkly card stock and adhered the sentiment panel to the frame.  I popped the  top piece of background and the frame up on foam dots.  I die cut the black bow, added a clear rhinestone and adhered it below the sentiment.  
I'm entering this card in the Little Red Wagon Challenge - Frame it.
I stamped the frame from Putting on the Ritz and another sentiment from the set on the inside of my card.

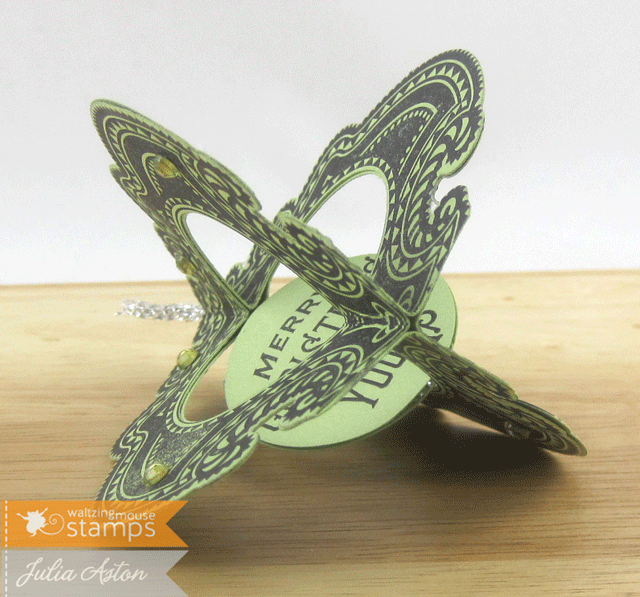
My last project today is a 3D creation I made using one of the ornaments from the Mini set Opera Tags Christmas.  When I stamped the ornament - I turned it upside down and it looked like a tree to me!

I stamped the ornament 4 times, die cut them with Claires' Opera Tag Die and punched out the centers with a 1 3/4" circle punch.  I cut off the point on the bottom just a bit so it would stand up.  I scored each piece down the middle  and glued them together - half to half to half. I punched 2 circles  with a 1 1/2" punch, stamped the sentiment on both pieces and adhered them together with a silver thread in between them. Before I adhered the top pieces of the 'tree' I placed the silver thread between the pieces so the circle would 'float' in the opening.
Here's a view with the 'tree' laid down so you can see all the sides.  This will fold pretty flat so it could be mailed like a card.
Well -  I hope you enjoyed my projects for today!

Here are the links to the Design Team members showing these sets today.  And please stop by tomorrow for Day 2!

 Becca Feeken  Jean Martin Jeanne Jachna Jennifer Holmes Julia Aston  Kelly Schirmer Kim Duran Laurie Schmidlin Teresa Kline Lynn Mercurio Renee Lynch Sandie Dunne Tosha Leyendekker Claire Brennan


Haute Tote Bag:
Stamps:  Art Deco Backgrounders, Putting on the Ritz - Waltzingmouse (available 9/19)
Paper:  Vintage Cream - PTI, black - Michaels
Ink:  Black Soot - Ranger Distress
Accessories:  Haute Tote Template - Creations by AR, Silhouette Cameo, wonky rectangles - Spellbinders, beaded key chain - Tandy Leather, Scor Tape, 1 1/2" circle punch - EK Success, brads - Black Tie/Bazzill, foam dots, Velcro.

Cat's Pajamas Card
Stamps:  Art Deco Backgrounders, Putting on the Ritz - Waltzingmouse (available 9/19)
Paper:  Vintage Cream, True Black - PTI, sparkle cardstock - Michaels
Ink:  Archival Jet Black - Ranger
Accessories:  Clear rhinestone - Michaels, scor tape, foam tape, Bow Die - L'il Inker Designs, Polaroid Die - Jillian Vance Design

Tree card/ornament
Stamps:  Opera Tags Christmas - Waltzingmouse (available 9/19)
Paper:  Certainly Celery - SU
Ink:  Archival Jet Black - Ranger
Accessories:  1 3/4" and 1 1/2" circle punches - EK Success, Opera tag Die - Waltzingmouse/Spellbinders, rhinestones - Kaiser, silver cloisonne thread.

Saturday, September 14, 2013

Matryoshka Thank You

Today I wanted to share a wonderful gift one of the doctors I work for gave me after he and his family visited their family in Russia this summer. 

To back track a bit -  you may remember the WMS June Release of Claire's beautiful Matryoshka (Russian Nesting Dolls) set called You're a Doll.  These were the projects I made for that release - (you'll find the details here.)

 You'll find the details for this card here.
I have always loved these nesting dolls ever since our aunt Helen (who was single and traveled to Europe and beyond each summer) brought us back a lovely doll when my sister and I were young.  You can read more about the history of Matryoshka on Wikipedia here.

So -  when Nikolay said he was going home to Russia for vacation - I asked him if he could get me a Matryoshka.  He said he'd be happy to!

and this is what he brought me: - Isn't this just gorgeous?!  She measures 7" tall by 3" wide and has 4 nesting dolls inside.
 The pictures tell a story - although I have yet to find out what that story is!?!  And here is what they look like on the back.
I decided to use the doll to make a thank you note for Nikolay and Valeria.  I took a picture of the Matryoshka, printed it and stamped Thank You from the Join Us set directly on the photo.  I layered it to a blue panel then to the white card base.
 Here's what I stamped inside from Blessed by You by Waltzingmouse.  It is the perfect sentiment for my thank you note to them!
Thanks for stopping by today!  Happy weekend everyone!

News Flash -  I will be starting sneak peeks for the Waltzingmouse Sept release on Monday so I hope you'll come by then!


Tuesday, September 10, 2013

Just a Mixed Media Note!

Today I have my Mixed Media Color Challenge project to share.  Mona and Sue have us using yellow, orange and kraft/brown, along with at least 2 mediums.
I decided to just make a Mixed Media card this week - keeping it on a small scale!  My card is a standard 
4 1/4" x 5 1/2"
 I used modeling paste with a stone wall stencil on my kraft panel base. After it dryed - I sprayed it all over with yellow ink spray that turned it yellow where I sprayed lightly and orangey where I sprayed heavily.  I stamped  text and chicken wire stamps in black ink.  I brushed Clear Distress Crackle Paint over the whole thing and left it to dry.  Then I rubbed some yellow and orange acrylic paint over it with a paper towel to tone down the shine a bit!  It also helped accent the crackle as you see below.


 I painted the wooden flower and leaf with yellow acrylic paint.  I used a Sentiment Strips die for the sentiment, adhering it and the flower with foam tape
To finish it off I added some orange enamel dots, layered the panel to a slightly larger orange panel and then to my kraft card base!

If you've been dabbling in Mixed Media or even just thinking about it (!).... Come and join us over at the Mixed Media Color Challenge! 

Stamps:  Text It, Chicken Wire, Funky Feathers - Waltzingmouse
Paper:  Kraft, Orange Zest - PTI
Ink:  Archival Jet Black - Ranger
Accessories:  Liquitex Light Modeling Past, Jonquil and Carrot Acrylic Paint - Martha Stewart, foam dots, enamel dots - My Mind's Eye, Stone Wall Stencil and Sentiment Strips Die - MFT, Distress Crackle Clear Rock Candy and Glue N Seal - Ranger.  Wooden flower and leaf - Michaels.


Saturday, September 7, 2013

Welcome to Our Table

Boy - I don't know what I've been doing - but I sure haven't been posting to the old blog!  My other life (the non-stamping one!) sort of took over for a few days I guess -  sometimes you just have to take a break, don't you know?!

So - to remedy that situation -  here is a card I made for this week's Cas(e) this Sketch
as well as the CAS on Sunday challenge - Welcome Home - make a new home themed card.  Now my card has the sentiment 'Welcome to our Table' on it -  and I'm thinking this could be a card to a new neighbor inviting them over -   or it could be on the table when you have new neighbors to dinner - so it's kind of a loose translation of the challenge!
When I looked at  the sketch  and was trying to think new neighbor or new home to combine the challenges -  I looked through my stamps for that theme and when I saw the Welcome to our Table sentiment (from Waltzingmouse - Country Labels 4)  - the shape on the sketch suddenly became a table - I thought this piece of the MFT open scallop doily die looked like a lacy table cloth -  so there it is - popped up on foam dots.  I just added two enamel dots on either side of the sentiment.

 Just a heads up -  I'll be posting a project using a brand new template from Creations by AR on Sept 17th

and Claire is releasing some wonderful new Waltzingmouse stamp sets on Sept 19th so I'll be having sneak peaks starting Sept 16th

Lots coming up so I hope you'll stop by!

Welcome to our Table
Stamps:  Country Labels 4 - Waltzingmouse
Paper:  Vintage Cream - PTI, textured cream - from stash, DP Simple Stories - Snap
Ink:  Archival Jet Black
Accessories:  foam dots, enamel dots - My Minds Eye, Open Scallop Doily Die - MFT

Tuesday, September 3, 2013

Praying

I loved this week's CAS(E) this Sketch
.......and I just had to get a card done using it.  I made mine very CAS,  using a base of Soft Stone Card Stock - I simply layered two pieces of patterned paper from the Country Boutique Paper Pad by Fancy Pants, stamped the sentiment directly over the papers and added a Nestability die cut felt heart.  I just love how the papers go with the Soft Stone card stock and the sandstone felt.  I ended up making 7 cards for my stash with this lovely sketch -  here are three of them:
I used a lovely little stamp set called Boutique Borders - Sympathy from PaperTrey Ink


Stamps:  Boutique Borders - Sympathy - PTI
Paper:  Soft Stone - PTI, DP Country Boutique Paper Pad - Fancy Pants Designs
Ink:  Archival Coffee
Accessories:  Sandstone Felt - Joann's, Heart Nestabilities - Spellbinders, Glue N Seal - Ranger

Monday, September 2, 2013

Starting School and Thinking of You

 There was a fun Mix-Ability Challenge over on Split Coast last Friday -  Drip, Drip, Drip -  to drip water over an inked or colored panel for your background.  I made two cards - a bright colorful one and a softer tone one.

First up is the colorful one - that I combined with the other Friday challenge on SCS - Free 4 All which was to use the primary colors of red, yellow and blue.

I made the background by sponging Ranger Distress inks over a white panel - then I dripped drops of water on the background using an eye dropper.  I didn't want the water to run, I wanted just drops on this one - so I patted a paper towel over the panel to absorb the water.

My 3 year old grandnephew, Landon, is going to start pre-school one day a week this month so I thought I'd send him this card.  I think he'll love seeing himself on the card - I hope he is just as happy his first day of school!  I cut out this picture of him and popped it up on the panel with foam tape.  I made the sentiment with my Brother P-Touch Label maker.
For my 2nd card - I again made a background by sponging a white panel with ink and then dripping water on it using an eye dropper.  This time I wanted the water to run as I was trying to make it look like this photo below.  This is a wall paper sold at Eskayel - a web store that was our inspiration for the IC challenge on Split Coast on Saturday.
And here's my card:
I cut the panel with Labels 18 Nestabilities.  The flowers are layered over the panel, some with foam tape. I used a beautiful flower set I just purchased, Fresh Cut Florals, and the coordinating dies from W Plus 9
I love how this came out!

Starting School
Paper: white, true black - PTI
Ink: Ranger Distress - Salty Ocean, Festive Berries, Squeezed Lemonade
Accessories: foam dots, photo, Brother P-Touch Label Maker, water, eye dropper 

Inspired Thinking of You
Stamps: Fresh Cut Florals - WPlus9
Paper: white - PTI
Ink: Ranger Distress Stormy Sky, Victorian Velvet, Milled Lavender, Archival Jet Black
Accessories: Labels 18 Nestabilities, Fresh Cut Florals dies - WPlus9, water, waterdropper, paper towel, foam dots

Sunday, September 1, 2013

Each of Us is God's Special Work of Art

I made this card for a new challenge I just found when visiting the blog of my stamping friend Annette -  it's called Pinspired - and they choose an image from Pinterest for the challenge inspiration.  Here is this week's inspiration:
And here's my inspired card:
I used my brandy new hibiscus die that I got from My Favorite Things along with my brandy new stitched mat rectangle from Lil' Inker Designs.

I'm also entering this into Word Art Wednesday - Anything Goes.

My next card was made for the Cas-ual Fridays Challenge - to use Kraft and text.
I used stamps from the Ocean Bound set by Waltzingmouse.  I stamped the frame, sentiments and anchor on a piece of kraft paper, cut it out and layered it over the kraft card base with foam dots.  It's always good to have a masculine card on hand!
 

Each One of Us
Stamps:  Trust God - SU
Paper:  white, hawaiian shores, hibiscus burst, berry sorbet, summer sunrise, scarlet jewel - PTI
Ink:  Ranger Distress Tubbled Glass, Ranger Archival Jet Black
Accessories:  dies - Hibiscus- MFT,  Stitched Mats Rectangles - Lil' Inker Designs, glue pen, foam tape.

Old Salt Birthday 
Stamps:  Ocean Bound - Waltzingmouse
Paper:  Kraft - PTI
Ink:  Archival Jet Black and Coffee
Accessories:  foam dots