Saturday, May 15, 2021

May CAS Christmas Card Challenge - Mid Month Reminder

 Hi everyone!  I'm here today to remind you there is still time to join in the May CAS Christmas Card Challenge.  Hostess Christine would like us to use Foliage and Berries this month.

Here's my card.
I used the same die cut base that I used for my 1st card this month (Noted: Scalloped Square from PTI)  - all three layers are in the die set.  It creates a 3 3/4" square card. I love this die and use it a lot!
 I die cut the holly with Winter Leaves from Sizzix.  The holly and berries and dots are all cut from glitter cardstock from Michaels.  I also cut the holly out of white fun foam and glued it to the green glittered holly so it pops it up off the card.  
   
You have until 5/24 to link up your Foliage and Berries card!  Please join us at CAS Christmas!


Stamps: Nordic Winter - Waltzingmouse (retired)
Paper: White - PTI, red and green glitter cardstock - Michaels
Ink: Barn Door Archival Distress - Ranger
Accessories: Winter Leaves Thinlit Dies - Sizzix, Noted: Scalloped Square - PTI, white fun foam.

Thursday, May 6, 2021

A Trucker's Birthday Card

 Today I have a fun pop up box birthday card I personalized for a friends' grandson, Logan, who is turning 4 and loves trucks!

I used the Scalloped Box Card Pop Up Die from Lawn Fawn.  It's really easy to put together AND it folds flat to fit inside a regular A2 envelope.  

(Lawn Fawn has great YouTube videos of how to assemble all their dies)

I adhered dimensional truck stickers from Michaels on the two 'roads'. I glued some hearts and stars (from the die set) onto thin strips of clear acetate and adhered them on the 'roads' so they look like they are floating in air.  I also added them to the sides and back panel.
The DP is Petite Places Patterned Paper Collection and Black and White Basics - both from PTI (both retired I think)
The 4 was made with By the Numbers dies from PTI and I used Alphanumeric Tiny Type Upper dies from Tim Holtz/Sizzix for LOGAN.
Here's the view from the bottom.
Here it is folded flat - ready to slip into an envelope.  I put two postage stamps on this when I mail them as it's a little thicker than a card - but check with your Post Office for exact postage needed.
I'm linking my Truck card to:

Stamps:  Birthday Basics - PTI
Paper:  WHite, True black, Pure Poppy, Harvest Gold, Clear Acetate, DP Petite Places Patterned Paper Collection, Bladn and White Basics - PTI, Blue Glitter Paper - Michaels.
Ink:  Obsidian - Altenew.
Accessories:  Scalloped Box Card Pop Up Dies - Lawn Fawn, By the Numbers Dies - PTI, Alphanumeric Tiny Type Upper Dies - Tiim Holtz/Sizzix, ScorTape, Ultra Bond Adhesive - iCraft, Dimensional Truck Stickers - Michaels.

Tuesday, May 4, 2021

Creating with Eileen Hull's Sizzix Dies and Unexpected Supplies

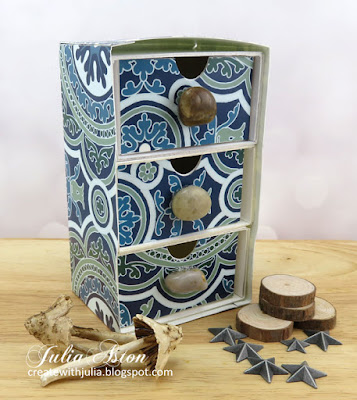
 This month Eileen Hull has asked her Inspiration Team to make things using her dies with unexpected supplies.  After thinking about this for quite a while (!)  I decided to make a storage unit for some of the bits and bobs in my craft room using Eileen's Treasure Box Die and her Stacking Drawer Die

(I'll actually need about 100 of these for all the bits and bobs I have!)

My unexpected supplies?   A plastic/vinyl placemat for the box and drawer fronts and smooth river rocks for handles on the drawers!


The box measures 5 1/4" high x 3" wide x 2 1/4" deep 
(I trimmed down the depth of the box as shown further below)
View from the back.
I put some Idea-ology things in my drawers -  the wonderful plastic toadstools , metal stars and tiny wood slices.
Each drawer is 2 3/4" long  x 2" wide x 1 1/2" deep.
Here's how I made it.
These are the two dies used as well as the placemat.  Stacked Drawer and Treasure Box.
I die cut the box out of the placemat (not the cover) as well as the front panel of the drawer.  
I die cut the surround piece of the drawers out of matboard and the pieces for the drawers themselves out of watercolor paper.  The water color paper is stiff but not as thick as the matboard .  
I found that if I cut the drawers out of matboard, it was hard to pull the drawer in and out of the surround piece.
Below, the notched white pieces are the drawers and the small rectangles are the drawer bottoms.  The longer scored white pieces are the 'surround' of the drawers.  
I cut 3 of each piece for the drawers, two of the box sides and one bottom.
I folded the box pieces on all the score lines and put ScorTape on all the tabs. The score lines were scored perfectly on the plastic mat and it did not crack when I folded them.  
Then I assembled the box by attaching the shorter sides together at the tab.
and placed the bottom piece on the outside along the tabs that had ScorTape on them. 
This is how it looks on the inside.
This is how it looks on the outside.
So that finishes the box piece (accept for trimming down the depth shown later below)
Now onto the stacked drawers.  
I added ScorTape to one of the ends of the drawer surround that was cut from matboard and assembled three surrounds overlapping the two ends.
I put ScorTape on both of the long sides of the middle piece to adhere the 3 surround pieces on top of each other being careful to line them up as evenly as possible.
I put a strong adhesive glue (Beacon 3 in 1) on the bottom of the stack and on the sides (not on the top!)
and placed the stack inside the box all the way to the back of the box.  
The box is deeper than the surrounds so I first cut the corners to about 1/4"above the surrounds and then cut across each side until the box was just slightly past the surround. The plastic is stiff, so it's easier to cut across each edge a little at a time until you are down to about 1/4" past the surrounds.  
I used my sturdy Tonic scissors to cut through the plastic cleanly.
I put clothespins along the glued sides to hold them until the glue had time to set (an hour or so).

While the glue was drying,  I assembled the 3 drawers that I had die cut out of watercolor paper.  I put ScorTape on all the tabs, adhered the smaller side tab to the other end of the drawer piece and then placed the bottom piece over the bottom tabs from the outside of the drawer 
(just like when assembling the box)
I adhered the front panels I had cut out of the plastic place mat on the fronts of the drawers using Ultra Bond Adhesive.

I used the strong glue again to glue the polished stones to the front of the drawers and let them sit overnight to be sure they were dry as they would be pulled to open the drawers.  
I chose stones that had a flat surface on one side to adhere to the drawer and also large enough to pull with my fingers to open the drawer!
There is a little space at the top of the drawers as the box is a tad taller than the 3 stacked drawers, that's why I didn't glue the top of the drawers to the box.  
Using the colorful plastic/vinyl placemat gives the box a pretty design, is light weight but strong and waterproof, so it makes for a great case for my little storage drawers and the stone drawer pulls give it a little 'character'!  
(even though you COULD open the drawers just by putting  your finger in the cut out on the drawer front)

What kind of unexpected supplies do you have around your craft room that you might create with??!

Please stop by Eileen Hull's Blog every Wednesday during the month of May to be inspired by her Inspiration Team creating with unexpected supplies!


Paper: Little Sizzles Matboard - Sizzix, water color paper - Canson Cold Press
Accessories: Treasure Box Die, Stacking Drawer Die - Eileen Hull/Sizzix, plastic/vinyl place mat - The Dollar Store, polished stones - JoAnn, Scortape, Beacon 3 in 1 Advanced Craft Glue, Ultra Bond Adhesive - iCraft, Tonic Scissors, Toadstools, Wood Slices,  Adornments: Metal Stars - Tim Holtz/Idea-ology.

Monday, May 3, 2021

May CAS Christmas Card Challenge - Foliage and Berries

 Today's the day for the May CAS Christmas Challenge to be posted.  Christine is our hostess this month and she would like us to use Foliage and Berries  on our clean and simple cards.

Here is the card I created.  I used the Holly Joy die from Frantic Stamper, cutting it out of white card and also out of black fun foam.  I glued the two pieces together to give it depth and added die cut berries from Winter Leaves by Sizzix.  The berries were cut out of red glitter cardstock from Michaels.  The card base was cut out of white card using Noted: Scalloped Square die from PTI.  The background layer was cut with Marvelous Squares - an older Spellbinders Die.

Here's a view from the side showing the depth the black foam adds.

Please join us this month to get a head start on your Christmas cards!  You'll find the challenge details, lots of inspiration from the Design Team and our lovely May Guest Designer, Robyn,  all over at CAS Christmas!


Paper: White - PTI, red glitter cardstock - Michaels.
Accessories: Holly Joy Die - Frantic Stamper, Berries from Winter Leaves Thinlit Dies - Sizzix, Marvelous Squares Dies - Spellbinders, black fun foam.

Sunday, May 2, 2021

April's Card Chain Challenge Reveal

 Today is the day of the April Card Chain Challenge Reveal - the day they post all the cards sent and received by participants in the challenge.  People join from all over the world each month.  You have to sign up by the 6th of each month and if you sign up, after the 6th of that month you get the name of someone to send a card to and someone gets your name to send you their card.  You contact each other by email to get the snail mail addresses.   The challenge has options for your card design each month (colors, sketch, theme, product used) but you only have to use one of the suggestions.

This month I sent a card to Alex in Germany - so I used some of my Tim Holtz masculine images.  I hope he likes it!

This month I used the sketch, the colors (brown, purple, green), one of the themes - Funny, and for a product - a die cut (hat and bowtie!)
I simply stamped the Professor from the set called Professor by Stampers Anonymous, onto a panel of barn wood patterned paper, masked him and stamped the wheel from the same stamp set so it looks like it's behind him.  Then I die cut the hat and bow tie from The Gent die set from Sizzix out of glitter paper and black Krart Stock paper and adhered them with foam dots - they just happened to be the right size to fit him!   I pressed 3 small wooden stars into Walnut Stain Distress Ink and adhered them inside the circle.  And then for the 'funny' part, I adhered this Snarky Small Talk Sticker.

So come join in the fun and sign up some month over at The Card Chain Challenge - send a card and get a card!  You can try it out once and if you don't enjoy it, you don't have to join in again, or you can come back another month after not participating for a while.

I'm also linking my card to NBUS:
The stamps and dies were used for the first time even though purchased a while ago!


Stamps:  The Professor - Tim Holtz/Stampers Anonymous
Paper:  White card stock- Papertrey Ink, Glitter Card stock - Michaels, Black Kraft Stock Paper Pad - Tim Holtz/Idea-ology, DP Marble Paper Pad - JoAnn.
Ink:  Obsidian - Altenew, Ranger Distress Walnut Stain.
Accessories:  The Gent Thinlits Die set - Tim Holtz/Sizzix, Snarky Small Talk Stickers - Tim Holtz/Idea-ology,  little wooden stars - Hobby Lobby, foam dots.