Saturday, December 31, 2011

Wishing you a Happy & Healthy 2012!

Hi stampers!   Just popping in to wish everyone a very Happy and Healthy New Year!  As the years pass - I realize just how important good health is!

Here's a card I made today for the Inspiration Challenge over on Split Coast.
The inspiration Etsy Shop that Steph had for us was called Embroidery Everywhere and I was inspired by this Asian doll .

As I stated on my last post - I've been cleaning out my stamping room and came upon a sweet set of Four Chinese Dolls by Hero Arts - perfect for my inspiration!

I stamped the row of flowers across the card and colored them with Copics. Then I dry embossed a rectangle Nestability on the card. I stamped and colored my Chinese Doll, cut her out and layered her inside the frame with foam tape. My card is 4 1/4 x 4 1/4 (my favorite size to make!)

Then I added Tiny Twinkles to the flowers and to her robe. I stamped the Chinese symbol for Health in the corner. I will use this as a get well card!

Kent and I are going out to an early dinner at a new Thai Restaurant in the next town over from us - called Spice.  Then we'll be home on the couch watching the ball drop on TV (if we can stay awake that long!!) - safe and snug in our warm home - (which I'm SO thankful for!)

What are your plans for this New Year's Night???

Stamps: Hero Arts - Four Dolls & Tiny Chinese Wishes
Paper: white - PTI
Ink: Memento Tuxedo Black & Bahama Blue
Accessories: foam tape, Copics - B00, B24, R20, R29, E50, Y17

Thursday, December 29, 2011

The Princess and the Purse

I'm in the midst of cleaning out my craft room -  I have so much 'stuff' in there I have no room to stamp and no place to put my new goodies (I see other heads nodding!).  I've already filled 5 big boxes with stamps I no longer use and haven't even put a dent in the room!  It seems like an endless job - but I'm trying to do one section at a time and not think about now much more there is to go.  I know it will be worth it when I can stamp in a less 'cluttered' environment!

So -  here are 2 creations I did manage to create in the clutter -  both for Split Coast Challenges this week.

This little fairy birthday card was made for  3 challenges -  I was inspired by this  fairy from the Urban Art Loft from the Inspiration Challenge, the Ways to Use it challenge was to use a digital image and I was also inspired by this week's Queen for the Day Barbara's pretty cupcake thank you card  .   I was inspired by her framing her image with a Nestability, using a dotted background and using a banner for her sentiment.

I changed the size of my card to 4 1/4 x 4 1/4.  My Godchild looks just like this adorable fairy Tabia from Mo's Digital Pencil - so this will be for Eden's next birthday! (it's not till November so I hope I remember where I put it by then!)
And I made a little leopard purse for the Tuesday Teapot Challenge -  Our inspiration was a leopard teapot!
You will find this week's Teapot Tuesday challenge here in the SCS forums.

I used a purse die by PTI to create my little bag - cutting it out of cocoa card stock and layering some leopard patterned paper over it.  I added 3 ceramic brads with punched stars behind them down the center. My tag is a stamp from the Afternoon Tea set by Waltzingmouse . I tied it around my wrinkled seam tape bow with some book twine.

This will go to a friend with either a little cookie/candy treat, teabags or maybe a gift card inside!

Fairy Birthday
Stamps:  Fairy Tabia - digi image by Mo's Digital Pencil, Sentiment from MFT Pure Innocence-Birthday Princess
Paper: white, lavender moon, textstyle bitty star basics - PTI
Ink: Memento Tuxedo Black, Ranger Distress Weathered Wood
Accessories: Copics - E00, E37, R20, RV23, RV11, BG10, Star Circle & Nested Lacey Pennants Nestabilities, Rhinestones - Kaiser, foam tape.

Leopard Purse
Stamps: Waltzingmouse - Afternoon Tea
Paper: Vintage Cream - PTI, Close to Cocoa & Choc Chip - SU, unknown DP
Ink: Archival Coffee, Ranger Distress Tea Dye
Accessories: wrinkled seam tape, book twine & purse die - Papertrey Ink, ceramic brads - Basic Grey, Scotch Quick Dry Adhesive, Micron 01 fine black pen, star punch - McGill

Monday, December 26, 2011

Clean and Simple Snow!

I've been missing a bit here on the old blog - I'm on vacation for two weeks - just at home - busy with holiday preparations and celebrations - some babysitting of one of my sweet grand-nephews - 7 month old James Charles - seen here playing happily with his feet!
- going out to lunch with  my sister at Pickity Place - and today I went to see the Sherlock Holmes movie with my dear husband Kent! - Wednesday I have plans to meet my stamping friend Anne (jdmommy) for lunch and I still have 7 more days off!

I have been stamping though -  and here are two I made for Split Coast challenges - both oddly enough involving snow! (although our ground is bare here in New England we did have some flurries on Christmas Day!)

This card was made for the CAS challenge (to make a window card) as well as the Technique Lovers Challenge - to make a simple thank you card.  I used 3 new toys on this - the Small Madison Window die, the Snowfall die and the Country Landscape die.  I sponged the window and the landscape with Antique Linen.  I love how this came out!
My second snow card is also a thank you card -  made for the Color Challenge which is Night of Navy, Bashful Blue and White with the dessert option of using glitter (that I put on the punched snowflakes!)
The flight pattern stamp is from Little Lady set by Papertrey Ink, and the Thank You is from Join Us set by Waltzingmouse.

Thanks so much for stopping by today!
Window Card
Stamps: Waltzingmouse - Thank You from the set Join Us
Paper: White - PTI
Ink: Versafine Onyx Black, Ranger Distress Antique Linen
Accessories: foam tape, Small Madison Window Die - Poppy Stamps, Snowfall and Country Landscape Die - Memory Box

Snow Flake Card
Stamps: thank you from Join Us by Waltzingmouse, flight line from Little Lady by PTI
Paper: white - PTI, bashful blue - SU
Ink: Night of Navy - SU, London Fog - Memento
Accessories: Snowflake punch and Coarse Glitter - Martha Stewart, foam tape, glue pad - Pallette

Tuesday, December 20, 2011

A Snow Globe, Gingerbread Men and a Rosette!

Hi fellow stampers!   Here are 3 cards I made in between baking for various Christmas celebrations this week!

First up is a fun snow globe - made for the Try a New Technique challenge over on Split Coast - to make a snow globe!  I cut a circle Nestability, stamped George the Snowman, colored him with Copics and then inked the image with my Palette Glue Pad and covered it with Dazzling Diamonds.  I embossed the card base with Swiss Dots.  I used the SU Key Tag punch for the base of the globe.
 Next is my card for Cindy's SCS Teapot Tuesday Challenge - which was a gingerbread man teapot.  I made a Many Thanks card and used my many gingerbread men stamp for it!
And finally my card for the SCS Color challenge -  a birthday card with a paper rosette flower.
Ok -   enough distraction!   I'm off to wrap some presents!

Snow Globe
Stamps: Rubbernecker - Snowman George #594-02, Let It Snow #151 SO
Paper: white, blueberry sky, black - PTI
Ink: Versafine Onyx Black, Ranger Distress Fired Brick, Palette Stamp & Stick Glue Pad
Accessories: Circle Nestability, foam tape, Swiss Dots Embossing Folder, small oval and key tag punches - SU, Dazzling Diamonds - SU, Copics - BG10, YG17, YG63, RV11, C6, R59, YR04 

Gingerbread Thanks
Stamps: Waltzingmouse - Candy Jar Christmas Fillers, sentiment from Frame It
Paper: White - PTI, More Mustard - SU
Ink: Versafine Onyx Black, Ranger Distress Tea Dye
Accessories: square Nestabilities, Copic - R29, Rhinestones - Kaiser, Tiny Twinkles - Taylored Expressions, Foam Tape. 

Birthday Rosette
Stamps: Papertrey Ink - Birthday Basics
Paper: White, Textstyle Bitty Dot Basics - PTI, Lucky Limeade, Calypso Coral - SU, DP Capetown Scenic Route Paper Co
Ink: Versafine Onyx Black
Accessories: rhinestones - Kaiser, sizzix Leaf stem die, thick foam tape, thick glue dots, Paper rosette die - Tim Holtz Alterations

Sunday, December 18, 2011

Sisterhood Sundays - An Inspiration Challenge

Hello Stampin' Sisters!   It's Sunday and time for another Sisterhood Sundays Challenge!  This week we have an inspiration photo
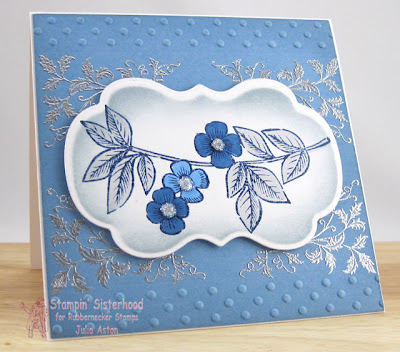
So pretty in the blues and silver isn't it?!     I'm really done with all the holiday/Christmas theme cards at this point -  so I let the colors inspire me,  not the theme - and created this card:
I clear embossed the Kolo Berry image that I inked with Chipped Sapphire Ranger Distress Ink (this ink dries slower so you can emboss with it!)  I cut the image with Nestabilities 14 and sponged the edges before taking it out of the die.  I colored the image with Copics and added Silver Stickles to the centers of the flowers.

I silver embossed the Ivy Frame on blue cardstock and embossed the edges with a dotted strip.

I adhered the die cut image to the blue panel with foam tape, then adhered the panel to the card.

This would make a lovely thank you note don't you think?!

This is also for the Featured Stamper today over on Split Coast - where I CASE'd this card of Bonnie's.

I hope you'll join us in the Sisterhood Sunday Challenge this week -  you could be chosen a Sunday Sister and win a stamp from Rubbernecker -  check it out here!

Stamps:  Rubbernecker - Colo Berry #531-10, Ivy Frame #557
Paper:  White, Blueberry Sky - PTI
Ink:  Ranger Distress Chipped Sapphire & Weathered Wood, Versarmark Watermark Ink.
Accessories:  Clear Embossing Powder, Silver Embossing Powder, Hot gun, Copics: B34, B37, N2, Silver stickles, Labels 14 Nestabilities, embossed dots - Just My Type Provo Craft Embossing strip.

Saturday, December 17, 2011

The 12 Tags of Christmas #12 - Finally!

I finally finished up my 12th Tag of Christmas from Tim Holtz Challenges!  Preparations for Christmas sort of took me away from my craft table - but I was determined to get it done!  You can see Tim's 12th tag here along with all his instructions for the various techniques he uses -  including making the pretty tissue paper flower!

Here's my Tag #12:
I didn't have Tim's printed tissue paper - so I stamped music from  Musical Backgrounds on plain white tissue and glued that to my card base that I had stamped with a text stamp from Text It.   I used sparkly Thicker Letters.   Instead of a white figurine -  I used a tree and reindeer that I had made from Shrink Plastic when I was using that technique on my Tag #11 (that was SO fun!) The sentiment stamp is from VIP Inc.

I'll be back tomorrow with my card for the  Stampin' Sisterhood Sunday Challenge -  hope you'll join in!

Stamps:  Waltzingmouse - Text It, Musical Backgrounds,  VIP Inc - Sentiment
Paper:  white - PTI,  thin coaster, Shrink Plastic
Ink:  Versafine Onyx Black, Ranger Distress Walnut Stain,  Picket Fence Distress Stain, Adirondack Cloudy Blue Acrylic Dabber, Alcohol Inks - Rust, Lettuce.
Accessories:  Thicker Letters, glitter eyelash yarn - Martha Stewart, glue dots, wrinkled seam tape, Glossy Accents, tree & reindeer - Sizzix Dies, star button from stash, Melting Pot - Ranger, Ultra Thick Embossing Enamel.

Friday, December 16, 2011

Chanukah Baskets for the Bosses

Today I wanted to share the baskets I decorated and filled for the 3 doctors I work for.   They celebrate Chanukah and every year I like to create something special for them. I got the plain blue baskets at The Christmas Tree Shop for $2.99 each.  The basket is 9 1/2" tall and 8" wide.

I adhered the striped May Arts Ribbon around the top, tied the Glitter Eyelash yarn (Martha Stewart from Michaels) over the ribbon in a bow and added a paper flower I made out of sparkle tissue paper.  I just learned how to make these simple flowers on Tim Holtz blog when he made one on his12th Christmas Tag.
I strung the tag on the basket with the same glitter yarn.  The stamps I used on the tag are from the Mazel Tov set by Papertrey Ink.  I silver embossed the images and added Yellow Stickles to the flames.
I filled the baskets with home made goodies:    
Star of David Sugar Cookies wrapped in a flat bottom clear bag.
home made fudge wrapped in a clear acetate box.  (you can find my simple, delicious fudge recipe here)
and Pecan Rum Cake Bundtlettes with a label added to warn receivers they contain nuts!
Here's the basket filled to the brim with the goodies!


Amazing what a little ribbon, a flower and a tag can do to dress up a plain basket isn't it??!!
I have made these Rum Cakes every Christmas season since I found this recipe in a magazine several years ago.  They are super easy and 'out of this world' delicious!


Bert's Rum Cake
Makes 1 large bundt cake or 12 Bundtlette cakes 
 
1/2 cup chopped pecans
1 box yellow cake mix
1 box (3.4 oz) vanilla instant pudding mix
1/2 cup light rum
1/2 cup vegetable oil
1/2 cup water
4 eggs
 
GLAZE
1 cup sugar
1 stick unsalted butter
1/4 cup light rum
1/4 cup water
 
Preheat oven to 350.  Spray a 12 cup bundt pan or 2 - 6 bundtlette pans with cooking oil spray with flour.  Sprinkle chopped pecans over bottom.  Stir cake mix and pudding together in large mixing bowl.  Add rum,  water, oil and eggs.  Beat for 2 minutes with an electric mixer.  Pour cake batter over nuts and bake for 45-50 minutes.  If you are making the smaller cakes, spoon batter evenly into each mold (about 2/3 cup each) and bake for 20 minutes.
 
5 minutes before cake is done, prepare the glaze.  Place sugar, butter, 1/4 cup rum and 1/4 cup water in a saucepan and boil for 3 minutes, stirring occasionally. 
 
Remove cake(s) from oven and slowly drizzle the glaze over the top while cake is still hot.  It will take several applications to use all the glaze.  Cool cake in pan for 30 minutes before unmolding.  Finish cooling on a wire rack.
 
Yum!!

You can see the gifts I've made in past years for the doctors here and here.

Wishing a very happy Chanukah to all those who celebrate -  starting next Tuesday at sundown.

Thursday, December 15, 2011

Waltzingmouse and Moxie Fab Stamp of Approval!

Yikes!  Have you seen the Moxie Fab World today??   Cath Edvalson is showcasing Waltzingmouse holiday stamps!
In honor of the day I made a card using two of the featured sets:
I cut an opening in the card with an Oval Nestability, then embossed the opening with a larger Oval.  I inked around the edges with white craft ink just to highlight the embossing a bit.

Here's the inside when you open the card.
The Santa and 'No Peeking' stamps are from Santa's Coming to Town.  The square poinsettia and Merry Christmas are from Nordic Winter.

This is also my Christmas card for the Waltzingmouse Forum Monthly Christmas Card Challenge -  to make a no layer card.  Come join this fun challenge in the WMS Forum!  What a great feeling to have all of my Christmas cards made and ready to mail!  We'll be starting all over again in January!

And now - hurry over to the Moxie Fab World and check out the Waltzingmouse post - that's where I'm going!!

Stamps:  Waltzingmouse - Santa's Coming to Town, Nordic Winter
Paper:  Pure Poppy - PTI
Ink: Versafine Onyx Black, Whisper White Craft Ink - SU
Accessories:  Oval Nestabilities, Rhinestones - Kaiser, Q-tip (to apply the Craft ink)

Monday, December 12, 2011

12 Tags of Christmas #11

I'm on the home stretch with Tim Holtz's 12 Tags of Christmas Challenges -  I have #11 for you today and I'm working on #12 and will post it soon!

You must go see Tim's tag #11  then see how I used what I had to recreate it in a slightly different way!   He has a video showing how to use the Melting Pot, UTEE (Ultra Thick Embossing Enamel)  and shrink plastic to make the pretty holly on my tag.  See it on the top left there?   I was SO glad that I had bought the Melting Pot several years ago and had it in a drawer in my craft room!  NOW I know something fun to do with it!
I used another German Paper Santa Image (see yesterday's tag) on this tag since I didn't have Tim's fun retro Santa stamp.  The tag is made with glossy card stock, sponged, dried - then flicked with water to make the droplets! - ANOTHER cool technique I learned!  My sentiment is from Twas the Night Before Christmas set by Waltzingmouse - and goes perfectly with my Santa I think!   Here is Santa - on Christmas Eve - bringing presents and even a little tree!

It's a good thing we have come to the end of Tim's challenges -  I really need to get cracking on decorating some baskets for my bosses and co-workers food gifts!!   I just have to finish Tag #12...............

Stamps:  Waltzingmouse - Twas the Night Before Christmas
Paper:  glossy white - SU
Ink:  Versafine Onyx Black, Ranger Distress - Chipped Sapphire, Broken China, Faded Jeans, Festive Berries, Peeled Paint, Adirondack Alcohol Inks - Lettuce, Rust.
Accessories:  Ranger Melting Pot, UTEE, vintage paper Santa - The Paper Source, rhinestones - Kaiser, wrinkled seam tape, foam tape, Glossy Accents, Holly Branch Die - Tim Holtz Alterations Sizzix

Sunday, December 11, 2011

12 tags of Christmas - #9 & #10

Well - I've had a festive weekend - on Friday night - my husband's holiday work party at a local Chinese Restaurant and on Saturday night - a dinner with friends before going together to the Melrose Symphony Christmas Concert.

In between the fun events I was still working on Tim's Tags - in bits and pieces (of course!  does a stamper EVER stop stamping when they are busy doing other things?!)

So please check out Tim's Tag #9 and see how he cut up his Candle Fright die to make his candlestick.

Here's my version of Tag #9.
I did not have his candle die - so I dug out my really old Sizzix birthday candle die (first time I've used it!!)  I die cut it out of a thin coaster, painted the candle with acrylic white paint and the flame with Wild Honey Distress Ink.   Then I covered the candle with Glossy Accents and the flame with Yellow Stickles.    When the candle had dried - I put some Liquid Applique along the top to create the 'drips' of wax.

For the candle base I die cut an Elegant Post from Spellbinders and covered it with Glossy Accents.  I turned it on it's side and adhered it to the tag.  The swirl to the left is a piece that came out when I die cut the post - you can see where it would fit in to the right....

The tag base is made by stamping a Victorian Damask Panel by Rubbernecker with Evergreen Boughs Distress Ink, clear embossing it, then sponging over the tag with Festive Berries Distress Ink - and clear embossing the whole tag.   This makes the damask design double thick with embossing and the tag base clear embossed.  I just love all the new tricks I'm learning from Master Tim!

Tim's Tag #10 goes back to a nostalgic look with a musical background and vintage Santa clip art.

Here's my version of Tag #10
I didn't have the clear acrylic frames so I didn't do his technique for the Santa's -  I had these wonderful paper images made in Germany that I adhered to white card stock and then covered with Glossy Accents.  After they dried I cut around the edges and sponged with Brushed Corduroy.

My music stamp is from Musical Backgrounds, the pine bough at the top and bottom of the tag is from Festive Foliage and the sentiment "You're on my "Nice" list" is from Secret Santa - all from Waltzingmouse.

Just two more days of tags -  I'm working on #11 now!

Tag #9
Stamps:  Rubbernecker Victorian Damask #498
Paper:  White - PTI, Green Kraft Core - Coredinations, thin coaster.
Ink:  Ranger Distress - Wild Honey, Evergreen Boughs, Festive Berries, Vintage Photo.
Accessories:  sander, chip board Thickers letters,  Sixxiz Candle die, elegant posts - Spellbinders, Liquid Applique, Glossy Accents, clear embossing powder, hot gun, lace netting, yellow stickles, Holly Branch & Tattered pine cone Dies - Tim Holtz Alterations Sizzix.

Tag #10
Stamps:  Waltzingmouse - Musical Backgrounds, Festive Foliage, Secret Santa
Paper:  Rustic Cream PTI
Ink:  versafine onyx black, Ranger Distress - Forest Moss, Brushed Corduroy
Accessories:  gold Perfect Pearls in Mini Mister, netting, metal ball buttons, clear embossing powder, hot gun, glue dots, Ribbon Banners - Spellbinders, wrinkled seam tape, Glossy Accents, santa prints made in Germany, glitter eyelash yarn - Martha Stewart,

Friday, December 9, 2011

The 12 Tags of Christmas - #8

Well, Tim's Tag #8 was the hardest one yet for me - all kinds of nuts and bolts and images that I didn't have - it made me realize I can do grunge a little bit but I'm not hard core!!?! There was WAY too much 'stuff' on his tag - I just couldn't put that much on mine....and I had to soften it up a little by using green sparkly letters and numbers instead of black!
So here's my version:
I didn't have any of the dies or metal that Tim used -  so I improvised - using half of a Floral Doily Motif Spellbinders die, a piece of chipboard and a watch stamp for my circle layers.    I didn't have the 3 dapper guys so used a vintage biker from Rubbernecker.  I did have a metal steering wheel charm and a crown charm so I stuck those on!

And I actually like this now that it's done - growth is always painful I guess - even when it's artistic growth!!

Stamps:  Rubbernecker - bicycle man from Paris set #527,  Believe from Fall Trilogy Set #480, Watch from Clowns and Crowns set #528.
Paper:  white - PTI, acetate brick wall -screen prints Hambly, thin coasters
Ink:  Versafine Onyx Black, Ranger Distress - frayed burlap, walnut stain, iced spruce, festive berries, everygreen bough.
Accessories:  sparkly thickers, ticket, crown charm - Mark's Finest Papers, steering wheel charm - Karen Foster, green cord and wrinkled seam tape - Prairie Bird Boutique Etsy Shop, foam tape, glue dots, ScorTape, floral doilly motif die - Spellbinders..

Thursday, December 8, 2011

The 12 Tags of Christmas - #7

Wow - I thought I was done in with Tim's Tag #7  - I don't have any Kraft Glassine paper (I didn't even know it existed!!) and I don't have the holly die (yet....... it's in the mail!!) but...... I did have some plain glassine envelopes (like the ones the Post Office puts your stamps in) and the alcohol inks so I tried using that instead!
I used the alcohol inks on the glassine envelope and it worked like a charm - they just come out a little more transparent than Tim's because they aren't Kraft based  - I free hand cut some holly leaves, crumpled them up and inked them with Vintage Photo.  I had some red beads in my 'beads & buttons" box for the holly berries (one was already on a little piece of wire - so I used that to wire the 3 beads together and wrap them around the scrap of lace!).  The pearl bauble at the top is a clip on earring and the silver ball is a button, both from my dear Mother-In-Law's button box that I inherited - I'm so happy to use them on something!  The lovely silver cloisonne thread was hers also.

Not having Distress Stains -  I put drops of Pumice Stone and Antique Linen re-inkers on my craft mat - spritzed them with water and dragged my tag through it - I think it gives pretty much the same effect as the stains.  I used my Bare Tree die from Sizzix for the twigs - painting them gold, dabbing them with white acrylic paint and adding some silver stickles.

Not having Tim's stamps -  I stamped a crackle panel by Rubbernecker on the tag for background and my sentiment is from Seasonal Remedies by Waltzingmouse - it says "Tincture to aid in the attainment of PEACE on Earth"

I learned a lot of fun techniques with this tag today!   I'll definitely be looking for some of that Kraft Glassine paper!

I've got some evening events coming up the next couple of days (A Christmas party and a Christmas Symphony!) - so I'll probably be posting two tags at a time every other day over the weekend - I hope I can keep up!

Stamps:  Sentiment from Seasonal Remedies - Waltzingmouse, crackle background panel #574 - Rubbernecker.
Paper:  white - PTI, glassine envelope
Ink:  Distress Inks/Vintage Photo, Frayed Burlap, Alcohol Inks - Stonewashed, lettuce, pesto, gold mixative, alcohol blending solution, Distress Embossing Ink.
Accessories:  hot gun, glittering eyelash yarn - Martha Stewart, red beads, wire, pearl earring, silver bead button - from my stash, glue dots, scortape, lace - Mark's Finest Papers, Sizzix bare tree die, silver ice stickles, acrylic paints - white, gold, black embossing powder. cloisonne thread.

Wednesday, December 7, 2011

The 12 Tags of Christmas - #6

I can't believe we are half way through with the tags -   I honestly was wondering if I could do them all at this busy time of year -  but they are actually working up pretty quickly.  And they are really taking me out of my comfort zone (of CAS)  into the grungy artsy look - and I'm lovin' it!

Having said that -  when I first saw Tim's Tag #6 -  I wasn't overly excited about it - the colors he used weren't pleasing to my eye -   I didn't know what I could use instead of the embossing folder he had and I wasn't sure the metal sheets I had would work...... but then I got home - assembled what I had that I thought I could use -and created my tag #6!
I found a sheet of metal aluminum, got out this Sledding embossing folder from Provo Craft (which I have NEVER used until today!) grabbed 4 random acrylic paint colors that I thought would be a little winter/Christmas/festive  (Lettuce, icy white, Raspberry, Yellow Ochre and black), painted over the embossing, let it dry, sanded it, sponged it with Walnut Stain and clear embossed it -  AND I LOVE IT!!!

My rusty heart was already colored and rusted (I had a package of them - from Michaels I think)  and I used a snowflake rub on  from Stampin' Up on it to tie in the snowman theme.

Thanks Tim for pushing me way out of my comfort zone and showing me ways to use all the 'stuff' I have accumulated in my craft room!!!  Gosh - every day I can't wait to see the next tag!

Paper:  Smokey Shadow - PTI, glossy card stock - SU, aluminum metal sheet - Making Memories.
Ink:  Ranger Distress - Walnut Stain
Accessories:  acrylic paints - Lettuce/Adirondack, Black/Plaid, Ivy White & Ochre/Folk Art, Raspberry/Anitas,  sanding block -SU, clear embossing powder - Ranger, hot gun, Allegro & Sledding embossing folders - Provo Craft, wrinkled seam tape - Prairie Bird Boutique Etsy Shop, rustic heart - Michaels, rub on snow flake - Stampin Up.

Tuesday, December 6, 2011

The 12 Tags of Christmas - #5

Wow - I'm up to tag #5!  Keeping pace with the Master Tim!  Check out  Tim's blog for his tag and his description of all of the wonderful techniques he uses!   I get so excited each day when I see his tag - thinking about what supplies I have and I can't wait to get home from work and get into my craft room!!  Here's my Tag #5.
I did not have a 'backwards stamp' sentiment so I couldn't use his alcohol inks on acetate technique.  Instead - I used the alcohol inks (Cranberry, Wild Plum and Rust) on a piece of glossy card stock, then white embossed my sentiments on top!

I used three sentiments from Compliments of the Season by Waltzingmouse.

I do have the Regal Crest Die  he used for the wreath (Yippee!) and the Lettuce Paint Dabber so I made the wreath pretty much like he did adding the pearls and the ribbon.  I even had the netting to loop through the top!

I love how this came out!   so festive and Christmasy! Between the glossy card stock, the alcohlol inks and the white embossing - this tag is REALLY shiny IRL

Stamps:  Waltzingmouse - Compliments of the Season
Paper:  Glossy white card stock - SU, White - PTI,  rectangle coaster
Ink:  Adirondack Alcohol Inks - Wild Plum, Cranberry, Rust, Versamark.
Accessories:  Hot gun, glue dots, wrinkled seam tape - Prairie Bird Boutique Etsy Shop, white embossing powder, Regal Crest Die - Tim Holtz Alterations, netting - from my stash, sticky pearls - Michaels.

Monday, December 5, 2011

12 Tags of Christmas - Tags 3 & 4

Well I'm still on this wonderful creative journey of  Tim Holt's 12 Tags of Christmas! 
Tag #3
Check out all the details on Tim's blog for his Tag #3 -   Here is my version of it:
I didn't have a single multi-sentiment stamp like Tim had - so I used separate sentiments from Say It Loud - Winter Holiday, Sewing Box Hugs - Christmas, and Santa's Coming to Town..   My holly is from Festive Foliage.  All the stamps are from Waltzingmouse.  I used my Martha Stewart fern punch and the rhinestones are from Kaiser.

I mixed some gold Perfect Pearls powder with water in a mister and sprayed the tag giving it a little shimmer.  I embossed the top half of the tag with my Swiss Dots just to cover up the empty spaces since my sentiments were smaller than Tim's! All the edges are sponged with Brushed Corduroy.

Tag #4
Check out Tim's Blog to see his 4th Tag and all of his cool techniques!   Here is my version:
I used a different snowman die and because my number dies were too big to cut out of Mr. Snowy like Tim did -  I adhered musical patterned paper to white card stock - die cut the numbers, covered them with Glossy Accents and adhered them on top of Mr. Snowy!.  I punched 3 snow flakes out of acetate, inked them with chalk ink and adhered them on the right side of the tag (not very noticeable in the pic!)

I inked my tag by dragging Stormy Sky and Weathered Wood ink pads over my nonstick craft mat, misting the mat with water and dragging my tag over it.   Then I stamped a snowflake from Very Vintage Christmas by Waltzingmouse randomly on the tag.  I inked the edges with Weathered Wood and Iced Spruce.

I die cut my snowman out of a piece of light cardboard (sort of like the back of a lined note pad) - not as thick as grunge board as my die wouldn't cut through that.  I covered him with Weathered Wood Distress Crackle Paint and let him dry!

I added netting to the wrinkled seam tape scarf and on the blue button - I just happened to have a piece in my 'stash'!! (I KNEW I saved it for something!)

The fiber at the top is a yarn called Glitter Eyelash by Martha Stewart I tied the metal tag around that with bakers twine.

Are you doing the 12 Tags of Christmas too??  Let me know - I want to come see them!!

Tag #3
Stamps:  Waltzingmouse - Say It Loud - Winter Holiday, Santa's Coming to Town, Sewing Box Hugs - Christmas, Festive Foliage.
Paper:  Shipping tag 3" x 6", white & Ripe Avocado - PTI
Ink:  Ranger Distress - Worn Lipstick, Brushed Corduroy, Iced Spruce, Evergreen Bough, Faded Jeans, Fired Brick, Mustard Seed.
Accessories: Rhinestones - Kaiser, Perfect Pearls Gold,  Water Mister - Ranger, twine - PTI, bell - Michaels (from wreath kit), Swiss Dots Embossing Folder - Provo Craft, fern punch - Martha Stewart.

Tag #4
Stamps:  Waltzingmouse - Very Vintage Christmas (snowflake)
Paper:  White, Clear Card Stock - PTI, music patterned paper - Provo Craft
Ink:  Brilliance Moonlight White, Ranger Distress - Stormy Sky, Weathered Wood, Iced Spruce, Embossing Ink.
Accessories:  Snowman Die - Sizzix, wrinkled seam tape - Prairie Bird Boutique Etsy Shop, foam tape, vintage buttons & Number dies & bakers twine - PTI, silver tag, fringe & netting  from stash, sticky pearls - Michaels, fiber & snowflake punches - Martha Stewart, Dazzling Diamonds - SU, Glossy Accents & weathered wood Distress Crackle paint- Ranger.

Sunday, December 4, 2011

Sisterhood Sundays - A Sketch Challenge

It's Sunday and time for another Sisterhood Sundays Challenge!  Today's challenge is a lovely sketch!
For my card -  I flipped the sketch and turned it on it's side!
I just love this festive group of little carolers singing on the snowy street on a cold winters night!  I made the moon behind them by die cutting a Nestability circle and using it as a mask that I  placed over the image and sponged around  -  then I removed the circle and sponged in the bottom area -  easy peasy! ........and quite a dramatic look don't you think??  I colored  my carolers with Copics.  I stamped the Holiday Greeting sentiment right on the card -   A quick CAS card!

Please check out the Sisterhood Sundays Challenge on the Rubbernecker Stampin Sisterhood blog for all the details of the challenge -   There are prizes to be won!

Stamps:  Rubbernecker - Carolers with dog and lightpost # 337-09, Holiday Greetings #23-11
Paper:  white, True Black - PTI
Ink:  Memento Tuxedo Black, Weathered wood Ranger Distress.
Accessories:  Circle Nestability for mask, Copics:  R05, R20, E00, E35, BG10, BG18, G19, W6, YR09, Y13, Y26.  Blending tool and craft mat - Ranger

Friday, December 2, 2011

Trying the 12 Tags of Christmas - Day 1 & 2

Ok -  so every year I hear of Tim Holtz's 12 Tags of Christmas 'thing' but for some reason I never checked it out or realized that he created a new tag each day on his blog for people to be inspired by.  I've also sort of NOT been into the whole grunge, over the top decorating of things as is Tim's style.

But....... over the past couple of years I've been experimenting with Tim's style on and off - and on the way - gathering more and more Tim Holtz/Ranger 'supplies'.   SO -  having seen a tag on my blogging friend, Susan's, blog where she linked to Tim's challenges -  I got inspired to give the 12 Tags of Christmas a try!

Day 1 Tag -   You really need to go to Tim's Blog to see his sample  - but here is my inspired tag.  I used a lot of his ideas but with the supplies that I had in my craft room.  I used his tattered flower die instead of his pine cone and I used some of his grunge board flourishes instead of the floral pieces.  My Noel letters are Thickers that were already blue and sparkly!

Day 2 Tag -  You can see Tim's tag here.  And below is mine.   I didn't have a deer die - so I used a Sizzix Snowman, cutting the hat and scarf piece out of felt and adding 2 brads for his eyes. .  I used a lot of Dazzling Diamonds on this tag so it looks pretty snowy IRL!
So now I have to go check out Tim's blog for Day 3!    If you join in -  remember to link your creations to the proper day's tag posting -   there will be prizes to win - and you have until 12/31 to get them all done -  check out all the details on Tim's Blog.

Tag Day 1:
Paper:  Coredinations Distress Collection - Tumbled Glass & Shabby Shutters, Hawaiian Shore - PTI
Ink:  Ranger Distress Ink - Iced Spruce, Evergreen Branch, Embossing Ink.
Accessories:  Floral spray - wedding section/Michaels, snowflake embossing folder - Provo  Craft, wrinkled seam tape - Prairie Bird Boutique Etsy Shop, Tim Holtz Ideology grungeboard elements - Flourishes, Thickers Glitter Letters - American Crafts, Regal Crest & Tattered florals  Sizzix Alterations dies, white embossing powder, hot gun, shimmer brad - Making Memories, Liquid Pearls - white opal, Dazzling diamonds - SU.

Tag Day 2:
Paper:  Rustic Cream - PTI, DP music paper Provo Craft, Coredinations Distress collection - Bruxhed corduroy, Ranger Claudine Helmuth canvas.
Ink:  Ranger Distress Tea Dye, Iced Spruce, Embossing Ink.
Accessories:  wreath - Michaels, brads - Imaginesce, felt - Michaels, Sizzix Snowman die, pine tree punch - EK Success, Scallop punch -SU, dazzling diamonds - SU, gingham ribbons and bell - Michaels, marichino twine - the Twinery, thick foam tape.

Thursday, December 1, 2011

Wonder and Joy


 I made this card for the Ways to Use It Challenge over on Split Coast  - Faux letterpress - or inking your embossing folder inside and then embossing your card stock!

I used my Tim Holtz Tall Pines Sizzix embossing folder - I inked it with Memento Paris Dusk Ink (like navy) - so the trees show the green of the textured card stock (Core dinations) and the surrounding areas were darkened with the ink - I was thinking it would make it look like 'night time' in the forest!?!

The pine panel was punched with my new Martha Stewart Punch (on sale at Joann's!) I added some Diamond Stickles to give it a little shimmer.

The sentiment is the last two words of a larger sentiment stamp from Rubbernecker  - the full stamp says 'Wishing You a Holiday Full of Wonder and Joy"

The sentiment is die cut with Trio Labels by Spellbinders and adhered with foam tape. I added a few rhinestones to the trees to finish it off.

I used the colors from the CR84FN43 challenge.


Stamps: Rubbernecker - Wonder & Joy #22-04
Paper: textured green & brown - Core dinations Tim Holtz, dark chocolate - PTI, creamy caramel - SU
Ink: Memento Paris Dusk, Archival - Coffee
Accessories: foam tape, trio labels - Spellbinders, Tall Pines Sizzix Embossing Folder Tim Holtz, Diamond Stickles, Pine branch punch - Martha Stewart, rhinestones - Kaiser

Monday, November 28, 2011

After the Break - 3 Cards to Share

Wow -  It seems like I haven't posted in ages -  life kind of took over for a little bit there with some church projects and getting ready for hosting Thanksgiving dinner  - but here I am to share a few cards with you today!

I made this first card for the CAS challenge over on Split Coast -  we had a sketch to follow of a square in the middle of the card with a tag.     I made mine really CAS - with no layers.  I used some Papertrey Ink stamp sets (Chairished and On my Couch) that I purchased quite some time ago but have not inked up much!  Don't know why because they are SO CUTE!!  I love the oval rug stamp under the rocker.   The frame around the images is from Frame It by Waltzingmouse.  Inside I stamped a happy birthday verse.
 My second card was made for the Color Challenge on Split Coast -  I was the host this week and chose the colors of Kraft, white and Pear Pizzazz with the dessert option of using polka dots!  The sentiment is from Teeny Trees by Waltzingmouse.
My third card was made for the Teapot Tuesday Challenge -   this week we had a magical Harry Potter Hat teapot for our inspiration.

Our cards are going postal to Hunter Renz (who loves Harry Potter)  for his 12th birthday on Dec 1st.  We hope to make this first b'day without his mum (fellow stamper Katie Renz) a little bit happier with all the cards he'll receive.

Here's Hunter's address if you'd like to send along a card as well:
Hunter Renz
PO Box 5913
Bellingham, WA 98227-5913

You Rock!
Stamps: Frame from Frame It - Waltzingmouse, rocker, sentiment, rug from Chairished set, hanging picture from On my Couch set - Papertrey Ink
Paper: white, hawaiian shores - PTI
Ink: Memento Tuxedo Black, Hawaiian Shores - PTi
Techniques: CAS

Get Well Soon:
Stamps: Waltzingmouse - Big Blooms Chrysanthemums, hugs from Teeny Trees
Paper: Kraft, white, Text Style Happy Spots - PTI, Pear Pizzaz - SU
Ink: Memento Tuxedo Black, Ranger Distress Shabby Shutters
Accessories: rhinestone - Kaiser, wrinkled seam tape - Prairie Bird Boutique Etsy Shop, Swiss Dots embossing folder - Provo Craft, grommet tag - Spellbinders, foam tape   

Harry Potter:
Stamps: Happy Birthday and 12 from Free Spirit Sentiments set - Waltzingmouse, Harry Potter from Trade Mark Harry Potter set - Barnes & Noble, alphabet snap stamps - Karen Fisher (no longer available)
Paper: white, true black, plum pudding - PTI
Ink: versafine Onyx Black
Accessories: foam tape, square Nestability, pinking circle nestability, 1" circle punch - EK success, small oval punch - SU, Copics: BOO, B37, B41, E00, E37, R20, Y02, sticky stars - Amuse
  

Thursday, November 24, 2011

I am Thankful

Just wanted to pop in and say Happy Thanksgiving to all the stampers in the US!  I'm  hosting the turkey dinner for some of my family today so I thought I'd share a few of the crafty things I did for our celebration today.

Here's my table all set for 6 with a high chair for my dear grand nephew, 14 month old Landon.  I grow the Japanese Lanterns in my garden that I used in the center piece.  I found the bittersweet mixed in on a walk a few weeks ago!

 I made the little name place treat holders with a pattern from Split Coast (look here) and filled them with caramel Hershey kisses!  I saw the wishbone idea for tying around the napkins  in Martha Stewart Magazine - you can find the wishbones here

You may be able to see the fern print on the napkins?   I made these by taking real ferns, placing them on the linen napkin, covering it with a piece of white computer paper and pounding over it with a rubber hammer - the green from the fern dyes the napkin.  I ironed them after to help seal the color but they do turn brown when you wash them.
These cool turkeys are cornbread!   I found this idea again in Martha Stewart Magazine (I love her wonderful seasonal ideas!)   You can find the turkey mold here.  

I made a recipe of pumpkin butter to use on the cornbread.  Also from Martha - here's the recipe:

  Beat together 2 sticks softened unsalted butter, 1/4 cup plus 2 tablespoons pure pumpkin puree, 3 tablespoons pure maple syrup, 1/2 teaspoon pumpkin-pie spice and 1/2 teaspoon coarse salt with a mixer on high speed until pale and fluffy.  The mixture will stay fresh in the refrigerator for up to two weeks.

Here's the dessert selection!   Homemade pumpkin and pecan pie, some fudge and white chocolate dipped pretzels!
I make this fudge every year - it SO delicious and SO easy to make -  the recipe is from Eagle Brand Sweetened Condensed Milk:
3 cups (18 oz) semi-sweet chocolate chips
1 (14 oz) can Sweetened Condensed Milk
dash of salt
1/2 to 1 cup chopped nuts, optional
1 1/2 tsp vanilla extract

In a heavy sauce pan, over low heat, melt chips with sweetened condensed milk and salt.  Remove from heat, stir in nuts if desired and vanilla.  Spread evenly into a wax paper lined 8 or 9 inch square pan.  Chill 2 hours or until firm.  Turn fudge onto cutting board, peel off paper and cut into squares.  Store covered in refrigerator.   YUM!!

For the pretzels, I just melted the round white chocolate pieces (from JoAnn's or Michaels that you use to make lollipops) rolled the pretzels in the melted chocolate and sprinkled with colored jimmies and colored sugars. (I put them in the freezer on wax paper for a few minutes as they take a bit to harden!)

And finally here are two pics of traditional decorations that come out every year at my house.

My son, Josh (now 33) made these pilgrims when he was in kindergarten and although they are a little worse for wear and packing - they come out every year and I love them!
 And the tradition of getting out this picture called  Pilgrims Going to Church by George Henry Boughton goes back at least to my great grandparents - my parents reproduced the picture for my sister and I as we each were  married and established our own homes. 
Today I am thankful for so many things -  my family, my friends, the wonderful art of stamping, that I have a warm home and plenty to eat,  that I have a job and my health.

Happy Thanksgiving everyone celebrating today!

If you'd like to see all the Thanksgiving projects I've done since I started my blog you can check them out here.

Sunday, November 20, 2011

Sisterhood Sundays - There's a New Challenge in Town!

 I made this card for the very first Rubbernecker "Sisterhood Sundays" challenge!   Every Sunday there will be a new challenge and we hope you will check it out and join in!

You will find all the challenge information on the Rubbernecker Blog, including info on prizes you could win! 

This week the challenge is a photo inspiration challenge - and this is the card I created.
Well - it's actually an ornament tag!    I used my 2011 Heirloom Ornament dies to cut the metallic card stock and pretty red ornament patterned paper.  I embossed the 'Merry Christmas' sentiment in silver then die cut it with a Spellbinders Ribbon Banner, sponging it with Barn Door Distress ink before removing it from the die.  Then I just punched a hole at the top of the ornament and looped through this pretty silver cord (it's called silver cloisonne thread - I found it in a box of ribbon that I 'inherited' from my dear MIL).

I was SO inspired by the photo this week -  that I also made a card:
I love this pretty framed evergreen branch.  I embossed it with an embossing powder called Christmas Tree -  it's green with little flecks of shiny red so it really sparkles IRL - I think you can see the red flecks but the glitter doesn't show in the pic :(    I embossed a square Nestability on the card and adhered the image inside the frame with foam tape.   I sponged the edges of the image with Ranger Antique Linen.  I used the same Merry Christmas sentiment (my favorite can you tell?!) here that I used on my tag above but I just stamped it in black on the card.

So we hope you will join the Stampin' Sisterhood Design Team by creating an inspired project and linking it over at the Rubbernecker blog!   And don't forget to check out the new challenge EVERY Sunday!

Ornament Tag:
Stamps:  Rubbernecker - Merry Christmas #387-10
Paper:  Metallic Red - Grafix, Pure Poppy - PTI, DP Die Cuts With a View (DCWV) The Christmas Stack.
Ink:  Versamark, Ranger Distress Barn Door
Accessories:  Silver cloisonne thread - Elsa Williams Needlecraft, foam tape, ribbon banners - Spellbinders, 2011 Heirloom Ornaments - Nestabilities.

Evergreen Card:
Stamps:  Rubbernecker - Evergreen Block #1574 SO
Paper:  Pure Poppy, White - PTI
Ink:  Memento Tuxedo Black, Versamark, Ranger Distress Antique Linen
Accessories:  Foam tape, square Nestability, Embossing Powder - Christmas Tree/Antiquities - Joanne's, hot gun.