Thursday, June 18, 2015

Fusion - June 18th - Bright Butterfly

Welcome to the next Fusion challenge!   Look at the wonderful photo we have for inspiration this week! 
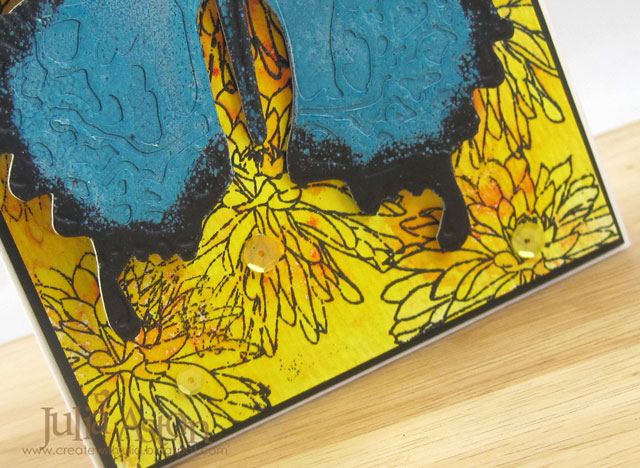
I went completely with the photo this week.  Pulling out my Alterations Layered Butterfly die and embossing folder -  she's 'almost' too big for the card - but I think it works with all it's boldness!
I die cut the butterfly out of black Little Sizzles matboard from Sizzix.  Then I embossed it with Wendy Vecchi Sky Blue Embossing Powder - before putting the heat gun on it though, I brushed off the powder along the edges and down her body so it looked similar to the inspiration photo.  Then I heat embossed it.  After the embossing cooled - I brushed  over the embossing with Wendy Vecchi Archival Forget Me Not ink - it's a little darker than the Sky Blue Embossing powder.  Then I heated it again -  I just learned about this technique called "Marbeled Embossing Powders"  over on Wendy's blog here.  Then I used the butterfly embossing folder that comes with the die to get all the details onto the butterfly -  I wasn't sure it would emboss given the thick mat board and the embossing powder - but it sure did!
  To make the colorful background, I first  black embossed one of the flowers from Tim Holtz' Flower Garden Set all over a white panel - overlapping the stampings and going off the edges.  Then I sprinkled Brusho Color Crystals over the embossed panel - using Lemon over the bottom 3/4's and Brilliant Red on the top 1/4.  Then I spritzed the panel with water and the Brusho colors melt and run and turn brilliant color!  Here you can see the yellow 
  I stamped a sentiment from Wendy Vecchi's set, All Occasion Art onto a Sentiment Strip and adhered it above the butterfly with foam dots.  You can see the Brilliant Red Brusho here.
I added a scattering of Lemonade Blend sequins across the card.  I adhered the butterfly to the panel with two thick foam dots on the wings near the body so the wings would stay sticking up a bit like she's in flight.  I twisted a little piece of black wire around her head for antenae.
I can't wait to see how you will be inspired by this wonderful photo - or perhaps you have a great idea for the lovely sketch this week??   You'll find all the details and Mr. Linky on the Fusion blog here.
Here are the links to my Fusion Teamies - wait till you see what they have made this week!

Deanne   


I'm  linking my card to Wendy Vecchi's June Make Art Challenge - Use Embossing Powder 

 The Card Concept The Butterfly Effect - Mixed Media Style


Wednesday, June 17, 2015

Tim's 12 Tags of 2015 - June tag

I was SO excited when I saw Tim's June tag because I have almost everything that he used on it - whoo hoo (which definitely means I'm buying WAY too much STUFF!! AND I said the same thing last month!!?)  So, anyway, here's Tim's tag!
You will find ALL the details of how Tim put his together here so I won't go into ALL of the details.  I actually made my plaid background differently than Tim did his (I know, I'm such a renegade!) - and I used shades of blues rather than greens.
I made my plaid background by spraying 3 colors of Distress Spray Stains first vertically, then horizontally over the Stripes stencil, dabbing the tag with paper towels after each spraying - I used Faded Jeans, Salty Ocean and Peacock Feathers.  I  substituted an Enameled Tag pinned onto the Linen Ribbon, rubbing the edges with Weathered Wood Distress Paint and adding Remnant Rubs/Words to it.  You can just barely see my Coredinations blue straw sticking up through the 'whipped cream' cover - it really blends in with the blue plaid in my photo!  I rubbed Picket Fence Distress Paint over the back of the acetate cover to make the whipped cream!
I used a blue piece of burlap from Die Cuts with a View that I sponged with Vintage Photo and a Big Chat sticker on my banner.  I added another Remnant Rub/Special Delivery to the bottom corner.  I made myself do the stitching over the burlap since I do have a craft sewing machine - I don't know why I shy away from using it!!??!
The fun surprise with Tim's design - is that you can slip a gift card behind the drink cup!  The cup is attached to the tag with two thin strips of foam tape along the top edge (near the cover) and along the bottom edge - so, as you see here, the card can slip right through!  I colored my Mirrored Star with two Alcohol Inks - Sail Boat Blue and Espresso.
I always layer my tags to a slightly larger piece of black cardstock - mostly to hide all the mess that gets on the back (like the back side of staples, inks from working on the craft mat and stitching!)  So I added a Journaling Ticket as well in case I wanted to write a message.
I love my tag in blue!  and all the fun techniques we used on it this month (even though I revised a few things!)
I'll be back tomorrow with the new Fusion Challenge!  Hope to see you then -  it's the last Fusion Challenge until September (we're taking a little summer break)!
Paper:  #8 Manilla tag - Ranger, True Black, Kraft, white - PTI, clear acetate, blue - Coredinations/Tim Holtz, corregated cardbord (recycled Starbucks sleeve)
Ink:  Ranger Distress Vintage Photo, Peacock Feathers
Accessories:  Ranger Distress Stains - Faded Jeans, Salty Ocean, Peacock Feathers; Stripes Stencil - Tim Holtz, Ranger Distress Paints - Weathered Wood, Picket Fence; Idea-ology - Mirrored Stars, Linen Ribbon, Jute String, Enameled Tags, Remnant Rubs/Words, Remnant Rubs/Special Delivery, Loop Inks, Journaling Ticket, Big Chat Stickers; sewing machine, Adirondack Alcohol Inks - Sailboat Blue, Espresso.

Tuesday, June 16, 2015

My Island Dream Home

Today I have another card to share I made this past weekend (see my yesterday post below).  
I haven't made a one layer card for a while - it's really hard to do, don't you think??!!  (I did add one tiny little butterfly - but we are going to pretend it just flew over my card and landed on the beach hut umbrella!)
I used the wonderful summertime set My Island from Waltzingmouse.  I inked the palm trees with 3 shades of blue - Tropical Teal, Hawaiian Shores and Aqua Mist (so that's Monochromatic) and I stamped the beach hut and umbrella with Harvest Gold and Orange Zest (so that's Ombre).

My CAS card design was inspired by 4 challenges:
Less is More - One Layer - theme HOME (I wish this beach hut WAS my home!)
Virginia's View Challenge - Monochromatic/Ombre (I did BOTH!)
Addicted to CAS - Code word Butterfly
Stamps:  My Island - Waltzingmouse
Paper:  White, Tropical Teal - PTI
Ink:  Tropical Teal, Hawaiian Shores, Aqua Mist, Harvest Gold, Orange Zest, Smokey Shadow - PTI
Accessories:  butterfly punch - Martha Stewart

Monday, June 15, 2015

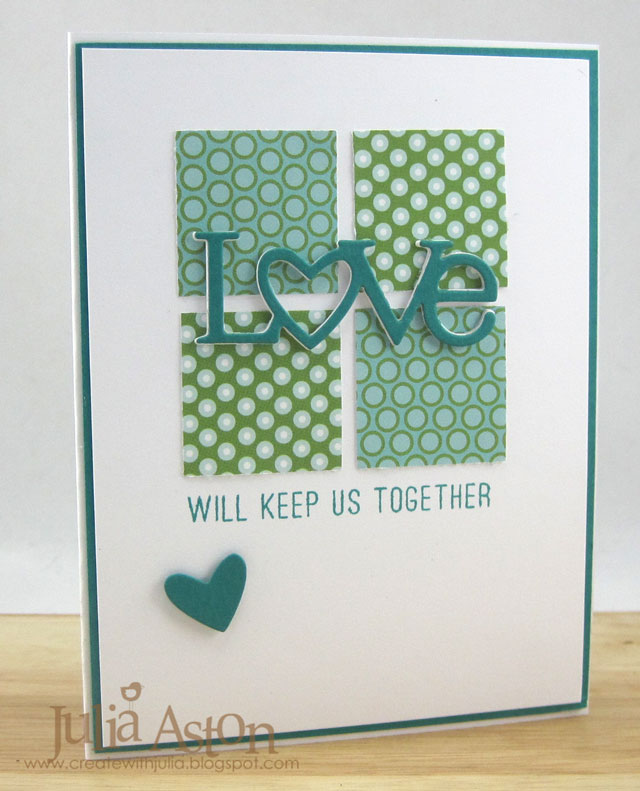
LOVE will keep us together

I had some crafting time this past weekend - and was able to make several cards that I'll be posting this week.  
Here's one for today - Kent and I will be celebrating our 18th anniversary on June 21 (first day of summer - and can I just say, the day of our wedding must have been 100 degrees with no airconditioning in the church - where we also had our small reception!) - I always make my card for him (of course!) and I knew I had to get going on this years as it's coming up fast!  (and I know you are all now singing that song - well the older ones amongst us anyway!)
I used the LOVE die and a stamp set from PTI - both called Wonderful Words: Love.  I decided to go with greens/blues to keep it more masculine for dear hubby.  I made the LOVE thicker by cutting it 4 times out of white and once out of Tropical Teal - then glued them all together.  Here's a side view so you can see the thickness.
And just 'cause some people like to know -  here's what I stamped on the inside - stamps from Hero Arts and Lil' Inker Designs.
My card was inspired by two challenges:
Just Us Girls - Stacked Die Cuts
Stamps:  Wonderful Words: Love - PTI, inside card - Happy Anniversary from Hero Arts, It Feels like Just Yesterday from It's Today, Right? from Lil'Inker Designs.
Paper:  White, Tropical Teal, Text Style/Green Boutique - PTI
Ink:  Tropical Teal - PTI
Accessories:  square punch - Creative Memories,  Wonderful Words - Love die - PTI, Scotch Quick Dry adhesive.

Sunday, June 14, 2015

Waltzingmouse Pajama Party - June 2015

I'm attending the Waltzingmouse June Pajama Party tonight -  are you coming too? 
Around the first of each month Claire posts the challenges for the PJ Party that happens on the 14th of each month over at the Waltzingmouse Blog.  You have almost two weeks to get your projects done and ready to bring to the party.  The party starts at Midnight (Claire's Time in Ireland) and you have 24 hours to link up your projects.  Here are Claire's June Challenges:
Challenge 1 - Can It/Pickle It  Make a project involving canning jars/jam jars
I decided to make a treat bag as I often give gifts of cookies or other treats, especially during the holidays so I like to have them on hand!  The jar, jar cover and cookies stamps are from Candy Jar Christmas Fillers, the Sweet Treats sentiment is from Candy Jar Christmas, the For You and little heart stamped on the striped paper are from Jam Packed.  
I cut the tags with the Stitched Tag Die set out of Kraft Core Coredinations paper and then lightly sanded them to reveal the kraft core.  I cut the jar and lid using the Jar Essentials Die set and the little heart hole reinforcer on the blue tag is from the Folding Tag die set.  So cute right?
(Design Tip:  the heart, star, circle and square reinforcer dies are great for filling a shaker card!)
I'm linking my treat bag to the Tag You're It challenge
I was inspired by the design of placing a tag on a gift bag and the food theme!
 
Challenge #2 - Coffee Color Challenge - Inspiration Photo
For this color challenge, I pulled out a little 4 oz coffee cup and decorated it with a brown strip of patterned paper and stampings from My Island. 
I stamped the sun stamp in Orange Zest, the beach hut and umbrella in Dark Chocolate and the chillax in Pure Poppy.  I sponged all the edges with Ranger Distress Brushed Corduroy and layered the pieces onto the sun stamping with foam dots.  I added some sequins, layered the sun to a piece of Pure Poppy and adhered it over the band on the cup.  A cute little treat container!
 (I got the 4 oz cups on ETSY here. thanks for enabling me Amy Tsuruta!!)
 
Challenge #3 - Old Pajamas -   Use one of your older Waltzingouse Stamps sets to create a project for this challenge! The WMS Design Team will be digging out our USA 1776,  stamp sets for this one.
Perfect timing for this set with the 4th of July coming up in the US!  I hand cut the stamped frame and Miss Liberty and layered them over the card base using foam dots.  I sponged everything with Ranger Distress Brushed Corduroy and added some sequins to the centers of several of the fireworks!
  I'm linking my 4th of July card to Addicted to Stamps and More - Holiday

Challenge #4  - Bedtime Story Sketch
I was inspired to make a baby girl card with the Bedtime Story Sketch.  I used stamps from USA 1776 for the banner (see how below).  The Special Delivery and Arriving Soon sentiments are from Little Darlings Images and A Baby Girl and a little bundle of Sweetness are from Little Darling Sentiments.   I used the beautiful Picot Panel Die for the sentiment in the center.   I added 3 Mirrored Stars for some sparkle!
Here's how I made my banner using one of the star arm stamps from USA 1776 (when you put 5 of these together it forms a star) -  I stamped it and cut it out leaving a little white border around the edge.  Then I just cut across it corner to corner to make a banner shape.  I used the larger bottom piece.  I put a piece of ScorTape across the top of each banner on the back and laid the twine over it to hold it in place.  I put a piece of foam tape on each banner so it would pop up off the card.  I flipped it over and spaced the  banners the way I wanted them on the card front.
You can also see how I lined up two sentiment stamps on my acrylic block so it was easy peasy to stamp the two sentiments evenly along the bottom.  For the  single stamp Special Delivery stamping along the top I just drew a line in pencil so I'd stamp straight and erased the line after stamping!

  (Design Tip:  when stamping a sentiment across the whole card - start on one side with part of the sentiment off the edge)
So we really hope to see you at the Waltzingmouse Pajama Party - there are prizes to be won!   You don't have to use WMS stamps but if you have them please do!! You'll find all the details at the WMS blog.  
And if you want to go Waltzingmouse shopping at the brandy new designed shop and check out Claire's new June releases  - take a peek here.
Treat Bag
Stamps:  Candy Jar Christmas Fillers, Candy Jr Christmas and Jam Packed - Waltzingmouse
Paper:  White - PTI, Kraft Core Coredinations/Tim Holtz, DP - Farm House Paper Pad - October Afternoon.
Ink:  Archival Jet Black
Accessories:  Brown paper bag - Michaels, Dies - Jar Essentials, Stitched Tags, Folding Tag - Waltzingmouse, Cappuccino Twine - The Twinery, Copics:  BG10, E37, E35, Mini sanding block - Ranger, Kraft Blend Sequins - Avery Elle, Scotch Quick Dry Adhesive, ScorTape, foam dots.

Coffee Cup
Stamps:  My Island - Waltzingmouse
Paper:  Textstyle Bitty Block Basics, Rustic Cream - PTI, red paper - Coredinations Distress Collection/Ranger
Ink:  Orange Zest, Pure Poppy, Dark Chocolate - PTI, Ranger Distress Brushed Corduroy.
Accessories:  Kraft Sequins - Avery Elle, 4 oz Coffee Cups - BellaCreations4U etsy Shop, ScorTape, foam dots, small oval punch - SU

July 4th card
Stamps:  USA 1776 - Waltzingmouse
Paper:  White, Pure Poppy - PTI
Ink:  Pure Poppy, Enchanted Evening - PTI, Ranger Distress Brushed Corduroy
Accessories:  Lemonade Blend Sequins - Avery Elle, foam dots, Scotch Quick Dry Adhesive.

A Little Bundle of Sweetness
Stamps:  USA 1776, Little Darling Images, Little Darling Sentiments - Waltzingmouse
Paper:  Fresh Snow Linen Cardstock, White, Hibiscus Burst - PTI
Ink:  Hibiscus Burst, Limeade Ice, Orange Zest - PTI
Accessories:  Blossom Twine - The Twinery, Mirrored Stars - Idea-ology, Picot Panel Die - Waltzingmouse, ScorTape, Scotch Quick Dry Adhesive, Foam dots.

Kind Father

I pulled out a lot of Tim Holtz/Idea-ology product  today for my creation.  I, sadly, lost my dad in 1981 when he was just 66 so I usually don't make Father's Day cards as I have no one to send them to -  but I found several challenges I wanted to participate in with the dad/masculine theme -  so here it is -  a Father's Day card!
The clock paper is from Idea-ology Paper Stash Collage.  The vintage 'dad' is a sticker from Salvage Stickers/French Industrial.  I attached Game Spinners to one of the clock faces with a brad. I added a Big Chat sticker to the 'father' Flash Card and then drew a rough line around it using a black Stabilo pencil that I smudged with my finger.  I did the same thing around the whole card panel.
I added two Chit Chat Stickers to the bottom right corner - and again drew around them with my Stabilo pencil and smudged it with my finger.

I'm linking my card to the following challenges:
Anything but Cute -  Make it Masculine
Friday Mashup - Dad or color challenge
Try it on Tuesday - Watches/Clocks
Happy Sunday everyone!   I'll be back tonight as I'm joining the Waltzingmouse Pajama Party that starts at 6:50 pm EST.

Saturday, June 13, 2015

You Make All the Difference

I had creative fun making my card today trying out some new techniques. 
I made the background using a Tim Holtz Stripes stencil and some Distress Spray Stains.  First, I laid the stencil top to bottom on my white cardstock panel and sprayed over it lightly with Peacock Feathers Distress Spray Stain.  I removed the stencil, wiped it off with a baby wipe and dried the panel with my heat tool.  Then I turned the panel 1/4 turn and laid the stencil over it and sprayed with Wild Honey Distress Spray Stain to create a plaid!
I used my Poppy Stamps Stitched Landscape die to cut the panel - since this is a stitched die - I cut both the top and bottom with the die so you could see the stitches (probably not so important with the plaid on this - but you'd definitely notice the lack of stitching on one side on a plain panel!)  I've seen this sentiment technique on so many blogs and was dying to try it out myself.  I like it!
The sentiment is from Say It Loud by Waltzingmouse and being a clear stamp I could bend it a little to fit the curve.  I adhered the panels to the card base with foam tape so they are popped up.  I added sequins for a little sparkle!
I'm linking my card to the Happy Little Stampers CAS challenge - Sprays/Mists.
I'm heading out to the garden this morning to do a little weeding!  Happy weekend everyone!