Thursday, February 5, 2015

A Vintage Journey Challenge #25 - Tic Tac Toe

There's another fun challenge up at A Vintage Journey -  Annie is the hostess this fortnight and her challenge is a Tic Tac Toe - Chose any three from her grid.
Here's the challenge in her words:  "With so many Tim Holtz/Ranger and any other similar products we would like you to choose at least three items from the grid below and incorporate them in your projects. You can choose items horizontally/vertically or diagonally, it's your decision. Please include the name of the items you are using within your post." 

I decided to use the products on the right vertical column:  Ribbon/twine, Die Cuts and Stains -  as the main ingredients on my tag. 
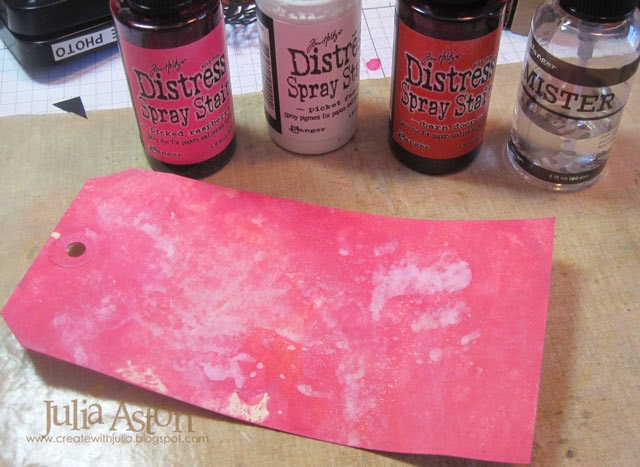
  For inspiration in using stains - I went to my Tim Holtz Compendium of Curiosities Vol II and found his Marbled Stain Technique on Page 46 there.  I sprayed Picket Fence, Fired Brick and Picked Raspberry spray stains onto my craft mat and then dragged my tag through it.  Then I dried it with my heat tool.  As a final step, I spritzed it with water to give it the marbled look.  I had enough stain on my mat to color two tags - so I have one to use later!
For the die component - I used the heart from Mini Lovestruck and the Mini Lock and Key set. I cut them out of black card stock but wanted to age/rust them a bit so I dabbed some Picket Fence and Antiqued Bronze Distress paints on my craft mat and then pressed little sections of the die cut pieces into the paint.  I did one color at a time - drying the paint with my heat tool after each color was added.
 I wanted to add a little more dimension to the background so I sponged over the Latticework Stencil with Tea Dye Distress Ink -
That added a soft subtle design to the stained background.The stamp is from Tim's Random Quotes set.
I just had to add an Idea-ology pen nib to the tag since the sentiment was about writing a love letter.  For the ribbon component I added two - I stapled the Film Strip Ribbon along the side adding a couple of Remnant Rubs/Words to it, and I stained a piece of Linen Ribbon with the same colors as my background and looped it through the hole in the tag.
I added a Chit Chat Sticker that I sponged with Tea Dye Distress Ink in the bottom corner.  I adhered the heart, lock and key to the tag with foam tape - putting the key inside the lock - as this love note is sure to 'unlock' someone's heart!
I hope you will join us at A Vintage Journey by creating a project for Annie's Tic Tac Toe challenge!  Our challenge sponsor is Country View Crafts.  They are offering one winner, chosen by the Creative Guides, a £10 voucher to spend in their on-line shop.  
You will find all the details of the challenge, all of the wonderful inspiration from the other Creative Guides participating this fortnight-  and the link up over at A Vintage Journey

Please Note:  AVJ is celebrating it's 1st Birthday in March - whoo hoo!!!  - and we will be instituting a few changes - Brenda has a note about it on the AVJ blog today - the biggest change is that starting with the March Challenge, it will be a monthly challenge so people have more time to create!   And the selected winner will receive a
 £20 voucher from Country View Crafts, we will be having project Fridays and education Mondays more details to come!!

I'm also entering my take in the Inspiration Journal challenge -  Love is in the Air.


Stamps:  Random Quotes - Tim Holtz/Stampers Anonymous
Paper:  #8 manilla tag - Ranger, True black - Papertrey Ink
Ink:  Ranger Distress Tea Dye and Vintage Photo, Archival Jet Black
Accessories:  Ranger Distress Spray Stains - Picked Raspberry, Picket Fence and Barn Door, Latticework Stencil - Ranger, Dies:  Mini Love Struck and Mini Lock and Key - Sizzi, Idea-ology - Pen Nibs, Linen Ribbon, Film Strip Ribbon, Remnant Rubs/Words, Chit Chat Stickers.

Sunday, February 1, 2015

February Mixed Media Card Challenge - Love

It's the first of the month and time for a new Mixed Media Card Challenge -  appropriately enough for February - Shery has chosen Love as the inspiration - with the option of using buttons!
I made a tag/card for my love creation - and also used a button
I used Wendy Vecchi's Splattered Plaster technique for my background - you'll find her tutorial here.  
I rubbed two ink pads over my nonstick craft mat - Wendy Vecchi Orange Blossom and Cornflower Blue.  I added several splashes of Rubbing Alcohol and mixed it all with a pallet knife.  Then I added one spritz of Ranger Picket Fence Spray Stain (do not mix after spraying - just let it sit on top).  I dragged my tag through it all until it was completely covered and then let it dry.  I took a faceted black plastic button from my button box, inked it with Wendy Vecchi Tree Branch Ink and embossed it with Tree Branch Embossing powder.  I cut the shank off the back of the button and adhered the button to the tag with foam dots.
Here is a close up where you can see the white spray stain - it leaves little clumps like specks of plaster.  I stamped the background with Wendy's  Spatter stamp using Cornflower Blue Ink,  I stamped the flourish and lacey stamp with Watering Can Ink and the sentiment in Archival Jet Black - these stamps are from Wendy's Say it With Art set.  And here you see the LOVE piece - the sentiment "I didn't choose you..... my  heart did"
You have until 2/25 to link up your Mixed Media Card -  you will find all the details, some wonderful inspiration from the rest of the Design Team and the linky over at the Mixed Media Card Challenge blog.  How will you be inspired by the theme LOVE - Optional Element: Buttons???
Mixed Media is defined as using texture, dimension and techniques.
Stamps:  Spatter Background Stamp, Say it With Art - Wendy Vecchi Studio 490/Stampers Anonymous.
Paper:  #8 Manilla Tag - Ranger, True Black - PTI
Ink:  Wendy Vecchi Archival Orange Blossom, Cornflower Blue, Tree Branch, Watering Can,  Archival Jet Black.
Accessories:  black plastic button - from stash, Wendy Vecchi Tree Branch Embossing Powder, wrinkled seam tape, Picket Fence Spray Stain - Ranger, foam dots.

Saturday, January 31, 2015

Addicted to CAS - Guest DT for Hugs and Kisses

Hello again Addicted to CAS fans!   I'm back as Guest Designer for Deepti's challenge - Code Word Hugs and Kisses - just in time for our Valentine's Creations (or maybe you have a different idea - like for a wedding or anniversary OR birthday creation??!)
I recently purchased Tim Holtz' Stacked Words/Valentines die so it was fresh in my mind - and proved to be perfect for this challenge! I die cut the words in black and red, layered them over the white panel, popping one over the other with foam tape.
And there you go -  clean and simple - n'est-ce pas??

I have had such fun being the Guest Designer for January -  thanks so much to the ATCAS team for inviting me to join in this month!   What does 'Hugs and Kisses' inspire you to create?  Can't wait to see what you link up over at the ATCAS blog!

Paper:  White, True Black, Pure Poppy - PTI
Accessories:  Stacked Words/Valentines die - Alterations/Tim Holtz, foam tape.

Thursday, January 29, 2015

Fusion Challenge - Jan 29th - Heart Full

It's time for the next Fusion Challenge and appropriately enough to help us with the Valentine's we need to give in a couple of weeks - we've got hearts again to inspire us!
I actually did the FUSION this week (whoo hoo!) being inspired by both the hearts photo and the sketch!
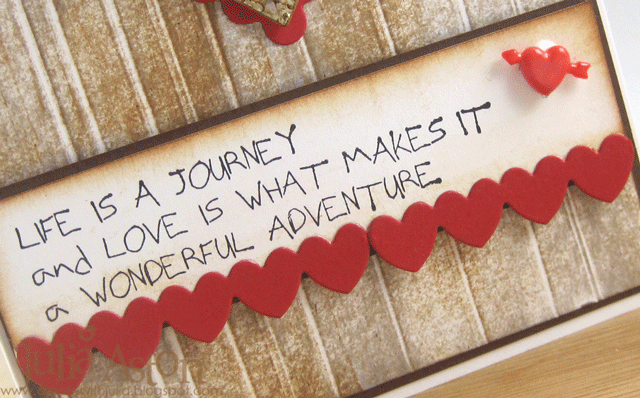
I made my silver heart out of a Foil Tape Sheet from Ranger - die cutting it with a heart Nestability and embossing it with a Hounds Tooth embossing folder.  Then I adhered the silver heart to a white card stock heart for stability.  I colored the silver with Adirondack Alcohol Inks - Mushroom, Caramel and Pitch Black.  Then I layered it over the die cut red heart using foam tape.  I made my own barnboard background by scoring lines on a piece of white card stock and then rubbing Vintage Photo and Pumice Stone Distress Inks over the panel.
The sentiment is from Wendy Vecchi Studio 490 Lovely Art set.  Instead of banners - I adhered a row of die cut hearts along the bottom of my sentiment strip using a die from the Love Notes set from Reverse Confetti.  The little plastic heart with the arrow through it was on a pin I had in my stash -  I cut off the pin and just glued the heart to the panel.
How will this lovely new Fusion Challenge inspire you?   You will find all the challenge information, the link up and lots of inspiration from the rest of the Design Team over at the Fusion Challenge Blog

Stamps:  Lovely Art - Wendy Vecchi Studio 490/Stampers Anonymous
Paper:  white, Dark Chocolate, Pure Poppy - PTI, Foil Tape Sheet - Ranger
Ink:  Ranger Distress Vintage Photo and Pumice Stone, Archival Jet Black, Adirondack Alcohol Inks - Mushroom, Caramel, Pitch Black.
Accessories:  Hounds Tooth Embossing Folder - Provo Craft, ScorPal, Heart Nestabilities, Love Notes Die - Reverse Confetti, plastic heart (pin removed) - Micheals, foam dots, Scotch Quick Dry Adhesive.

Tuesday, January 27, 2015

Make Art - Challenge #1 - Embossing Paste

There's a new Blog Challenge out here called Make Art - celebrating all things Wendy Vecchi.  She is a designer of stamps and products for Ranger - and I have been a devoted fan ever since I took a class Wendy taught at Kim's Eclectic Paperie shop (Kim has closed the brick and mortar shop but still operates the web store!)  And Eclectic Paperie is sponsoring the very first challenge so be sure to check it out!

So - the first challenge is to use embossing paste.  I decided to make a tag for my project.  I used Wendy's Splattered Plaster technique for the background on my tag which involves rubbing inks across your nonstick craft mat (I used Leaf Green and Tree Branch) splashing a lot of Rubbing Alcohol over the inks and mixing with a pallet knife, then spraying Picket Fence Spray Stain once over the mix and then dragging your tag through it  - you will find Wendy's tutorial for this technique here.  Next I used Wendy's Metallic Gold Embossing Paste with her Basically Bricks Stencil - covering just a portion of the area of my tag.  After the paste dried (helped along with my heat tool!)  I stamped the lace from The Beauty of Art set along the top and bottom of the tag and the Vintage Pricing Chart over the embossing - using Watering Can Archival Ink.
I stamped the flower, also from the Beauty of Art set on white card stock with black ink, sponged over it with Orange Blossom and Leaf Green inks and cut it out close to the edges.  I stamped the bloom again, sponged it with Dandelion ink, cut out just a portion of it and layered it over the first flower with foam tape.
I don't have Wendy's new little flower pots - yet!  but I do have Flower Pots Nestabilities so I cut one out - altering it to layer the rim over the base.  I inked the pieces with Tree Branch ink then embossed them with Tree Branch Embossing powder.  Then I stamped over them with the Spatter stamp in Snow Cap Ink (Wendy's Faux Graniteware technique).  I added a Remnant Rub/Botanicals to the pot.
I hope you will check out this fun new challenge blog and join in on the fun -  there will be a new challenge the first Thursday of each month.
Here's Wendy and me at the class I took with her.

Stamps:  The Beauty of Art, Spatter Background, Vintage Pricing Chart - Studio 490 Wendy Vecchi.
Paper:  #8 Manilla tag - Ranger, White and Smokey Shadow - PTI
Ink:  Wendy Vecchi Archival Leaf Gree, Tree Branch, Orange Blossom, Dandelion, Watering Can, Adirondack Snow Cap.
Accessories:  Nestability Flower Pot die, Tree Branch Embossing Powder - Wendy Vecchi, Linen Ribbon and Remnant Rubs/Botanicals - Ranger, Picket Fence Spray Stain, Rubbing Alcohol.

Saturday, January 24, 2015

Little Red Houses

Another Christmas card today -  using a lovely stamp set from Waltzingmouse called Alpine Christmas.
A simple design using Festive Berries Distress Ink and white card stock.  I love this little village nestled beneath the giant Alps -  The alps is one stamp, the cluster of houses is another stamp and the trees are another stamp in the set - so it's easy to ink them in different colors, but today I used just red.   I used a Lil Inker Design Stitched Mat Rectangle to cut out the images and layered it over the card base with foam dots.  I scattered 3 sequins around the card and stamped the sentiment at the bottom.
My card was inspired by this week's Merry Monday Challenge - create a card with a house on it.
I'm getting this in just under the wire!   Thanks so much for stopping by today!

Stamps:  Alpine Christmas - Waltzingmouse
Paper:  White - PTI
Ink:  Festive Berries - Ranger Distress
Accessories:  Stitched Mat Rectangle Dies - Lil Inker Designs, Sugar Blend Sequins - Avery Elle.

Thursday, January 22, 2015

A Vintage Journey #24 - Love is in the Air

Welcome to the latest A Vintage Journey challenge!  Astrid is our host and she is challenging us to be inspired by Love is in the Air.  Here's Astrid's description of her challenge:
It being nearly the end of January, it's not long until Valentines day. A flower cannot blossom without sunshine,
And man cannot live without love.
So the saying goes. For this challenge please share what moves your heart with us, be it a Valentine's card for a loved one, a heart themed project, or something else that expresses what true love means to you. Just make sure that Tim's style is evident in what you make.
 
I decided to use Tim's fun In the Bag die to create two vintage looking Valentine treat bags that I will give to two special people in my life, with a little gift tucked inside.
I die cut one bag out of Kraft Cardstock and one bag out of red Coredinations/Kraft Core.  I used two different pieces of Valentine papers from Tim's Seasonal Paper Stash for the front and back panels of the bags.
I stenciled over the black and white Valentine advertising paper that I used for the kraft bag with Tim's Latticework Stencil and Worn Lipstick Distress Ink sponging the edges with Tea Dye.
I die cut the cupids and hearts using Tim's Mini Love Struck Mover's and Shapers die. I used Wendy Vecchi Metallic Gold Embossing Paste on one set - and Art Anthology Stone Effects paint in red and stone on the other set.  After they both dried - I put on a coat of Clear Rock Candy Distress Crackle Paint.  I put a coat of the Clear Rock Candy crackle on the Alpha Chips but it chipped right off after drying (I guess it needs some kind of basecoat in order to stick?!) so I just painted the edges of the letters with Picket Fence Distress Paint.
I die cut the XO using Tim's Stacked Words/Valentine's die out of a piece of black Coredinations Kraft Core and sanded it so the kraft showed through in some places..  I adhered some Industrious Stickers/Borders under the edges of the panel so they stick out beyond the edges of the little bag.  I added a Remnant Rub/Words over the LOVE.  I twisted tan and red Jute String together and knotted the ends through a hole in the side of the bag for a handle.
I rubbed Picket Fence Distress Paint and Pumice Stone Distress Ink over the crackle on the heart and cupid with my finger.
I did a simple back panel using the same paper, stencil, ink and Industrious Stickers.
I used a colorful piece of Seasonal Paper Stash of vintage Valentine post cards for the front and back panels.  I inked the Industrious Stickers frame with Wendy Vecchi Archival Orange Blossom Ink.  I painted Wendy Vecchi Mettalic Gold Embossing Paste on the cupid and heart.  After it dried, I covered them with Clear Rock Candy Distress Crackle Paint. 
I used some Remnant Rubs/Words on the heart, wing and bottom corner of the panel and a Chit Chat Sticker in the top right corner.
I used a piece of Linen Ribbon for this handle pulling apart the ends (love that look!).  I used the same paper and inked Industrial Stickers on the back.
I think these make  really 'sweet' Valentine Treat Bags!
I hope you will join us at A Vintage Journey by creating a project for Astrid's Love is in the Air challenge!  Our challenge sponsor is Country View Crafts.  They are offering one winner, chosen by the Creative Guides, a £10 voucher to spend in their on-line shop.  
You will find all the details of the challenge, all of the wonderful inspiration from the other Creative Guides participating this fortnight-  and the link up over at
A Vintage Journey
Thanks so  much for stopping by today! 
 
I'm also linking my project to the Mixed Media Monthly Challenge - although I've had the In the Bag die for some time -  I have never made a project with it!!