Tuesday, May 9, 2017

A Heartfelt Purse and a matching 5th Birthday Card!

This month Eileen Hull's Creative Team will be posting their creations using Eileen's Heart Felt Dies and Kunin Felt.  They will be gathered over at Eileen's blog each week.

My little grandniece, Mila, is turning 5 in August - and she just LOVES all of her little purses where she keeps ALL of her special treasures - so I knew I wanted to make Mila a little shoulder bag!  I also made her a matching personalized card
Here's how I made them:
First the shoulder bag!
I die cut the house frame with the stitch holes out of pink Kunin Felt twice from Eileen's House Pocket Stitchlits set.  I cut off the roof part of one of the cuts to use as the front of the purse.
I used a blanket stitch all the way around the edges including the single layer of the top. (You tube has lots of videos on how to do the blanket stitch - here is one.
I wanted the closing to be strong since this is going to a 5 year old (!) so I hand sewed a snap on (rather than Velcro which can also be used)
Here it is unadorned and snapped closed!
After I put it together - I decided I should have put her name somewhere on the purse - it would have been easier to do this before I put it together - but it worked out ok.    I used Eileen's Word Stitchlits which just happen to have all the letters for Mila's name within the words of the dies.  So I die cut the words on a piece of white card.
and then cut out the MILA and laid them over the back of the purse - trying to space them evenly!
Then I marked the dots with a Sharpie pen.
And used a back stitch with the embroidery thread -  it was easy to reach inside the purse since the letters were located towards the middle of the back piece.
(Oops!  I didn't quite get the A spaced properly but that's ok - it's handmade!)
I had this funky twisted pink/blue/white yarn in my stash and thought it would make the perfect shoulder strap for this little purse -  I simply glued the ends inside the purse on each side.  I may try to put a little stitch on it - but it seems to be held quite firmly with the glue.  I put the clothespins on to hold it all together tightly while the glue dried.
I used more of the Kunin felt to cut the bird from Eileen's Birds and Butterflies Thinlits.
The hearts are part of the House Pocket die set.  I glued all the pieces onto the front of the purse, added a black pearl eye to the bird and pink rhinestones to the hearts.
I added three more hearts (without rhinestones) to the back around her name.
 And now onto Mila's personalized card.
I used Eileen's Mailable Frame die (on sale while supplies last!) for my card base so the card will stand up nicely on it's own!  I left the frame cut-out piece in the front (outline just seen on right side below) and covered it with paper on the outside to hold the piece in place.  (see photo below this one)
I used 2 pieces of patterned paper from Eileen's new Heartfelt Paper Pad to cover the front and back.  It looks like one sheet here -  but this is the front and back of the Frame card so each piece starts in the middle and each faces the opposite way!  
I cut another bird, a butterfly, and a branch using Birds and Butterflies and the flower from House Pocket from the Kunin Felt to decorate the front - see how the paper matches the die cuts??!!    I stamped the Happy Birthday, added a die cut 5 stamped with 'th' and printed her name with my Brother Label Maker.  I added black pearls to the butterfly, flower and bird.   I put foam dots under the wings of the butterfly to hold them out and glued along the center of the body.

I adhered a different page from the Heartfelt Paper Pad to the inside and printed this note with my Brother Label Maker.
Mila loves to color so she will enjoy the fact she can color on her own card!
And here's the back - with more images to color!
Now I just have to wait until August to see how Mila enjoys her gifts!
Be sure to check out Eileen's blog for more inspiration from the Creative Team using these fun new dies and Kunin felt!
Stamps:  happy birthday from Studio Calico Limited Edition,  th from Karen Foster Snap Stamps - retired.
Paper:  White Little Sizzles Matboard - Sizzix, Heartfelt Paperpad - Eileen Hull/Sizzix, Simply Chartreuse - Papertrey Ink.
Ink:  Archival Jet Black
Accessories:  House Pocket Stitchlets Die, Birds and Butterflies Die, Word Stitchlits, Mailable Frame Die - Eileen Hull/Sizzix,  Kunin Felt - Pink, Aqua, black and Olive, Snap Fasteners, Black Sharpie Marker, embroidery thread and needle, Rhinestones and Black Pearls - Kaiser Craft, yard from stash,  #5 die - Papertrey Ink, Brother Label Maker, foam dots, Tombow liquid glue.

Thursday, May 4, 2017

A Vintage Journey - May Challenge - Use a Quote

Hello everyone!  I'm here today with my project for the May - A Vintage Journey Challenge.  
Jenny is our hostess this week and her challenge is:  Use a Quote.
Here's Jenny's description of her challenge:  "Take a quote! Any quote! Whether it be on a stamp, a sticker, handwritten or sourced from the internet and make it the focal point of your vintage; shabby; mixed media; art journaling, industrial, timeworn or steampunk project."

Our Sponsor this month is That's Crafty and they will provide a £20 Voucher for one lucky randomly chosen winner!
All of the Creative Guides were able to choose one item from That's Crafty to use on this month's project and I chose this sweet Matchbox Art Shrine - Scallop Top  
(overall size with scallop front is 2 3/4" x 4")
I made my scene using Tim Holtz/Sizzix Snow Globe Thinlits that I bought after Christmas last year on sale - but have never used - so out they came for today's project!  I used one of the houses, one of the mountain peaks and two of the pine trees for my 'Adventure' scene cutting them out of Coredinations Kraft Core papers. I sanded them a little bit to reveal some of the kraft core.
I glued the pieces of the matchbox part of the Shrine together and cut pieces of paper from Paper Stash Correspondence to fit the back of the box and to cover the scallop top frame.  I sponged the edges with Ground Espresso Distress Ink.  I also sponged the edges of a Quote Chip.
Then I put my scene together inside the matchbox, layering the pieces onto the background using foam dots.  I used layers of thick foam to have the house brought forward to the front.  For the little pine tree, I simple put some glue on it's bottom edge and stood it on the base.  I also die cut stars (from the Snow Globe set) 3 out of blue Kraft Core Cordinations that I layered onto the frame and 3 from Kraft Stock Metallic Gold adhered inside on the scene.
I also adhered the star paper to the sides and top of the Shrine.

View from the back.
So I ended up using two quotes -  the Quote Chip - Adventure Awaits - and a Clippings Sticker  "Challenge the World".
So please join us in the May A Vintage Journey challenge "Use a Quote"!  I can't wait to see what you create.  
You'll find lots of inspiration from the other Creative Guides as well as the challenge 'rules' here at AVJ.
And remember -  Our Sponsor this month is That's Crafty and they will provide a £20 Voucher for one lucky randomly chosen winner!

Paper:  Kraft Core Core-dinations, Idea-ology Paper Stash/Correspondence, Kraft Stack Metallic Gold - Tim Holtz.
Ink:  Ranger Distress Ground Expresso
Accessories:  Matchbox Art Shrine/Scallop Top - That's Crafty, Thinlits Snow Globe - Sizzix/Alterations, Idea-ology Clippings Stickers and Quote Chips, TomBow Liquid Glue, Mini sander - Ranger.

Wednesday, May 3, 2017

Guest DT - Frilly and Funkie Challenge

I was SO excited when Linda asked me if I would like to be a guest designer for the Frilly and Funkie challenge!  Especially since the DT is using Eileen Hull's new Journal Die for their projects!
The challenge is - Put Your Inking Cap On  and here is the challenge description from hostess Kathy:
For this challenge we are asking you to create a vintage or shabby chic project without using any designer paper. You can use inks, mists, paints, texture paste, fabric, felt, embossing powders, pencils, markers, pastels, chalks...the sky is the limit! As long as you are not using designer paper on the front of your project, you are golden.

The lovely and creative Eileen Hull generously donated a set of her HeARTfelt Journal cover sets to each member of the team, so each of us has created a lovely Traveler's Notebook style journal to share with you for this challenge. However, you do NOT have to create a journal to play along!

If you are looking for Eileen's Journal Bigz XL Die, you can pre-order it from The Funkie Junkie Boutique.
 
 Here is my funkie journal creation!
 Before I show you more close ups -  I'll take you through my steps in making this!
 
 I started with Eileen Hull's wonderful new Sizzix Journal.  I cut it out of Cream Little Sizzles Mat Board.
 I decided to use Ranger Distress Oxides in Vintage Photo, Broken China and Peeled Paint.  I rubbed them over my craft mat, spritzed the inks with water and then dragged my covers through the inks.
I kept adding more inks, drying with my heat tool, more inks -  and when I was done - I decided to add some DOX Worn Lipstick to the mix.  I also sponged all the edges with DOX Vintage Photo.
I decided to just use DOX Vintage Photo on the inside of the covers.
Then I flicked water onto both inside and outside.
I adhered the covers at the center - overlapping the scored edge with the holes in the middle - being sure to line up all the holes. I stamped  randomly across the front covers using a Distressed Grid stamp and DOX Vintage Photo.
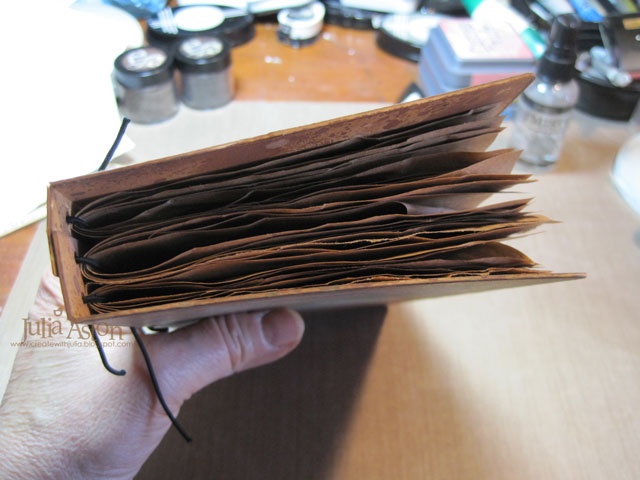
I cut three 17" pieces of black round elastic cord and put them through the holes at top and bottom knotting them on the outside.  These will hold the 3 signatures in the journal.
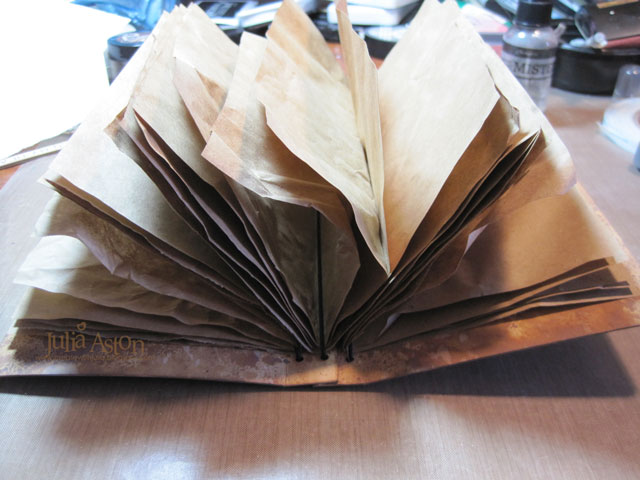
I made my pages out of brown paper that I have saved from packages I received in the mail.  I just love the crinkle sound of it when you turn the pages  
(I got this idea from Eileen Hull who used this kind of paper on a journal she made on a Facebook video!) 
I cut 15 pieces of paper each 8 1/2" x 7 1/2" and folded them all in half.  I put 5 pieces together for each signature creating 10 pages in each (when folded in half).
I slipped each signature through an elastic in the middle of each signature.
Here they are all loaded in!
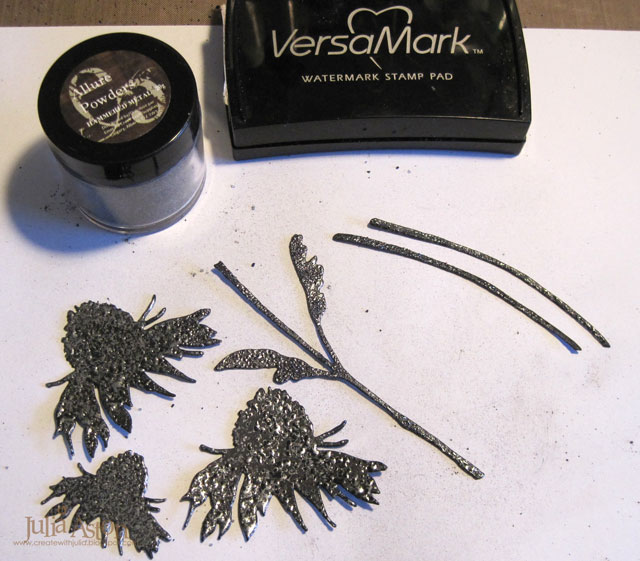
Then I got to work on decorating the front of my journal.  I used Tim's Flower Garden Framelits to cut the 3 stems and 3 coneflowers out of black cardstock.  I inked the pieces with Versamark and embossed with Hammered Metal Allure Powder from Emerald Creek.
I adhered them on my cover (using foam dots just under the cone flower head and glue everywhere else), along with Quote Chips, Industrious Stickers, Clippings
and Design Tape/Chatter which I wrapped around the front and back
and continued it around onto the inside covers
 I also added a few more pages in the signatures that were smaller - just for fun!
I used the clasp piece that is on the Journal Die to close my journal.  I embossed it with the same Hammered Metal Embossing powder and sponged it with DOX Vintage Photo.  I added a piece of Linen Ribbon through the hole.
And I have to confess to you -  when I was putting the Velcro on the front of the journal -  I didn't like how it looked when I closed it  - but when I tried to pull off the Velcro - it took the top layer of the journal with it!!   SO -  I inked over the torn space - and then put a Clippings Sticker over it!
 I added 3 charms on the bindings - a crown from Prima that I colored with Pink Sherbert Alcohol Ink, an Adornment Pinecone colored with Pesto Alcohol Ink and a Philosphy Tag.
So - here is the finished product, once again - front and back!
Thank you so much Linda, for asking me to join the team this week as a Guest Designer for this fun challenge!  I really enjoyed creating my funkie journal.
I can't wait to see what everyone creates without any patterned paper!  Check it out here!
Stamps:  Distressed Grid - Cornish Heritage Farms (no longer available)
Paper:  True Black Cardstock - Papertrey Ink, Cream Little Sizzles Mat Board - Sizzix, brown paper packaging.
Ink:  Ranger Distress Oxides Vintage Photo, Broken China, Peeled Paint, Worn Lipstick,  Versamark.
Accessories:  Journal Die - Eileen Hull/Sizzix, Flower Garden Framelits - Tim Holtz, heat tool, Allure Powder/Hammered Metal/Emerald Creek, Scotch Adhesive Back Velcro, Adirondack Alcohol Inks Pink Sherbert and Pesto, Black Round Cord Elastic - Dritz, ScorTape, Craft Mat, water mister, Idea-ology Industrious Stickers, Quote Chips, Design Tape/Chatter, Clippings Stickers, Adornments/Pinecones, Philosophy Tags, Jump Rings, Linen Ribbon,  Black Stabilo Pencil.

Monday, May 1, 2017

May CAS Mix Up Challenge - Splatter

Happy May Day everyone!  Today is also the May CAS Mix Up Challenge!  Loll is our host this month and she wants us to Stamp, Splatter and use another mixed media of your choice (suggested list on the challenge blog!)
I stamped my sentiment, sponged inks, splattered over Distress Inks with water, used a Digi Image, masked using a circle, and added 3 rhinestones!
First, I die cut a circle and laid the negative cut (the frame) over my card.  I sponged inside the circle with Mermaid Lagoon and Twisted Cintron Distress Inks.  Then I splattered with water and dried with my heat tool.  The water reacts wonderfully with the water based inks.
I had a digital image of this cute little girl in my stash (sorry I don't know where she is from - but I think she was free).  I colored her with Zig Clean Color Brush pens and fussy cut around her.  I added a little blush to her cheek using powder and a q-tip!  I layered her over the inked circle with foam dots. 
I stamped the sentiment from Dress Form Set by PTI in black ink in the upper corner as if the girl is looking at the message.
To finish my design, I added 3 blue rhinestones.
You have until May 24th to join in!  Can't wait to see how you 'splatter'!!   You will find the challenge details and all of the inspiring splatter projects from the talented Design Team at the CAS Mix Up Challenge Blog!

Also linking my post to:
Seize the Birthday
 

Stamps:  Signature Series - Dress Form Set - PTI,  Digi image unknown
Paper:  White - PTI
Ink:  Ranger Distress Mermaid Lagoon and Twisted Cintron, True Black - PTI
Accessories:  mask made from negative of circle die cut out blue rhinestones - Kaiser Craft, foam dots.