Wednesday, November 12, 2014

Christmas Greetings in a Bottle

Just wanted to share a little gift box I made using a sweet template from Creations by AR.
 A Bottle of Cheer, is an awesome Wine Bottle gift box.
You slip off the little tab around the neck and the bottle tops open to reveal a place to tuck a gift or gift card!
 I used my Cameo Silhouette to cut out the template but it also comes in a PDF format that you can print and hand cut out.  It really works up quickly - and what an exciting way to give a gift card or small gift to someone!

A Bottle of Cheer
Stamps: Mini Holidays 5 - Tim Holtz Stampers Anonymous 
Paper:  Brushed Silver - SU, Tan - Prismatics, DP - Merriment Paper Pad - Tim Holtz.
Ink: Archival Jet Black, Ranger Distress Vintage Photo
Accessories:  Scotch Quick Dry Adhesive, Tinsel Twine - Idea-ology/Tim Holtz, Antique Enamel Dots - My Minds Eye, Silhouette Cameo, A Bottle of Cheer Template - Creations by AR.


Tuesday, November 11, 2014

12 Tags of Christmas with Loll Thompson

I am so happy and excited (!) to be joining the wonderfully talented Loll in her 12 Tags of Christmas posts running from Nov 3rd through Nov 14th.  You MUST check it out as there is so much holiday inspiration to be seen!!  Today I am joining her on Day 9.
I made my tag very much in the Tim Holtz style -  using almost all 'Tim' materials!
 Here's how my tag started.  I die cut a piece of Merriment DP with Tim's Tag die and adhered it to the manilla tag.  I embossed Tim's Christmas Stencil with white embossing paste and added Christmas Remnant Rubs
 After the embossing paste dried (overnight), I sponged over the tag and Tinsel Trim with Ranger Distress Vintage Photo ink.  I sponged the Alpha Chips and Natural Trimming and Game Piece with Fired Brick.
Then a 'whoops' happened -  I wanted to rub on some Ranger Distress Brushed Pewter Paint - so I was shaking the bottle as directed -  and somehow pulled off the whole top (instead of just the cover - it has a dabber top) and the paint plopped ALL OVER my tag!  After saying a pretty bad word, I quickly dabbed up the paint with a paper towel and said - "well I guess I'll put it there, and there and there!!" - so much for having to decide just where to put the paint on the tag!
 I purposely dabbed the paint on the letters and metal skate charm (!) and inked the Mirrored Stars with Archival Red Geranium ink.  I added the Trimming and Jute String to the top of the tag using a Ring Fastener and finished off my tag by layering it to a slightly larger piece of black cardstock
I hope I have given you a little inspiration for a Christmas tag you might create.
Please be sure to check out Loll's blog to see all of her 12 tags of Christmas as well as those by a different guest designer each day!  She's also offering a prize to one lucky tag maker!
Thank you so much Loll, for including me in your creative and festive holiday event!!

Paper: True Black - PTI,  Manila tag, DP Idea-ology Paperstash/Merriment
Ink:  Ranger Distress Fired Brick and Vintage Photo
Accessories:   Ranger Distress Paint - Brushed Pewter, Tag and Bookplate Die - Alterations, White Embossing Paste - Wendy Vecchi, Christmas Stencil - Tim Holtz, Idea-ology Adornments/Ice Skates, Game Pieces, Alpha Chips, Ring Fastener, Jute String, Trimmings Naturals/Black, Cream, Mirrored Stars, Glue N Seal - Ranger.

Thursday, November 6, 2014

Fusion Card Challenge - November 6th

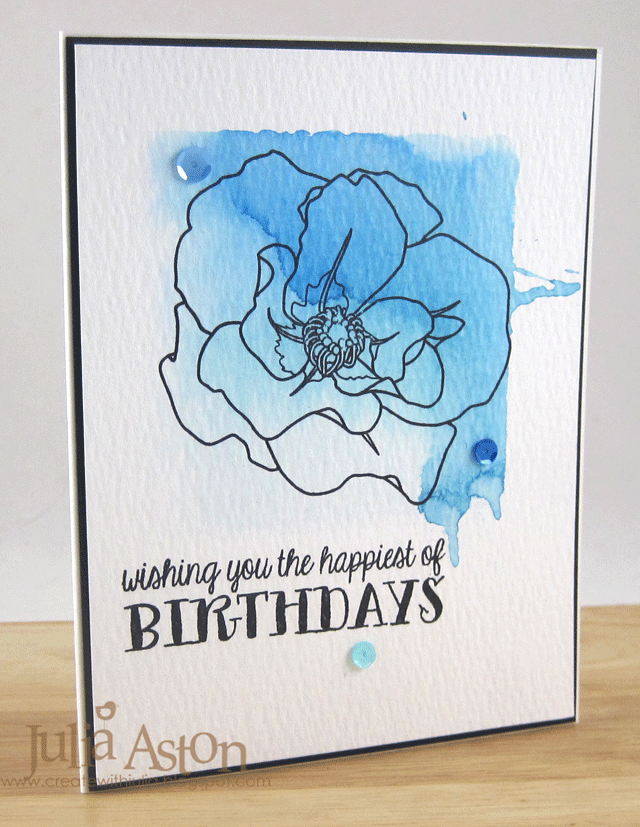
Well, here we are in November, can you believe it??!!  AND it's Thursday - which means it's time for a new FUSION challenge.  We can be inspired by the lovely ombre colors, the cake, the rose or this fun sketch -  or you can do a FUSION and be inspired by both!
I was inspired by the rose and the ombre color for my card today.
To get the ombre effect on my CAS card - I used one of my square clear acrylic blocks - brushing Ranger Distress Markers (Salty Ocean, Broken China and Tumbled Glass) over the block in three sections- the darkest at the top and the lightest at the bottom.  Then I spritzed the block about 5 times (every time you do this it will come out different!) and pressed the acrylic block (color and water side down) onto a panel of watercolor paper.  I lifted the block off and picked up the panel to let any drops drip down.  If there were big puddles I dabbed them with a paper towel - then dried the panel with my heat tool. I stamped the rose from Roses in Bloom by Waltzingmouse and the birthday sentiment from Cake and Candles by Avery Elle on the panel using Archival Jet Black Ink.  I added 3 sequins from Avery Elle and layered the panel to a slightly larger black panel and then to the white card base.

How will you be inspired with this week's Fusion Challenge?   We hope you will join us and link your card over at the Fusion Blog - where you will all the details of the challenge as well as plenty of wonderful inspiration from the rest of the very talented Design Team!

I'm also entering my card in the following challenge:
Cas on Sunday - One Layer Wonder

Stamps:  Roses in Bloom - Waltzingmouse, Cake and Candles - Avery Elle
Paper:  Watercolor paper - Ranger, True Black and white - PTI
Ink:  Archival Jet Black
Accessories:  sequins - Avery Elle, Glue N Seal - Ranger, Ranger Distress Markers - Salty Ocean, Broken China and Tumbled Glass, Mini Mister - Ranger, water.

Saturday, November 1, 2014

Nov Mixed Media Card Challenge - Christmas - Bells Optional

If you are looking for my Words 2 Scrap by card please scroll down.Or click here.

It's the first of the month - and Shery has a new Mixed Media Card Challenge for us!
This month we have a sponsor for the challenge - STAMPlorations - see below how you can win some stamps!

In honor of our sponsor - the Design Team is using Stamplorations' Holiday Sketches - Christmas Bells stamp set on our Mixed Media Cards.
To add texture to my card -  I used silver embossing paste with a Check Mate stencil -  randomly adding the paste over the stencil leaving some open spots.  After the paste dried, I die cut the panel with Tim Holtz Arch Frame Die.
I embossed the bell stamp with Wendy Vecchi Watering Can Embossing Powder, then colored the bells with a silver Wink of Stella.  I colored the ribbon with a red sparkle Spica Pen and some of the plaid lines with a Black Glaze pen - which leaves a lovely texture as you can see in the close up below.  I colored the holly with a Sparkle Green Gelly Roll pen and added home made enamel dots for the berries.  I cut out the bell and adhered it over the arch with foam tape.
I stamped the sentiment in Watering Can Ink and die cut it with a Stitched Mat rectangle die from Lil Inker Designs.  To finish it off, I added 3 silver half pearls. 
You will find lots more inspiration from the rest of the Design Team over at the Mixed Media Card Challenge Blog -  we hope you will join us and link up your Christmas theme card!  You have until Nov 25th to get it done!

Here's how you can win by linking your card this month:
Prizes:
1 winner - $15 gift certificate (randomly drawn from entries with optional element)
1 winner - choice of stamp set from select categories (randomly drawn from all entries)

Remember - mixed media means using texture, dimension and techniques! 

Stamps:  Christmas Bells - Stamplorations
Paper:  Soft Stone - PTI, Brushed Silver - SU
Ink:  Wendy Vecchi Archival Watering Can
Accessories:  Wendy Vecchi Silver Embossing Paste, Silver half pearls - Michaels, Wendy Vecchi Watering Can Embossing Powder, Heat tool, Silver Wink of Stella, Sparkle Red Spica, Sparkle Green Gelly Roll - Sakura, Black Glaze Pen - Sakura, home made enamel dots from Perler Beads, Arch Frame Die - Tim Holtz Alterations/Sizzix, Stitched Mat Rectangle die - Lil Inker Designs, Glue N Seal - Ranger, Check Mate Stencil - Wendy Vecchi.

Words 2 Scrap By - Guest DT!

I'm so excited to be the Guest Designer today for the November Words 2 Scrap By Challenge!  I won the honor with this card I made for their September challenge.

The words for November are:  
You cannot do a kindness too soon because you never know how soon it will be too late - 
Ralph Waldo Emerson
That quote inspired me to create this card:
This willow tree and sentiment are from a set called Blessed by You from Waltzingmouse.  Perfect for this quote I think!  I stamped the tree right on the patterned paper with Archival Potting Soil ink - then stamped the sentiment on a rectangle of Soft Stone cardstock and layered it over the tree with foam dots.  I added a fiber trim to the top and bottom and adhered 3 kraft sequins with Glue N Seal.
What do these words inspire in you?  I hope you'll join us at the Words 2 Scrap challenge!  You'll find all the details here.  Maybe you'll be chosen to be the guest designer for an upcoming challenge!
Oh, did someone say PRIZE?  Yep, we did!  In addition to being the Guest I-Teamer in January and being awarded the winner badge for your blog...there's this fantastic Mini Blueprints stamp set by Tim Holtz that will be mailed to the challenge winner! 

Stamps:  Blessed by You - Waltzingmouse
Paper:  Soft Stone, Dark Chocolate - PTI, DP My Minds Eye/Cowboy
Ink:  Archival Potting Soil
Accessories:  Kraft Blend Sequins - Avery Elle, Trimmings - Naturals/Black Cream Tim Holtz Idea-ology, foam dots, Glue N Seal - Ranger.

Thursday, October 30, 2014

A Vintage Journey #18 - Bountiful Harvest

I'm excited to be participating in my second A Vintage Journey challenge as one of the newbie Creative Guides on the team. 
Here's the challenge in Host Sandie's words:  With Halloween's passing we step into fall.  For this challenge let's think about the harvest.  It seems that pumpkins, wheat, corn and even the Harvest Moon could be in order. For us in the US -  a Thanksgiving theme could work but not necessary.  
I decided to focus on the Thanksgiving aspect of fall and I used an Art Parts Create a Container to make this lovely box.
 Here are all the pieces that come in the Art Parts Create a Container Kit.  I inked the back piece with Wild Honey Distress Ink and then stamped it with Ornate Dots in Archival Jet Black.  I inked the square with Tumbled Glass Distress Ink and then stamped it with From A-Z background stamp in Archival Watering Can Ink.  Then I stamped the sentiment from Say it With Art in Archival Jet Black.  I sponged the edges of both pieces with Chipped Sapphire Distress Ink.  The stamps are all Wendy Vecchi.
I made some cards stamped with Bible Verses (described below) to tuck inside my container, clipping them together with an embossed Hinge Clip, looping a Swivel Clasp through the hole and attaching a Heart Charm to the end of the chain.  It says 'heart songs' inside the heart.
 I embossed the Keyhole with Tree Branch Embossing Powder - add the brads and glued it over the hole on the back piece of the container.
I embossed the Art Parts Leaf with Fern Green embossing powder - and then stamped it with a linear stamp from Large Collage in black.  I embossed the flower with Tree Branch embossing powder and  stamped over it with a dots stamp from Large Collage with Archival Potting Soil Ink.  I added a Blossom Bucket Button  to the center.  I embossed the scalloped edge with Tree Branch embossing powder and then stamped it with Ornate Dots using Archival Potting Soil Ink.  I drew on the faux stitching with fine black marker.
Although we certainly should be thankful all year long - celebrating the Thanksgiving Holiday in the US - reminds me how much I have to be thankful for in my life - family, friends, a home to live in, a husband to share my life with, and the knowledge that it is God's grace that has given me all these things.   SO....  I filled my little container with cards - made from 2 1/2" x 4" pieces of Paper Stash Wallflower paper that I stamped with Bible Verses from Beautiful Blessings by Papertrey Ink..
 I love how they look stamped on this paper.  I sponged around all the edges with Vintage Photo Distress Ink.
 I clipped the cards together with a Hinge Clip that I had embossed in Tree Branch Embossing Powder and slipped them right into the container.
 
 Here's a top view to see the little opening in the container
 And I couldn't let the back go bare-naked!  so I stamped this lovely lacey stamp from Say It With Art by Wendy Vecchi  twice.  The metal pieces come with the Art Parts container - they add strength to the box part.  Looking at this now  - I'm thinking I just might emboss them with Watering Can embossing powder to age them!  Don't know why I didn't think of that when I was putting it together!?!
 So - there it is - my fall/thanksgiving project.
As always, our sponsor is Country View Crafts who is offering one winner, chosen by the Creative Guides, a £10 voucher to spend in their on-line shop.  

 I hope you will be inspired to play along with us -  you have 2 weeks - you will find all the details at the A Vintage Journey Blog - as well as a multitude of glorious projects from my wonderfully talented fellow Creative Guides!

I'm also entering this in the Frilly and Funkie Challenge -  Gratitude

Stamps:  Ornate Dots Background, From A-Z Background, Large Collage Background, Say It with Art - Wendy Vecchi Studio 490; Beautiful Blessings - Papertrey Ink
Paper:  Paper Stash/Wallflower - Tim Holtz
Ink:  Wendy Vecchi Archival Fern Green, Tree Branch, Watering Can and Potting Soil: Ranger Distress Tumbled Glass, Wild Honey and Chipped Sapphire; Archival Jet Black.
Accessories:  Idea-ology - Keyholes, Hinge Clips, Heart Charm, Swivel Clasp; Art Parts Create a Container - Wendy Vecchi; Button - Wendy Vecchi Blossom Bucket; jump ring, Scotch Quick Dry Adhesive, Bic Z4 Black Marker, Wendy Vecchi Embossing Powder Fern Green and Tree Branch.


Tuesday, October 28, 2014

Waltzingmouse Oct Release Day and DT Blog Hop!

The Waltzingmouse October Release day has finally arrived -  today you will be able to purchase the new stamp sets - Flurries, Jolly Old Elf and Elf Made as well as the beautiful new dies - Pretty Panels #1 and Pretty Panels #2.
To celebrate the release - the Design Team is having a Blog Hop -  I am first on the hop this time - but you can always find the list over on Claire's WMS blog if you lose your way.

I have two final cards to share -  first up I used stamps from Flurries along with some Winter Blend Sequins to make this snowy starry winter sky scene. I just LOVE this row of trees!  I stamped the little panel of stars stamp many times over the panel to fill the sky around the trees.  
This card is 4 1/4" x 4 1/4".
And for my final offering using the new stamp sets -  here's a fun '10 days to Christmas countdown' card using stamps from Elf Made.  I stamped the numbers on some grid paper that made it easy to stamp everything straight (!) and layered the strips and punched sentiment over a panel of patterned paper with foam dots.
Next stop on the hop is Sandie Dunne
Details on how you can win a stamp set are on the WMS blog.
Thanks so much for joining us for the Waltzingmouse October release!  Now you can GO SHOPPING so you can get started on all those holiday cards that need to be stamped!!!
Warm Winter Wishes
Stamps:  Flurries - Waltzingmouse
Paper:  White, Smokey Shadow, Enchanted Evening - PTi
Ink:  Archival Jet Black
Accessories:  winter blend sequins - Avery Elle, Glue N Seal - Ranger

Sleeps til Christmas
Stamps:  Elf Made
Paper:  white, smokey shadow, white grid sheets - PTI, DP Christmas Home - Teresa Collins
Ink:  Archival Jet Black, Fern Green, Red Geranium
Accessories:  Pure Poppy Twill Tape - PTI, foam dots, Winter Blend Sequins - Avery Elle, Key Tag Punch - SU.