Thursday, July 31, 2014

Fusion Card Challenge - July 31st

Welcome to the next Fusion Challenge - there's a new one every other week - and what inspiration we saw for the last challenge!  So many beautiful flowers and cupcakes and pastel colors!  And here is our new inspiration!

Once again - I was inspired to use both the photo and sketch on my creation!  Whoo hoo! (that doesn't always happen!)
I used the Cover Plate - Stripes Horizontal die from Papertrey Ink to cut the Lemon Tart card stock to give the impression of the hutch.  I backed it with a piece of DP from October Afternoon/Farm house that reminded me of the dishes on display.  The blue die cut arrows were inspired by the blue chair in the photo and finally the yellow enamel dots are like the cupcakes - don't they look yum??!!! (the cupcakes that is!)  The sentiment is a free stamp I received in an order from Lawn Fawn.
What will you be inspired by this time?  We'd love for you to link up your card to the Fusion Challenge -  check out all the details here.

And if you have a few minutes - please check out all the inspiration from the Design Team linked below!


Stamps: sentiment - I received free with an order from Lawn Fawn
Ink:  Memento Tuxedo Black
Paper:  White, Lemon Tart - PTI, Tempting Turquoise - SU, DP October Afternoon/Farm House Paper Pad
Accessories:  1 1/4" circle punch - EK Success, arrow dies - Lead the Way Dienamics/My Favorite Things, Cover Plate Stripes Horizontal die - PTI, Glue Pen, Glue N Seal, enamel dots - home made from Perler beads.

Tuesday, July 29, 2014

You're as Sweet as Honey

Today I'm sharing a Thank You card.
I used a stitched mat rectangle die from Lil' Inker Designs for the cream panel - and a Time Piece die from My Favorite Things that I cut from shiny gold card stock.  You would usually pop out the little squares on this die - but I wanted it solid behind my bee.
I stamped the large bee from the PTI set Honey Bees in black ink and colored in the body with a Gold Gel Stick pen from Uni ball.  The gold body is shimmery IRL!  The gold strip is a tape from the Market Kit Luxe Letterpress set from PTI
I stamped the sentiment from the Honey Bees set in the corner on the front of the card - and stamped Thank You inside along with the crown from the same set.

My card design was inspired by this weeks Cas(e) this sketch


Stamps:  Honey Bees - PTI
Paper:  White, Vintage Cream - PTI, Gold Mirror Paper - The Paper Company
Ink:  Memento Tuxedo Black
Accessories:  Gold tape - PTI, foam tape, Gold Gel Stick - Uni Ball, Circle punch - EK Success, dies - Stitched Mat Rectangle - Lil Inker Designs; Time Pieces - My Favorite Things.

Sunday, July 27, 2014

CC3C #7 Painted Industrial - and A Vintage Journey #11 Just Stain It!

I have been trying to work up the creative juices to start an Art Journal - and these two challenges finally enabled me to do it!  The CC3 Challenge is to use Tim Holtz Painted Industrial technique which is found in his Compendium of Curiosities III on page 46 (part of the challenge is that we cannot describe the technique - you need to have your own CC3 to look it up).  And the A Vintage Journey challenge is to Just Stain It - to use Ranger Distress Stains in various ways on your project.

So here is my Art Journal - that started out life as a plain black - spiral bound journal - I think I got it at Michaels.....I've had it for some time - gathering dust in my Craft Room!  I decided to see how Distress Stains would look on Kraft Glassine Paper.  So I stamped the bird and window frame from Classics #16 stamp set using Archival Jet Black Ink and let it dry.  Then I just dabbed Tumbled Glass and Picked Raspberries Distress Stains over the images - they kind of beaded up on the Glassine paper so I just kept dabbing and the color did soak in a 'blotchy' kind of way - and they did keep their bright colors!

I used the Painted Industrial technique on borders along the top and bottom of my cover using the Vintage Lace dies.  I didn't pop out the little circles on the lacey cuts so the black distress paint would show. I also used the technique on the crown and ink bottle which I'll show close up below.

The sentiment stamps are from Destination Art by Wendy Vecchi/Studio 490 Stampers Anonymous.  Perfect for my Art Journal I think!
I added Forest Moss Distress Stain to some White Embossing Paste from Wendy Vecchi and applied it to both the Dot Fade and Stripes stencils.  I cut the label from the Apothecary Bottles die from cork, stained it with Picked Raspberries Distress Stain and added some Life Quotes Remnant Rubs to it.  I dabbed the edges with Frayed Burlap Distress Paint.
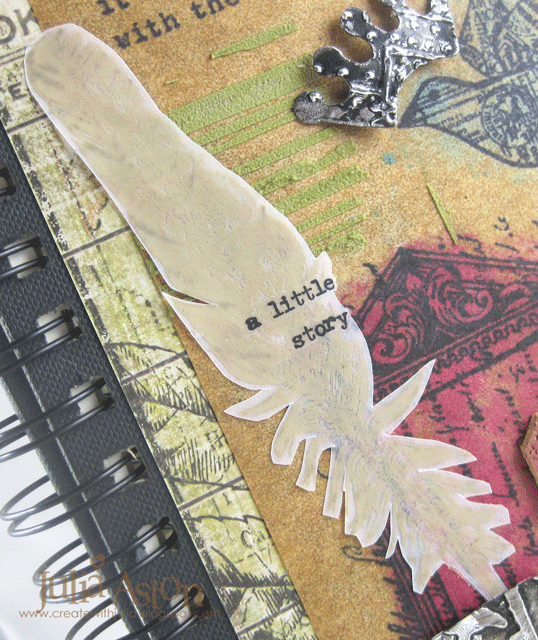
I stamped the feather from the Bird Feather stamp set on vellum using Frayed Burlap Distress Paint (wash your stamp right after 'inking' it with paint!)  The paint on the vellum is very subtle but can be seen better IRL!  I added some Life Quotes Remnant Rubs over the feather  (note - Remnant Rubs will NOT stick to the Kraft Glassine but will stick to vellum- how do I know this??!!)
The ink bottle is a die cut Apothacary Bottle that I cut the bottom off of to look like an ink well - with the feather as the pen.
I die cut another  Apothecary Bottle labels out of Art Parts Clearly for Art Modeling film, added a Chit Chat sticker that I stained with Tumbled Glass Distress Stain and outlined with a black Stabilo Pencil and layered it over the bottle.  I used the clear film as I didn't want to hide any of the Painted Industrial technique on the inkwell!  I used the Sizzix Patchwork Embossing folder on the ink well.
Here's a close up of the crown using the Painted Industrial Technique.  The curve of the crown fit nicely over the bird's head.  I used the Riveted Metal Embossing folder on the crown
You can see the Door Knob that I screwed into the cover better in this photo - you can actually open the Journal with the knob - so fun! and when the journal is open on the table - the knob actually protects the popped up pieces on the cover since it keeps the cover from lying flat.  I looped a single piece of Linen Ribbon through one of the binder rings.
I wanted to keep the back flat - so there is nothing sticking up here. I used several Remnant Rubs here (Life Quotes and Botanicals).  I used the same papers on the front (under the Kraft Glassine) and the back - Paper Stash/Wallflowers.
I stained some Chit Chat stickers with Picked Raspberry Distress Stain and outlined them with a black Stabilo Pencil
I die cut the Ornante Frame from Kraft Glassine and stained it by dabbing Tumbled Glass Distress Stain over it and framed the gentleman's face on the patterned paper.
I used the same papers on the inside covers - I've just left them as they are for now - they have such wonderful imagery on them - I don't think I will do anything to them - maybe put some sentiments later.....
Now I just have to work up the nerve to actually do something on all of these clean white pages inside my Art Journal!!!   One step at a time - right??!!!
So one project for 2 fun challenges!  Maybe you'd like to join in too?  You will find all the details at these links:

This week's CC3 challenge is sponsored by Inspiration Emporium who graciously offers a $50 gift certificate to the winner!
Stamps:  Stampers Anonymous - Classics #16 and Bird Feather/Tim Holtz, Destination Art/Wendy Vecchi,
Paper:  Kraft Glassine - Idea-ology; Foil Tape Sheet - Ranger, Vellum - Stampin' Up, Paper Stash Wallflowers - Tim Holtx, cork sheet - Michaels, Art Parts Clearly for Art Modeling Film - Wendy Vecchi/Studio 490.
Ink:  Archival Jet Black
Accessories:  Ranger Distress Stains - Tumbled Glass, Picked Raspberries, Forest  Moss; Ranger Distress Paint - Black Soot, Frayed Burlap; Alterations Dies - Apothecary Bottles, Heart and Wings, Ornate Frame, Vintage Lace Sizzlets; white embossing paste - Wendy Vecchi/Studio 490; stencils - Dot Fade and Stripes - Tim Holtz; Cropadile; Idea-ology Door knobs, Chit Chat Stickers, Live Quotes and Botanicals Remnant Rubs, Linen Ribbon; Black Stabilo Pencil.

Thursday, July 24, 2014

Sending Smiles

Sprinkles and Smiles to be exact!
For today's creation I used another of my Papertrey Ink Market kits - Shakers and Sprinkles -  I buy so many things that I actually forget what I have - so I'm making a conscious effort to get things out and play with them!
My stitched tag is from Waltzingmouse.  The white stitched frame die, the pretty chevron patterned paper, the Sprinkles die, the sending, &. and Smiles stamps, the stars and green sequins are all from the PTI Shakers and Sprinkles Market kit (which I actually just received last week - I was on the backorder list from May).  The arrows are MFT and the black jute string is Tim Holtz.  

I'm entering my tag into the 2nd Tag You're It challenge:

Stamps:  Shaker & Sprinkles kit - PTI
Paper:  white, True Black, Simply Chartreuse - PTI,  DP - from Shakers and Sprinkles kit - PTI
Ink:  Versamark, Memento Tuxedo Black
Accessories:  White embossing powder, heat tool, Glossy Accents, foam dots, Jute String - Tim Holtz, Stitched Tag Die - Waltzingmouse,  Lead the Way Arrow dies - MFT, Stitched Frame die Sequins and stars from Shakers and Sprinkles Kit - PTI.

Tuesday, July 22, 2014

Art with Heart Challenge - Star Student!

I finally finished my project for Eileen Hull's Art with Heart July Challenge -  Red, White and Beautiful.  
I had the box  (Sizzix Blocks/Cubes 3D) and panels all made and put together but just couldn't decide how I wanted to decorate it. But now the deadline is one day away so I put the creative engine in full gear!  And here is my interpretation of Red, White and Beautiful!
I used a Clock Key for the top and tied some wrinkled seam tape around it in a bow and let the tails dangle down.
The 3D Star die is from Savvy Dies and the gem stars are from JoAnns.  I used 2 thick foam dots layered together in the center of the star to adhere it to the sides of the block.
Given that fall and getting back to school are just around the corner (although I do NOT want to wish the summer away!!)   I'll save this to give to "a star student'  in the fall. The top of the box opens so a little treat can be placed inside.   The stamp and stitched banner are from Lil' Inker Designs.
For the panels - I stenciled a big strip of white card stock using Wendy Vecchi's Translucent Embossing Paste and Tim Holtz Layering Stripes Stencil.  Then I inked the panel with both Salty Ocean and Festive Berries Distress Inks.  To finish it off - I stenciled Graduated Stars from MFT in Archival Black ink.  Then I cut the panel into 2" squares and adhered them to the cube.  You can see it most clearly on the bottom side here.
So I guess I'm finishing this project just in time to find out what the August Art with Heart Challenge will be!

Stamps:  2 Cute Ink - Bunny Star - Lil' Inker Designs
Paper:  White Little Sizzles Mat Board, White - PTI, DP October Afternoon Farm House and Sidewalks.
Ink:  Ranger Distress Salty Ocean and Festive Berries, Memento Tuxedo Black, Archival Black.
Accessories:  Stripes Stencil - Tim Holtz, Graduated Stars Stencil - MFT, Wrinkled Seam Tape - Prairie Bird Boutique Etsy Shop, Wendy Vecchi Translucent Embossing Paste, sticky stars - Joanns, 3d Star Die - Savvy Dies, Stitched Sentiment Flag Die - Lil' Inker Designs, thick foam dots, Idea-ology Clock Keys, Sizzix Block/Cube 3D.

Monday, July 21, 2014

Winter Bunny

I've missed a couple of the Festive Friday Challenges - and I was determined not to miss it again!  This is the beautiful inspiration photo:
So many pretty things to focus on -  first I thought pinecones,  then snowflakes, then white frame and wreath,  I toyed with the idea of branches with silver balls, or a roaring fire..... but then
The little bunny won out! I love the stitched bunny and bow from Lil' Inker Designs - I guess she's not just for Easter anymore!! I cut her out of a brushed gold card stock.  I also used (for the very first time!) my long ago purchased and stored away Impression Plate from the Luxe Letter Press Market Kit from PTI.  
I stamped the NOEL from the Nutcracker Sweet set by Waltzingmouse in Brilliance Gold Ink next to my bunny.  The bunny and bow are both popped up on foam tape. 

On the inside I stamped this verse from an old wood mounted rubber stamp I have:  
In the stillness of snow falling
In the glow of candlelight
In the beauty of frosty windows
May peace be yours tonight.

Perfect for my little bunny, I think.....

Stamps:  Noel from Nutcracker Sweet - Waltzingmouse
Paper:  Vintage Cream, Letter Press 110# Stock - PTI,  brushed gold from stash
Ink:  Brilliance Galaxy Gold
Accessories:  Bunnies and Bows Die set - Lil' Inker Designs, Luxe Letter Press Impression Plate - PTI

Saturday, July 19, 2014

Vintage Journey Challenge 10 - Dies and Distress

I made today's card for the latest A Vintage Journey Challenge - Dies and Distress.  These are the details of the challenge from the site:  

You can create any type of project i.e tags, canvas, cards, altered art.....as long as you include dies and distress products such as inks, paints, stains, embossing powders and markers.  Dies can be distressed, stained,painted, embossed and stamped.................the creativity is yours.
We are a Tim Holtz inspired challenge blog, however, it is all about Tim's style, so the dies you use do not have to be from Tim's Sizzix range. Please check out our Travelling Instructions for more details.
Our regular sponsor is Country View Crafts and the challenge winner will receive a £10 gift voucher to be redeemed at their online store.
 
For my distress products I used Mustard Seed, Faded Jeans and Antique Linen Distress Inks, Aged Gold Frantage Embossing Powder, Tim Holtz Dot Fade Stencil, paper from Idea-ology PaperStash/Wallflower, and Tim Holtz Paper Distresser.
For my dies - I used Tim Holtz Arch Frame and Cresent Moon and Stars cutting them out of white card stock. I sponged the arch with Faded Jeans Distress Ink - and then inked the Dot Fade Layering stencil over it with Mustard Seed Distess Ink.   I embossed the moon and stars with Frantage Aged Gold embossing powder from Stampendous - and then sponged over them with Mustard Seed Distress Ink to color any white spots that showed through.  I layered them over the panel with foam dots.


The sentiment frame already looks distressed when you ink it.  I added some Remnant Rubs/Botanicals words to the arch die cut.  I distressed the edges of the patterned paper panel and sponged them with Antique Linen.
I hope you'll create a Dies and Distress Project and link it up over at A Vintage Journey - you have until the 24th  6pm UK time to link up your project!
 
I'm also entering this in this week's Seize the Birthday - anything goes

Stamps:  Saying Stuff - Stampers Anonymous
Paper:  White - Papertrey Ink, DP - Idea-ology Paper Stash/Wallflower
Ink:  Ranger Distress - Faded Jeans, Antique Linen, Mustard Seed, Archival Jet Black, Versamark.
Accessories:  Aged Gold Frantage Embossing Powder - Stampendous, Stencil - Dot Fade Tim Holtz, Remnant Rubs/Botanicals - Idea-ology, Dies - Arch Frame,  Crescent Moon and Stars - Tim Holtz, Distress Tool - Ranger.

Friday, July 18, 2014

A Stylish Birthday

A friend at work asked me to make a special birthday card for her sister who is a "fashionista!"  I thought it would be fun to use my Tim Holtz dress form die on a piece of honeycomb paper to make it 3 dimensional.  I was going to just put it on a card front - but then found this cute  bureau side step tutorial in a pile of things I've printed off on one of the tables in my craft room (when I was cleaning!) and thought it would be the perfect thing to highlight the dress form!  The basic side step tutorial can also be found on Split Coast here.
I inked all the edges of the card, drawers, sentiment labels and dress form with Antique Linen Distress Ink.  I added pieces of Melange Tissue Wrap to two of the step and tied two colors of wrinkled seam tape around the waist of the dress form to add a splash of color to the card.
I stamped the sentiments on die cut Sentiment Strips from MFT.
I put clear tape along the seam in the back of the honeycomb to hold it open - this looks good even from the back doesn't it?!  I stamped a birthday verse here and my friend can also write a note to her sister here.
I stamped the birthday girl's name on a hand made label (the bottom end was made with the SU Curly Label Punch) and tied it onto the neck of the dress form using a piece of twine.
I'm linking my birthday card to Seize the Birthday -  optional toppings: use twine or string.


Stamps:  Cornish Heritage Farms - Birthday Centers
Paper:  White - PTI, Tissue Wrap Melange - Idea-ology/Ranger, Honeycomb paper - Inky Antics
Ink:  Archival Jet Black, Ranger Distress Antique Linen.
Accessories:  Wrinkled Seam Tape - Prairie Bird Boutique Etsy Shop, Square Gems - Joann's (old!), curly label and modern square label punches - SU, twine from stash, ScorTape, Dies - sentiment strips - MFT, dress form from Sewing Room die - Tim Holtz Alterations.

Thursday, July 17, 2014

Fusion Card Challenge - July 17th


Hi everyone - it's time for another Fusion Challenge - wow - did we see a lot of wonderful red poppies with bright blues and lovely triangle designs on all of your entries for the last challenge!  It is SO hard for us to choose our one favorite - there are SO many beauties to choose from - and thanks so much for joining us!

And now we have today's beautiful inspiration -  Look at these yummie cupcakes - I think they are candies or soaps don't you?   I got a gift of some soaps last year that look similar to these only they had real dried flowers on them.
So - I'm proud of myself this week - I was able to combine the photo AND the sketch in my creation!
First, I inked my white card stock panel with Antique Linen and Tumbled Glass Distress Inks.  Then I flicked water onto the panel - and since Distress Inks react with water - it created this lovely splatter.  I adhered a strip of Sketch Book Tissue Tape along the edge of the colors, wrapping the ends around the edges of the panel.  I stamped 'happy birthday' on a sentiment strip and adhered it with foam dots above the Tissue Tape.
I made my pretty flower out of Terminology Tissue Wrap.  I cut 4 squares each 3"x3", stacked them on top of each other and then fan folded them.  I stapled it together in the center and rounded both edges.  Then I pulled apart each fold and fluffed it up.  Tim Holtz has the tutorial for this Tissue Wrap Flower in his Compendium of Curiosities Vol II page 37.   After I fluffed my flower and was happy with it's shape -  I applied Spun Sugar Ranger Distress Paint with my finger.  This will, no doubt, get a little crushed if mailed, but I think it can be fluffed up again when received and opened!

I hope you will check out this week's challenge - and also all of the beautiful inspiration from the Design Team - Here are their links:


Sindu
Stephanie Severin


Thanks so much for coming by today and I hope you will join us in this week's Fusion Challenge

I'm also entering this card in the Curtain Call Challenge
And in the Runway Inspired Challenge

 
Stamps:  Birthday Basics - Papertrey Ink
Paper:  White, Soft Stone - PTI, Tissue Wrap/Terminology - Ranger
Ink:  Memento Tuxedo Black, Ranger Distress Antique Linen, Tumbled Glass
Accessories:  Sentiment Strips Die - My Favorite Things, Tissue Tape/Sketch Book - Ranger, Eclipse Tape (to mask), foam dots.

Tuesday, July 15, 2014

WMS Team Talk Post - Chillax


Hi all -  today is my day to post over at the Waltzingmouse  Team Talk Blog -   I'd love if you'd take a look and check out my creation!  -  here is the link to my post.


This is a snippet of a get well card I made for my good stamping friend Anne's husband who had hip replacement surgery yesterday morning and all went well-  I'd appreciate your good thoughts and prayers for Jay -  thanks so much!


WMS Products used:
My Island
Frame It
Good Egg Dies