
We had a world traveling Aunt Helen that brought my sister and I Nordic Sweaters when we were young - mine had red in it and Marcia's had blue and both had those lovely flower stamped pewter-like buttons! and I must say - itchy as heck as they were wool!
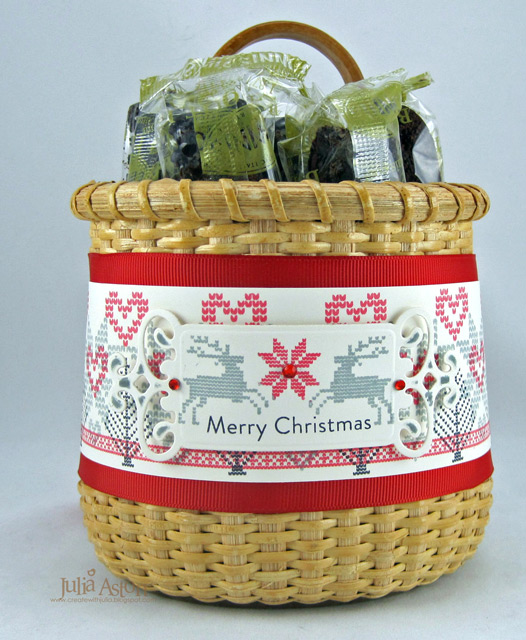
Today I decorated a lovely basket (I got at the Christmas Tree Shop for just $2.99) using several single stamps from the set to create my own Nordic pattern. See how the patterns of the stamps look like yarn stitches?!


Then I added some read hearts

Then smaller hearts in grey and trees in black ink

And finally I stamped a narrow red strip along the bottom.
Now - this panel is 11" long and the basket measures longer than this around. The basket sides are not straight down so I knew a longer panel would not adhere flat if I went all the way around. So.......

I added red grosgrain ribbon to the top and bottom of the panel with ScorTape - extending the ribbon on the top past the edges of the panel so I could tie it in a bow at the back of the basket. I hate having an open unfinished space and I think this finishes it off nicely!

I used both ScorTape and thick glue dots to adhere the panel to the basket as there is a shiny finish on it and Scor Tape wasn't enough alone to keep it held on. I also made a little tag using stamps from this set to tie around the ribbon with twine.
Front:
Front:

and back:


I've got so many more ideas for using this set - I can't wait to have some more time with it!
So let's go check out what the rest of the Design Team created! I can't wait to see - can you!??! Hope you will stop by again tomorrow to see what we have for Preview Day 3!
Anya Schrier
Becca Feeken
Belinda Chang Langner
Julia Aston You are here!
Jennifer Holmes
Kate Whelan
Kelly Schirmer
Laurie Schmidlin
Lynn Mercurio
Mona Pendleton
Niki Estes
Sandie Dunne
Tosha Leyendekker
Claire Brennan (Owner)
Stamps: Waltzingmouse - Nordic Winter (to be released 10/15)
Paper: Vintage Cream - PTI
Ink: Memento Tuxedo Black, Lady Bug, London Fog
Accessories: Heart Punch - Paper Shapers, Fancy Tags - Spellbinders, rhinestones - Kaiser, cropadile, Pure Poppy Grosgrain Ribbon - PTI, thick glue dots, ScorTape, cookies, Basket - The Christmas Tree Shop, Twine - PTI
28 comments:
LOVE LOVE LOVE it!!! What a wonderful idea.
Wonderful basket!!! Love how you used the nordic set, and I'm with you: those Nonni's biscotti are too good to let go of (unless you buy a BUNCH!)
What a fabulous project - and thanks so much for sharing your "how-to" pictures. The goodies sound delicious!
Fabulous creation Julia. Love the little basket cozy and how very creative of you to combine those images in such a way to get such awesome results. Love all your little details.
Stop the madness! I am doing this, Julia! I am soooo making a cute basket like this!!!! I just love the pattern that you created, I would never think to layer up the images like that! SO creative to make a sweet basket wrap. Christmas Tree Shop? It's Kelly calling. I'll see you at about 12:00 noon today, heeee! Love it!
STUNNING!!!
I absolutely LOVE this basket...
I need some!
What a perfect gift, Julia!
And I don't blame you for keeping it...
I think I would too...
*giggle*
And thank you for showing the step by step because without it...
I could make a colossal mess!!
Fabulous project...
just love, love, love it...
I can't wait for more!! :)
WOW! That basket is the PERFECT application for these beautiful stamps!!!
Julia, I just love how you combined the images of the new set to decorate that beautiful little basket (which I would also keep to myself if I had one like that). You stamped so accurately, that is really perfect. I also like the ribbon on the top and bottom of the panel and that Spellbinder label also looks great.
Kind regards
Carola
Julia, how fab that you showed your process - you sure put the images together well! Love your basket!!
Thanks for the mini tutorial! Your basket is amazing! Love how the pattern is Christmas-y but could be used all winter. Thanks for all the inspiration!
Julia, You lined everything up PERFECTLY!! So worth the effort - Looks beautiful! What a great way to dress up a gift.
Great idea for gift baskets, I may have to borrow it!
So pretty Julia! Love how you dressed up a basket making it a treasured keepsake! Love you choice of colors and thanks for sharing the tutorial!
Now how clever is this? Great idea, Julia. I love how you used these stamps!
So gorgeous Julia.
Hugs Riet.xx
You are so talented, Julia! This is a beautiful Christmas basket!! I appreciated your showing how you stamped the individual images to create your pattern, too.
I have no words for this! This is exactly the kind of project that this set was made for. All those layered patterns just makes my heart go pitter patter! LOVE this!
Wow, Julia, some Amazing stamping going on to decorate the basket!! I love how you combined the different images to create the strip for the basket. LOVE the result!!
Wonderful Julia and I love the 'how to do it' - needed as I am so challenged! This is a very clever use of the stamps.
Wht a pretty design on that basket!
This is genius Julia. What a neat set. I love your basket idea.
Great idea with the ribbon and thanks for the wonderful tutorial. You have captured the essence of the Nordic set!
How cute is this!! You know I love it!!
Julia, I love, love, love, love this! I can hardly wait 'till it arrives in the mail! :) Totally super brilliant the way you used the ribbon to attach it to the basket! I can hardly wait to try that idea out!
Oh My Goodness, I lust love that Nordic set & your lovely project!! P&G are wearing sweater dresses w/ a Nordic pattern for Christmas this year!!! I just may need to borrow that set to make borders on scrapbook pages!!
Simply stunning!!!!
Ali x
Beautiful set - loving the backgrounds you can build with it.
Fabulous layout - thank you for showing the steps you used. This is a beautiful basket.
Post a Comment