
With Origami you really need to see each step clearly as it can be confusing the first time you make anything. There are 11 steps shown here!
I suggest you use a piece of plain computer paper the first time you try to make this butterfly. Once you get it - you can whip them out in just a couple of minutes! It may take a few tries to figure out the folds so don't get discouraged. I hope my pictures help you visualize them.
To make the small butterflies that end up to be about 1 3/4" x 2 " I used a piece of Origami paper 2" x 3". I purchased my paper at The Paper Source but there are many places to get it. I like the colors/patterns they have and you can see all of the pieces that you are buying - most packages you only see the first and last piece so you're not always sure what's in between!

You should use a piece of double sided Origami paper - ie. printed on each side - since both sides end up showing and it makes it more colorful. Note: Although you can use any kind of paper, it needs to be light weight so you can make good creases and folds. Origami paper is best.
So - let's take a deep breath and get started on it! My husband, Kent, was the photographer for me since both of my hands were busy!!
Step 1: Hold paper with the longer side at top and bottom, front side up.
 Step 2: Fold in half bringing top down to meet bottom and crease.
 Step 3: Open the paper back up, turn it over & rotate it so that the short side is at top and bottom (Note - I had already made a butterfly out of this piece so you can see many folds - yours will only show the center fold!)
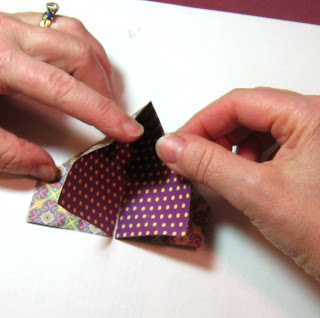
 Step 5: Lift right side up to the existing vertical center crease - open the edges on the right side and squash fold it (push the top fold down towards you where my right index finger is)
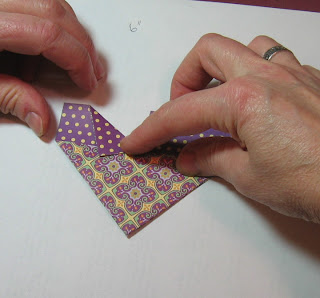
so it makes a triangle.

Crease the edges.


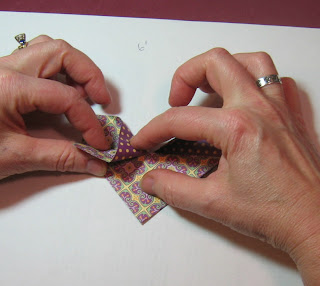
and crease it.


Step 11: Fold down the front wings from the top on each side.


Done! Phew! Good Job!
 And here is a 5 x 5 card I made to show you a large and 2 small butterflies. I used this designer paper as background as I thought it looked sort of like the bark of a tree where butterflies might be hanging out!
This Origami Butterfly design was created by Ralph Matthews from England. It is just one of the many Origami projects in the book called "Minigami" by Gay Merrill Gross published by Firefly books. I highly recommend this book. It has patterns for dresses, hats, purses, ducks, flowers and pots, fish, stars, penguins, santa and many others! I purchased mine at Borders Books and you can also find it on Amazon.com
Please let me know what you think of my tutorial and if you make some butterflies please link back here so I can see what you created!
Thought for the day from Poor Richard's Almanac: "The good or ill hap of a good or ill life, is the good or ill choice of a good or ill wife".
Thanks for stopping by today!
Stamps: Paptertrey Ink
Ink: Pitch Black Adirondack
Paper: Very Vanilla, Always Artichoke, Basic Black, DP: K& Co., Origami papers
Supplies: oval punches, Dimensionals
47 comments:
Wow this is beautiful! Thanks for the tutorial!
Louise C.
Great tutorial! Your husband's so cool to take all those pics :)
This card is gorgeous! Love the pp you used and the three sizes of butterflies! Thank you so much for your generousity for sharing this with us! That was really nice of you!!
these are just beautiful, Julia! The very detailed tutorial and wonderful visuals are fantastic! I will give this project a try and let you know how it goes! They won't be this lovely, that's for sure! TFS! hugs~
Wow, what a wonderful tutorial---a lot of time went into that, Julia!
Thanks for sharing....I would like to try this!
LeAnne
Great job on the tutorial Julia! May have to try making one of your butterflies!
wow! thanks for a fabulous tutorial.. I will definitely be trying this a little later..
Beverly
This was a beautiful card. I found you from SCS. The mother's day card on there is exactly what I was looking for. Thank you so much for sharing your tutorial. I can't wait to make some!!!
great tutorial, I'm going to have to make some these
Oh wow!! This is outstanding. So creative! Thanks for taking the time to create the tutorial!
Elizabeth Bead Diva
It's awesome Julia....what wonderful butterflies! Great job on the tutorial!
I used your wonderful tutorial for one of my Caard{varks} tags of the month ... thanks for the inspiration!
AMAZING!! Thank you for sharing!!
whoa! this is amazing!!!
thanks. you make it really easy :D
great tutorial! it took me a few tries, but i finally got it. mine aren't anywhere as good as yours, but they look like butterflies. thanks so much for posting this!
--anne
These are by far the prettiest origami butterflies!!! Your tutorial is going to help make my wedding reception look amazing!!! Thanks :o)
Loved the butterfly origami tutorial. Thanks for posting it and thanks for telling me about it!
I searched the internet for a simple origami butterfly as I have to make about 100 for my daughters first birthday decorations. This is by far the most beautiful one and such an easy to follow and fabulous tutorial. Many thanks
Hi,
I would like to do this butterfly but i don't know what does it mean the paper size is 3" x 4" or 2" x 3"....
I am hungarian. I don't know the english measures.
Can you help me?
thank you for the tutorial. i was looking for a simple design for my mum's easter present. i've also done a peacock which i am going to lacquer and make into a keyring, these will probably make a necklace! thank you for the photos too. they made it really simple. bethX
i was in maths and we had to make origami butterflies!
i used your site and it was really easy and made a cool butterfly!
thank you ! :)
xxx
carys
hi julia..thanks to ur husbands great photos and ur lovely instructions i was able to create beautiful butterflies!!!thanks again..
ayesha
mumbai
india
Thanks so much for this great demonstration. I have made 2 beautiful butterflies. I plan to make more and to check out the book you mentioned.
This is gorgeous, thanks for the detailed instructions! I've been looking all over the internet for this exact butterly pattern, and now I'm happy to have found your site. Very inspiring!
I have to make 90 butterflies by the end of today. I think I have been to every possible butterfly site trying to find an easy-to-follow set of instructions. Yours is the only one that delivers what it promises. The instructions are so clear and the pictures are incredibly helpful. Thank you so much. (only 80 to go now!)
this is wonderful :) thank you for the very clear instructions... I'm going to make earrings out of these :)
Hi this project turn out to be a good one very easy instructions to follow, and I feel like I accomplish something, thank you
Love this tutorial, of all the origami butterflies I've tried recently this is by far the nicest looking for the ease of it's making! Love it =D
wow.. what a great pict n tutor..
i wished to share this...
asked 1st..
:D
This is a beautiful paper butterfly and thank you for the great instructions :)
I'm following this cause to make 1,500,000 butterflies http://www.hmh.org/ed_butterfly1.shtml
And I would like to share your tutorial with others interested in above cause through my blog. Is it ok for me to use a link to this tutorial?
that was the most cool butterfly every
Thank you so much for this great tutorial! I've been looking for a simple origami butterfly to translate into cloth and I think this one is it!
Hi Julia,
I have been looking for ages for the perfect, easy butterfly origami to make. Your tutorial is wonderfully clear, and I am now really excited about making these butterflies!
Thank you so much for sharing!
Juanita
thanks so much for this! I have spent the last hour trying to find an easy butterfly to fold that does not start from a square as I'm trying to fold money into a butterfly.
i really like your butterfly origami but o couldn't find anywhere the diagram for it. do you have the diagram for it? can you post it or give a link to it? thank you
Thank you so much! I'm an art teacher and I've been looking through results on origami butterflies for over an hour and getting really frustrated! The photos are so much easier for me to understand than black and white illustrations with all the arrows and lines!
I Loved this tutorial so much! Thank you. My fiance and myself will be using this to make sembazaru for our wedding instead of cranes because we still give each other butterflies - I featured your tutorial on my blog here: http://glickwedding.blogspot.com/2011/01/one-thousand-butterflies.html
Have been looking for ages for this particular butterfly. It absolutely fabulous...cheers tam.
Ohh and i see others have featured your tutorial too, wow good job.
i loved the butterfly. very nicely explained. thanks
I couldn't believe how easy your very detailed photographic tutorial was to follow. You really have a knack for teaching. Thank you so much for the effort it took to produce this.
Ann
2/5/12 7:00 PM
The butterfly is the prettiest one I've seen! I like to make hand-made cards for friends and family, and right now I'm starting on one for a friend's birthday. She loves butterflies so I think she will love it! Thanks heaps!
PS: The section for the crease of the wings were a little hard to understand but after playing around with it, it seemed to be so simple!
This was fantastic! I just made the most fantastic butterfly for my friend for her birthday because of how wonderfully detailed and easy to follow this was. Thank you!
Such a clear tutorial, thank you! Time to get busy!
Thanks for the fabulous tutorial. Here is what I made: http://mayadahan.blogspot.com/2014/03/three-cards.html
Here it s 2025 already, was looking for a tutorial to make fabric butterflies, so many to choose from. I chose your's because t was by far the very best one, so precise and easy to follow. I got it right first try! Thank you so much for creating a excellent tutorial and for sharing it so generously.
Hi Julia! 🌸
I really enjoyed your origami butterfly tutorial—your step-by-step photos make it so easy to follow, and the reminder to “take a deep breath” is actually perfect for origami!
I also wanted to share this link for anyone interested in additional resources:
49s drivetime results
Thanks for the lovely tutorial! 🦋
Post a Comment