Wednesday, September 18, 2019

Mid Month Reminder: Sept CAS Stencil Challenge - Baby Wipes

Hello friends!  I'm here today to remind you that there is still time to link up your Sept CAS Stencil Card Challenge.    I'm hosting this month and my challenge is to use Baby Wipes with your stencils.  There are a few links to techniques over at CAS Stencil for your inspiration.
Today I used the technique I like the best - sponging a panel with water based inks (I used Distress Oxides here) and then laying the stencil over the panel and rubbing over the stencil with a baby wipe to remove some ink.
I'm in Halloween mode already as 2 friends and I will be having a Halloween sale at my church in October so we have to get crackin'! 
a close up of the web
Here are a few process photos.
I sponged Distress Oxide Black Soot ink over a water color panel - this is 5" x 5" but I later trim it down to fit an A2 card front.
I laid my Web Stencil from MFT over the panel and held it with some mask tape.
I rubbed over the stencil with a baby wipe.
The wipe was a little bit over-wet and you can see that it looks a bit juicy after I removed the stencil!
So I quickly got out my heat tool to dry it before I smudged it!
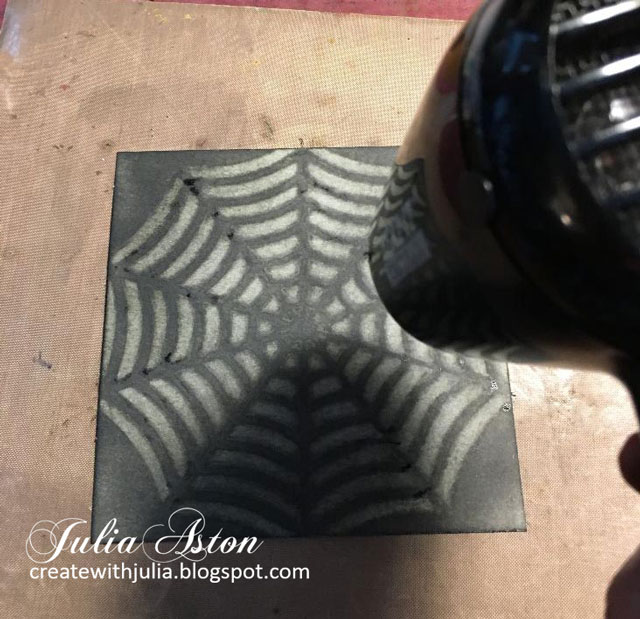
and here it is all nice and dry!
Then I die cut a black card panel using Lawn Fawns Reverse Stitches Scalloped Circle Die, layered it over the web  (that I trimmed to 4 1/4" x 5 1/2" size) on foam dots.  I die cut the Memory Box Dangling Spider out of  black Kraft Stock and laid it over the web with a foam dot as well.  I added two Tiny Twinkle yellow eyes.  I white embossed the sentiment from Amuse in the corner.
 I think this is the first time that I have used black as my open CAS space.  But I knew if I used white it just wouldn't be as scary! 

I also wanted to share with you what I did since I had all my supplies out on my work table.  I had saved some white inside pieces from prior projects that I cut using the Scalloped Circles Die. (We just can't throw this stuff away right?!)  The three lighter ones are just a white card stock.  I sponged them with the DOX Black Soot ink, laid the stencil over them and wiped with the baby wipe.  
The one on the top left was the black piece cut out from this project and I just sponged it with the black and then wiped over the stencil and was surprised that even black over black gave a fun result!  So now I can make 4 more Halloween cards using these!


You have until 9/24 to link up your CAS stencil with baby wipes card.  I can't wait to see what you do!  
There's lots of Design Team inspiration over at CAS Stencil - as well as from our talented Guest Designer this month - Sarah!

Stamps:  Boo - Amuse wooden stamp.
Paper: Watercolor paper - Canson, White, True Black - PTI, Kraft Stock Black - Tim Holtz/Idea-ology
Ink: Versamark, Ranger Distress Oxide Black Soot
Accessories: Dangling Spider Die - Memory Box, Reverse Stitches Scalloped Circle Window Dies - Lawn Fawn, Tiny Twinkles, foam dots, Spider Web Stencil - My Favorite Things, baby wipes, heat tool, white embossing powder, Tiny Twinkles rhinestones.

Sunday, September 15, 2019

Four Paper Dolls for Halloween

I purchased some of the new Tim Holtz release for Halloween and wanted to get started using them!  I used the Masquerade dies, some Geo Insects,  the new Abandoned Paper Stash papers, last years Halloween Clippings Stickers for the sentiments and Halloween Paper Dolls to create 4 different designs.

For my first card, I used the largest mask from the Masquerade set as wings and one of the smaller masks on the Paper doll.  I added the Dangling Spider die cut from Poppy Stamps. I lightly sanded both the large mask and spider.  I rubbed over her dress with a Distress Crayon. She and the spider are popped up on foam dots.
 I'm linking the card above to:
International Art and Soul - Things with Wings

For my second card, I die cut one of the Geo Insects out of Kraft Stack black paper as well as a small mask.  I colored the Paper Dolls dress with a Distress Crayon, layered her over the wings and adhered a mask over her eyes.  She is popped up over the wings with foam dots.
 I'm linking the card above to:

I colored the shirts of this Paper Dolls (two girls attached) with a Distress Crayon, added a small mask to one and the other is holding the wing of a bat!  The girls and the bat are popped up on foam dots.
 I'm linking the card above to:
Children

For my final card, I die cut a Geo Insect out of orange Kraft Stack paper and the skull out of tan which I sponged with Gathered Twigs Distress Ink.  I adhered masks to the skull and the Paper Doll.  I colored her dress with a Distress Crayon.  She and the skull are popped up on foam dots.
I'm linking the card above to:

Paper:  white, True Black - PTI, DP Abandoned Paper Stash - Tim Holtz/Idea-ology, Kraft Stack Classics - Tim Holtz/Idea-ology.
Ink:  Ranger Distress Gathered Twigs.
Accessories:  Halloween Paper Dolls, Clippings Stickers/Halloween - Tim Holtz/Idea-ology, Masquerade Dies,Mini Skull and Bat Dies, Geo Insects Dies - Tim Holtz/Sizzix, Dangling Spider Die - Poppy Stamps, foam dots, mini sander, Tiny Twinkles, Ranger Distress Crayons.

Thursday, September 5, 2019

A Vintage Journey - Sept Challenge - Box it Up!

I am the hostess for September over at A Vintage Journey and my challenge is:  Box It Up!

This month our theme is boxes! Perhaps you will make a trunk or suitcase, some kind of package to hold a gift, or maybe make a card or journal page showing presents. 

Just remember to ensure that you create in one of our preferred styles of vintage, shabby, mixed media, art journaling, industrial, timeworn or steampunk.

 I'll be posting a full tutorial over at A Vintage Journey on September 20th so I'm just sharing photos of my finished project here today.
I made a Halloween Haunted House Box using Eileen Hull's new House Ornament Die and some pieces from her House Pocket Die (window frames, chimney, roof trim and door!)
Here are the four sides of the house


And close ups of the creepies peeking out of all the windows and front door.


The bottom of the house box opens and inside I put a treat of Chocolate River Rock Candy that I found on Amazon, an appropriate earthy Halloween treat don't you think?!

So we hope you will join in on our A Vintage Journey September Challenge - and Box It Up - can't wait to see how the theme of a box inspires your creativity!

You'll find the challenge here, as well as lots of inspiration from the other Creative Guides!  You have until Oct 3rd to link up your Box It Up projects! 


Paper:  True Black Card stock - Papertrey Ink,  DP Regions Beyond and Materialize Paper Stash - Tim Holtz/Idea-ology
Accessories:  House Ornament Die, House Pocket Die (window frames and door) - Eileen Hull/Sizzix, Mini Bat Die, Mini Cat Die - Movers and Shapers/Tim Holtz/Sizzix, tiny rhinestones, Halloween Twine - Lawn Fawn,  Bronze Age Metallique Wax - Prima, Chocolate River Rock Candy - Amazon, foam tape, Tombow Glue, Occasion Stickers - Tim Holtz/Idea-ology.

Wednesday, September 4, 2019

September CAS Stencil - Use Baby Wipes!

This month I'm honored to be the hostess for the September CAS Stencil Card Challenge.  My challenge is to use baby wipes with your stencils.

There are 3 techniques that I found on the topic (they are also linked over at the CAS Stencil Challenge Blog).

One uses Distress Inks, one uses Pan Pastels and one uses acrylic paint - but feel free to use another technique you may know about and share it with us!  It just has to involve baby wipes and stencils!
Techniques:
Acrylic paint, stencils and baby wipes:  (no video just a description below)

Since I am the hostess this month - I felt I should show you two different techniques to inspire you!   I used the same stencil and card design on both - but different materials to create the stenciled panel.

Here are some process photos for each card. 

For the card on the left above, I sponged Ranger Distress Mowed Lawn and Broken China over a panel of white card stock. 
I laid the stencil over the panel in the location I wanted it.  I used the same Portal Shutters Stencil from Stencil Girl for both cards.  This is a 6"x6" stencil with 4 different windows/shutters on it.
Then I dabbed/rubbed over the stencil to remove the ink with a baby wipe.  Don't press too hard as you can rub off the paper!  And be sure your Baby Wipe isn't dripping water or it will seep underneath the stencil! I could see when the ink was being removed - and I lifted up an edge to see if the stenciling was clear enough before removing the stencil completely.
So here's the result.  I heated it just a bit with my heat tool to dry it.  Drying also reveals the stenciling a little more.
To finish this card, I die cut the panel with a stitched edge square die, mounted it to a slightly larger panel of Tropical Teal card.  I die cut a 4 1/4" x 5 1/2" piece of white card and die cut it with Halftone Cover Die from Altenew.  I stamped the sentiment from Happy Village by Lawn Fawn on a white strip and layered it below the stenciled panel.  I punched a heart out of some blue vellum I found in my craft room (!) and adhered it with a tiny piece of ScorTape just at the top of the heart.
Here's how I created my 2nd card - on right at the top of my blog post.
I put drops of 3 acrylic paints on my white card stock panel.  I found that using inexpensive acrylic paints like you get at Michaels or JoAnn worked better than then my more expensive Paper Artsy paints (which did not rub off!)
Then I spread the colors with my brayer over the panel.  Just roll up and down - you don't want to mix the colors too much.
Again, I used one of the windows on the Portal Shutters Stencil from Stencil Girl. 
 (Lay the stencil over your panel quickly - you don't want the paint to dry too much or it won't rub off.)
I wiped over the stencil with a baby wipe until I could see the paint was being removed.
And here is the result - the top layer of paper tore off in a tiny spot when I removed the stencil there at the bottom center below the stenciling - I guess the paint stuck to the stencil - but luckily it was just a spot and just adds a little more to the distressed look!?
I finished off my card in the same way I did the first one.
So there you have two ways to participate in the CAS Stencil Card Challenge!  Easy, right?!!  I can't wait to see how you use baby wipes with your stencils.
You'll find the challenge, lots of inspiration from the Design Team as well as our guest designer this month, the very talented  Sarah, over at CAS Stencil.  You have until 9/24 to link up your CAS design!

I'm linking my card to:
Use shapes on your card


1st Card
Stamps:   Happy Village - Lawn Fawn
Paper:  White, Tropical Teal - PTI, Watercolor Vellum - Making Memories.
Ink:  True Black - PTI, Ranger Distress Broken China, Mowed Lawn.
Accessories:  Portal Shutters Stencil -Stencil Girl, baby wipes, sponge and blending tool applicator- Ranger, craft mat, Stitch Mat Squares Die - Lil Inker Designs, Halftone Cover Die - Altenew, Heart Punch - Marvy.

2nd Card
Stamps:   Happy Village - Lawn Fawn
Paper:  White, Amethyst Allure - PTI, Watercolor Vellum - Making Memories.
Ink:  True Black - PTI.
Accessories:  Portal Shutters Stencil -Stencil Girl, baby wipes, Americana Acrylic Paint Mint Julep Green, Wild Orchid, Cadmium Yellow - JoAnn, craft mat, Stitch Mat Squares Die - Lil Inker Designs, Halftone Cover Die - Altenew, Heart Punch - Marvy Uchida, breyer.

Sunday, August 18, 2019

August Mid-Month Reminder: CAS Stencil - Sprays

Hi all!  I'm here today with a reminder post about the CAS Stencil Challenge - you still have time to join in!  The challenge ends on 8/24!

Robyn is our wonderful hostess this month - and she wants to see us use our Spray Inks!  We all have them right?!!  Let's get them out and use them with our stencils! 
You can make your own ink sprays by adding water to some reinker in a spray bottle, or adding anything like Brushos to water in a spray bottle.  Experiment with what you have!
So for my reminder card -  I decided to use these beautiful Layered Dahlia Stencil A and Layered Dahlia Stencil B from Altenew.
The A stencil has more open space on it - so you ink that one first and you use a lighter color.  I used Altenew Soft Lilac Metallic Ink Spray over Stencil A.
(I use an old pizza box lined with some computer paper to contain the spray!)
(I tried making a monoprint by pressing the inked stencil onto a clean panel of card stock - but it didn't give a good result - I think because the stencil is so open - the lines did not give any kind of recognizable design.)

I let the first spray dry (didn't take long and you can also hit it with your heat tool), then I laid Stencil B over the panel matching up the image and sprayed over it again, this time using Altenew Lavender Fields Metallic Ink Spray, and just look at this gorgeous result!  
These metallic ink sprays have a shimmer to them that I try to show with an angled photo of my card further below.
So, to make it CAS - I hated to cut the 6"x 6" panel into smaller panels and  I made two cards.  The bloom was so large that I couldn't make it any smaller than this without making it an abstract print!  
I added a die cut hugs and stamped the first part of the sentiment on a punched strip.
Here's a tilted view to hopefully capture the pretty metallic shimmer to the colors
The lovely Quilted Backdrop Die is from Lawn Fawn.

So show us how you use all those sprays you have in your craft room with your stencils!  You'll find links to technique videos as well as lots of inspiration from the creative design team, along with our two Guest Designers this month -  Hilary and Amy over at the CAS Stencil Blog!
The challenge is open until August 24th!

I'm also linking my card to:
my occasion is sympathy

Inspired by the colors


Stamps:  Casual Comfort: Cas-ual Fridays Stamps.
Paper:  White, Lilac Grace - PTI
Ink:  True Black - PTI,  Metallic Spray Inks Soft Lilac and Lavender Fields - Altenew
Accessories:  Quilted Backdrop Die - Lawn Fawn, Scripted Words Dies - Altenew, foam dots, Tombow Glue, word window punch - SU.