Monday, November 13, 2017

Loll and Friends - 12 Tags of Christmas - Day 8

I was thrilled when Loll Thompson invited me to be a guest designer again this year for her wonderful Twelve Tags of Christmas event over on her blog Stamping with Loll.  Her event runs from November 6th - 17th so we're a little bit more than half way through!  
If you want some beautiful and creative ideas for Christmas tags - be sure to check it out!

And now, without further ado -  here is my tag for Loll's Twelve Tags of Christmas 2017!
I have a few photos to show you how I put this together.
First I created the background by rubbing Ranger Distress Walnut Stain ink on my nonstick craft mat.  I spritzed over the ink with water and then bounced the tag into the mix.  I dried it with my heat tool and then tapped it in again to get more bead-like drops.
Then I stenciled over the background with Tim's Merry Christmas stencil using Barn Door Distress Ink.  I put removable tape on the back of my tag to hold it on the mat while I sponged over the stencil.
Then I got out Tim's Mini Pine stencil and decided where I wanted to put a few trees - and sponged them on over the text - using Forest Moss Distress Ink.  I sponged the bigger tree on the left, then shifted the stencil and sponged the big tree again as well as the medium tree.
I die cut a Ribbon  banner out of red card, stamped it with a sentiment from Tim's new Watercolor Trees stamp set and sponged the edges of the banner with Walnut Stain Distress.  I also sponged around my whole tag at this point with Walnut Stain Distress.
I put an extra thick foam dot in the center of the banner and thinner foam dots near each end so the center stands out off the tag.  I looped red and green wrinkled seam tape through the hole and knotted twine around them
I always layer my tags to a slightly larger colored piece that I just cut from cardstock and trim off the corners - here I used red.  I like how it defines the tag - plus it covers up any mess created on the back with all the distress inks!
I flicked water over the tag with my fingers to create water spots.  You can see them on the trees here -  you can also see how the trees DO actually look greenish in the right light!
I added this cute wooden deer 
(I don't know where I got these critters - the bag has no company listed on it - maybe Hobby Lobby?)  A adhered two Clippings Stickers/Christmas from Idea-ology on the bottom of my tag.
So what kind of tags are you making for the holidays?

Look here for my 2016 tag
Look here for my 2015 tag
Look here for my 2014 tag

You will find my 2017 tag over at Loll's 12 Tags of Christmas post here.   I'd love if you'd take a peek!
 We hope you'll create a mixed media tag as well and link it up over at  Stamping with Loll!

 The guidelines for Loll's challenge are that it must be a mixed media Christmas tag (any style / any size) which includes stamping, plus two mixed media elements (techniques or products).

I'm also linking my tag to:
Happy Little Stampers


Stamps:  Water Color Trees - Tim Holtz/Stampers Anonymous
Paper:  #8 Manila tag - Ranger, Pure Poppy - PTI
Ink:  Ranger Distress Forest Moss, Barn Door, Walnut Stain, Archival Jet Black
Accessories:  Clippings Stickers/Christmas Idea-ology, twine, Wrinkled Seam Tape, Wooden Deer - Hobby Lobby?, Ribbon Banner Die - Nestabilities

Saturday, November 11, 2017

A Tag for Christmas

I have a tag to share today that I made for 3 challenges!
The Inspiration Challenge over at Splitcoaststampers is Balsam Hill this week and I was inspired by  this lovely table top tree.
  I created a Christmas tag with a wrinkled seam tape ribbon looped through the top that is long enough to tie around a bottle of bubbly if that's the gift I decide to put it on!
I stamped the tree (this set is on sale now!) in two greens (two stamps), then I silver embossed the garland and cranberry embossed the berry/ornaments. I embossed the urn in Ranger Pumice Stone Emb Powder and it really feels like stone when you touch it - Distress Emb Powder leaves a texture. 
I die cut my tag out of white card and patterned paper and adhered them together. I layered the Arch die cut over the tag and then layered the tree over the arch with foam dots. The sentiment is stamped on a piece left from the arch die cut that I cut the tip off of!
I'm also linking my tag to Loll's 12 Tags of Christmas challenge going on now through Nov 17th.  She's got prizes to be won so check it out and link up your mixed media tag soon!


And linking just under the wire to:

Stamps:Water Color Trees - Tim Holtz/Stampers Anonymous
Paper:white - PTI, Mixed Media Paper - Ranger, DP Tidings Paper Stash - Tim Holtz/Idea-ology
Ink:Ranger Distress Pine Needles, Mowed Lawn, Frayed Burlap, Hickory Smoke, Versamark, Archival Jet Black
Accessories: Small Gothic Arch Die - Poppy Stamps, Tag Sale #2 die - PTI, silver embossing powder - PTI, Cranberry Emb Powder - Adirondack, Pumice Stone Distress Emb Powder - Ranger, foam dots, wrinkled seam tape

Friday, November 10, 2017

Watercolored Holly

I've been wanting to play along with a couple of challenges and finally got a card done for them!
I gold embossed the holly stamp onto watercolor paper.  I water colored the leaves and berries with watercolor paints and then did a watercolor wash in blue around the holly.  I layered the panel to a slightly larger piece of brushed gold paper and layered that onto my card base with foam dots. I gold embossed the sentiment directly on the card base below the panel.

I'm linking my card to:


I'd say my card is Clean Mixed Media?! 

Stamps:  Christmas Blueprint 4 - Tim Holtz/Stampers Anonymous, sentiment from Beautiful Berries/Winter - PTI
Paper:  Water color paper - Ranger, Brushed Gold - SU, White - PTI
Ink:  Versamark
Accessories:  Gold embossing powder, heat tool, water color paints, brush, water, foam dots.


Tuesday, November 7, 2017

Eileen Hull's Sizzix Stamp and Photo Storage Box Die

Finally -  the long awaited arrival of Eileen Hull's Sizzix Book Club Dies!  They will be available in Dec!
Today, I'm using the Stamp and Photo Storage Box die to use as a thin gift box - it measures 4 1/4" wide x 6" high x 1/2"deep.
 The Merry Christmas label is part of the DCWV Cranberry Christmas Paper Pad - where all of the papers used in this project are from.
 I cut the flowers with Eileen's Flower Heart and Soul and the tag using Eileen's Luggage Tag Die.

The holly paper adhered to front and back is a beautiful shimmery gold!
I adhered the gold braid from the bottom of one side, up to the top leaving enough for a handle and back down the other side.  I used ScorTape on the sides with an additional dab of glue at the top edges and bottom corners to be sure the braid wouldn't pull away from the box when held by the handle!
You'll find all the new Book Club dies here.  Photos will fit perfectly inside this box as well!

Paper:  White Little Sizzles Matboard - Sizzix,  DP - Die Cuts with a View DCWV - Cranberry Christmas.
Accessories:  Stamp and Photo Storage Box Die, Flower Heart and Sould Die, Luggage Tag Die - Eileen Hull/Sizzix, Tombow glue, ScorTape, foam dots, gold braid from stash, large Silver Brad.

Thursday, November 2, 2017

A Vintage Journey - November Challenge - Mini Marvels!

Well - it's the first Friday of November (in Great Britain!) and so it's time for the A Vintage Journey November Challenge to be announced!
 Anne is our hostess this month - and her challenge is:  Mini Marvels and this is her description of the challenge:
"This month's challenge is to create something in miniature - it could be a little book, a tiny scene, a small canvas, a wall hanging or even a box. It MUST be 4" or less in size and be created in your vintage; shabby; mixed media; art journaling; industrial, timeworn or steampunk style."

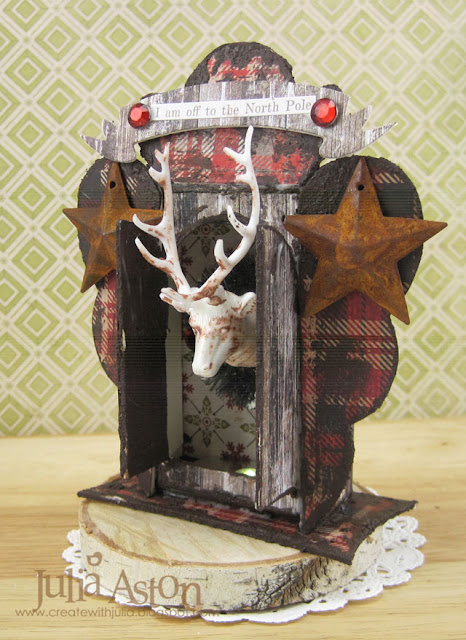
I wanted to use a fun new die I recently purchased for my project.  It's called Heart Shrine from Sizzix.  It's just over 4" with the decorative piece on top but the box itself is just 2" x 3 1/2"  which you'll see in a photo below.  
I made a little reindeer stall for one of Santa's reindeer who is getting all decked out for Christmas with a green wreath around his neck - 
Yes, he is a real reindeer (not a trophy on the wall) even though you can't see into the stall to see the rest of his body!  That's my story and I'm sticking to it!
Here are a few photos of how I put this together.  I cut the shrine out of cream matboard and cut some papers to cover the various pieces.  I also got out the reindeer and a couple of wreaths I might use.
Sorry for the lines across some of my photos - I think my camera is ready for retirement!?!
I glued the papers to the matboard pieces and colored the white reindeer with an Antiqued Bronze Distress Crayon.  I used woodgrain and plaid papers from PaperStash Tidings from Idea-ology.  I had this already-decorated green wreath in my stash and it fit perfectly around the reindeer's neck.  I think the snow was Gesso and there's a red rhinestone there too.
To age the stall, I brushed some Rust Effect Paste from Prima over the fronts and backs of the pieces.  When that dried I painted Gel Matte Medium over everthing to seal it.
I added a little LED battery button light to the inside bottom of the stall - you just press on the left side and it either blinks, blinks fast, or stays lit depending on how many times you press it. 
(I got them at Papertrey Ink a year ago - but they don't have any in stock right now)
back of battery lifght
I couldn't get a great photo of it lit - so here's a not so great photo just to show you how it looks lit up!
 From the side
From the back
from the other side!

So please join us this month and show us your MINI MARVELS! 

Our generous sponsor this month is Southern Ridge and their prize for a randomly chosen entry is $50.00 which can be used for a varied selection of chipboard & wood veneer laser cuts!
You can find them here

 You'll find lots of creative inspiration from the Creative Guides over at A Vintage Journey and the link up for your project!

I'm also linking my project to:
The Holly and Ivy Christmas Challenge - Anything Christmas Goes

The Merry Christmas Challenge
Anything Goes + Christmas

Paper:  Little Sizzles Cream Mat Board  - Sizzix, DP - Paper Stash/Tidings - Tim Holtz/Idea-ology.
Accessories:  Heart Shrine Die - Sizzix, Idea-ology Clippings Stickers/Christmas, Trophy Antlers,  Rusted Stars from antique/craft store, thick foam dots, Gel Matte Medium - Dina Wakley, red rhinestones, LED light strip, Tacky Glue, green wreath, Gesso.

Silhouette Heart Felt Thanks

Today I'm playing along with the Mixed Media November challenge today
I made my background by rubbing Distress Wilted Violet Ink over my craft mat, spritzing with water then flapping a panel of watercolor paper into it.  When I was happy with the coverage, I dried it with my heat tool.  I repeated the same process with Distress Walnut Stain Ink.
Then I laid a stem stencil over the panel and sponged over it with Distress Walnut Stain Ink.  I stamped the sentiment in the top corner and layered the panel over a Rustic Cream card base with foam dots.
I'm also linking to Loll Thompson's blog where she is running a mini challenge for a few days using this background technique that she made a video on and calls Splash Watercolor.

Stamps:  Verve
Paper:  Watercolor paper - Ranger, Rustic Cream - PTI
Ink:  True Black - PTI, Ranger Distress Wilted Violet and Walnut Stain.
Accessories:  stem stencil - Ali Express, non stick craft mat, sponge and applicator.

Wednesday, November 1, 2017

November CAS Mix Up Challenge - Glitter!

Wow - is it really Nov 1?!   It must be - since the Nov CAS Mix Up Challenge is up over at the blog!  This month Bonnie is our hostess and this is her challenge for us!
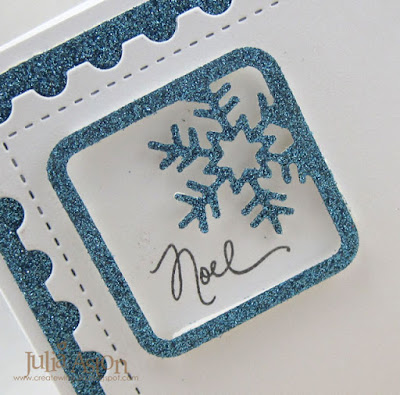
For my card, I used stamping, blue glitter cardstock, and two dies.  I jumped right over Thanksgiving and made a Christmas card!
The snow flake frame die is from Simon Says Stamp and the postage stamp edge square die is from Ali Express.  I layered the snowflake die over the white panel popped up on foam tape.  I stamped the sentiment in the space before I put the frame up on foam.
This photo shows the wonderful bright glittery look of the paper!  SO festive for Christmas!
So, please join us this month and show us how you use glitter - remembering to leave lots of empty space so it's CAS! You'll find several links to tutorials on ways to create glitter for your creations on the CAS Mix Up Blog!  Check it all out here.
Stamps:  Signature Christmas - PTI
Paper:  White - PTI, Glitter Card Stock - Michaels
Ink:  True Black - PTI
Accessories:  Postage Stamp Die - Ali Express, Holiday Frames - Simon Says Stamp, foam dots.