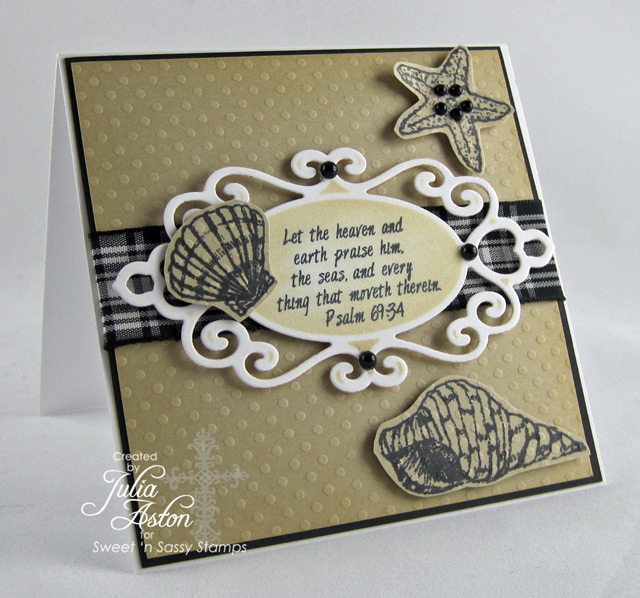
As part of the Design Team for SNSS - Today is my day to post to the Sweet 'n Sassy Blog - and this is the card I've posted over there.
The stamps are from the June Release set called Beauty by the Sea which is a set of lovely sea shells and sentiments including this lovely Psalm
I stamped the sentiment on white card stock, cut it with a Fancy Tags 2 by Spellbinders, sponged the edges before removing it from the die and adhered it to the card using foam tape.
I stamped the shells and starfish on the same dotted Bazzill as the panel, cut them out and adhered them also with foam tape.
I added some black pearls to the starfish and tag to finish it off!
Thanks so much for stopping by today - I really appreciate it!
Stamps: Sweet n' Sassy Stamps - Beauty by the Sea.
Paper: White, true black -PTI, Bazzill dotted tan
Ink: Memento Tuxedo Black, Ranger Distress Antique Linen
Accessories: black plaid ribbon - SNSS, foam tape, Fancy Tags 2 - Spellbinders, pretty pearls - Amuse, blending tool + nonstick craft mat - Ranger,
Wednesday, June 8, 2011
Monday, June 6, 2011
A Whale of a Good Time - Friend to Friend!
I've got some new Rubbernecker Stamps and couldn't wait to ink some of them up!
I made this card for last weeks sketch challenge over at Split Coast.
I used a cool new background stamp called Crackle Panel behind my little whale. I stamped Mr. Whale on a light gray cardstock and colored him a bit with light blue Copics. I cut him out and layered him over the stamped panel with foam tape. I added some blue gems and applied Glossy Accents to the water 'blow'. I stamped the coordinating sentiment directly on the panel and added some blue gems there as well.
This cool style card was the Wednesday SCS Tutorial last week - it's called a Center Step Card! I just had to try this out!
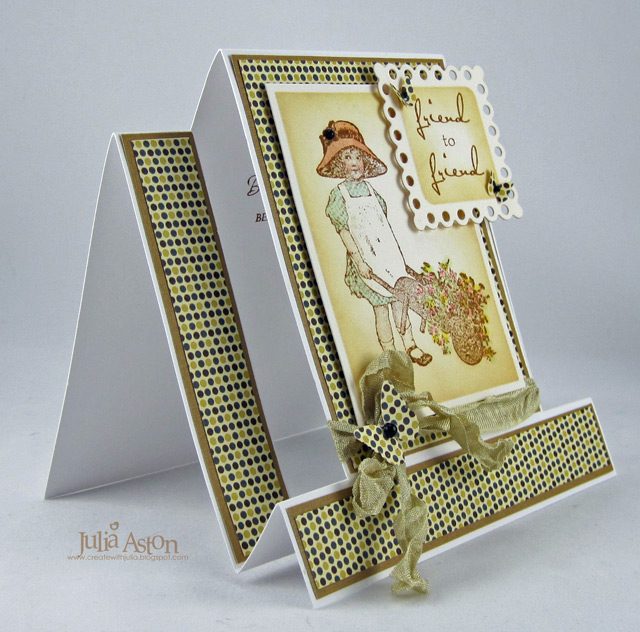
You can find the tutorial for this fun style card here in the forums of Split Coast. Here's a side view.
I knew this sweet little Hannah image would fit perfectly on the front panel! I stamped the image with Vintage Photo Distress ink and then colored her a little bit with my Copics. I cut the image with a square Nestability and sponged the edges with Antique Linen before taking it out of the die.
The sentiment is cut with a Lacey Square Nestability. The pretty dotted DP is Webster's Pages.
This card was really easy to make - you should try one! It is larger than an A2 card - lying flat it measures 5 1/2" x 5 1/2" so needs an oversize envelope or to be hand delivered!
Whale Card:
Stamps: Rubbernecker - Crackle Panel #574, Whale #569-05, Sentiment Whale of a Time #568-01
Paper: White, Softstone, Plum Pudding - PTI, DP Cosmo Cricket/Snorkel/Umbrellas, Current, Schools Out
Ink: Memento Tuxedo Black + Summer Sky
Accessories: foam tape, Copics: B00, BG10, B41, Glossy Accents - Ranger, self adhesive jewels - Bazzill Basics
Friend to Friend Card:
Stamps: Rubbernecker - Hannah 581-05, Friend to Friend #565-21
Paper: white, vintage cream - PTI, Textured Tan - unknown (like Bazzill) DP Webster's Pages - Petite Papers/Hollywood Vogue + Wonderfall
Ink: Ranger Distress - Vintage Photo + Antique Linen
Accessories: Copics - Y02, BG10, G20, E02, R00, RV02, trio butterfly punch - Martha Stewart, Rectangle + Lacey Square Nestabilities, black pearls - Amuse, wrinkled seam tape, foam tape, glue dots
I made this card for last weeks sketch challenge over at Split Coast.
I used a cool new background stamp called Crackle Panel behind my little whale. I stamped Mr. Whale on a light gray cardstock and colored him a bit with light blue Copics. I cut him out and layered him over the stamped panel with foam tape. I added some blue gems and applied Glossy Accents to the water 'blow'. I stamped the coordinating sentiment directly on the panel and added some blue gems there as well.
This cool style card was the Wednesday SCS Tutorial last week - it's called a Center Step Card! I just had to try this out!
You can find the tutorial for this fun style card here in the forums of Split Coast. Here's a side view.
I knew this sweet little Hannah image would fit perfectly on the front panel! I stamped the image with Vintage Photo Distress ink and then colored her a little bit with my Copics. I cut the image with a square Nestability and sponged the edges with Antique Linen before taking it out of the die.
The sentiment is cut with a Lacey Square Nestability. The pretty dotted DP is Webster's Pages.
This card was really easy to make - you should try one! It is larger than an A2 card - lying flat it measures 5 1/2" x 5 1/2" so needs an oversize envelope or to be hand delivered!
Whale Card:
Stamps: Rubbernecker - Crackle Panel #574, Whale #569-05, Sentiment Whale of a Time #568-01
Paper: White, Softstone, Plum Pudding - PTI, DP Cosmo Cricket/Snorkel/Umbrellas, Current, Schools Out
Ink: Memento Tuxedo Black + Summer Sky
Accessories: foam tape, Copics: B00, BG10, B41, Glossy Accents - Ranger, self adhesive jewels - Bazzill Basics
Friend to Friend Card:
Stamps: Rubbernecker - Hannah 581-05, Friend to Friend #565-21
Paper: white, vintage cream - PTI, Textured Tan - unknown (like Bazzill) DP Webster's Pages - Petite Papers/Hollywood Vogue + Wonderfall
Ink: Ranger Distress - Vintage Photo + Antique Linen
Accessories: Copics - Y02, BG10, G20, E02, R00, RV02, trio butterfly punch - Martha Stewart, Rectangle + Lacey Square Nestabilities, black pearls - Amuse, wrinkled seam tape, foam tape, glue dots
Sunday, June 5, 2011
A Trigger, Something Cool and Christmas Cactus!
I have three cards to share today!
The first is one that I made for the Tuesday Trigger Challenge - Here's the lovely Trigger inspiration photo:
And here's my card using Waltzingmouse Roses In Bloom
My next card was created for the Split Coast Inspiration Challenge - Our inspiration was the Daniel Maher Stained Glass Studio.
I was inspired by this piece:
And here is the card I created using Waltzingmouse Free Spirit Boy and Free Spirit Sentiments.
And my last card was made for the Waltzingmouse Forum Christmas Card Challenge for May (I'm a tad late!) The challenge for May was to use trees on our card - I used cactus as my trees! Here are my 3 versions of the same design using Waltzingmouse Way Out West and Compliments of the Season.
Paper: white, true black - PTI, Green Bazzill Irish eyes
Ink: Ranger Distress - black soot, peeled paint, faded jeans
Accessories: glue dots, scor tape, Tim Holtz Paper Rosette die/Ranger
Christmas Cactus:
Stamps: Waltzingmouse - Way Out West, Compliments of the Season
Paper: White, Text Style 2008 Bitty Star Basics - PTI
Ink: Versafine Onyx Black, Memento Bamboo Leaves, Ranger Distress Stormy Sky
Accessories: Tiny gems - Taylored Expressions.
The first is one that I made for the Tuesday Trigger Challenge - Here's the lovely Trigger inspiration photo:
And here's my card using Waltzingmouse Roses In Bloom
My next card was created for the Split Coast Inspiration Challenge - Our inspiration was the Daniel Maher Stained Glass Studio.
I was inspired by this piece:
And here is the card I created using Waltzingmouse Free Spirit Boy and Free Spirit Sentiments.
And my last card was made for the Waltzingmouse Forum Christmas Card Challenge for May (I'm a tad late!) The challenge for May was to use trees on our card - I used cactus as my trees! Here are my 3 versions of the same design using Waltzingmouse Way Out West and Compliments of the Season.
Thanks for coming by today!
You Mean Everything to Me:
Stamps: Waltzingmouse - Roses in Bloom
Paper: White - PTI, Blue - Coredinations
Ink: Memento Tuxedo Black, Bahama Blue
Accessories: large scallop die -Martha Stewart, Rhinestone - Kaiser, Tiny Gems - Taylored Expressions, foam tape.
Cool Stained Glass:
Stamps: Waltzingmouse - Free Sprit Boy, Free Spirit Sentiments
Paper: white, true black - PTI, Green Bazzill Irish eyes
Ink: Ranger Distress - black soot, peeled paint, faded jeans
Accessories: glue dots, scor tape, Tim Holtz Paper Rosette die/Ranger
Christmas Cactus:
Stamps: Waltzingmouse - Way Out West, Compliments of the Season
Paper: White, Text Style 2008 Bitty Star Basics - PTI
Ink: Versafine Onyx Black, Memento Bamboo Leaves, Ranger Distress Stormy Sky
Accessories: Tiny gems - Taylored Expressions.
Saturday, June 4, 2011
Day 4 - Waltzingmouse SoAP - Free Spirit - Boy Revisited! And the WMS Sketch
Welcome to the last day of the Waltzingmouse Stamp of Approval Parade - today all of the Design Team is parading the Free Spirit - Boy stamp set. Check the end of my post to see how you can participate in a parade challenge!
There are lots of summer events coming up that this set is perfect for! I made 3 cards to show you just some of its' uses! All of the sentiments are from Free Spirit - Sentiments. (a great complementary set for Free Spirit - Boy!)
First off - I made a graduation card.
This could be for a high school or a college grad! I love the skateboarder and bike stamps. My design is today's Waltzingmouse Sketch - and since this is a long post - I'll let you just check out all the details about the sketch challenge here.
Here's what I stamped on the inside:
A lot of people travel during the summer - so I created this fun Route 66 card.
I used my newly acquired Spellbinders Elegant Posts die and some cool road map patterned paper.
And my final offering for you is a cool summertime surfer card! I just can not open this set up without using the fun surfboards so here's a surfing card!
First, I embossed a square Nestability on my card. Then I stamped the boards directly on the patterned paper and adhered it inside the frame. I die cut the waves and adhered them over the panel with foam tape. I added one little blue gem to the flower on the surfboard. An easy peasy design!
So there you go - I hope I've given you a little inspiration for using this wonderful masculine stamp set!
And now I hope you'll follow the parade one last time to see what the other Design Team members have to show us using this great stamp set! Thank you SO much for joining us these past 4 days!
To the Grad Card:
Stamps: Waltzingmouse - Free Spirit - Boy, Free Spirit - Sentiments
Paper: white, true black, Hawaiian Shores - PTI
Ink: Versafine Onyx Black, Hawaiian Shores - PTI
Accessories: Rhinestones - Darice (Michaels), trio labels - Spellbinders, foam tape.
Route 66 Card:
Stamps: Waltzingmouse - Free Spirit - Boy, Free Spirit - Sentiments
Paper: White, True Black - PTI, Green Bazzill Irish Eyes, DP Paper Pizazz - Road Map.
Ink: Versafine Onyx Black, Memento Bamboo Leaves, Ranger Distress Antique Linen
Accessories: Key tag punch and 1 3/4" circle punch - SU, 1 1/2" punch - EK Success, circle Nestability, Elegant Posts - Spellbinders.
Aloha Card:
Stamps: Waltzingmouse - Free Spirit - Boy, Free Spirit Sentiments.
Paper: White, Hawaiian Shore, DP Text Style 2009 Bitty Dot basics - PTI
Ink: Versafine Onyx Black
Accessories: foam tape, square Nestability, waves die - MFT, gem - Darice(Michaels)
There are lots of summer events coming up that this set is perfect for! I made 3 cards to show you just some of its' uses! All of the sentiments are from Free Spirit - Sentiments. (a great complementary set for Free Spirit - Boy!)
First off - I made a graduation card.
This could be for a high school or a college grad! I love the skateboarder and bike stamps. My design is today's Waltzingmouse Sketch - and since this is a long post - I'll let you just check out all the details about the sketch challenge here.
Here's what I stamped on the inside:
A lot of people travel during the summer - so I created this fun Route 66 card.
I used my newly acquired Spellbinders Elegant Posts die and some cool road map patterned paper.
And my final offering for you is a cool summertime surfer card! I just can not open this set up without using the fun surfboards so here's a surfing card!
First, I embossed a square Nestability on my card. Then I stamped the boards directly on the patterned paper and adhered it inside the frame. I die cut the waves and adhered them over the panel with foam tape. I added one little blue gem to the flower on the surfboard. An easy peasy design!
So there you go - I hope I've given you a little inspiration for using this wonderful masculine stamp set!
As our parade ends - we invite you to participate in a CASE (Copy and Share Everything) competition.
Find a card or project from any of those posted during the SoAP by the WMS Design Team. CASE that project using Waltzingmouse Stamp images, post it on your blog or gallery and link it using the Inlinkz on Claire’s blog.
The competion will close at 8:00 AM Claire’s time (Ireland) on June 10th (3 AM Eastern, 2 AM Central and Midnight, Pacific time).
One project will be randomly selected to be highlighted with a Parade of its own on several of the Design Team blogs. The winner will be announced on Claire’s blog on June 11th.
And now I hope you'll follow the parade one last time to see what the other Design Team members have to show us using this great stamp set! Thank you SO much for joining us these past 4 days!
To the Grad Card:
Stamps: Waltzingmouse - Free Spirit - Boy, Free Spirit - Sentiments
Paper: white, true black, Hawaiian Shores - PTI
Ink: Versafine Onyx Black, Hawaiian Shores - PTI
Accessories: Rhinestones - Darice (Michaels), trio labels - Spellbinders, foam tape.
Route 66 Card:
Stamps: Waltzingmouse - Free Spirit - Boy, Free Spirit - Sentiments
Paper: White, True Black - PTI, Green Bazzill Irish Eyes, DP Paper Pizazz - Road Map.
Ink: Versafine Onyx Black, Memento Bamboo Leaves, Ranger Distress Antique Linen
Accessories: Key tag punch and 1 3/4" circle punch - SU, 1 1/2" punch - EK Success, circle Nestability, Elegant Posts - Spellbinders.
Aloha Card:
Stamps: Waltzingmouse - Free Spirit - Boy, Free Spirit Sentiments.
Paper: White, Hawaiian Shore, DP Text Style 2009 Bitty Dot basics - PTI
Ink: Versafine Onyx Black
Accessories: foam tape, square Nestability, waves die - MFT, gem - Darice(Michaels)
Friday, June 3, 2011
Day 3 - Waltzingmouse SoAP!
Wow - we're already at day #3 of the Waltzingmouse Stamp of Approval Parade (SoAP)!! The Design Team is reviewing the WMS May release giving you more creative ideas on how to use the stamps you bought!
Today I'm parading the wonderful set you can use for notes and invitations called Join Us.
My niece, Christie, and her husband, Nate, just gave birth to a beautiful little boy named James Charles. Here he is going home from the hospital - a wee 2 days old!
The colors in James' room are jungle colors - predominantly greens, browns, yellows and oranges.
So I made these little 4 1/4" x 4 1/4" note cards for Chris and Nate to use for "thank you's" - their last name begins with R so I used that monogram from an older release - Victorian Alphabet - on the notes.
First I did one of my favorite techniques on cards - which is to emboss a Nestability frame. Here I used a square Nestability.
Then I stamped the designs on cream cardstock panels and adhered them inside the frame with foam tape.
I hope you'll keep viewing the parade by visiting the other WMS Design Team linked below - and please stop by tomorrow for Day 4 where we'll all be parading on older WMS release - Free Spirit - Boy.
Stamps: Waltzingmouse - Join Us, Victorian Alphabet
Paper: Vintage Cream, Simply Chartreuse - PTI
Ink: Memento Rich Cocoa
Accessories: Foam tape, square Nestabilities, rhinestones - Kaiser, Tiny Gems - Taylored Expressions, 1" circle punch - EK Success.
Today I'm parading the wonderful set you can use for notes and invitations called Join Us.
My niece, Christie, and her husband, Nate, just gave birth to a beautiful little boy named James Charles. Here he is going home from the hospital - a wee 2 days old!
The colors in James' room are jungle colors - predominantly greens, browns, yellows and oranges.
So I made these little 4 1/4" x 4 1/4" note cards for Chris and Nate to use for "thank you's" - their last name begins with R so I used that monogram from an older release - Victorian Alphabet - on the notes.
First I did one of my favorite techniques on cards - which is to emboss a Nestability frame. Here I used a square Nestability.
Then I stamped the designs on cream cardstock panels and adhered them inside the frame with foam tape.
I could have just stamped the R in the middle of the decorative stampings - but I thought it gave more depth to the card to stamp it on card stock and then punch it out with a circle punch.
Then I just added some orange rhinestones to the stampings for a little sparkle.I hope you'll keep viewing the parade by visiting the other WMS Design Team linked below - and please stop by tomorrow for Day 4 where we'll all be parading on older WMS release - Free Spirit - Boy.
Stamps: Waltzingmouse - Join Us, Victorian Alphabet
Paper: Vintage Cream, Simply Chartreuse - PTI
Ink: Memento Rich Cocoa
Accessories: Foam tape, square Nestabilities, rhinestones - Kaiser, Tiny Gems - Taylored Expressions, 1" circle punch - EK Success.
Thursday, June 2, 2011
Day 2 - Waltzingmouse SoAP
Welcome to the 2nd Day of the Waltzingmouse Stamp of Approval Parade (SoAP)! Thanks for all your kind comments left yesterday - weren't all the DT's projects inspirational??!!! I know I got a lot of great ideas for using the May release sets!
Today I'm parading Gingham + Co with a little bit of Say It Loud slipped in!
First I stamped two sentiments from Say It Loud in two colors of ink - then I stamped 2 different gingham background stamps and the reverse dots background stamp from Gingham + Co. on white card stock and punched them with the butterfly punch. I adhered the butterflies to the card with glue dots.
A cheerful little card that took just minutes to make! And the cool thing is - when you stamp one of these background stamps - it's big enough to be able to punch 3 or 4 butterflies out of the stamped panel - so you can make multiple cards at one time! whoo hoo!!
My second card again uses both of these wonderful stamp sets.
I stamped a gingham background directly on the card, then stamped the sentiment over it in black ink. I stamped the reverse dots background in two different colors and die but my flowers (Tim Holtz Alterations Tattered Florals). The leaf is from Big Blooms - Chrysanthemums. I layered the flower with foam dots, curling the petals a bit for dimension. I adhered the ribbon with Scor Tape and just cut it off at the edge of the card (I hate wrapping ribbon around a no layer card!)
Please continue viewing the parade on each of the Design Team blogs listed here - and I hope you'll stop by again tomorrow for Day 3!
Take Care:
Stamps: Waltzingmouse - Say it Loud, Gingham + Co.,
Paper: White - PTI
Ink: Memento - Cantalope, Bahama Blue, Sweet Plum
Accessories: glue dots, rhinestones - Darice, butterfly punch - SU
Hugs+ Prayers:
Stamps: Waltzingmouse - Say It Loud, Gingham + Co, Big Blooms Chrysanthemums
Paper: White - PTI
Ink: Memento - Tuxedo Black, Cantalope, Bamboo Leaves, SU - Pumpkin Pie, Ranger Distress - Dried Marigold
Accessories: flower die - Tim Holtz Alterations - Tattered floral, rhinestones - Kaiser, saddle stitched Orange Zest Ribbon - PTI, Scor Tape, foam tape
Today I'm parading Gingham + Co with a little bit of Say It Loud slipped in!
First I stamped two sentiments from Say It Loud in two colors of ink - then I stamped 2 different gingham background stamps and the reverse dots background stamp from Gingham + Co. on white card stock and punched them with the butterfly punch. I adhered the butterflies to the card with glue dots.
A cheerful little card that took just minutes to make! And the cool thing is - when you stamp one of these background stamps - it's big enough to be able to punch 3 or 4 butterflies out of the stamped panel - so you can make multiple cards at one time! whoo hoo!!
My second card again uses both of these wonderful stamp sets.
I stamped a gingham background directly on the card, then stamped the sentiment over it in black ink. I stamped the reverse dots background in two different colors and die but my flowers (Tim Holtz Alterations Tattered Florals). The leaf is from Big Blooms - Chrysanthemums. I layered the flower with foam dots, curling the petals a bit for dimension. I adhered the ribbon with Scor Tape and just cut it off at the edge of the card (I hate wrapping ribbon around a no layer card!)
Please continue viewing the parade on each of the Design Team blogs listed here - and I hope you'll stop by again tomorrow for Day 3!
Take Care:
Stamps: Waltzingmouse - Say it Loud, Gingham + Co.,
Paper: White - PTI
Ink: Memento - Cantalope, Bahama Blue, Sweet Plum
Accessories: glue dots, rhinestones - Darice, butterfly punch - SU
Hugs+ Prayers:
Stamps: Waltzingmouse - Say It Loud, Gingham + Co, Big Blooms Chrysanthemums
Paper: White - PTI
Ink: Memento - Tuxedo Black, Cantalope, Bamboo Leaves, SU - Pumpkin Pie, Ranger Distress - Dried Marigold
Accessories: flower die - Tim Holtz Alterations - Tattered floral, rhinestones - Kaiser, saddle stitched Orange Zest Ribbon - PTI, Scor Tape, foam tape
Wednesday, June 1, 2011
Day 1 - Waltzingmouse SoAP!
Welcome to Day 1 of the WMS DT Stamp of Approval Parade (SoAP)! For the next 3 days the DT will be sharing with you more ways to use the May Release WMS stamps - Say it Loud, Join Us, Gingham + Company, Dainty Doilies - Large and Dainty Doilies 2 - Small and on June 4th we'll be highlighting an older stamp set!
Today I'm parading the Dainty Doilies - Large set.
I made these fun stars on a stick to decorate my table at my Memorial Day Cookout this past weekend! I even made star shaped brownies to stand them in! (Yes- they were yummy and, yes, they are gone!)
I white embossed several of the doilie stamps on red and blue card stock and stamped them in blue ink on white card stock. Then I die cut them using my star Nestability - sponged the edges and added the sentiments 'Party' and "Celebrate" from Free Spirit Sentiments. I taped them onto the stick and added the wrinkled seam tape.
Here is a close up so you can see the doily stamping more clearly.
I had some left over stamped panels that I had cut too small to fit the star die (whoops!) so I made cards out of them!!
Click on any pic to see it larger. I embossed a rectangle Nestability frame on the card then adhered the panels inside the frame using foam tape. The sentiment 'we had a wonderful time' on my cards is from Join Us. If it hadn't been my own cookout - I would send one of these cards to the host and hostess to thank them for inviting me!! LOL!!
Here's a clean and simple card I made just by layering some doily stampings!
First I embossed the Lacey Circle Nestability on the card - then I stamped 3 doilies in 3 colors (2", 1" and 1/2") and punched them out layering them inside the embossed framing with foam tape. I added a tiny gem in the center of the smallest stamping. An easy peasy card that packs a punch don't you think?!
I hope you'll continue viewing the parade on these Design Team members blogs and please stop by tomorrow for Day 2 of our parade!!
Stars:
Stamps: Waltzingmouse - Dainty Doilies - Large, Join Us, Free Spirit - Sentiments.
Paper: White, Pure Poppy, Enchanted Evening - PTI
Ink: Ranger Distress Fired Brick, Chipped Sapphire, Versamark Watermark Inkpad.
Accessories: Glue dots, white embossing powder, hot gun, Star Nestabilities, wooden stick, wrinkled seam tape, modern label punch - SU
Thanks Card:
Stamps: Waltzingmouse - Dainty Doilies - Large
Paper: White - PTI
Ink: Ranger Distress - Brushed Corduroy, Dusty Concord, Memento Summer Sky, Tuxedo Black
Accessories: 2" + 1" circle punch - EK Success, 1/2" punch - Marvy Uchida, Lacey Circles Nestabilities, Tiny Gem - Taylored Expressions, foam tape.
Today I'm parading the Dainty Doilies - Large set.
I made these fun stars on a stick to decorate my table at my Memorial Day Cookout this past weekend! I even made star shaped brownies to stand them in! (Yes- they were yummy and, yes, they are gone!)
I white embossed several of the doilie stamps on red and blue card stock and stamped them in blue ink on white card stock. Then I die cut them using my star Nestability - sponged the edges and added the sentiments 'Party' and "Celebrate" from Free Spirit Sentiments. I taped them onto the stick and added the wrinkled seam tape.
Here is a close up so you can see the doily stamping more clearly.
Click on any pic to see it larger. I embossed a rectangle Nestability frame on the card then adhered the panels inside the frame using foam tape. The sentiment 'we had a wonderful time' on my cards is from Join Us. If it hadn't been my own cookout - I would send one of these cards to the host and hostess to thank them for inviting me!! LOL!!
Here's a clean and simple card I made just by layering some doily stampings!
First I embossed the Lacey Circle Nestability on the card - then I stamped 3 doilies in 3 colors (2", 1" and 1/2") and punched them out layering them inside the embossed framing with foam tape. I added a tiny gem in the center of the smallest stamping. An easy peasy card that packs a punch don't you think?!
I hope you'll continue viewing the parade on these Design Team members blogs and please stop by tomorrow for Day 2 of our parade!!
Belinda Chang Langner
Bonnie Sharp
Carly Robertson
Claire Brennan
Jennifer Holmes
Julia Aston You are here!
Kate Whelan
Laurie Schmidlin
Lynn Mercurio
Mona Pendleton
Niki Estes
Sandie Dunne
Sarah Martina Parker
Tosha Leyendekker
Bonnie Sharp
Carly Robertson
Claire Brennan
Jennifer Holmes
Julia Aston You are here!
Kate Whelan
Laurie Schmidlin
Lynn Mercurio
Mona Pendleton
Niki Estes
Sandie Dunne
Sarah Martina Parker
Tosha Leyendekker
Stars:
Stamps: Waltzingmouse - Dainty Doilies - Large, Join Us, Free Spirit - Sentiments.
Paper: White, Pure Poppy, Enchanted Evening - PTI
Ink: Ranger Distress Fired Brick, Chipped Sapphire, Versamark Watermark Inkpad.
Accessories: Glue dots, white embossing powder, hot gun, Star Nestabilities, wooden stick, wrinkled seam tape, modern label punch - SU
Thanks Card:
Stamps: Waltzingmouse - Dainty Doilies - Large
Paper: White - PTI
Ink: Ranger Distress - Brushed Corduroy, Dusty Concord, Memento Summer Sky, Tuxedo Black
Accessories: 2" + 1" circle punch - EK Success, 1/2" punch - Marvy Uchida, Lacey Circles Nestabilities, Tiny Gem - Taylored Expressions, foam tape.
Subscribe to:
Posts (Atom)