Friday, February 28, 2025

Group of Seven Cardmakers - Feb 2025 Technique - Floating Frames

 This month, the Group of Seven Cardmakers are playing with the technique - Floating Frames.

There are several tutorials for this on YouTube -  two of them are linked to over at GO7.  I looked at both of them and because I just happened to have Press N Seal Glad Wrap in my cabinet - I went with this tutorial. Floating Die Cut Frame by Jennifer McQuire. 


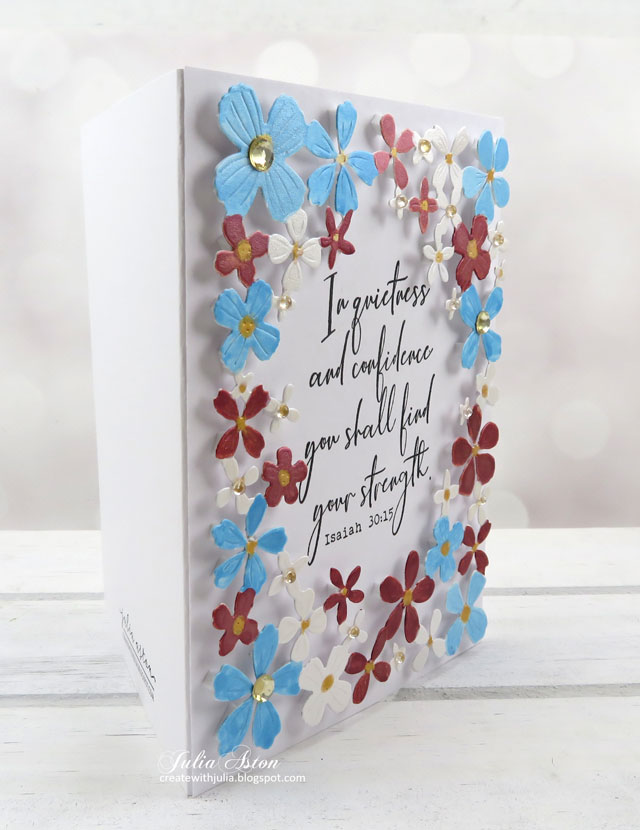
Side view to see the depth of the 'floating' frame.
I used Antique Roses stamps and dies from Altenew.  I chose 3 shades of green ink for the leaves and 3 shades of blue and black for the two blooms.  I used my Misti and stamped all the layers of leaves and blooms on a white panel - four times so I had 4 panels of each bloom and leaves to use on my card.
I die cut all the pieces and laid them over a 4 1/4" x 5 1/2" white panel.
I laid a piece of Press'n Seal over the panel and pressed over all the pieces with my fingers - it is slightly tacky on one side (be sure to have the tacky side down!) so holds all the pieces in their places on the white panel.
I cut around the edges of the white panel so nothing went over the edge..
I removed the white panel and the pieces remain stuck to the Pres'n Seal
Then I die cut a rectangle out of the center of the panel - So I had two pieces to work with - still stuck to the Press'n Seal.
I added pieces of thick foam tape all over the back of the pieces.  Thick foam makes the frame 'float' higher off the card base.
I removed the backs of the foam tape, flipped over the panel and carefully pressed it onto the white panel, removed the Press'n Seal and there's my floating frame!  I adhered the inside of the frame cut- out onto a white card front for my 2nd card and removed the Press'n Seal!  I added 3 clear Fairy Drops to each card.


A couple of days after I made the above cards - I was looking through my box of cover dies and came upon this Flower Field Frame die from Poppy Stamps - I've had this for at least a year and it's the first time I've used it!
A faux floating frame so to speak!  It's all one piece - just has to be colored and adhered to a card base with lots of little bits of foam strips!  I used Metallic Water Color Paints to color the blooms and added gems to the center of some of the flowers.


Notes:  
1.  Depending on what stamps you choose (my first card blooms had 4 stamps for each bloom to create the 3D look) it can take a couple of hours just to stamp everything and then die cut the pieces for these two cards.   But it does create a beautiful look for a special card for someone.  I would suggest you do all the stamping one day - die cutting the next day and placement the third day and to stamp/cut enough for several cards!
2.  You could hand color your stampings or stencil the colors over your stampings depending on what kind of sets you have in your craft room.  That would save a lot of time.

3.  Maybe you'll find a cover die similar to the one I used for my last card that works as well!  Check out all the corners of your craft room!


We'd love to see what you do with this technique and to let us know what was easy/difficult for you.  You'll find some beautiful inspiration from the rest of the Group of Seven as well as Mr. Linky to show us what you do over at Group of Seven Blog!

 
I'm sending my one piece floating frame card to:

first time using the Flower Field Frame die

something tiny/small   My flowers are small on this floating frame. 
ends 3/4

Sending  my You're Amazing card to:

Cardz 4 Galz - embellishments
clear Fairy drops   ends 3/4


Antique Roses Card
Stamps: Antique Roses - Altenew, Isaiah 30:15 - Impression Obsession
Paper: White, True Black - Papertrey Ink.
Ink: Light Spruce, Medium Spruce, Dark Spruce - Gina K Designs, Persian Blue, UIltramarine, Sapphire - Altenew, Nocturne - Versafine Clair.
Other Supplies: Antique Roses Dies - Altenew, Rectangle Die - Nestabilities, Press'n Seal - supermarket, foam tape, Fairy Drops - Memory Box.

Flower Field Card
Stamps: Antique Roses - Altenew, Isaiah 30:15 - Impression Obsession
Paper:  White - Papertrey Ink
Ink:  Nocturne - Versafine Clair
Other Supplies:  Flower Field Frame Die - Poppy Stamps, Metallic Water Colors Paints - Yasutamo, paint brush, water, foam strips, gems - Park Lane, Clear Fairy Drops - Open Studio

Saturday, February 15, 2025

Inkspirational #335 Mood Board - Inspired Flowers

 Inkspirational Challenge #335 has just posted and it's a lovely Mood Board!

I was inspired by the aqua colors and the florals.


Still trying to follow my New Year's resolution to use things I've had for ages and never used,
I pulled out the Craft-A-Flower Lily die set from Altenew.  And boy, aren't these pretty blooms?!  I didn't think they would still have them, I bought them so long ago - but they do!   I added Silver Wink of Stella on the stamens but it doesn't show much on the photo.  The flower on the right is popped up on foam dots.


This challenge ends on Feb 28th so we hope you will join us before then and link up your card inspired by our Moodboard!   

You'll find more inspiration from the rest of the Design Team as well as Mr. Linky over at Inkspirational!


I'm also sending my card to:

1st time using these Altenew Lily dies!

did not use optional red ends 2/27

Flowers make me smile ends 2/17

ends 2/28


Paper:  Robins Egg - Bazzill, Aqua Mist, Hawaiian Shore, Tropical Teal, True Black - PTI, DP: Untamed Meadow - Unity two shades of textured green from my stash.
Other Supplies:  More Sentiments Hot Foil Plate and die set - Spellbinders, Silver Hot Foil, Glimmer Hot Foil System, foam dots, Silver Wink of Stella.

Thursday, February 13, 2025

Surprise Party Guest at Seize the Birthday - Add a Heart

 I am excited to be playing along with Seize the Birthday today as a Surprise Party Guest! I was asked after my card was chosen a winner on this post.


I almost started making a Valentine (with a heart!) and luckily my brain refocused and remembered this is a birthday card challenge - duh!  

My boxwood wreath and stamp set are from The Greetery.  I have had this stamp set and die since it came out in 2021 and until today, have never used it.  My New Year's Resolution is to stop buying so much and start using what I have that hasn't yet been touched! (it's sort of working!)

I made the background using the Herringbone Parquet Die, also from The Greetery.  I cut it out of white paper and colored it using blender brushes with Brushed Corduroy and Hickory Smoke Distress Inks.  I splattered it using a white POSCA Pen.  I tied a bow out of twine and adhered it to the wreath.  The wreath is popped up on foam dots.

We hope you will join us at Seize the Birthday and you'll 'Add a Heart' to your birthday card design - or you can just make a birthday card!  

You will find some lovely inspiration from the Design Team as well as Mr. Linky over at Seize the Birthday!

I'm also sending my card to:

first time using the Boxwood stamps and die

ends 2/16

Love  ends 2/22

Romance  ends 2/16


Stamps:  Love Is (boxwood wreath) - The Greetery, Birthday Basics - Papertrey Ink.
Paper:  white - Papertrey Ink
Ink:  Light Spruce, Medium Spruce - Gina K Designs, Brushed Corduroy, Hickory Smoke - Ranger Distress.
Other Supplies:  Herringbone Parquet Die, Boxwood Heart base Die - The Greetery, Blender brushes, Oval Punch - Stampin'up, twine, white POSCA pen.

Sunday, February 2, 2025

January 2025 Card Chain Challenge Reveal

 Today's the day we can see all of the cards that were exchanged all over the world for the January Card Chain Challenge!    I sent a card to Carol in England and I received a card from Hilary - also in England!

Every month there are suggestions of colors, sketch, theme, product and technique options to inspired us.  

This month I just went with the theme of Friendship.

I used a recently purchased Gate Fold X Fence die from Mama Elephant along with the Dandelion Wish Embossing folder from Sizzix.  The stamps are from Dandelion Wishes Sentiments from Papertrey Ink (on sale!)

I embossed the dandelions onto a white panel and then rubbed over the panel with  Ranger Distress Ink - Scattered Straw ink pad to color the raised bits.  I adhered the fence tabs to the back of the panel
Since the fence will stand the card up I embossed and inked another white panel and adhered it to the back of the card panel which also covers the tabs from the fence.  I added a die cut scalloped trim and a white panel for the sentiment and message!
I adhered the oval sentiment to just one side of the fence and 3 yellow enamel dots on each side of the fence.

Have you been thinking of joining this fun monthly card exchange challenge?  You sign up each month - so you can just do it once and see if you enjoy it!  You'll find all the info you need to know about joining in over at The Card Chain Challenge!

I'm also sending my card to:

First time using the fence and the sentiment stamps.


layer, warm, love

Anything goes with embossing


Stamps:  Dandelion Wishes Sentiments Mini Stamp Set - Papertrey Ink.
Paper:  White, Summer Sunrise - Papertrey Ink.
Ink:  Scattered Straw - Ranger Distress Ink, Nocturne - Versafine Clair.
Other Supplies:  Gatefold X Fence die - Mama Elephant, Scalloped Edge Die - unbranded, Oval and Scalloped Oval Punches - Stampin'Up, Zutter Corner Rounder, Yellow enamel dots - Altenew.

Saturday, February 1, 2025

Inkspirational #334 Collaboration with Color Hues!

 Today the Inkspirational Challenge is teaming up with the Color Hues Challenge and both Design Teams are creating cards using Red and Pink!  We invite you to join in as well!


The Impressionist Garden StencilGarden Gateway die and Bloom and Grow sentiments are new purchases from The Greetery.  The gate and sign are up on foam dots.  

So please join us at Inkspirational AND at Color Hues and link up your red/pink creation!

The challenge ends on 2/14

I'm also sending my card to:

first time using the stencils, die cuts and stamps


ends 2/4


ends 2/28


Stamps:  Bloom and Grow Sentiments - The Greetery
Paper:  White, Lovely Lady, Pure Poppy, True Black - Papertrey Ink, Hammered White (on gate/fence) - Amazon.
Ink:  Lovely Lady, Pure Poppy - Papertrey Ink, Nocturne - Versafine Clair.
Other Supplies:  Garden Gateway dies - The Greetery, Impressionist Garden Stencil Set - The Greetery, Pierced Feature Frames dies - Papertrey Ink, enamel dots - Altenew, blender brushes, foam dots.