Friday, January 31, 2025

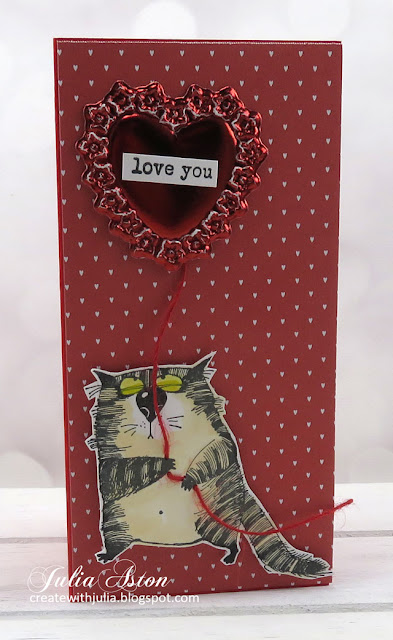
A Snarky Cat with a Valentine Balloon!

 Today, I'm sharing the Valentines that I made this year to send to my grandnieces and grandnephews.  I used pink metallic paper to emboss/die cut the hearts for the girls and red metallic paper for the boys, ages 14, 13, 12 and 10.  

These are mini slim line size 3"x 6".  I always include a $1 bill as a (very small!) treat but it adds a little fun when they open the card. 

I used a large eye sewing needle to 'sew' the balloon twine string through the cats hands.  I colored the Snarky cat with Distress Water Color Pencils and a water brush.  The hearts are die cut/embossed using Tim Holtz/Sizzix  3D Impresslits Lucky Love 

I'm sending my Valentine to the following challenges:

Time Out Challenges

used Stitch (balloon string), Heart, Love, Layer  ends 2/12


Inspired by Challenge

Red, heart, Valentine, animal ends 2/5


Can You Handle the Pressure

anything goes (embossed heart) ends 2/5


Tic Tac Toe #263

Used the top horizontal line -  Hearts, Designer Paper, Love Sentiment ends 2/13


Stamps:  Snarky Cat - Tim Holtz/Stampers Anonymous, Love You from Mini Boxwood Heart set - The Greetery.
Paper:  Red and dark pink card bases from stash, DP Gosh I love You - Unity, Valentines Day - Recollections.
Other Supplies:  Crushed Olive and Wild Honey Distress Water Color Pencils - Tim Holtz, foam dots, water brush pen.

Tuesday, January 28, 2025

Group of 7 Cardmakers - January 2025 Technique

 Today the Group of 7 Cardmakers are playing with the technique of Dry Embossed Highlights over Ink Blending.

You'll find links to a couple of YouTube Videos over at the Group of Seven Blog.

I tried two of the techniques with varying success depending on the embossing folder and lighter colored ink I used over the panel.  

The instructions say to use a white pigment ink to rub over the embossing. All of my white ink pads seem to dry out by the time I go to use them?! I used the one I had on the heart card below this card - but it wasn't very 'juicy' and also picked up the pink from the background.

So, I used Antique Linen Distress Oxide over the embossing on the two cards below.  I used Distress Oxide Seedless Preserves, Squeezed Lemonade and Salvaged Patina on the backgrounds.


A few creation photos for these two using the same embossing folder.


I used an old Colorbox Frost White Ink rubbed over the embossed hearts on the card below -  the pad wasn't very 'juicy' and picked up some of the Festive Berries Distress Oxide ink so the white was not very 'white'!  But I liked the result.  This older embossing folder was not very deep. 
I rubbed my Squeezed Lemonade Distress Oxide ink pad over the embossing, using Speckled Egg Distress Oxide inside the rectangle.

Notes:  I decided to use light Distress Oxide Inks to rub over the embossing on 3 of my designs instead of white (accept on the Valentine) since I didn't have a 'fresh' White Pigment Ink.

I found if the embossing wasn't deep enough, the ink pad I rubbed over the embossing would also get ink onto the un-embossed areas of the card.

I tried 4 other embossing folders that didn't work out either with the colors I used on the background or the thinner depth of the embossing - so keep playing!


We'd love to see what you create using this technique.  You can link up your card over at the Group of Seven Cardmakers blog so we can all come and see them!

I'm linking my Thank You card

 to:

anything goes with embossing ends 2/5

optional: Close to Nature (flowers) ends 1/31


Thank You and Sympathy Cards
Paper:  White - Papertrey Ink, Gold foil, Silver Foil
Ink:  Ranger Distress Oxides - Seedless Preserves, Squeezed Lemonade, Salvaged Patina, Old Paper.
Other Supplies:  Masking Tape, Flowers and Leaves Embossing Folder - Altenew, Way with Words Hot Foil Stamps (Thank You) - Ellen Hutson, Classic Frame Foil Set (Sympathy)- Waffle Flower, foam dots, blender brushes.

Valentine Card
Paper:  White - Papertrey Ink, gold foil
Ink:  Ranger Distress Oxide - Festive Berries, Frost White - Color Box.
Other Supplies:  Masking Tape, Hearts 3D Embossing Folder - Sizzix, Way with Words Hot Foil Stamps (Love You) - Ellen Hutson, foam dots, masking tape, blender brushes.

Congratulations Card
Paper:  White - Papertrey Ink, gold foil
Ink:  Ranger Distress Oxides - Speckled Egg, Squeezed Lemonade.
Other Supplies:  All Star Burst Embossing Folder - Simon Says Stamp, masking tape, foam dots, blender brushes, Way with Words Hot Foil Stamps (Congratulations) - Ellen Hutson. 

Saturday, January 18, 2025

Inkspirational #333 - Word Prompt - Snow

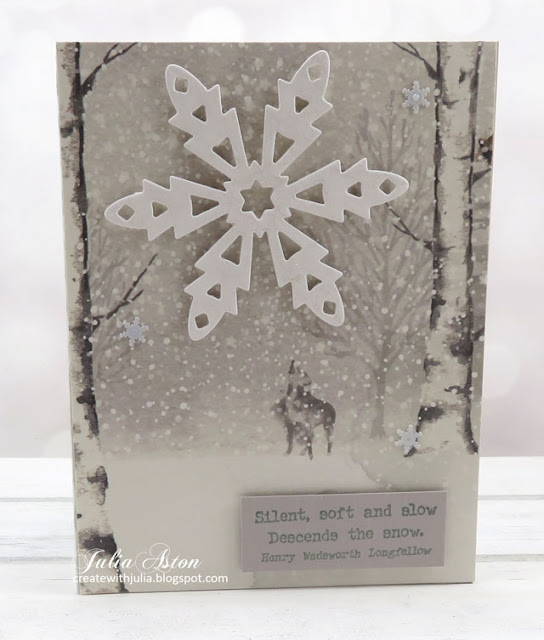
 Here is my DT card for today's Inkspirational Challenge - Snow!   We just had a lovely 4" snow fall in MA last Saturday - falling on freezing bare ground.  That small amount is enough for me to feel warm and cozy when I look out the window!


I just received these snowflake dies from a sale over at The Greetery - So I made two cards using different snowflakes.  The snowflake below is from Snipped Showflakes #3.  The DP is from Charlie and Paulchen on both cards and I also added snowflake sequins from This Calls for Confetti on both cards.   The sentiment is from Paper Artsy Alison Bomber EAB05 set.
The snowflake below is from Snipped Snowflakes #2 from the Greetery.
I brushed Clear Glitter Wink of Stella over both of the large snowflakes - so they are shiny IRL but it doesn't show up in the photo.
Here's a close up where maybe you can see the sparkle a little bit?

So we hope you will join us and show us 'SNOW'!  You will find Mr. Linky and some beautiful inspiration from the rest of our talented team over at Inkspirational.

Link up by 1/31!

I'm also sending my card to:

First time using the die cut snowflakes and the DP

The Christmas Song -  Line: Jack Frost nipping at your nose

ends 1/31

ends 1/25


Stamps:   Alison Bomber EAB05 set - Paper Artsy
Paper:  White - Papertrey Ink, Alpaca - Bazzill, DP - Charlie and Paulchen.
Ink:  Stormy Sea - Papertrey Ink
Other Supplies:  Snipped Snowflakes #3, Snipped Snowflakes #2 - The Greetery, snowflake sequins - This Calls for Confetti, foam dots, Clear Glitter Wink of Stella.

Wednesday, January 15, 2025

Reminder Post - Christmas Kickstart: Baubles

 Today, as the Guest Elf for January -  I have a reminder post for the Christmas Kickstart January Challenge - Baubles.


I used another die from Festive Ornaments from Sizzix for my baubles card  - Santa's belted belly! (See my 1st post for the challenge using the plum pudding dies in the set here

I added a silver cord to hang it and layered it over a beautiful piece of pine branch DP.   Santa's belt is black glitter card but the sparkle doesn't show in the photo.  I popped up the bauble with foam dots and taped the top of the silver cord on the back of the DP.   Inside I stamped "Here Comes Santa Claus"!


So lets start building our new stash of Christmas cards so we're not in a rush come December!
You have until Jan 31 to link up your 'Bauble' cards over at Christmas Kickstart!

Thank you to Jo for inviting me to be Guest Elf for January -  I'm happy to be starting my Christmas card stash for this year!

Also sending my card to:
The Christmas Song ends 1/31
They know that Santa is on his way.

Something Old - DP,  Something New  Santa belly ornament die
ends 6 pm EST 1/15

ends 1/31

Anything Goes Christmas ends 1/16


Stamps: Jolly Old Elf - Waltzingmouse (retired)
Paper: Pure Poppy - Papertrey Ink, Black Glitter paper - Recollections, Kraft Stock Metallic Gold and Silver - Tim Holtz/Idea-ology, DP - Make It Merry - Honey Bee.
Ink: Nocturne - Versafine Clair
Other supplies: Festive Ornaments - Spellbinders, silver cord from stash

Sunday, January 12, 2025

A Birthday Ballerina

 A friend asked me to make a card for her grandaughter who is turning 10 and she is a dancer.  I've made Lia other cards with die cut and stamped ballerinas and so went searching in my bottomless pit of a craft room for something different!

I found an unopened bag of Baseboard Dolls from Tim Holtz/Idea-ology that I've had at least for a year but have not used and when I looked through them I found this wonderful vintage ballerina!  So then I searched Tim Holtz YouTube videos on how I could color the image (the Baseboard Dolls are all black and white photographs printed on thick baseboard.) 

I found a video on coloring with Distress Watercolor Pencils (another thing I have had in my room for over a year but have never used -  and totally forgot what to do with them)  I rubbed both Tattered Rose (for the flesh parts) and Tumbled Glass (for the dress, hat and shoes) onto my craft mat in two different spots.  Then I used a water brush pen to pick up the colors brushing over the flesh parts first and then the dress.  It gives a wonderful soft color! You can see, especially on the dress, that the blue doesn't cover the whole dress, which makes it light and airy!

You can brush over these Baseboard Dolls with clear Gesso and let it dry before watercoloring - then the color covers more of the area and is darker- this works well especially if you are coloring a Baseboard Doll that has a lot of black that wouldn't  show the color (like a long coat or pants)  But I digress......

I embossed a white card panel using All Star Burst EF and water-brushed the same Tumbled Glass,  lightly radiating out from the center along the embossed lines.

I popped the ballerina up on foam dots and added a computer generated personalized sentiment for Lia!


Baseboard Ballerina and Distress Watercolor pencils are new! 
ends 1/21


First time using the Baseboard Dolls and Watercolor pencils

Use Stars  Ends 1/13


Paper:  White - Papertrey Ink.
Other Supplies:  Baseboard Dolls - Tim Holtz/Idea-ology, All Star Burst Embossing Folder - Simon Says Stamp, Ranger Distress Water Color Pencils Set #3, water brush pen, Computer Printed Sentiment.

Tuesday, January 7, 2025

Guest Elf at Christmas Kickstart - Jan 2025 Baubles

 Today, I'm excited to be posting a card as the Guest Elf at Christmas Kickstart for January!  


For those of us living in the US - baubles are what we call ornaments, just in case you weren't sure (like me)?!

I recently purchased a fun die set - Festive Ornaments - from Spellbinders that has 5 ornament designs 
(sold out on Spellbinders site, but still available on Amazon)

I used plum pudding dies from the set for this card - matching it with patterned paper that had plum pudding and other Christmas desserts and foliage on it! 
 
And - I made my Christmas card a Christmas Thank You card because I needed one to send a friend and I used a bauble on it!


So we hope you will join us in January, creating a Christmas card with Baubles on it!!  You'll find the challenge here.

I'll  be back with a reminder post on January 15th!

Also sending my card to:

Christmas Song  ends 1/31
Line: Jack Frost Nipping at your nose - 
 Frosty snow on the ornament and snowflakes in background

Something Old - Something New ends 1/15
DP is old - ornament die is new

first time using the ornament dies

ends 1/31

Anything Christmas  ends 1/16


Stamps:  Join Us - Waltzingmouse (retired)
Ink:  Nocturne - Versafine Clair
Paper:  Scarlet Jewel, Pine Feather - Papertrey Ink, White Glitter Paper - Recollections, Kraft Stock Metallic Gold and Silver - Tim Holtz/Idea-ology, DP Wintery Wonderlands - Brass and Bliss.
Other Supplies: Festive Ornaments Dies - Spellbinders, foam dots, silver cord - from stash.