
I was SO excited when Linda asked me if I would like to be a guest designer for the Frilly and Funkie challenge! Especially since the DT is using Eileen Hull's new Journal Die for their projects!
The challenge is - Put Your Inking Cap On and here is the challenge description from hostess Kathy:
For this challenge we are asking you to create a vintage or shabby chic
project without using any designer paper. You can use inks, mists,
paints, texture paste, fabric, felt, embossing powders, pencils,
markers, pastels, chalks...the sky is the limit! As long as you are not
using designer paper on the front of your project, you are golden.
The lovely and creative Eileen Hull generously donated a set of her HeARTfelt Journal cover sets
to each member of the team, so each of us has created a lovely
Traveler's Notebook style journal to share with you for this challenge.
However, you do NOT have to create a journal to play along!
If you are looking for Eileen's Journal Bigz XL Die, you can pre-order it from The Funkie Junkie Boutique.
Here is my funkie journal creation!

Before I show you more close ups - I'll take you through my steps in making this!
I started with Eileen Hull's wonderful new Sizzix Journal. I cut it out of Cream Little Sizzles Mat Board.


I decided to use Ranger Distress Oxides in Vintage Photo, Broken China and Peeled Paint. I rubbed them over my craft mat, spritzed the inks with water and then dragged my covers through the inks.

I kept adding more inks, drying with my heat tool, more inks - and when I was done - I decided to add some DOX Worn Lipstick to the mix. I also sponged all the edges with DOX Vintage Photo.

I decided to just use DOX Vintage Photo on the inside of the covers.

Then I flicked water onto both inside and outside.

I adhered the covers at the center - overlapping the scored edge with the holes in the middle - being sure to line up all the holes. I stamped randomly across the front covers using a Distressed Grid stamp and DOX Vintage Photo.

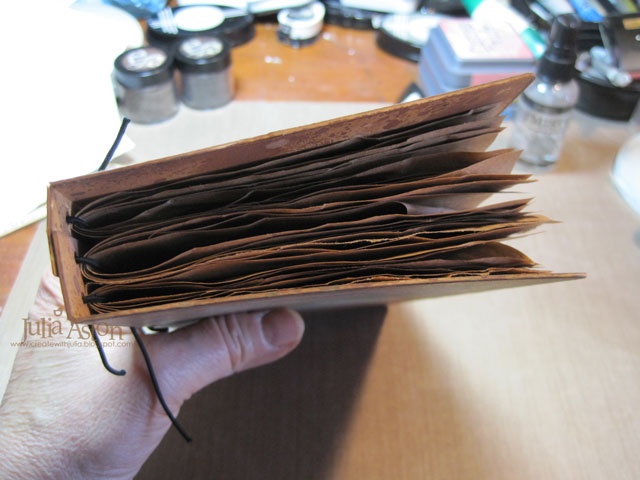
I cut three 17" pieces of black round elastic cord and put them through the holes at top and bottom knotting them on the outside. These will hold the 3 signatures in the journal.


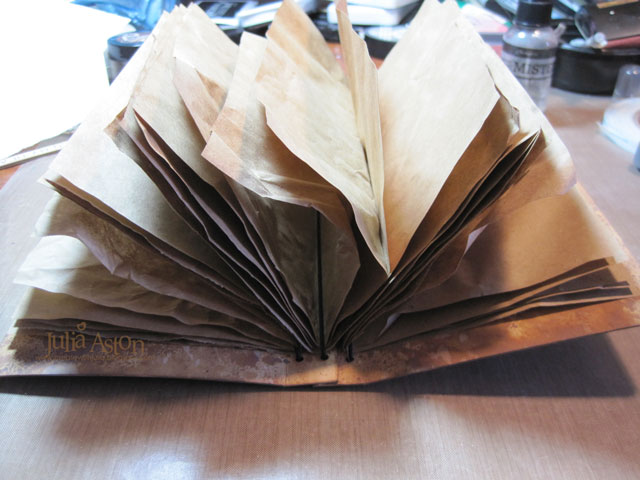
I made my pages out of brown paper that I have saved from packages I received in the mail. I just love the crinkle sound of it when you turn the pages
(I got this idea from Eileen Hull who used this kind of paper on a journal she made on a Facebook video!)
I cut 15 pieces of paper each 8 1/2" x 7 1/2" and folded them all in half. I put 5 pieces together for each signature creating 10 pages in each (when folded in half).

I slipped each signature through an elastic in the middle of each signature.

Here they are all loaded in!
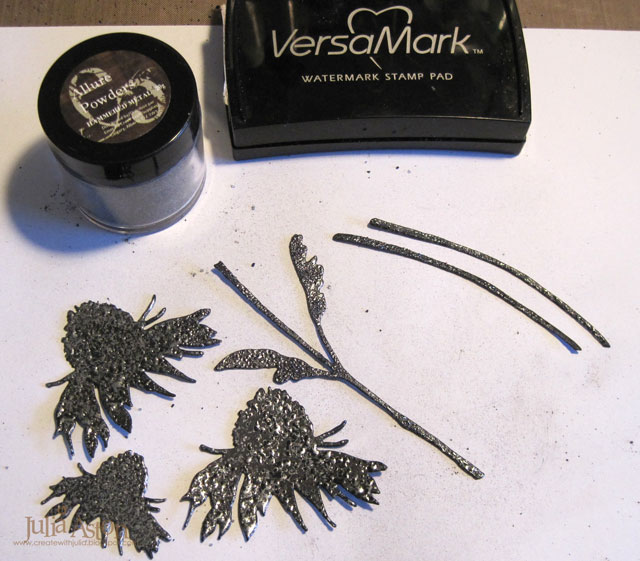
Then I got to work on decorating the front of my journal. I used Tim's Flower Garden Framelits to cut the 3 stems and 3 coneflowers out of black cardstock. I inked the pieces with Versamark and embossed with Hammered Metal Allure Powder from Emerald Creek.
I adhered them on my cover (using foam dots just under the cone flower head and glue everywhere else), along with Quote Chips, Industrious Stickers, Clippings

and Design Tape/Chatter which I wrapped around the front and back

and continued it around onto the inside covers


I also added a few more pages in the signatures that were smaller - just for fun!

I used the clasp piece that is on the Journal Die to close my journal. I embossed it with the same Hammered Metal Embossing powder and sponged it with DOX Vintage Photo. I added a piece of Linen Ribbon through the hole.

And I have to confess to you - when I was putting the Velcro on the front of the journal - I didn't like how it looked when I closed it - but when I tried to pull off the Velcro - it took the top layer of the journal with it!! SO - I inked over the torn space - and then put a Clippings Sticker over it!

I added 3 charms on the bindings - a crown from Prima that I colored with Pink Sherbert Alcohol Ink, an Adornment Pinecone colored with Pesto Alcohol Ink and a Philosphy Tag.

So - here is the finished product, once again - front and back!


Thank you so much Linda, for asking me to join the team this week as a Guest Designer for this fun challenge! I really enjoyed creating my funkie journal.
I can't wait to see what everyone creates without any patterned paper! Check it out here!

Stamps: Distressed Grid - Cornish Heritage Farms (no longer available)
Paper: True Black Cardstock - Papertrey Ink, Cream Little Sizzles Mat Board - Sizzix, brown paper packaging.
Ink: Ranger Distress Oxides Vintage Photo, Broken China, Peeled Paint, Worn Lipstick, Versamark.
Accessories: Journal Die - Eileen Hull/Sizzix, Flower Garden Framelits - Tim Holtz, heat tool, Allure Powder/Hammered Metal/Emerald Creek, Scotch Adhesive Back Velcro, Adirondack Alcohol Inks Pink Sherbert and Pesto, Black Round Cord Elastic - Dritz, ScorTape, Craft Mat, water mister, Idea-ology Industrious Stickers, Quote Chips, Design Tape/Chatter, Clippings Stickers, Adornments/Pinecones, Philosophy Tags, Jump Rings, Linen Ribbon, Black Stabilo Pencil.
17 comments:
This is magnificent Julia! I love that inky cover with the embossed flowers and word trims. Thank you so much for joining us at Frilly and Funkie for this challenge and sharing your genius xx
Gorgeous! I love the beautiful patina from the inks and the inside pages was brilliant! I love that you used the packaging paper as your pages. Beautiful design! Thanks for joining us as a guest DT for the inky challenge!
Julia, this is just sooooo gorgeous! I love the wonderful earthy colors you created with your DOX. The enameled die cuts add wonderful texture and shine. Your step out is so clear and easy to follow. Thanks you so much for being our guest designer for the Put on Your Inking Cap challenge!
Congratulations on your GDT spot Julia and what a lovely journal you have created, I think this might be my new favourite. I love the way the matboard takes the Oxides, the cover looks amazing and the brown paper inserts really suit the cover too. Fantastic step by step. I am experimenting with small magnetic closures at the moment... Hugs, Anne xx
OMGSH, what a fabulous book! I love the rustic look and how many details there are!
Excellent work!!
Your journal is AMAZING, Julia! Love the DOX ink covers and the metal heat embossed accents ... gorgeous. And great idea to use the brown packing paper for the inside. I can hear the crinkle in my head when you mentioned it ... wonderful sound. :) xx
This flat out ROCKS, Julia. I have been drooling since I first saw it and haven't stopped. I really love everything about it, especially the amazing Hammered Metal coneflowers! Your design elements and embellishments are absolutely perfect. Thank you for rounding out our DT offerings for this challenge. It was a delight to have you join us!
Hugs,
Linda
Congrats on being Guest Designer Julia! And I absolutely LOVE this journal! The flower, the colors, sentiment... AND those nice crinkly pages! Beautiful job as always!
What a super mix of patterns with the inks and the texture of the flowers is amazing! WOW! I hope you are going on a trip soon so you can record the details in your journal!
Julia, I'm blown away by how fabulous this is! It's a wonderful example of mixed media. I love all the details of the subtle background stamping, the beautifully heat embossed flowers, the great word stickers! I've never tried making anything like this, but your great step-by-step instructions have inspired me to try one day.
This has to be the most gorgeous distressed, vintage style journal book I have ever seen, Julia. I LOVE how you used your DOX inks with all the layering. How cool to use your brown paper for a fun crinkle sound. All your embellishments are so beautiful and perfect for your book and yet not over done. TFS all your photo steps and descriptions my friend. Hugs...
P.S. WE are home and Denny has hundreds of photos to work with :-) We have lots of gardening to catch up on too, but looking forward to getting dirty :-) Hugs..
Love all that you've done, it's gorgeous.
Wow Julia! What a stunning project! Love all the inky details! You really rocked the challenge! Congrats on the feature!
Amazing journal, Julia! I love every single detail, but the Hammered Metal flowers take the prize! Don't you love that powder? How clever of you to use it on the coneflowers! Perfectly simple to show off that fabulous background and all the other wonderful details! Oh, this is just a treat for the eyes, and I would love to hold it in my hands! Congrats on your Guest Designer spot at Frilly and Funkie! Linda couldn't have chosen a more perfect artist for this challenge theme and to make the journal! Hugs!
A stunning journal, Julia - the Oxides make for a fabulously weathered look with so much depth and light and shade, and those "metal" flowers look just incredible. Beautiful, beautiful work - a great GD spot at F&F.
Alison x
This is utterly beautiful and so inspiring!
Huge congratulations on being a 'cover girl' on the new eBook Julia with this fabulous journal!!!! Hugs, Anne xx
Post a Comment