Friday, March 31, 2017

Big Sale at Sizzix of Eileen Hull's dies!

I'm excited to share the news with you that Sizzix is having a sale of many of Eileen Hull's dies starting today (3/31/17) and going through the weekend! - whoo hoo!
So several of Eileen's Creative Team are posting projects using some of the dies in the sale throughout the weekend.

I am sharing several projects I have made using Eileen's Mailable Frame Die -  it is one of my favorite ways to send a special card because of it's ability to stand up for display.
Here is a card I made for my Grand Nieces' birthday last year - I love using photos on cards.  You will find the details of how I put this together on this post.
Here's another photo card I made using the Mailable Frame Die - this time it was for a friend at work who's baby daughter was turning 1 and she wanted a special card to celebrate the occasion.  You will find all the details on this post.
Another project, this time using die cuts and stickers to decorate my Mailable Frame die cut.  More details on this project can be found on this post.

Here's an anniversary card I made using the Mailable Frame die decorating with die cuts and patterned papers -  you will find all the details of this project on this post.
 And a final card using the Mailable Frame Die - (can you tell yet it's my favorite??) you'll find the details of this card here.
Four of the Creative Tea are doing a blog hop today!  Just click on their names below to see their wonderful inspiring projects using their fav Eileen Hull's Sizzix dies!  I know you won't be disappointed!

Karen Bearse
Anna-Karin 
Diana Hetherington
Donna Budzynski
Tonya Tranthum

And Eileen - the designer herself - has a link on her blog post - link up a project you made with one of her dies and there is a prize to be won!
Eileen Hull
So let's go shopping ladies and save some money over at Sizzix this weekend!

Thursday, March 30, 2017

Tag Friday at A Vintage Journey

Whenever there is a 5th Friday in a month -  we celebrate a Tag Friday over at A Vintage Journey and who ever signs up creates a tag in any theme/design.  We post them on our blogs with tutorials and then post just the tags over at A Vintage Journey.
So I signed up for this month - and decided to get out my brandy-new and hardly been touched Ranger Distress Oxide Inks and have some play!  And I have to say - I LOVE how the background came out on this tag!  I can't wait until my order with other colors comes so I can play some more!
Here's how I created my tag.
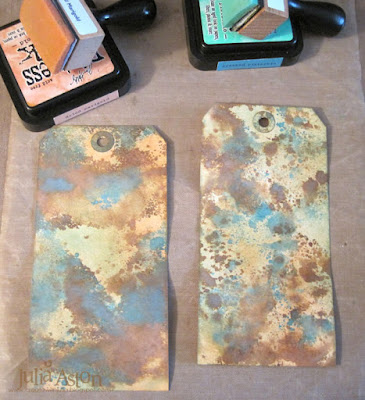
I took a #8 Manila Tag and dragged it through Distress Inks Cracked Pistachio and Dried Marigold that I had rubbed on my craft mat and spritzed with water.  
Pretty light at this point.  
The tag on the left was the first drag so the one on the right  in my photos will always be lighter for each step!  I dried each layer with my heat tool before moving onto the next - so I didn't create MUD!
Next, I dragged each tag through Distress Oxide Vintage Photo that had been spritzed with water on my mat.  With each drag over the mat - I look at the tag and decide if I want more in a certain place or if I want spots or big areas of color.    You never really know what you'll get but you can control it a little bit!  You can already see how the Distress Oxides look different than the Distress Inks. The orange and green show up a little bit more than you can see in the photo below but they are much lighter than the Oxides.
My next layer was with Distress Oxide Broken China with water on the mat.
I wanted to add a little more of the Distress Dried Marigold and Cracked Pistachio so I sponged that on the tags here and there.
And finally I decided to try the Distress Oxides sponged through stencils.  I used Vintage Photo on the left tag and Broken China on the right tag.
The stenciling was pretty dark so I spritzed with water over the stenciling and it melted the color down a little bit.   I also flicked some water over the tags to create spots.
Then as Tim says in his video about the DOX inks -  you have to stop or you could keep adding layer on layer for ever -  just to see what it will look like!  So I stopped here and started decorating.  I ended up using the tag on the right and will use the other one another
I got out Lifes Possibilities - a clear set from Tim/SA and Daper, along with some new Idea-ology stuff - Chatter Design Tape, Quote Chips, and Clippings Stickers.
I colored some Mirrored Hearts with Aqua Adirondack Alcohol Ink
I tied Linen Ribbon and Trimmings/Natural through the hole - tying them with a piece of twine.
I just LOVE the background with it's mix of Distress and Oxide Inks!
 I always add a slightly larger layer of black card to my tags - I like the finished look it gives to the edges and also hides all the mess on the back of the tag that seems to 'happen' when you drag through ink, flick and splatter!
 I put a panel of kraft card on the back of my tag so I could stamp a sentiment or write a salutation.  I will probably use this for a masculine birthday card.
If you are a maker of tags (or think you might like to be!) -  please check out all of the Creative Guides tag creations over at A Vintage Journey here!

I'm linking my tag to:
Country View Challenges - Inspired by Tim Holtz
Stamps:  Daper and Life's Possibilities - Tim Holtz/Stampers Anonymous
Paper:  #8 Manila Tag - Ranger, True Black - PTI
Ink:  Ranger Distress Oxide Inks Vintage Photo and Broken China, Ranger Distress Inks Dried  Marigold and Cracked Postachio, Adirondack Lights Alcohol Ink Aqua,  Archival Jet Black, True Black - PTI
Accessories:  Idea-ology Chatter Design Tape, Mirrored Hearts, Quote Chips, Clippings Stickers, Linen Ribbon, Trimmings/Natural; water mister, craft mat - Ranger, twine.

Tuesday, March 28, 2017

Embroidery Hoop Stand Up Birthday Card

This is my last project for March showcasing Eileen Hull's new dies called the Heart Felt Collection, that were introduced at Creativation in January.
Today I have a birthday 'card' that looks like an embroidery project and stands up with an easel attached to the back!
I have used Eileen's Embroidery Hoop die and her Heart Felt Birds and Butterflies Thinlits die set along with the HAPPY from her Heartfelt Word Stitchlits Thinlits die set.
I layered the white cardstock die cut butterfly over the solid felt die cut butterfly and she is flying above the felt die cut branch!   I die cut and embroidered the HAPPY beneath the branch and added a stamped birthday sentiment strip with a little felt flower from the Heartfelt Stitchy Flowers and Leaf  Thinlits die set.
Here is how I attached the die cut easel on the back.
Here are a few photos showing how I put this together with Eileen's embroidery hoop die.
I laid a 5"x5" square of cotton over the back of the hoop and placed the front of the hoop over the cotton.  The front hoop is cut from cream matboard and Tan Paper Leather from Sizzix that I glued together and I silver embossed the metal piece.
I pressed the back of the hoop with my fingernail so it was inside the outer front piece (like it would be on a wooden embroidery hoop!).  I die cut this piece out of cream mat board.
I added all the pieces along with some light blue rhinestones.
I attached the Tim Holtz die cut Easel to the back, cutting off a piece of the top as it was too tall being sure the bottom edge lined up with the bottom of the cotton.
I sponged the edges of the cotton with Ranger Distress Antique Linen to age it.

Be sure to check out Eileen Hull's blog - she has been posting our projects using her new dies all month and you are sure to find some wonderful inspiration!


Saturday, March 25, 2017

Coffee Lovers Blog Hop - Keep Calm and Put the Kettle On

Here's my second card for the Spring Coffee Lovers Blog Hop
and here is my 2nd spring design coffee card!
First, I sponged over the background using Wendy Vecchi's Check Mate Stencil with Sky Blue Ink.  I used her Stripes stencil on the top and bottom edges with black ink. I used a fun Wendy Vecchi Cone Flower stamp/stencil set for the flowers, where you stamp the flower and then there are two stencils included with the stamp, the flower shape and the stem shape, so you lay the stencil over the stamping and sponge on the color!  So easy!!  
I die cut a strip of grass out of green tissue paper and adhered it over the bottom of the stem.  I stamped the sentiment from Stampendous on a panel cut with a Stitched Mat Rectangle die from Lil' Inker Designs.
You'll find lots of Spring Coffee lovers inspiration over at the hop here

I'm also linking my card to:
Word Art Wednesday - Anything Goes

The Card Concept -  my style - clean and graphic 

Stamps:  Stamp it Stencil It - Cone Flower - Wendy Vecchi Stampers Anonymous,  Kettle On - Stampendous
Paper:  White - PTI, green tissue paper
Ink:  Wendy Vecchi Archival - Leaf Green, Sun Flower, Cactus Flower, Tiger Lily, Sky Blue,  Archival Jet Black.
Accessories:  Fringe Die - Memory Box, Stitched Mat Rectangle die - Lil Inker Designs, foam tape, Stencils - Check Mate, Dots and Stripes - Wendy Vecchi.

Friday, March 24, 2017

Spring Coffee Lovers Blog Hop!

Today I'm joining in with the Spring Coffee Lovers Blog Hop!  I somehow totally missed the winter hop and didn't want to miss another one!
and here is my spring design coffee card!
I water colored the background on a watercolor panel using watercolor paints, brush and water.  I die cut the coffee cup and donut out of watercolor paper, stamped them with Archival Jet Black Ink and colored them using Ranger Distress Crayons and a waterbrush.
Then I stamped the sentiments on the panel and adhered the cup and donut with foam dots.  I added these sweet white flowers that I got free with an order from Funkie Junkie Boutique 
(Linda includes free treats with all orders!)  
The stamp set, We Go Together,  is from Gina K - designed by Claire Brennan.  
(Claire formerly had this set at Waltzingmouse with a die set that is no longer available.)

You'll find lots of Spring Coffee lovers inspiration over at the hop here

I'm also linking my card to the CAS Watercolor challenge (just under the deadline!)

Word Art Wednesday - Anything Goes
Stamps:  We Go Together - Gina K Designs
Paper:  White - PTI, watercolor paper.
Ink:  Archival Jet Black
Accessories: We Go Together Dies - Waltzingmouse/no longer available, Ranger Distress Crayons Weathered Wood Tattered Rose, Tea Dye, water color paints, water brush, paint brush, water, flowers - Funkie Junkie Boutique, foam dots, Tombow adhesive.

Tuesday, March 21, 2017

Felt Embroidered New Home

Today I have a project to share that I made using another of Eileen Hull's new dies that were introduced at Creativation in January.  For this project I made a stand up card using her House/Pocket Stitchlits die and the LOVE from her Word Stitchlits dies
I started by making the base of the card using Eileen's Mailable Frame die that I cut out of Cream Little Sizzles Mat Board and layered a piece of wood grain patterned paper over it.
I die cut the house and decorative pieces out of felt and glued them together.  The die cuts holes along the edges of the house so it is very easy to embroider a blanket stitch around the edges which I did with red embroidery floss.  I die cut the love over the door and embroidered that as well.  I added a little flower brad to the door as a cute little door handle.
I adhered the house to the front of the Mailable Die cut and stamped a new home sentiment inside.

Wouldn't this be a fun and impressive card to send to someone in a new home?!
You can also use this die to make a little purse by cutting two pieces of the house, cutting off the roof of one (just below the roof line - so you're left with a rectangle), layering the two pieces together (with the rectangle in front) and folding down the roof piece of the back for the purse flap!
  
You will find examples of the purse made by some of the Creative Team over on Eileen's blog where she will be posting our projects during the month of March!

I'm linking my card to:
Happy Little Stampers