
For the A Vintage Journey March Challenge (March also happens to be AVJ's Birthday!) - Nikki is challenging us to use the contents of the March Design Inspiration Travel bag.
Here is Nikki's description: For our birthday challenge we thought it
would be fun to challenge you to use the products in our DI Travel Bag this
month. You’ve seen how the Creative
Guides have used the products in the past and you will see how they use them
this month too. So join us in using the following products and enjoy the journey!
So here are the contents of our travel bag - the supplies we have to use for our project.
Substrate: Board (eg grey board, coaster
board, cardboard)
Main Colour: Lilac or Pale Purple
Technique: Rust Effects (perhaps using rusting
or embossing powders or rust coloured paints)
Product: Something Metal
When I looked at the supply list - the substrate made me think I might make something 3D using matboard and the color lilac made me think Easter (which is early, the last Sunday in March, this year!) and so here is what I created. I used Eileen Hull's Chair - 3D Adirondack Sizzix Die.

I have several photos to share of just how I put this together - and how I used the contents in our travel bag.
After die cutting all the chair pieces, I inked each one with WV Adirondack Tree Branch Ink

Then I quickly dumped WV Violet Embossing powder over the piece and embossed it with my heat tool.

I did that on the front and back of each piece - then sponged all the edges and bends with Ranger Distress Vintage Photo Ink. The powder doesn't stick everywhere when you emboss like this which gives it a great distressed/vintage look.
(you can add more ink and powder as you melt it to get complete coverage if you want that look)

To get the Technique: Rust Effects into my project - I used Tim's Eroded Metallic Technique found on page 44 of Vol III Compendium of Curiosities for my die cut bunny. First, I rubbed two Distress Paints over a piece of matboard - Weathered Wood and Cracked Pistachio, and dried it with my heat tool.

Then I rubbed Tarnished Brass Distress Paint completely covering the panel. I spritzed it with water, immediately pressed a paper towel over the panel to absorb the water and some of the paint, and quickly removed the towel. Then I sponged Vintage Photo Distress Ink over the whole panel.

I die cut the bunny (Movers and Shapers Mini Bunny and Bow Set) out of the panel, adding the die cut bow that I had embossed in the same purple as the chair, and a black rhinestone eye.

I added a little tab to the back of the bunny so I could adhere her to the center of the chair.

here she is - sitting up pretty as you please!
(the glue hadn't dried yet when I took the photo!)


To get the Product: something metal piece into my project - I embossed a flower and leaf stem from Foliage by sponging them with WV Archival Tree Branch Ink and covering them with WV Fern Green and Violet Embossing Powders - again there is an uneven coverage which gives them a nice vintage look (although you can keep adding powder until it is solidly covered with color). I dropped some Shell Pink Adirondack Ink onto the flower brad that I used to hold the flower and stem together and to attach them to the chair.
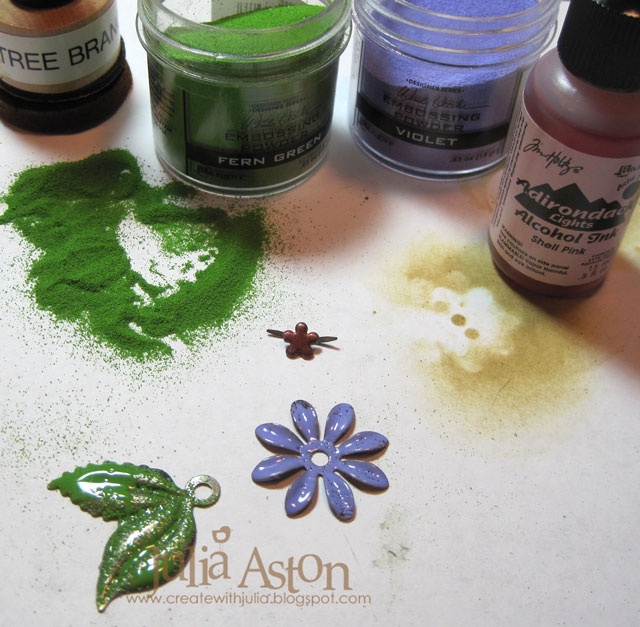
I punched a hole in the chair back with my Cropadile to add the flower.

To finish off the decoration of my Easter Adirondack Bunny Chair - I die cut a row of hearts using the Thinlits Shape Strips out of Kraft Core Cordinations green paper. I sanded over the paper to reveal some of the kraft core.

I added the strips layered with Small Talk/Occasion stickers across the back of the chair and across the bottom of the chair. I also adhered 3 of the cut out hearts on the back slats of the chair.


I wasn't sure whether I needed to emboss both sides of each piece when I started making my chair - but I'm glad that I did - as it looks nice and 'finished' no matter what angle you look at it from!


I laid some brown basket filler around the bunny and will also add some candy eggs.
(I haven't yet because I know I would just eat them, so I'll wait until Easter Sunday!)
So are you ready to create with the supplies in our travel bag?? We can't wait to see what you create with these supplies. You will find the link to the challenge as well as all of the Creative Guides creations
at the A Vintage Journey Blog.
We also have a new prize sponsor this month - AVJ is grateful to welcome:
March Sponsor: Andy Skinner
(check out the AVJ blog to see what you could win!)
(check out the AVJ blog to see what you could win!)

Ink: Wendy Vecchi Archival Tree Branch, Ranger Distress Vintage Photo.
Accessories: Dies: Chair - 3D Adirondack - Eileen Hull/Sizzix, Movers and Shapers Mini Bunny and Bow Set - Tim Holtz/Alterations, Thinlits Shape Strips - Alterations/Tim Holtz, Idea-ology - Foliage, Small Talk/Occasions, Tiny Twinkles - Taylored Expressions, mini sander - Ranger, Scotch Quick Dry Adhesive, Wendy Vecchi Embossing Powder - Violet and Fern Green, Ranger Distress Paints - Weathered Wood, Cracked Pistachio, Tarnished Brass, flower brad - Making Memories.
24 comments:
oh wow this is incredible.. totally love it
This is so cute and so clever!
Wow Julia, your Easter chair composition is absolutely awesome! I love it! My favourite is the embossed vintage look chair!
Oh Julia that's superb!!! I love the way you've perched the bunny on the deckchair and added that embossed vintage patina for a seriously weathered look. Amazing!!! Jenny x
Love this very unique project Julia especially the cute bunny on it. Very cleverly put together.
Have a great weekend.
Hugs Brenda xxx
Gorgeous Julia - love all the embossing!x
Oh my gosh Julia, you made an Easter chair, I just love that!! Great colours and your little bunny is the icing on the cake! hugs :)
What a wonderful 3D project! Julia - so original. Love the vintage look you've achieved with the various techniques . A really inspirational way to use the contents of the travel bag .
Great creativity .
hugs x
What a super clever piece of Easter crafting Julia, totally brilliant and so cleverly put together. I adore all the little details that make it special! Fabulous project!
how cool is this!!!! wow!
I absolutely adore Eileen's Adirondack chair and you have decorated this one brilliantly Julia! I love the little rabbit, he looks so cute nestled on the chair. Gorgeous work and a great way to celebrate our birthday over at AVJ too! Hugs, Anne xx
What a fun project, Julia! And those step by step how to's ...
Way to go.
I love how,you used Eileen's chair and you worked it so well into using the ingredients. Absolutely fantastic, love it. Tracy x
This is such a lovely project Julia with lots of gorgeous techniques. I adore the little bunny and the colours you've used. A real show stopper 3D project! Julia S-W xx
Super fun project Julia! Love the cool beach chair and cute bunny rabbit! Thanks for the inspiration!
Super creative take on the challenge ingredients Julia. Fantastic make. Nicola x
oh love this!!! =)
You did a fabulous job with this die! Adorable!
You did a fabulous job with this die! Adorable!
LOVE your project Julia! And thanks for sharing all the steps you took to make it ... lots of work, but well worth it --- it's one amazing Easter decoration! xx
So adorable Julia and what fabulous techniques, love the finish on your Adirondack chair and the rusty metal finish on the bunny is perfect! Such a fun 3D project, thanks so much for sharing it! Deb xo
Just love how you have used the chair and the bunny is so cute. Great use of color and textures. Sandy xx
What an Easter treat - the finish on the chair is so cool, and I love your cute metallic rabbit - really adorable!
Alison x
LOVE this! You are rocking the Easter inspiration Julia. :)
Post a Comment