
 What a fun new technique challenge Joan had for us over on Split Coast this week! For all those large stamps that are hard to ink up and get good stamping coverage - Joan devised a way to ink it so it looks like plaid and the multicolored inking makes missed spots unnoticeable!
You can find Joan Ervin's tutorial for this plaid silhouette technique on her blog here.
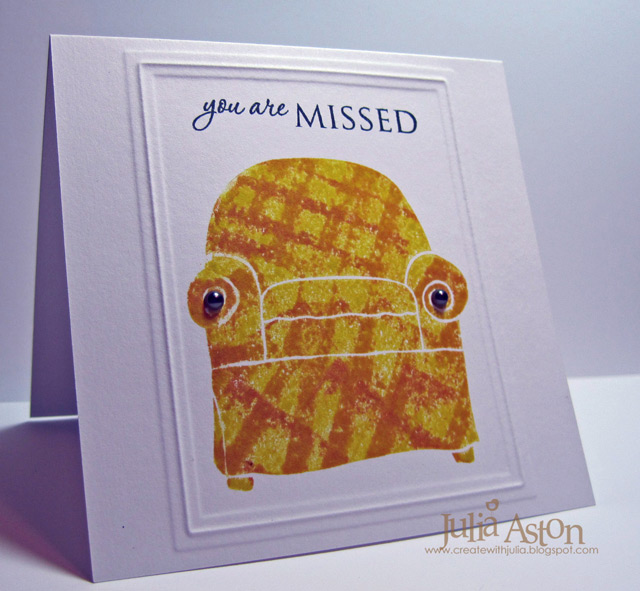
The first time I 'plaid' inked my chair - just inking it from top to bottom- the chair details disappeared and all you could see was the plaid. So then I tried to 'selectively' ink the top, arms, cushions and bottom to give each section definition. I embossed a rectangle nestability first - then stamped the sofa and sentiment. Then I added two pewter pearls to the arms.
My stuffed sofa is from A Stamp in the Hand and my sentiment is from Waltzingmouse.
Several people have left me comments when I do embossed frames with my Nestibilities asking how I do it. So I took pictures as I made the frame for this card.
 This is my 'sandwich' of layers from left to right - I'm using a Cuttlebug here.
1) First you have the A plate on the Cuttlebug.
2) Place a buffer (3 pieces of cardstock taped together) on top of the A Plate
3) put a B plate over the buffer
4) place the rubber mat on top of this B plate.
Then you take your card stock - Either a panel or the card itself depending on where you are embossing. If you are doing it directly on the card like I did - you want to fold your card - open it up and place the Nestability die on the inside of the card. This results in a raised frame.
If you emboss from the front of the card - the frame will be depressed. Try out each way to see which you prefer!
So - back to the embossing -
5) place your card stock with the Nestability (cut edge down) on top of the rubber mat
6) place another B plate over this being sure the Nestability is still placed exactly where you want it -
7) run it through the Cuttlebug.
Here's the sandwich being run through.

And, Voila! a beautiful embossed frame. I always emboss first and stamp after to be sure I get my image centered within the frame.  I hope this is helpful to you - I'm sure there are other 'sandwiches' out there - but this is how I do mine! Practice with scraps to see how it comes out - you may need to adjust your # of pieces of card stock in your 'buffer' depending on how thick they are. It shouldn't be too hard to roll it through your Cuttlebug - but it can't be too easy either - then it doesn't emboss deeply!
I hope this is helpful to you - I'm sure there are other 'sandwiches' out there - but this is how I do mine! Practice with scraps to see how it comes out - you may need to adjust your # of pieces of card stock in your 'buffer' depending on how thick they are. It shouldn't be too hard to roll it through your Cuttlebug - but it can't be too easy either - then it doesn't emboss deeply! And just a reminder about the Waltzingmouse Sketch Challenge here and the Friends of WMS blog waltz coming up here!
Stamps: Over stuffed sofa - A stamp in the Hand, Sentiment Waltzingmouse - Fancy Phrases
Paper: White - PTI
Ink: Ranger Distress - Mustard Seed, Wild Honey, Rusty Hinge, Memento Tuxedo Black
Accessories: Rectangle Nestabilities, Pewter Pearls - Kaiser
Paper: White - PTI
Ink: Ranger Distress - Mustard Seed, Wild Honey, Rusty Hinge, Memento Tuxedo Black
Accessories: Rectangle Nestabilities, Pewter Pearls - Kaiser
18 comments:
Oh Julia ~ I have been wanting to make this frame forever...Thank you for sharing how to do it!!! Love the plaid too!
Your card is wonderful. The plaid came out so well. Thanks for the info..I'm off to try it! Hugs, GF!
Fabulous plaid chair design, Julia! Lovin' how you used the pearls! Too cool! Thanks so much for the dry embossed frame tute.
Thanks so much, Julia, for sharing how to do the embossed frame...I've been wondering how to do it for some time!
Love your plaid sofa and wonderful embossed framing! Thanks for the tutorial!
LOVE your chair - but I'm most thankful for the tutorial on the dry embossing! I tried this for a few minutes one day and the nestie cut through everything I tried. I finally gave up! Now that I have the secret plate recipe, I'll try again!
Hugs!
What a lovely card Julia! Your plaid chair looks comfy & that embossed border is fabulous! Thanks for sharing the process :)
Thanks so much for sharing how you emboss with your Spellbinders. The frame you've created around your chair looks brilliant!.
I saw this challenge and thought it was pretty cool. Your chair turned out wonderfully - looks so comfy right about now (as I sit in my secretarial chair at work...shhhhh)
Thanks for these sandwich directions, Julia!! I will certainly be giving this a try!! It looks sensational framing your plaid chair!!
Thanks for the tutorial - I used it today - Thanks for sharing
Your plaid chair looks FABO, Julia...you did an awesome job with the challenge and what a wonderful tutorial on the embossing!! Ya did good, girly!!!
thanks for sharing what a fab idea :)
Thanks for the tutorial Julia, had to check it out after seeing your lovely WM poinsettia basket.
Thanks for the tutorial Julia, had to check it out after seeing your lovely WM poinsettia basket.
Thanks for the tutorial Julia, had to check it out after seeing your lovely WM poinsettia basket.
Oh Wow thank you! You inspired me to try and work out how to do this on my big shot and I got it!! I loved the WMS basket card you made with the link back to this instructional post.
Post a Comment