
Have you seen all of the wonderful journals using Eileen Hull's Sizzix Journal die over on Eileen's blog this month? The Inspiration Team has been on overdrive! And today I'm sharing mine.
Front

and back
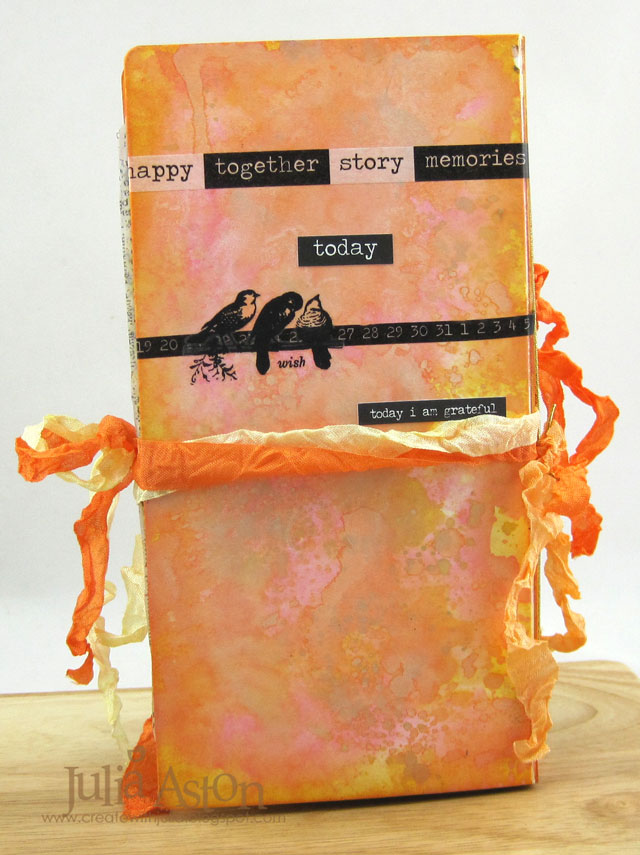
And if you'd like to see "how" there are lots of photos to come!
I die cut the journal out of Cream Little Sizzles Matboard using Eileen Hull's Sizzix Journal die. Then I started inking the sides by rubbing Distress Oxide Inks onto my craft mat, spritzing with water and then dragging the journal pieces through it.
The first color was Worn Lipstick.

The second color was Spiced Marmelade

The third color was Fossilized Amber. I inked all sides using the same mix of colors.
(sorry the lighting was slightly different on my work table when I took the 3 photos below)

To add a little shimmer to my covers - I sprayed them with Wendy Vecchi Buttercup Mica Spray. (not sure you can see it here?!)

I also inked some white card at the same time wiping up left overs on the mat figuring I might use some on my inside pages.

I assembled my journal gluing the two edges together being sure the holes lined up. I looped 2 pieces of gold elastic cord through the top and bottom holes knotting them on the outside. These will hold the pages inside the journal. I pushed two pieces of wrinkled seam tape, folded in half, through the middle hole, knotting it inside.
(I had to punch the middle hole a little bigger to fit the double ribbon)
These will be used to tie the journal shut.

Here's the knot of ribbon in the center between the two signatures.
(Since the pages are tissue the bulk of the knot in the middle doesn't affect the pages.)

Now to choose what kind of pages I wanted inside my journal. I decided to use some of Tim's Tissue Wrap in varying sizes. I colored some Tissue Wrap Terminology using the same Distress Oxides I used on my covers.

And I used Brushos in Ultramarine and Orange to color some Tissue Wrap Melange.

I started by cutting the pages 7 1/2" wide by 9 1/4" tall - I cut some to 7 1/2" x 5 1/4" as I like to mix the size of papers in my journals.
(I adjusted the width again after putting the journal all together as the pages extended beyond the edge of the cover a little bit!)
I got out some more of Eileen's Sizzix Dies to use in decorating my journal and it's pages. I cut flowers using Stitchy Flowers and Leaf, butterflies from Birds and Butterflies out of Kraft Core Cordinations, made some pockets using House/Pocket Stitchlets cut from white Paper Leather from Sizzix, and cut the word SUNSHINE on one envelope using Word Stitchlets. I colored around the SUNSHINE cut-out using Distress Crayons in Scattered Straw and Shabby Shutters.

Then I turned my attention to the cover. I stamped this lovely There is a Garden stamp from Stampotique onto a piece of Sticky Back Canvas. Then I die cut it along with a piece of Terminology Tissue Wrap using Tim's Arch Frame. I adhered the sentiment to the tissue and the tissue to the cover.

I had cut all the flowers out of Kraft Core Cordinations paper - so I sanded each piece a little bit being careful not to tear the petals.

I layered several sizes and colors of petals together, joined them with an orange brad and layered them onto the cover using foam dots. I also added some Botanicals Remnant Rubs, Design Tape, and Small Talk/Occasions stickers - all from Idea-ology.

Then I started adding things to my pages. The Being Happy stamp on the inside cover is from Wendy Vecchi's Forever Art set, the flower is a Botanical Remnant Rub.

On the right side - I made this panel by running a leaf from a Solomon's Seal plant in my garden through my Vagabond. I learned about this technique on Splitcoaststampers - called Duoprinting with Chlorophyll (a modern version of pressing flowers!)
you need:
Plants from your yard (practice to see which ones work best - some are too wet, some too dry)
Die cutting machine
Paper towels
Printer Paper
Cardstock or watercolor paper (I used white cardstock)
Fold the copy paper in half. Build the following sandwich: cutting plate, paper towel, folded copy paper (open), piece of cardstock, plant.
Place a second piece of cardstock on top of the plant. Close the folded
copy paper (so the cardstock pieces and plant are inside the copy paper like a book), and place second cutting plate on top. Run through die cutting machine on the normal setting you use for thin steel dies.
I stamped over the plant print with a stamp from Stampotique and added a bird Remnant Rub. I sponged the edges of the panel with Distress Spiced Marmalade and adhered it to the page with double sided tape.
Here's a close up of the 2nd print I got from these Solomon's Seal leaves that I used on another page of my journal with A Little Garden stamp from Stampotique.

Another page - this is a leaf from my Bleeding Heart plant and Living is not Enough stamp from Stampotique.

One more page using Geranium leaves

and a sentiment stamp from Wendy Vecchi's Forever Art set. I die cut a butterfly from the Tissue wrap with Eileen's Birds and Butterflies die set adhering it on the left page.
A close up of the geranium leaves.

I stamped this sweet Agatha Flower stamp from Stampotique onto one of the panels I inked when making my covers. The sentiment is from Wendy Vecchi's Trademark Art set.

I used the pockets I made with Eileen's House/Pocket Stitchlits die on two pages.
On this one I added a die cut layered butterfly from Birds and Butterflies, attaching it to the envelope with an orange brad. I used a strip of Idea-ology Design tape across the top and sponged the edges with Distress Spiced Marmalade ink. I adhered it to the page with double sided tape. I die cut 2 wildflowers using Tim's Wildflower dies and inserted them into the envelope adding a Big Chat sticker beside them.
As stated above - I colored around the SUNSHINE cut-out using Distress Crayons in Scattered Straw and Shabby Shutters. Since I didn't embroider the word I needed to color it to be seen)

I put another die cut pocket on the inside of the back cover inserting some feathers found around my bird feeder into the top of the envelope. I added a Clippings sticker (if they were let to fly away) and Small Talk Occasions sticker (nature's wonder) as well as a die cut butterfly.

A final finished view!
I hope I have inspired you to try creating your own journal! (and not put you to sleep with all my photos!) I appreciate any and all comments left here! Remember to check out Eileen's blog to see all of the July posts about Journals using her wonderful new die! Happy Journaling!
I'm also linking my garden journal to:
Inspired by the flowers

Things with Wings
(Birds on front and back covers, bird and butterflies and bird feathers on inside pages)

Paper: Cream Little Sizzles Matboard - Sizzix, White Paper Leather - Sizzix, Kraft Core Coredinations, Natural Sticky back Canvas - Ranger.
Ink: Ranger Distress Oxides Worn Lipstick, Spiced Marmalade, Fossilized Amber, Ranger Distress Ink Spiced Marmalade, Archival Jet Black.
Accessories: Eileen Hull/Sizzix Journal Die, House/Pocket Stitchlets, Stitchy Flowers and Leaf, Word Stitchlits, Birds and Butterflies; Tim Holtz/Alterations Arch Frame, Wild flowers die; Distress Crayons Shabby Shutters and Scattered Straw - Ranger, Idea-ology Tissue Wrap Melange and Terminology, Remnant Rubs/Botanicals, Design Tape, Small Talk/Occasions, Big Chat, Clippings Sticker, Brushos Orange and Ultramarine, gold elastic cord - Michaels, Mica Spray Butercup - Wendy Vecchi/Ranger, foam dots, wrinkled seam tape, double sided tape, Gel Medium - Ranger, Mini sander - Ranger.
19 comments:
Good morning my friend. This journal is amazing of course. Wonderful use of the oxides, and a real treasure!!! Hugs, Anne
So so beautiful! A wondeful journal . in and out!
What a stunning journal, Julia - the sunshine colours are so uplifting and I just love all the details inside - wonderful papers and images and textures. Believe it or not, I've never seen those Stampotique quote stamps before - how funny! Beautiful, beautiful work.
Alison x
Your Oxide colour choices are superb, the resulting colour is so warm and inviting and I love how you carried it through to the inside of your gorgeous journal! Hugs, Anne xx
What a beautiful journal, Julia! I love the colors and classy decorations inside and out! Great choice of quotes too. Hideko
Wow, wow, wow Julia, your journal is utterly fabulous. I love the beautiful covers and gorgeous pages, you certainly went to town on this one with such gorgeous results xxx
What a wonderful journal, Julia! I think you've about convinced me that I need to start a journal of techniques! Love how the leaves turned out. I've been meaning to try that! So many techniques, so little time!
WOW! What a wonderful journal!! So many fun elements -- I love it!
Julia this is such an amazing journal. I've always wanted to try but never seem to get the time but after seeing this I think it's time for me to head to Michael's to pick one up.
This is just beautiful!
Wow, Julia! What a BEAUTIFUL journal you have made! The colors on the covers and pages are a perfect choice for a nature journal and your cover design is superb! I love your flowers and am amazed at the results you got with your flower press technique--I've so got to give that a try. I am dying to get started on my own journal using the die cuts you sent, but I am so busy playing catch up from vacation, my head is spinning! Sending hugs your way!
Wow!! I have read your post several times now and am so impressed with your artistic and very creative journal my friend. TFS every detailed description to each step and all your wonderful photos and links. You have obviously put in a lot of thought and time into your work of art, Julia. Thank you so much for sharing. Hugs..
Your journal is AMAZING, Julia. So many fantastic techniques and creativity. Especially like the idea of pressing flowers and leaves from your garden to create beautiful flora and fauna prints. Must give that a try! xx
My oh my! This is stunning and so filled with amazing details! I love the color palette and awesome stamps & embellishments. We are thrilled that you played along with our challenge at Stamps & Stencils. Hugs, Autumn
Julia- so many great tips in here! I love the flower press Big Shot tip and am totally trying that! I also love these sunset colors- just beautiful journal!
This looks very much like a pure crafting pleasure endeavour! Love the results too, and the great techniques you used. Thank you so much for showing us at Country View Challenges!
Fabulous journal, love all the detail and the many pages ! Thanks for joining us at Stamps and Stencils. Sue C x
Fabulous journal - both inside and out. Love all the inky goodness in this. Thanks for joining us at Stamps and Stencils.
Hugs!
Cec
This is wonderful Julia! I love the covers and what a great idea to use the tissue paper for the inside. Thankyou for sharing the process and joining us over at Stamps and Stencils. Toni X
Post a Comment