Sunday, May 13, 2018

Spring Flowers with Eileen Hull's Sizzix Dies

This month Eileen Hull's Inspiration Team is bringing spring to life using Eileen Hull's Sizzix Dies.
I made a lovely decorated frame for my project.
The frame measures 5" x 4 1/4" (not counting the flowers sticking out!).
The opening measures 2" x 3".
Without the flowers, this frame will fit into a regular A2 envelope.
I used several of Eileen's Sizzix dies -  her Mailable Frame die, Pansy Flower die and Spring Leaves die.  For the front of the frame I embossed a piece of watercolor paper using her Eyelet Lace embossing folder and die cut it to fit the frame.  The patterned paper is from Eileen's Heartfelt Paper Pad.

I have a few photos showing how I put this together.
I die cut the Mailable Frame out of white mat board.  I embossed a panel of watercolor paper and embossed it with the Eyelet Lace folder, then die cut it laying it over the front of the frame die.
I die cut 3 large, 3 medium and 5 small petals from the Pansy Die and 3 stems from Spring Leaves.  I inked the petals using Tutu, Melon and Wildberry Color Box Blends Ink - so easy to use with their round foam applicators - just squeeze the ink out and rub on!
I didn't try to get full coverage on the petals as I then spritzed them with water.  They blend wonderfully with the water giving a great look of light and dark colors!
I dried them a bit with my heat tool and then crunched them up and let them dry for about 15 minutes.
I inked the petals with both Frog and Leaf Color Box Blends Ink and spritzed them with water.  I wanted some of the white to still show through.
I un-scrunched all the petals and took two wired stamens from Wiltons, folded them in half and pushed them through the layers of petals.  I bent the ends over on the back after I layered the amount I wanted and put a dot of glue to hold them.  I also put some dots of glue at the center of some of the petals so they wouldn't spin around.
I glued the stems to the backs of the blooms. 
I layered two of the smaller sets on the bottom right corner of the frame.
I used one medium petal and 2 small for the medium flower and 2 small petals for the small flower.
And attached the largest bloom in the top left corner.
I used 2 large, 2 medium and one small petal for the big flower.
Here's a view of the frame standing up.
I stamped a sentiment from Beautiful Blessings by PTI onto patterned paper and adhered it to the inside of the front piece and added 3 clear sequins to it. 
So if you'd like to welcome spring with lots of blooms - please check out Eileen's blog during the month of May to see all of the Inspiration Teams creations!

I'm linking my card to:
Cute Card Thursday
Flowers

My card is clean and layered

Stamps:  Beautiful Blessings - Papertrey Ink.
Paper:  White Little Sizzles Matboard - Sizzix, Waercolor paper - Canson, Heart Felt Paper Pad - Eileen Hull/Sizzix.
Ink:  Color Box Blends Inks - Tutu, Melon, Wildberry, Frog and Leaf,  Hero Hues Black.
Accessories:  Mailable Frame Die, Pansy Flower Die, Spring Leaves Die, Eyelet Lace Embossing Folder- Eileen Hull/Sizzix, flower centers - Wilton, ScorTape, Tombow Glue, Winter Blend Sequins - Avery Elle.

Saturday, May 12, 2018

Rustic Nativity

Another Christmas card for the box!
I die cut the stable and Holy Family out of Birch Bark Wrapping paper that I bought last Christmas season at Pier 1 Imports (LOVE THIS PAPER!!).  I embossed the images in black and layered them onto a cream Bazzill card base using foam dots.  I die cut the big star our of gold paper and added 3 little wooden stars.  The Nativity stamps and  Holy Couple, barn and star dies are from Simon Says Stamp.

I'm linking my card to:
and I made it rustic for the Inspiration Challenge over at Splitcoaststampers where we were to be inspired by the Vineyard Market web site - I was inspired by this Nativity.
Stamps:  Nativity - Simon Says Stamp, For Unto You - Wordsworth
Paper:  Cream Bazzill, Gold - DCWV Paper Pad, Birch Bark Wrapping Paper - Pier 1
Ink: Versamark, Hero Hues Black
Accessories:  Wow Black Embossing Powder, Holy Couple and Barn Dies - Simon Says Stamp, wood veneer stars - The Paper Studio/Hobby Lobby, foam dots, Tombow Glue.

Thursday, May 10, 2018

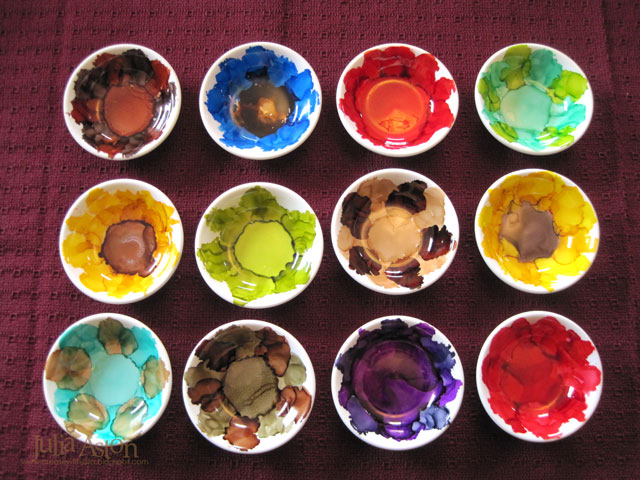
Jewelry Dishes with Alcohol Inks

Today I'm sharing a lovely little gift idea that I found on this blog through Pinterest.
You decorate small ceramic dishes with Alcohol Inks to look like flowers and to use as jewelry dishes on your bureau or bedside table.
Here are 12 that I made in a couple of hours time.
You'll find Patti's tutorial here.     
No two dishes ever come out alike - and the good thing is that you just have to rub over the dish with rubbing alcohol on a cloth to erase it all and start all over if you aren't happy!   
I have to say, as I was learning and figuring out how the Alcohol Ink blew around - I 'wiped clean' more than half of my dishes and started again!
Here are some photos of how I made them (slightly different than Patti):   
So you start with these little white ceramic sauce dishes -found at Amazon here.    You wipe off the dishes with Rubbing Alcohol.  I used these Rubbing Alcohol wipes that worked perfectly and are very convenient.  Patti used a canister of Canned Air to blow her Alcohol inks around but I just used this Distress Marker Spritzer from Tim Holtz 
(you squeeze the body and air puffs out of the nozzle.)
 I used a slightly different steps in applying my Alcohol Inks.  I added a drop to start the petal first. (she started with dropping ink on the center)
Then I tipped the bowl back a bit and pumped air on the ink with my tool to spread it up the side, trying for a petal-like shape. It dries pretty quickly so you want to work fast.  You can make any kind of petal shape that pleases you!
Then I went around the dish adding petals.
Then I took a second color of Alcohol Ink and added petals in between the first petals.  For this dish I used Patina and Citrus but you can use anything you have and colors that you favor!
Then I added a drop to the middle, it spreads pretty well, but you can also blow on it to move it and blowing will also stop it's spread.  Just practice to see how the inks move! You can add ink to fill in more petals or cover spots if you have them or wipe the whole thing off with rubbing alcohol and start over.
Here are close ups of a few of the ones shown above. 
 Sunshine Yellow and Ginger Alcohol Inks
Red Pepper and Poppyfield Alcohol Inks
Latte and Patina Alcohol Inks
Latte and Sepia Alcohol Inks
Sailboat Blue and Espresso Alcohol Inks
 You let the dishes dry for a day - then you spray them with a couple of coats of sealent.   
I packaged them up in clear square bottom bags that had a cupcake insert in them so they fit right into the hole on the insert.  I made labels using Tiny Tags stamps and dies from Papertrey Ink.

I had them at our Mother's Day sale at church and will sell them again at our church fair in October.
I think these would also make nice little gifts for friends!

Sunday, May 6, 2018

Hang In There

I was looking through my stencils for a chevron stencil the other day - and although I didn't find it -  I did find this beautiful rainbow stencil from Stencil Girls and knew it would be perfect for the May CAS Watercolor card challenge!
It's a large stencil - so this card is 6"x6" and will probably get hand delivered unless I can find an envelope to fit it in!  I've had the stencil for a while but have not used it yet - so I was glad to get it out!

I laid my stencil over a piece of watercolor paper and then sprinkled (in rainbow color order!) over the stencil with Brushos in Scarlet, Orange, Yellow, Leaf Green, Turquoise and Purple.  Then I spritzed over the stencil with water to activate the colors.  The more you spritz, the more they blend - so I stopped spritzing when I had the look I wanted and carefully removed the stencil.   The stencil is designed with these drippy ends - the perfect look for my watercolor rainbow!

The sentiment is from Ways to Say: Get Well Soon by PTI.  This card would work for someone who is ill or someone going through a rough patch.

I don't use watercolor techniques too often - so I like to try and participate in the CAS Watercolor challenge to inspire me to do it more!  And there's always lots of inspiration from the Design Team!

Also linking to:


Stamps:  Ways to Say: Get Well Soon - PTI
Paper:  Water color paper - Canson, Royal Velvet - PTI.
Ink:  Hero Hues Black
Accessories:  Rainbow stencil - Stencil Girls, Brushos Scarlet, Orange, Yellow, Leaf Green, Turquoise, Purple, water mister.

Saturday, May 5, 2018

Kentucky Derby Florals

I have a birthday card to share today - and I'm SO happy with how it came out!
I had made the background piece for a card I made last week - I had taken a panel of water color paper and pounced it on my craft mat where I had rubbed Carved Pumpkin Distress ink spritzed with water. After drying the panel I pounced it into Mermaid Lagoon on the craft mat also spritzed with water and then dried that.  

I laid the Happy Flowers Stencil from Stamplorations over the panel and sponged over it with Ripe Persimmon Distress ink.

I die cut the BIRTHDAY, layered it onto the panel and stamped HAPPY.

My card design was inspired by the following challenges:
Splitcoaststampers Free 4 All Challenge
Be inspired by the Kentucky Derby - I was inspired by the flowers all the ladies wear on their hats!

Splitcoaststampers Mix Ability Challenge
Keep It Simple -  use 2 layers and at least 2 Mixed Media 
(I smooshed ink and used a stencil and a die cut)

Bold Bloom - Mixed Media Style

Stamps: Never Enough Birthday - PTI
Paper: Tropical Teal, white - PTI, watercolor paper - Canson
Ink:  Ranger Distress Ripe Persimmon, Carved Pumpkin and Mermaid Lagoon; Tropical Teal - PTI
Accessories:  Happy Flowers Stencil - Stamplorations, Happy Birthday Combo Die - Poppy Stamps, craft mat, water mister.

Friday, May 4, 2018

A Simple Snowman

On this hot and humid day in Massachusetts - what better card to make than one with a snowman on a snowy field?! 
In the never ending quest to get all of my Christmas cards done before the season, I'm joining in on two  Christmas blog challenges linked below with my Simple Snowman Christmas design!
I used several dies on my card today -  the scalloped landscape edge is a die from Ali Express, the snowman (with Tiny Twinkle eyes and buttons) is from PTI In the Meadow die set, the tree is from Tiny Town Holiday Yard Die set also from PTI, and the red Merry Christmas is actually from a Christmas Tag die set from Impression Obsession (I cut the top part off!)  The hillside is popped up on foam dots over the tree.  Everything on the scene is cut out of watercolor paper to give a little texture - adhered to a white cardstock base.

Here are the challenges I'm linking my card to that inspired my design:
No stamps allowed!

Paper:  White, Pure Poppy - PTI, Water color paper - Canson.
Accessories:  Scalloped edge die - Ali Express (China), tree die - Tiny Town Holiday Yard Die Set - PTI, snowman die - In the Meadow Die set - PTI, Merry Christmas Tag dies - Impression Obsession, Tiny Twinkles - Taylored Expressions, foam dots, glue pen.


Thursday, May 3, 2018

A Vintage Journey - May Challenge: Words and Music

Today the A Vintage Journey May Challenge has posted.  Alison is our creative hostess this month and her challenge is Words and Music.

Here is her description of the challenge:  For this challenge we would love to see projects that are inspired by our favourite song or that incorporate musical lyrics or sheet music in their design. Just remember to create your project in our preferred styles of vintage, shabby, mixed media, art journaling, industrial, timeworn or steampunk.  

For my project today, I used a recently purchased Holiday Shadow Box die along with a Dancers Die.  Both from Sizzix. The lovely music theme sentiment quote is from a set by our own Alison Bomber - Set EAB03 from PaperArtsy!
This die set with 3 sections allows you to create a fun dimensional scene.
I added a strip of music to the background that I stamped onto vellum.
The whole thing is designed to fold up and fit into an A9 envelope, but I added dried moss to my landscape so that would make it too lumpy to fold!!
I have just two photos of how I started making my creation.
I cut out the appropriate die pieces that I wanted for my shadow box 
(there are several Christmas dies in the set (pine trees, deer, snowflakes and Christmas sentiments that I didn't use for today's project!)
Then I sponged all the edges with Distress Vintage Photo before assembling the pieces.
I die cut the Victorian dancing couple out of both card stock and text patterned paper layering the two to make them more sturdy.  Then I cut out the gentleman's section again out of another pattern, cut  just the suit area and layered it over him.  I added a bit of gold leaf to the ladies head, a ribbon rose to her waist and lace at the bottom of her dress.  I colored the couples shoes black with a Sharpie.
I added pretty little Prima flowers around the front and on the layers inside and I added dried moss for their dancing carpet out in this magical forest!
Here's how it looks from the back.  
The shadow box measures 5 1/2"w x 5 1/4"h 
(6 1/4"h  if you include the vine at the top!)
How will music and words inspire you this month?  We can't wait to see your creations.  Please check out the lovely inspiration by the other Creative Guides participating in this months challenge over at A Vintage Journey!
Stamps:  Set EAB03 Alison Bomber - PaperArtsy, Music Backgrounds - Waltzingmouse (retired)
Paper:  Stormy Sea, Vellum - Papertrey Ink, Paper Stash Dapper and Etcetera - Idea-ology.
Ink:  Ranger Distress Vintage Photo, Hero Hues Black.
Accessories:  Holiday Shadow Box Dies, Dancers Die - Sizzix, ScorTape, Tombow Glue, dried moss - Joann, gold leaf, ribbon rose, lace, Prima Flowers.