Showing posts with label Kid Cards. Show all posts

Saturday, March 15, 2025

Inkspirational #337 - Designer Choice - Sports

 Inkspirational Challenge #337 is up over at the blog! It's Designer Choice and Pia is the designer this time - she wants to see cards about Sports!  

Basketball, football, baseball, skiing, skating, swimming, bowling, pickleball??!!


A friend of mine asked me to make a birthday card for her grandson who loves playing basketball so here is the card I created for the challenge AND for 13year old Danny!

I always pick up sports stickers when I see them, as several of my friends ask me to make sports cards for their grands or hubbies. The basketball hoop and flying basket ball are from a sticker set I recently purchased at Michaels.  The stadium seating and #1 hand are dies from a set by Lawn Fawn that I purchased quite a while ago and finally got it out to play with! (my New Year's resolution!)

The sentiment and images on the inside are from Tiny Sports Friends also from Lawn Fawn.

So we hope you will join us and create a Sports card!  You will find more inspiration from the rest of the DT as well as Mr. Linky over at Inkspirational!

The challenge ends on March 28th!

I'm also sending my card to the following:

First time using the Stadium Seating dies, the Tiny Sports Friends stamps AND this basketball sticker set!

Week 2 of March Dies  

Use a Die or Punch


ends 3/25


Stamps:  Tiny Sports Friends - Lawn Fawn
Paper:  White, Kraft - PTI, DP Grain and Grunge - Honeybee.
Ink:  Nocturne - Versafine Clair
Other Supplies:  Basketball Stickers - Recollections (Michaels), Stadium Seating Dies - Lawn Fawn, computer generated sentiment on front of card.

Friday, January 31, 2025

A Snarky Cat with a Valentine Balloon!

 Today, I'm sharing the Valentines that I made this year to send to my grandnieces and grandnephews.  I used pink metallic paper to emboss/die cut the hearts for the girls and red metallic paper for the boys, ages 14, 13, 12 and 10.  

These are mini slim line size 3"x 6".  I always include a $1 bill as a (very small!) treat but it adds a little fun when they open the card. 

I used a large eye sewing needle to 'sew' the balloon twine string through the cats hands.  I colored the Snarky cat with Distress Water Color Pencils and a water brush.  The hearts are die cut/embossed using Tim Holtz/Sizzix  3D Impresslits Lucky Love 

I'm sending my Valentine to the following challenges:

Time Out Challenges

used Stitch (balloon string), Heart, Love, Layer  ends 2/12


Inspired by Challenge

Red, heart, Valentine, animal ends 2/5


Can You Handle the Pressure

anything goes (embossed heart) ends 2/5


Tic Tac Toe #263

Used the top horizontal line -  Hearts, Designer Paper, Love Sentiment ends 2/13


Stamps:  Snarky Cat - Tim Holtz/Stampers Anonymous, Love You from Mini Boxwood Heart set - The Greetery.
Paper:  Red and dark pink card bases from stash, DP Gosh I love You - Unity, Valentines Day - Recollections.
Other Supplies:  Crushed Olive and Wild Honey Distress Water Color Pencils - Tim Holtz, foam dots, water brush pen.

Sunday, January 12, 2025

A Birthday Ballerina

 A friend asked me to make a card for her grandaughter who is turning 10 and she is a dancer.  I've made Lia other cards with die cut and stamped ballerinas and so went searching in my bottomless pit of a craft room for something different!

I found an unopened bag of Baseboard Dolls from Tim Holtz/Idea-ology that I've had at least for a year but have not used and when I looked through them I found this wonderful vintage ballerina!  So then I searched Tim Holtz YouTube videos on how I could color the image (the Baseboard Dolls are all black and white photographs printed on thick baseboard.) 

I found a video on coloring with Distress Watercolor Pencils (another thing I have had in my room for over a year but have never used -  and totally forgot what to do with them)  I rubbed both Tattered Rose (for the flesh parts) and Tumbled Glass (for the dress, hat and shoes) onto my craft mat in two different spots.  Then I used a water brush pen to pick up the colors brushing over the flesh parts first and then the dress.  It gives a wonderful soft color! You can see, especially on the dress, that the blue doesn't cover the whole dress, which makes it light and airy!

You can brush over these Baseboard Dolls with clear Gesso and let it dry before watercoloring - then the color covers more of the area and is darker- this works well especially if you are coloring a Baseboard Doll that has a lot of black that wouldn't  show the color (like a long coat or pants)  But I digress......

I embossed a white card panel using All Star Burst EF and water-brushed the same Tumbled Glass,  lightly radiating out from the center along the embossed lines.

I popped the ballerina up on foam dots and added a computer generated personalized sentiment for Lia!


Baseboard Ballerina and Distress Watercolor pencils are new! 
ends 1/21


First time using the Baseboard Dolls and Watercolor pencils

Use Stars  Ends 1/13


Paper:  White - Papertrey Ink.
Other Supplies:  Baseboard Dolls - Tim Holtz/Idea-ology, All Star Burst Embossing Folder - Simon Says Stamp, Ranger Distress Water Color Pencils Set #3, water brush pen, Computer Printed Sentiment.

Saturday, May 4, 2024

Inkspirational Challenge #315 - Seasonal - Cancun Summer

 A new challenge #315 is up over at Inkspirational.


There are lots of ways to interpret Seasonal -  the four seasons of the year, the various holiday's each year, seasonal clothing, seasonal activities, seasonal animals or flowers/plants?

I chose Summer Vacation as my seasonal topic.  

I made this card for my Grandniece Madelyn for her 10th birthday.  That's a photo of her in the center.  It was taken on their recent family vacation to Cancun - where it was already summer weather - hot and sunny!  I resized the photo on my computer to fit the space and printed it on white cardstock.
The fold is called Center Display Fold and I found it at a technique challenge hosted by Sabrina over at Splitcoaststampers.  It's really very easy to do - scores, cuts and cut DP  panels to fit

This is how it looks folded up - and it fits inside a regular A2 envelope for mailing - but might require a little extra postage as it's a little thick.
Here it is fully opened up and flattened.

I made another card using this fold for the April Card Exchange Challenge I posted on May 2nd.  I have Sabrina's full instructions and a diagram on how to make the fold -  see that post here.  Or just scroll down two posts!

So please join us over at Inkspirational and show us what Seasonal means to you in your card design.

 You'll find some creative inspiration from the rest of the DT as well!  
You have until May 17 to link up!

Also linking my card to:

ends 5/5
Middle vertical row - Butterflies/Free/Patterned paper

Fantasy (the giant bird wings on my grandniece!)


Paper: white - PTI, DP Amazon 8x8 Paper pack - Stamperia
Accessories: photo printed from computer, Scor Pal, paper cutter, Computer generated sentiment

Thursday, February 22, 2024

Mickey and Minnie Birthday Balloon

 A friend requested that I  make a card for her 9 year old granddaughter, Gwen, who loves all things Disney!


I recently purchased some fun Mickey and Minnie stamps, dies and patterned papers, so pulled them right out to create this card.  I colored the mice with Zig Clear Color brushes in Cobalt Blue, Black and Carmine Red.   I added dots to Minny's skirt with a white POSCA pen

The balloon is from the  Magical Memories Die set by Kat Scrappiness, Minnie and Micky are from Mousing Around stamps and die from Unity.  All the die cuts are up on foam dots.  I used my Brother Label Maker for the sentiment.

Instead of making a folded card - I added a die cut easel to the back of the panel so it could be stood up and displayed.  The hearts are from the Mousing Around stamp set, the sentiment is from Sentiment Suite: Birthday from The Greetery.


Linking my card to:
Main Color - Red


1st time using the Micky and Minnie stamps and die.


Stamps: Mousing Around - Hiya Pal - Unity, Sentiment Suite: Birthday - The Greetery.
Ink: Nocturne Versafine Clair, Ruby Red - Altenew
Paper: White, True Black - Papertrey Ink, DP Mousin-Mix Up Paper stack - Unity, Mousing Around Hiya Pal Die - Unity, Magical Memories Die - Kat Scrappiness, small easel die - Sizzix, Alphanumeric die - Tim Holtz/Sizzix, White Posca Pen, Brother PTouch Label Maker, Cobalt Blue, Black and Carmine Red - Zig Clear Color Real Brushes.

Sunday, February 18, 2024

Picket Fence Baseball Field Birthday

 Another card made for a friend for her grandson who plays baseball and is turning 12 - I bet you could tell that by looking at my card!?!

I printed a free image on the internet of the baseball field for the background.  I rubbed a brown inkpad over the die cut fence from Papertrey Ink and layered it over the background with foam strips.  I stamped the die cut bat, ball and mitt  and adhered them over the fence, as well as the die cut letters and sentiment.  I added the die cut numbers above the fence.

Instead of a folding card -  I adhered a die cut easel to the back so it can be stood up on shelf or bureau.


Linking my card to:


Featured Stamper Challenge
inspired by garden fence

inspired by the colors
Clean and layered


Stamps: Sentiment Suite: Birthday - The Greetery, 7th Inning Stretch - PTI (retired)
Paper: white, Dark Chocolate - PTI
Ink: Mocha and Rocky Shore - Altenew
Accessories: baseball field image printed from internet, Picket Fence Die, 7th Inning Stretch dies - PTI (retired), red 01 micron pen, Alphanumeric dies - Tim Holtz/Sizzix, foam dots and strips, small easel die - Sizzix.

Saturday, December 2, 2023

Inkspirational #304 - A Glittery Unicorn for Evelyn

 Here's my DT card for the newest Inkspirational Challenge #304 just posted.  Pia is the Designer to choose the challenge this time - and she wants us to Add Glitter!


A friend asked me to make a card for her 2 year old granddaughter - and I thought what would be better than a shaker Unicorn with glitter cardstock?!

I used this fun Potbellies Unicorn die from Papertrey Ink.
  (unfortunately no longer available - I also have the Penguin, Santa and Reindeer Potbellies!). 
 
I personalized it with her name and age, and die cut the wings, snout, hair, horn and flowers out of glitter paper.  I added a mix of colorful gems/sequins in the shaker piece.

I die cut another base piece and adhered it to the front so it stands up.

So how will you use glitter on a card?  
We hope you will join us over at Inkspirational and link up your card.
You'll find lots of inspiration from the rest of the DT as well as Mr. Linky at the Inkspirational Blog!

I'm linking my card to:
Anything Goes

at least 3 different elements
Die cuts, shaped card, sequins, shaker, glitter paper, a number


Stamps:  Potbellies Everyday Sentiments - Papertrey Ink.
Ink:  Nocturne - Versafine Clair
Paper:  Hammered White card - Amazon, white - Papertrey Ink, glitter cardstock - Recollections/Michaels.
Accessories:  Extra large clear bubbles, Potbellies Unicorn Die - PTI no longer available, Alphanumeric Tiny Type Upper dies - Tim Holtz/Sizzix, Mermaid Gems - Buttons Galore.

Tuesday, March 14, 2023

Pop Up Ballerina

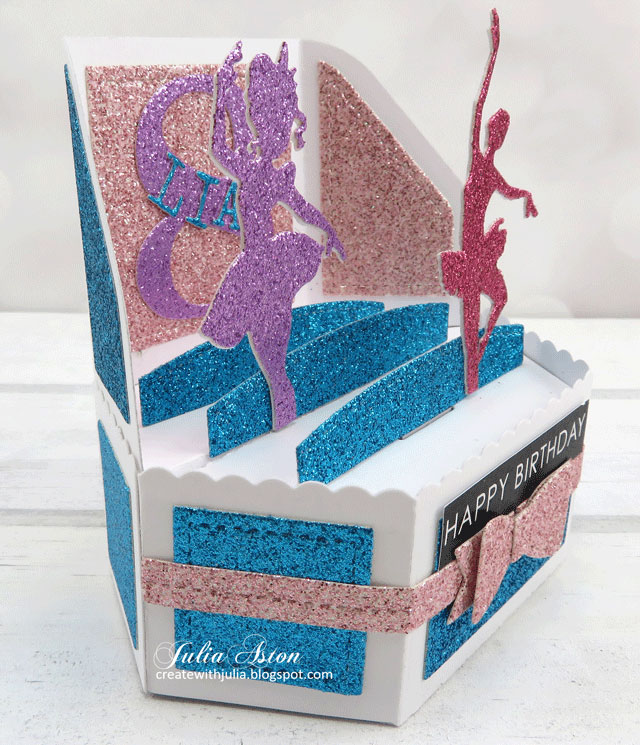
 I have a Pop Up Birthday card to share today that I made for a friend's granddaughter, Lia, for her 8th birthday.  Lia takes dance lessons so I used ballerina die cuts on the 'stage'.  

They were a little oversized so I couldn't show the full length of their legs?!!  

I love personalizing cards for kids - they get such a kick out of having their name and age right on the card.

I used the Platform Pop up dies as well as the Platform Pop Up Add On (the back piece) for this card. (Both from Lawn Fawn.)  I die cut all of the decorative pieces out of Glitter Cardstock.


View from the back, with room for a written message from the giver.
This cute pop up does fold flat to mail.  

If you use just the base Platform Pop Up it fits in an A2 envelope.  
When you use the Platform Pop up Add On piece (the back of the stage) it fits into a 5" x 5" envelope.  
I added the PUSH stamp to help the receiver see how to  POP UP the card.  But I'm sure they'd figure it out without it!

I'm linking my card to:

Card for a Child


Stamps:  Interactive Labels - My Favorite Things.
Paper:  White - PTI, glitter cardstock - Recollections/Michaels
Ink:  True Black - PTI
Accessories:  Platform Pop Up and Platform Pop Up Add On Dies - Lawn Fawn, ballerina dies - Amazon, Number Dies - PTI, Alphanumeric Tiny Type Upper Dies - Tim Holtz/Sizzix, Happy Birthday printed strip from stash.