Thursday, December 31, 2015

A Vintage Journey - January 2016 Challenge - Vintage Travel and Luggage

To see my Mixed Media Card Challenge post - please click here

Happy New Year everyone!  
(posting in the US - I'm a little early for our new year - but in Great Britain where AVJ lives - the new year has just arrived as this posts!)  
Today we are also celebrating the first challenge of 2016 at A Vintage Journey.  Brenda is our hostess this month and her challenge to us is Vintage Travel and Luggage.  Here is her description of the challenge:  "Let your imagination carry you back to the bygone eras setting off on an exciting journey for the New Year.  Keeping it in Tim's Style, we would love to see what item of luggage or mode of transport you would use on your journey, eg - think hand luggage, travel trunks, hat boxes,hot air balloons, ships and trains."
Well, there must be something in that description that tickles your creative fancy!!??!!

I decided to make a carry-on satchel to take on my vintage travels. A lady always needs certain things with her at all times right?  Her journal, gloves, embroidered handkerchief, perhaps some cash for tipping, a little blush for the cheeks, some white gloves for the evening meal and a good romance novel to pass the time?!  
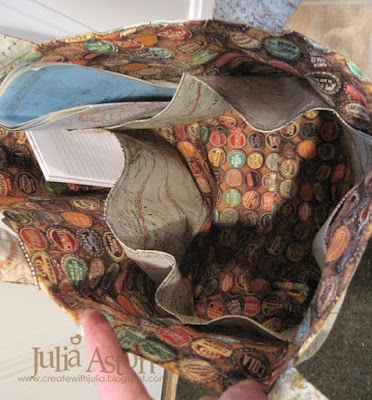
 I made my satchel using two of Tim's Eclectic Elements Fabrics - the world map and bottle caps.  It is completely reversible -  there are 6 pockets on one of the sides  - below shows the pockets on the inside of the bag.  Plenty of places to put things - in the pockets or just inside the bag.   The finished bag is 17" high x 14" wide 5" deep and the handles are long enough to use as a shoulder bag.
(The pattern is actually supposed to be a baby bag so you could put bottles, wipes, diapers in the pockets, here is a link to the pattern - I bought mine at Joanns)
You can choose to have the pockets on the inside or the outside - depending on what you are using the bag for!
Here's how the pocket panel looks without anything inside them.  There are 3 pockets on front and 3 on the back.
Here are the pieces all cut out and partially sewn together.  I added a fusible interfacing so the cotton fabric would be a little more sturdy.
The two sides finished - before being sewn together.
I also made a luggage tag for my satchel using Eileen Hulls Sizzix die. I used Tim's Marbled Stain technique to color it.  It can be found on Page 46 of Compendium of Curiosities Vol II.   First I spread some Picket Fence Distress Paint onto my craft mat, then I sprayed Distress Stains around the edges of the paint (I used Iced Spruce, Ground Espresso and Tea Dye).   I dragged my die cut luggage tag through it all.  I dried the tag a little bit with my heat tool - then spritzed it with water to marble it.  I wanted a weathered leather look and I love how this came out.  I sponged the edges a little with Iced Spruce Distress Ink.
I added a Pocket Card inside the window of the luggage tag that I  decorated with Chit Chat Stickers and some Remnant Rubs.  I drew around the Chit Chat Stickers with a black Stabilo pencil and rubbed over the lines with a damp finer to smudge. I hung the tag around the satchel handle with a keychain.
I thought I might want to be able to close the bag - so I bought a toggle button on some cord.  The cord wasn't long enough so I substituted some cord I had in my stash and hand sewed the loop and the toggle button to the bag, front and back.  It's not a super secure closing - but it keeps the bag from sagging open!  I added a Philosophy Tag with a Jump Ring below the button.
So now I just need to plan a lovely journey so I can bring my travel satchel along with me!  It's waiting patiently on my doorknob  - ready to go!  
(in the meantime -  I could use it to store some craft supplies! OR as the bag I commute back and forth to work with!)
A Vintage Journey is very fortunate to have Country View Crafts sponsor us every month and they offer one random.org winner a £20 voucher to spend online. Susan does not charge for UK postage, however, international charges may apply.
In addition to the randomly chosen winner, the Creative Guides will choose three pin worthy projects created by our fellow travelers......i.e YOU...... with the chance to be a Guest Creative Guide on a special post over at A Vintage Journey!  So get creating for this fun Vintage Travel and Luggage Challenge and link up your project here!
Ink:  Ranger Distress Iced Spruce
Paper:  Little Sizzles White Matboard - Sizzix
Accessories:  Tim Holtz Eclectic Elements Fabrics, Ranger Distress Picket Fence Paint, Ranger Distress Spray Stains - Iced Spruce, Tea Dye, Ground Espresso, Double Duty Bag Pattern - www.sewbaby.com, fusible interfacing,  sewing machine, Luggage Tag Die - Eileen Hull/Sizzix, Idea-ology Remnant Rubs Words and Special Delivery, Pocket Cards, Philosophy Tag, Jump Ring, Chit Chat Stickers. key chain - Tandy Leather.
 

Tuesday, December 29, 2015

You're the Best

I'm home on vacation this week - but it's a stay-cation since Kent is still recovering from his hip replacement.  He's improving every day - we've been able to take some great 50 minute walks down our local bike path.
So I've been using the time to get ahead on several of my DT obligations - but today I wanted to play along in the Color Challenge over at Splitcoaststampers.
These are the colors Karen asked us to use today with the option of also doing some embossing on your card:
And here is my card.
The trophy and ribbon are Alterations Die set from Alterations/Sizzix. All the pieces are popped up on foam dots.
I added two strips of Washi tape to ground the trophy over dotted DP. I stamped the sentiment from Lawn Fawn (free with an order!) right onto the DP.

We had snow today for the first time this winter!  We got about 2" but then it turned to rain - so now it is freezing slush as the sun goes down!

I'll be back at 7 pm Thursday night (Eastern time) with my January A Vintage Journey project - and on New Year's Day with my Mixed Media Card project -  Hope you can stop by!

Stamps:  Sentiment - Lawn Fawn, stars - Scene It/Celebration - PTI
Paper: Indigo Island, Pear Pizzaz - SU, Blueberry Sky - PTI, DP BoBunny Almond Dot
Ink: True Black - PTI, Versamark
Accessories: Die - Mini Trophy Prize Ribbon/Sizzix Alterations, silver embossing powder, washi tape, foam dots


Saturday, December 26, 2015

Papertrey Ink December Blog Hop

Even though we had a busy family Christmas day yesterday - when we got home I just had to get up into my craft room and make a card for today's Papertrey Ink Blog hop!
Here is the lovely photo inspiration
I decided to go with a birthday card -  rather than a holiday card.  
I folded a piece of white card stock in half and placing the die just above the fold cut the 3 3/4" circle card base using a circle Nestability so the circles stayed together at the top.   Then I cut a single circle out of black using a 3 1/2" circle Nestability.  I used dies and stamps from two PTI sets to decorate the black circle - Spruce and Sprigs and Birthday Cheer.
I embossed the HAPPY onto the black with white embossing powder and layered the sprigs with foam dots.  I adhered the Birthday die cut with Scotch Quick Dry adhesive and added 3 white sequins.  As a final step - I splattered white acrylic paint over the black circle using a Ranger Splatter Brush.
I cut a little bit off of the bottom of the circle so it would stand up!
You'll find everyone's creations and the details for the PTI blog hop over at the PTI blog here.  

I'm also linking this card to:

Stamps:  Spruce and Sprigs, Birthday Cheer - PTI
Paper:  White, True Black - PTI
Ink:  Versamark, Simply Chartreuse, Pure Poppy - PTI
Accessories:  Nestability Circle Dies,  Birthday Cheer and Spruce and Sprigs die sets - PTI, white embossing powder, white acrylic paint, Splatter Brush - Ranger.

Friday, December 25, 2015

Winter White Trees

Wishing everyone a most Blessed Christmas Day!
My cards today were inspired by this beautiful card made by Bobbi Smith


I used 3 different sentiments on the front -  this one is from Verve.
 First, I white embossed the beautiful trees from the Tree Line Set extending the embossing to the bottom of the panel.   Next, I sponged the sky with Tumbled Glass Distress Ink.
This Bible verse sentiment is from Silent Night by PTI.
I flicked water onto the sky with my finger and dried it with my heat tool.  Then I splattered Picket Fence Distress Paint onto the panel using my splatter brush.
This is another sentiment from the Silent Night set by PTI.


For unto us, is born this day, a saviour which is Christ the Lord.


Thursday, December 24, 2015

Shadow Box Christmas Ornaments

I made these fun shadow box ornaments using the Papertrey Ink All Through the House Market Kit designed by the talented Betsy Veldman, on the PTI DT.  The kit includes, dies, specialty paper and stamps (the kits are sold out but I think you can get on a waiting list?)   I also bought the mini LED lights (presently sold out and on backorder) to attach to the base so the scene could be lit (see below).  Betsy has a great video showing just how to add the lite and put these boxes together.  See her blog post here.
I made 4 of them - and sold them all at a Christmas sale at my church this past Sunday.  I added a little bottle brush tree to this one - and added pom pom ribbon for 'snow' on the bottom of all of them.
You can see the glow from the LED light that is attached to the base - I cut a hole in the base for the light to show through.
another view of them lit.
I added a little deer to this one and layered the stockings and wreath.
Close up with LED light on.
The die set cuts the matchbox, the frame, all the shapes.  I added a little owl in front of the layered tree on this one.
Here's a side view to show the depth of the box.  I added a street lamp and Santa to the frame - popped up on foam dots.
Shown with the LED lite on.

Now I have to make one for myself!
Wishing everyone celebrating a most Blessed Christmas!
Julia

Wednesday, December 23, 2015

Choriza's First Christmas

My son recently adopted a  dog  from the MSPCA  (Mass Society for the Prevention of Cruelty to Animals)  - she's a 2 year old Staffordshire Bull terrier.  Her name is Choriza.  I don't have any photos of her yet  -  but she looks pretty much like this photo I found on line.  She stands just about a foot off the ground - and she is one sturdy little piece of muscle - very sweet and well behaved!
So, being a crafter,  I made simple personalized ornament for my new granddog - since this is her first Christmas with my son and we wanted to make her feel welcome!
I found this unfinished wooden dog bone at Joanns - it's about 4" x 2".  I painted it with Bronze Art Anthology Metal Effects Dimensional Paint - leaving the streaks in it to look more like a dog cookie.  I added her name and the year with Idea-ology Label Letters and the snowflake and Christmas are Remnant Rubs Christmas Time.  I brushed over everything with Multi Medium Matte to seal it.   I added a piece of tan felt to the back and looped a piece of twine through the hole so he can hang it up. 
Julia

Monday, December 21, 2015

Tree Trophies

Oh my gosh -  did you see these adorable little Festive Trophy Cup Ornaments on Tim Holtz' blog the other day?  I flew home from work and started working on some of my own as soon as I got there!
These first 3 are pretty much clones of what Tim did -  I used different colors on the trees and trophy cups as I didn't have the ones Tim used and I used Remnant Rubs on the Vial Labels on the trophies instead of stamping on them. 
I used Butterscotch Alcohol Ink to color my mirrored stars and pretty much everything was adhered with my glue gun.
I just love the Tiny Tattered florals!  I used a Martha Stewart punch for the greenery, and Jingle Brads on the ribbons.
Then I ran out of Mirrored Stars and the right size Ranger trees - but luckily had some trees that came already colored and snowy from Joanns (half price!!)  that were pretty much the same size - so I used those. I omitted the Memo Pins and Small Talk Stickers - just decorating the trophies.
I love these simpler ones too!
In case you aren't familiar with these Ranger plastic trophy cups, they are about 2 1/8" tall so the whole thing with the tree inside is a mini 4 3/4" -  SO CUTE on shelf or mantel!  And these last 3 that are less obviously for Christmas can be left out all winter!
Are you ready for the holidays?!
I'm linking my little decorations to:
Simon Says Monday Challenge -  Winter Wonderland

Julia


Sunday, December 20, 2015

Clearly a Tag

Today I have a Christmas Tag to share.  There's no stamping on it accept on the back.  The white cardstock piece was cut with Tag Sale #10 from PTI.  The deer and 25 were cut out of Clearly for Art Blackout Modeling Film using the Mini Reindeer and 25 Movers and Shapers Set from Alterations. 
I added the same white die cut on the back to cover the adhesive on the front piece - and stamped it with To: and From: from the Tag Collection 1 from Waltzingmouse. 
And I cut the tag base out of Clearly for Art Clear Modeling Film using another die from Tag Sale #10 die from PTI.
I'm linking my tag to the Tag You're It challenge.
Thanks so much for stopping by today!  Christmas is coming - the goose is getting fat!  (along with the rest of us who have been having holiday party after holiday party at work!)
Stamps:  Tag Collection 1 - Waltzingmouse
Paper:  White - PTI
Ink:  True Black - PTI
Accessories:  Wendy Vecchi Clearly for Art Clear and Blackout Modeling Film, black ribbon - PTI, Score Tape, Foam Dots, White ribbon from Stash, Tag Sale Die #10 - PTI,  Mini Reindeer and 25 Movers And Shapers dies - Alterations/Ranger, clear rhinestone - Michaels.

Saturday, December 19, 2015

Peace

Luckily, I am done with my Christmas cards for this year - all posted and on their way - but two friends and I are having a Christmas sale at my church on Sunday - so I realized I needed to make a few more cards along with some Christmas crafts which I'll post later this week.
I die cut this Alterations Globe out of shiny gold cardstock - the US and Canada look a little burnished in the photo but it's just the light - IRL, it looks all gold!  The peace is a die from Holiday Words - Script by Alterations.   I had to cut the edges off of the world a little to fit on the panel - the globe measures exactly 4 1/4" and would have covered the whole card front.....
.....which would have been ok accept I was designed my card based on the Freshly Made Sketch
 This is also for Fridays Splitcoaststampers - Free 4 All challenge -   One Word Wonder 
I have a busy Saturday coming up -  a hair cut, an eye exam, and babysitting from 6 pm - 11 pm!

Tuesday, December 15, 2015

Coffee Lovers Blog Hop - Int. Nat'l. Tea Day

Did you know that today is International Tea Day?  If you are joining in on Amy's Holiday Coffee Lovers Blog Hop you do!
And I made a holiday tea card just for the occasion!  The 'Teas the Season' sentiment is from Becca's Caffeinated Christmas set by Stamplorations.  The pot and cups are from The Coffee Set, stamps and dies,  (I'm pretending they are for tea - see the teabag??) the tea bag and steam stamps are from Afternoon Tea - both sets are from Waltzingmouse.
 The Pretty Circle die is also from Waltzingmouse.  I popped up all the die cuts on foam dots and added a strip of washi tape and 3 sequins.
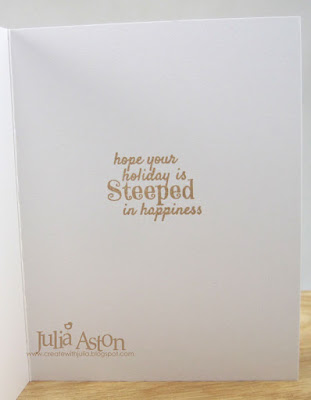
 I used another stamp from the Caffeinated Christmas set on the inside.  So fun!
Are you joining in on the Holiday Coffee Lovers Blog Hop?!!   There are TONS of randomly drawn prizes to be won if you link up your cards here!  You have until 12/18!

I'm linking my card to the following challenge:
Stamps:  Caffeinated Christmas - Stamplorations, Afternoon Tea and The Coffee Set - Waltzingmouse.
Paper:  White, Pine Feather, Textstyle Bitty Box Basics - PTI
Ink:  Classic Kraft, True Black - PTI
Accessories:  Pretty Circle Die and The Coffee Set Dies -Waltzingmouse, foam dots,  Copics, Washi Tape, Rhinestones.