
 This card is for 2 DTGD challenges - Amy's challenge to make a 3 1/4 x 6 1/2 size card and use something acetate/clear on it and Lindsey's challenge to use pink and black and some faux stitching. I don't think I have ever made this size card before and I love it!! I used this pretty DP from Basic Grey and some clear ghost flowers from Heidi Swapp I've had them for a couple of months and finally opened them! It feels so good to use the stuff you've bought! The border 'stitching' is a Hero Arts stitched ribbon stamp and it looks as crooked as it would if I stitched it on my machine!
Paper: Pretty in Pink, Basic black: SU, DP - Basic Grey: Perhaps
Ink: Onyx Black Versafine,kPretty in Pink: SU
Accessories: Black dotted grosgrain ribbon: Flourishes, clear ghost flowers: Heidi Swapp, sponge, jazzy pink brads, oval punch, word punch

And this card is for the DTGD challenge by Natasha who gave us a sketch - which I really love! I used some pretty designer paper by Graphic 45 and my cute stork from Gina K (another loved but never inked yet stamp!) The sentiment (Special Delivery) is from a $1 G clear set from Michaels and was perfect for this card!I colored my image with Prismacolor and SU markers and cut it out and embossed it with my rectangle nestabilities. I pierced the bottom, cuttled the panel and added the ribbons.
These challenges have been great - and I really appreciate all the behind the scenes work that went into this by a lot of dedicated people over at Split Coast. My heart felt 'thank you' to them all!
Stamps: Stork: How Sweet it Is - Gina K Designs, Sentiment: G - clear stamps
Paper: Sage Shadow, Very Vanilla: Su, DP: Graphic 45: Baby button bingo
Ink: Onyx black Versafine, Sweet Orange Adirondack
Accessories: Prismacolor markers, SU markers, green & orange gingham ribbons, Nestability rectangle, cuttlebug, paper piercer, Fiskars stamp edge scissors
 And last but not least on my post today - look at the fun package I got in the mail! This was my blog candy winnings from my good blogging and SCS pal - Linsey! Hi Linsey! I received this wonderful Asian theme clear stamp set by Clear Artistic Stamps called Shadows of Memories and two wonderful AncientPage inks which I'm so excited to try out!! You really MUST check out Linsey's blog - she makes the most fun and creative things over there - so get a 'cuppa' - sit back - and browse through her projects - tell her Julia sent you!!!


 I used this fun alphabet designer paper for the covers and this wonderful stamp from the Crafty Secrets
 Well - despite using colors I wouldn't usually grab - I do like my little project that I ended up with!! and that's what challenges are all about right?!!
 This card is for 3 DTGD challenges - Jen's sketch, Kittie's Make a Scene and Laura's make it dirty (distress, sponge & tear - not the other kind LOL!!!) I used a Kraft card stock base and layered on a green bazzill piece with sponged and distressed edges. Then I cuttled the 4 smaller squares putting ink on the folder so it came out two tone. I sponged and distressed the edges on these. I made my little shack in the field scene with 4 separate stamps, colored them, sponged and distressed the edges. I doodled around the edge of the card and added the velvet ribbon and metal dots. Finally, I stamped the sentiment on Kraft - sponged and distressed.
 I used velcro for the closure instead of a magnet (in the tutorial) and I heated the ends of the ribbon with my hot gun to make it curl and shrink up. I sponged the edges with Certainly celery.


 I stamped my fun bug in his inner tube - masked him and sponged the ocean and sky, added a school of fish to the ocean and a sizzix die sun that I sponged with So Saffron and stamped a little face on. I cut the oval with my nestabilities and stamped the summer sentiment. The sun and sentiment are up on dimensionals.
 I used this lovely wedding couple stamp from
 I scored a border on my white card. Then I stamped my tulip on a white piece that I cut with my petite rectangle nestability. I then mounted that to a sage shadow panel and a cameo coral panel (I don't have Regal Rose). That is mounted to the card with foam dimensionals. I used my horizontal punch to make two slots on either side of the stem and tied my ribbon through it.
 I immediately thought of using this designer paper that I had. I watercolored this cute little dragonfly from
  I don't think you can see it too well - but I outlined my dragonfly with Spica gold pen - IRL it looks all shimmery.
  I also stamped another head and layered it over the image. The sentiment circles are up on foam dimensionals also.


 This is only the 2nd time I've sewn on a card and I felt better about how it came out this time - more even stitches and straighter lines! Practice makes perfect as they say! I cut away the vellum close to the stitching and then distressed the edges of the DP and sponged them with Sage Shadow.
 I added the 3 flower brads on the side.
 I stamped the butterfly on the card stock as well as on a piece of designer paper. I cut it out of the DP and attached it over the stamping - bending up the wings. I pierced the flight pattern added the colorful Basic Grey designer paper and ric rac on the bottom half.

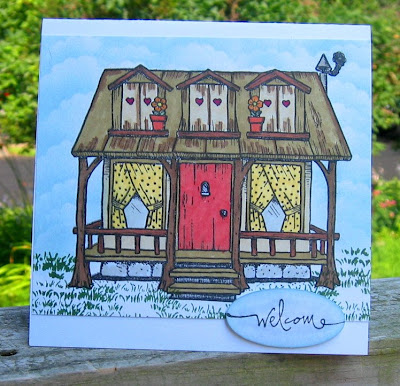


 There are 3 cottages on their property - this is the largest one where they live - their children or guests stay in the other 2 when they visit.


 And here is the bride - Joanne - standing - and her husband Walter, seated to the right. The dinner was actually held in a 'still being built' garage on the property - being the only room large enough to hold about 18 people! It was a lovely place to celebrate a momentous occasion with family and good food!


 I hope that my friend likes it and her boss isn't offended!! They really both look a lot like the girls on the front of the card (that's my story and I'm sticking to it!)