Tuesday, June 18, 2019

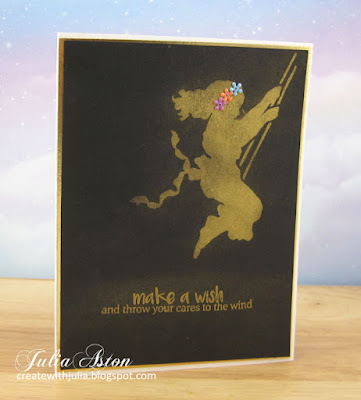
Reminder: June CAS Stencil Card Challenge - Perfect Pearls

I'm here to share another card I made for the June CAS Stencil Card Challenge - and to remind you you still have until June 24th to link up your card!  There are links to technique videos over at CAS Stencil.
Our lovely host Linda has asked us to use Perfect Pearls with our stencils this month.
For this card I used just one color Perfect Gold.
I used the Perfect Pearls on both my sweet swinging girl stencil Play Every Day from Stencil Girls and my sentiment stamp from Let the Wind Carry You by Altenew.   Here you can see that I already did the stencil (pouncing over the stencil with Versamark than brushing on the Perfect Pearls) and have just brushed the Perfect Pearls over the sentiment that was stamped with Versamark.
The Perfect Pearls are so wonderfully shimmery in the light, especially with the gold on the black.  As with my first card for the challenge, the powder didn't seem to totally brush off the card and leaves a little golden shadow on the black.  After I brushed off all I could - I misted the panel with water to seal it.
 I layered the black panel to a slightly larger gold panel and then to a white card base.  I added little colored flowers as a headband.
We can't wait to see how you use Perfect Pearls with your stencils!  You have until June 24th to link up at CAS Stencil.
You'll also find lots of inspiration there from the rest of the Design Team as well as our creative Guest Designer this month:  Chrissie (Simply One of a Kind)

Stamps:  Let the Wind Carry You - Altenew
Paper:  White, True Black - PTI, Kraft Stock Metallic - Tim Holtz/Idea-ology
Ink:  Versamark
Accessories:  Play Every Day Stencil - Stencil Girls, soft brushes, water mister, Perfect Pearls Gold, Mixed Flowers - Simon Says Stamp.

Thursday, June 13, 2019

It's All About the Bees!

I'm joining in with Darnell's Twofer Challenge today, but to help me make two cards using the same stamps but with different designs I turned to several other challenges as you will see linked at the bottom of my post!
So here are my twofer's -  both using retired stamp set Honey Bee from PTI. 
For the first card I made an encouragement or Birthday card depending on what I end up stamping inside!  I used the sketch from the Fusion Challenge, the colors from The Color Throwdown Challenge,  I popped up the bee on a folded strip of card for the Cupcake Inspiration - Add a Pop Up Element and The Country View Challenge is Bugs!


I used just the sketch
My flowers are hot pink and orange, the honeycomb stamp is yellow and the stem is green.

Add a Pop Up Element
It's a Bugs Life

For my 2nd card I made a baby card using the CAS Colours and Sketches Sketch
 My card is a 4 1/4" square.

CAS Sketch

So there you have my Twofers for this month - with a little help from my friends!  You'll find the Twofer Card Challenge here.

Stamps:  Honey Bee, Honey Bee Sentiments, Wee Folk - PTI.
Paper:  White, Bright Buttercup, Hawaiian Shores, Happy Spots DP - PTI,
Ink:  True Black, Bright Buttercup, Orange Zest, New Leaf, Berry Sorbet, Classic Kraft, Hawaiian Shores.
Accessories:  Pierced Feature Frames: Rectangles dies, Noted Scalloped Square Die - PTI, half circle die - from China, foam dots, Clear Glitter Wink of Stella, 1" circle punch - SU, enamel dots - Altenew, puffy heart - Michaels

Monday, June 10, 2019

Dearest Friend

I'm joining in again with the Lavinia World Challenges - every two weeks the new challenge is Anything Goes - using clear or rubber stamps (preferably Lavinia stamps but not necessary) and no digi's.

I was thrilled to receive honorable mention for my entry into their first challenge!
I am entranced by these Lavinia stamps - and today I used the beautiful Sebastian the Seahorse as well as the Miniature Group of Hearts stamp.
I masked my white panel and inked the blue strip using Ranger Distress Tumbled Glass.  I removed the mask and then stenciled over the panel using the Bubbly Stencil from Frantic Stamper using Twisted Cintron.  I used my Misti to stamp Sebastian so I could re-stamp if it didn't stamp completely the first time.  Then I stamped the sentiment from Scripted by PTI and the hearts above it. I added  three clear glass bubbles and called it done!

I'm linking my card to:


Stamps:  Sebastian the Seahorse, Miniature Group of Hearts - Lavinia Stamps, Scripted - PTI
Paper:  white, Green Parakeet - PTI
Ink:  True Black - PTI, Ranger Distress Tumbled Glass and Twisted Cintron
Accessories: masking tape, Bubbly Stencil - Frantic Stamper, Misti stamp positione.

Sunday, June 9, 2019

A Pansy Flower Journal

This month Eileen Hull's Inspiration Team is creating using her brand new Color Box Blends 2 inks and Emerald Creek Molten Dimensions Embossing Powders.
I made a journal using Eileen's newly released Notebook Die and adorned it with a die cut Pansy Flower.
The first decision I had to make was what colors I would use - and I looked through the array of Color Box Blends 2 that I had and pulled out Melon, Rose Gold and Flagstone.
I began with the flowers, cutting out each of the petal sizes twice out of watercolor paper using Eileen's Pansy Flower Die.  I sponged the largest and smallest petals with Rose Gold Blends 2 mixed with water on my craft mat and then sponged the medium size petals with Melon Blends 2 also mixed with water.  I love the mottled look achieved using this natural sponge.
While the watery ink was still wet  - I decided to emboss the largest and smallest petals with White Wonder Molten Dimensions.  I love the crackled look it gives when melted and you can still see some of the Rose Gold Blends 2 showing through.  (I ended up not using the smallest petal on my flower).
Then I die cut the Notebook out of Little Sizzles Matboard and sponged over some areas with Flagstone Blends 2 ink mixed on my craft mat with water.
I sponged over the rest of the cover with Melon Blends 2.  Just look at the wonderful mottled effect!
While the inks were still wet, I scattered some Golden Rod Molton Dimensions over the cover. I heat embossed it, holding my heat tool about 10" over the cover until the pieces started to melt and slowly moved my heat tool closer (to avoid having all the powder just scattering.)
Hopefully, you can see the wonderful shimmer of the gold in the photo below.
Next, I sponged the inside of the cover with the Melon Blends 2 mixed with water.  I also sponged just along the outside edges of the cover with Flagstone using what was left on the sponge.
I used two little notebooks for the notebook pages (from JoAnn sold in a package of 3)  I simply tied a piece of round white elastic cord through  the center of each notebook and around the binding of the notebook, knotting it on the outside to bind them to the cover.  That way they can be slipped in and out easily or replaced with full!
I tied a bird charm in the knot of one of the binding cords that matches the gold embossing.  I held the flower petals together with a pink plastic flower brad from my stash that just happened to match perfectly!  I glued the flower to the cover with Tombow Glue.
 I looped a silver elastic tassel for the closure of the notebook through the bindings so it won't fall off when opening the journal.
I like simple closures that are not bulky and are easy to open and close.

Please check out Eileen's blog during the month of June for lots of creative inspiraton using her new Color Box Blends 2 Inks and her Emerald Creek Molten Dimensions Embossing Powders!

I'm Linking my 3 3/4" x 5" Notebook to:


Paper:  Little Sizzles Matboard - Sizzix, watercolor paper - Canson
Inks:  Melon, Rose Gold, Flagstone - Eileen Hull/Color Box Blends 2
Accessories:  Golden Rod and White Wonder Molten Dimensions - Eileen Hull/Emerald Creek, Notebook Die, Pansy Flower Die - Eileen Hull/Sizzix, white round elastic cord, silver elastic tassel, bird charm, flower brad, water, Craft Mat, Tombow Glue.

Tuesday, June 4, 2019

June CAS Stencil Card Challenge - Perfect Pearls

The June CAS Stencil Card Challenge is posted today and our creative Host this month is Linda!  She would like us to use Perfect Pearls with our stencils.  
I was so excited to see this challenge as I have had Perfect Pearls in my craftroom for years (!) and have hardly used them!  So thank you Linda!
There are a couple of technique videos over at the challenge which I've posted here to give you some ideas if needed.
Stenciling with Perfect Pearls by Dyan Reavley (4:31)
Quick Tip - Perfect Pearls by Kristina for SSS (3:57)
I used a beautiful woman's face stencil (Stenciled Women by Dina Wakley).  There are two faces on the stencil but I just used this one.  It's a large one and would have filled the whole panel so to help make it CAS, I moved the stencil down and off the right and bottom edges.  
I sponged Versamark over the stencil by pouncing rather than any circular motion.  I removed the stencil and then brushed 3 different colors of Perfect Pearls over the panel using a different brush for each so as to not contaminate the colors too much!  Then I pounced over the colors with a soft brush (that came with my Perfect Pearls) as per one of the videos, to be sure the powder is pressed into the Versamark.  Then I brushed over the whole panel with a clean brush to remove the extra powder.
 Some of the powder seamed to have slightly colored some of the white (I tried both Papertrey Ink white and Bristol Smooth shown here and the result was the same), so I brushed off as much as I could and then let it be.  Then I misted the panel slightly with water to seal it (also as per the video!)
The image is very shimmery when you hold it in the light but does not really show up in the photo.
I layered the white panel to a slightly larger black panel and then to a white card base.  The sentiment is from Typed Sentiments by Neat and Tangled.
 So we hope you will get out those Perfect Pearls tucked away in your craft room and try them out with your stencils!  
The challenge is open until May 24th.  Here's the link to the challenge where you will find lots of inspiration from the rest of the Design Team as well as our talented guest designer this month:
Chrissie (Simply One of a Kind)

I'm also linking my card to:


Stamps:  Typed Sentiments - Neat and Tangled
Paper:  Bristol Smooth Surface, True Black, White - PTI
Ink:  Versamark, True Black - PTI
Accessories:  Stenciled Women Stencil - Dina Wakley, Perfect Pearls Forever Blue, Forever Red, Forever Green, several soft brushes, water mister.

Sunday, June 2, 2019

Dream Wish Believe

I have just recently discovered the beautiful Lavinia Stamps -  and more recently found there is a Lavinia World Biweekly Challenge!   So today I'm joining in their first challenge "Anything Goes" with this card.
I used the beautiful Eden fairy stamp today, stamping it in black over a white panel that I sponged with Ranger Distress Twisted Cintron and Mermaid Lagoon.
The background was a piece on my worktable - a failed attempt at Alcohol Lift through a stencil -  but it was perfect as the backdrop for my fairy today!

I'm posting just in time for the first challenge -  the deadline is tomorrow!

Stamps:  Eden - Lavinia Stamps, Let the Wind Carry You - Altenew
Paper:  White, True Black - PTI Yupo
Ink:  True Black - PTI, Ranger Distress Twisted Cintron and Mermaid Lagoon, Green Alcohol Inks, Alcohol Lift Ink Reinker.
Accessories:  Enamel Dots - Altenew, 1" Circle Punch Feathered Leaves Stencil - Altenew, foam dots.