Showing posts with label New Home. Show all posts

Monday, January 11, 2021

January Inspiration Team - Using Eileen Hull's Sizzix dies on Card Designs

 This month Eileen Hull's Inspiration and Educator Teams are creating cards using her Sizzix Dies.  You'll find them gathered every Wednesday on Eileen's blog.

I made two cards for my post today.

A Valentine using Eileen's Mitten Box Die.

(See the mitten box I made on my previous post here.)


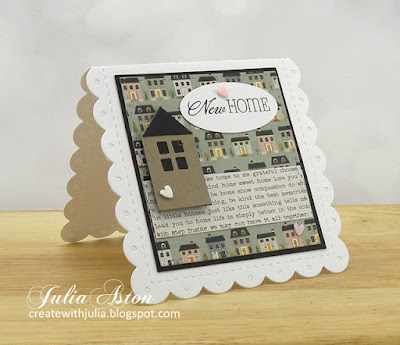
A new home card using the smaller tag house die from her House Ornament  Die.

(See how I used this little house tag on a summer card on my previous post here.)

It's always fun to figure out how to use the dies you purchase in perhaps unthought of ways!
Please check out Eileen's blog every Wednesday in January to see how her Teams use her dies for cards.

I'm linking my mitten card to:

My card is clean and layered


Mitten Valentine
Stamps:  Happy Valentine's Day from Perfect Match - Papertrey Ink, Sending Warm Fuzzies from Hero Arts set CL342.
Paper: White - PTI, DP Sweet as Sugar - Reverse Confetti.
Ink:  Obsidian - Altenew
Accessories:  Mitten Box Die - Eileen Hull/Sizzix, Skinny Strips Dies - Neat and Tangled, Nested: Pinked A2 die - PTI, foam dots.

New Home
Stamps:  A Cottage Home - Waltzingmouse (retired)
Paper:  White, True Black - Papertrey Ink, DP Farmstead Harvest Mat Stack - DCWV, Kraft Stack Classic - Tim Holtz/Idea-ology.
Ink:  Obsidian - Altenew
Accessories:  House Ornament Die - Eileen Hull/Sizzix, Noted: Scalloped Square Die - PTI, foam dots, Oval Punch - SU, Clay hearts - The Greetery

Wednesday, September 4, 2019

September CAS Stencil - Use Baby Wipes!

This month I'm honored to be the hostess for the September CAS Stencil Card Challenge.  My challenge is to use baby wipes with your stencils.

There are 3 techniques that I found on the topic (they are also linked over at the CAS Stencil Challenge Blog).

One uses Distress Inks, one uses Pan Pastels and one uses acrylic paint - but feel free to use another technique you may know about and share it with us!  It just has to involve baby wipes and stencils!
Techniques:
Acrylic paint, stencils and baby wipes:  (no video just a description below)

Since I am the hostess this month - I felt I should show you two different techniques to inspire you!   I used the same stencil and card design on both - but different materials to create the stenciled panel.

Here are some process photos for each card. 

For the card on the left above, I sponged Ranger Distress Mowed Lawn and Broken China over a panel of white card stock. 
I laid the stencil over the panel in the location I wanted it.  I used the same Portal Shutters Stencil from Stencil Girl for both cards.  This is a 6"x6" stencil with 4 different windows/shutters on it.
Then I dabbed/rubbed over the stencil to remove the ink with a baby wipe.  Don't press too hard as you can rub off the paper!  And be sure your Baby Wipe isn't dripping water or it will seep underneath the stencil! I could see when the ink was being removed - and I lifted up an edge to see if the stenciling was clear enough before removing the stencil completely.
So here's the result.  I heated it just a bit with my heat tool to dry it.  Drying also reveals the stenciling a little more.
To finish this card, I die cut the panel with a stitched edge square die, mounted it to a slightly larger panel of Tropical Teal card.  I die cut a 4 1/4" x 5 1/2" piece of white card and die cut it with Halftone Cover Die from Altenew.  I stamped the sentiment from Happy Village by Lawn Fawn on a white strip and layered it below the stenciled panel.  I punched a heart out of some blue vellum I found in my craft room (!) and adhered it with a tiny piece of ScorTape just at the top of the heart.
Here's how I created my 2nd card - on right at the top of my blog post.
I put drops of 3 acrylic paints on my white card stock panel.  I found that using inexpensive acrylic paints like you get at Michaels or JoAnn worked better than then my more expensive Paper Artsy paints (which did not rub off!)
Then I spread the colors with my brayer over the panel.  Just roll up and down - you don't want to mix the colors too much.
Again, I used one of the windows on the Portal Shutters Stencil from Stencil Girl. 
 (Lay the stencil over your panel quickly - you don't want the paint to dry too much or it won't rub off.)
I wiped over the stencil with a baby wipe until I could see the paint was being removed.
And here is the result - the top layer of paper tore off in a tiny spot when I removed the stencil there at the bottom center below the stenciling - I guess the paint stuck to the stencil - but luckily it was just a spot and just adds a little more to the distressed look!?
I finished off my card in the same way I did the first one.
So there you have two ways to participate in the CAS Stencil Card Challenge!  Easy, right?!!  I can't wait to see how you use baby wipes with your stencils.
You'll find the challenge, lots of inspiration from the Design Team as well as our guest designer this month, the very talented  Sarah, over at CAS Stencil.  You have until 9/24 to link up your CAS design!

I'm linking my card to:
Use shapes on your card


1st Card
Stamps:   Happy Village - Lawn Fawn
Paper:  White, Tropical Teal - PTI, Watercolor Vellum - Making Memories.
Ink:  True Black - PTI, Ranger Distress Broken China, Mowed Lawn.
Accessories:  Portal Shutters Stencil -Stencil Girl, baby wipes, sponge and blending tool applicator- Ranger, craft mat, Stitch Mat Squares Die - Lil Inker Designs, Halftone Cover Die - Altenew, Heart Punch - Marvy.

2nd Card
Stamps:   Happy Village - Lawn Fawn
Paper:  White, Amethyst Allure - PTI, Watercolor Vellum - Making Memories.
Ink:  True Black - PTI.
Accessories:  Portal Shutters Stencil -Stencil Girl, baby wipes, Americana Acrylic Paint Mint Julep Green, Wild Orchid, Cadmium Yellow - JoAnn, craft mat, Stitch Mat Squares Die - Lil Inker Designs, Halftone Cover Die - Altenew, Heart Punch - Marvy Uchida, breyer.

Tuesday, March 21, 2017

Felt Embroidered New Home

Today I have a project to share that I made using another of Eileen Hull's new dies that were introduced at Creativation in January.  For this project I made a stand up card using her House/Pocket Stitchlits die and the LOVE from her Word Stitchlits dies
I started by making the base of the card using Eileen's Mailable Frame die that I cut out of Cream Little Sizzles Mat Board and layered a piece of wood grain patterned paper over it.
I die cut the house and decorative pieces out of felt and glued them together.  The die cuts holes along the edges of the house so it is very easy to embroider a blanket stitch around the edges which I did with red embroidery floss.  I die cut the love over the door and embroidered that as well.  I added a little flower brad to the door as a cute little door handle.
I adhered the house to the front of the Mailable Die cut and stamped a new home sentiment inside.

Wouldn't this be a fun and impressive card to send to someone in a new home?!
You can also use this die to make a little purse by cutting two pieces of the house, cutting off the roof of one (just below the roof line - so you're left with a rectangle), layering the two pieces together (with the rectangle in front) and folding down the roof piece of the back for the purse flap!
  
You will find examples of the purse made by some of the Creative Team over on Eileen's blog where she will be posting our projects during the month of March!

I'm linking my card to:
Happy Little Stampers
 

Friday, January 9, 2015

WMS Team Talk Post

It's my turn to post over at the Waltzingmouse Team Talk Blog.  


Here's a snippet of my card:
I'd love if you'd take a peak over there!  Thanks so much for stopping by - and I hope you have a super weekend!

Waltzingmouse Products used:
Stamps:
A Cottage Home
Funky Flowers
Gift Card It
Dies:
Stitched Tag Dies


Wednesday, August 20, 2014

New Home Congrats Tag

I have a tag to share today that I made using a Mega Mat die from PTI rather than a tag die.  I also used another die and stamp set that I haven't used since purchasing it almost a year ago (the stamp set is only $5 and the die is only $3!). It's called  Polka Dot Parade #10 by PTI.  Because they are clear stamps - I could bend the congrats one to stamp it on the curve.
I die cut two Mega Mats -  die cut the house and roof out of one of them and then layered one mat over the other.  I stamped on the cut outs and inserted them into the openings on the top mat.  I love the look of the inlaid die cuts - so fun!  On the back of the tag I stamped "where your story begins' from the same stamp set.
My new home tag was inspired by the latest Tag You're it challenge.
Stamps:  Polka Dot Parade #10 - PTI
Paper:  White - PTI
Ink:  Memento Tuxedo Black, Tangelo, Bamboo Leaves and Rosebud
Accessories:  Mat Stack 3 die - PTI, Cropadile, Honey Dew and Pink Sorbet Twine - The Twinery, Polka Dot Parade #10 die set - PTI, home made enamel dots from Perler beads, Glue N Seal - Ranger, foam dots.


Saturday, August 9, 2014

Home Sweet Home

I've been wanting to use my Alterations Artful Dwellings die for quite a while - and today I finally got it out!  This cute New Home card was so easy to put together!
The die cuts all 4 of the dwelling shapes.  I attached them by laying them down side by side on my work table with just a little space between each one so they could fold over each other.  I ran a piece of Idea-ology Tissue Tape across all 4 pieces - then wrapped it around the back over each panel to where I started.  Here's the view from the back when it's opened up.
Here's how it looks folded up. It's small enough to be mailed in a regular A1 envelope.  Kind of cute isn't it?!  (It actually folds flatter - but I opened it a bit so it would stand up!)
I was inspired to make my house card by this month's Virginia's View Challenge - Shape Card
and I used stripes on it for the Cas-ology Cue card - Stripe.


The little windows and door were die cut using Tim Holtz Movers and Shapers Mini Openings die and Where Women Cook Windows Die from Sizzix.  The sentiments, front door and little house stamps are from A Cottage Home, A Cottage Christmas and Country Labels 4 from Waltzingmouse.

Stamps:  A Cottage Home, A Cottage Christmas, Country Labelsd 4 - Waltzingmouse
Paper:  Black, Vintage Cream - PTI, DP October Afternoon - Sidewalks and Farmhouse pads.
Ink:  Memento Tuxedo Black
Accessories:  Dies - Alterations -  Artful Dwellings, Mini Openings Movers and Shapers;  Windows - Where Women Cook - Sizzix, Sketch Book Tissue Tape - Idea-ology, Glue N Seal - Ranger.

Wednesday, March 26, 2014

Home Sweet Home

I used a newly learned technique on my card background today.  
Over this past weekend I attended 2 workshops by Wendy Vecchi (see this post and this post) and one of the myriad of techniques she taught us was this wonderful 'marble-look' background.  To make it you first need Ranger Specialty Stamping Paper - that is somewhat like glossy card stock - but not as glossy (it may work on glossy card stock - I haven't tried it yet!).  You pour a puddle of rubbing alcohol on a non-stick craft mat and mix a drop of Archival Reinker into it (I used Cornflower blue - you can use more colors if you want).  Then you drag your paper through it and dry it with your heat gun tilting it to move the drips around and dropping more alcohol right on the paper if you want to change the look.  Then you dry it completely with the heat gun
I then used Ranger Distress Stains to color two of my chipboard houses and one I inked with Cornflower Blue Archival Ink.  I layered them to the panel with foam dots.   I stamped the sentiment from Waltzingmouse on white card stock and punched it with a circle punch.  Then I simply layered the panel to a white panel and then to the blue card base.

I was inspired by the following challenges for my card today:
The Jugs Inspiration Photo - I was inspired by the blues and the patterns of the sky
Less is More - to use 3 of something -  I used 3 houses and 3 colors of blue.

Stamps:  A Cottage Home - Waltzingmouse
Paper:  White, Blueberry Sky - PTI, Specialty Stamping Paper - Ranger.
Ink:  Cornflower Blue ink pad and re-inker - Archival, Ranger Distress Stains - Salty Ocean, Tumbled Glass.
Accessories:  Rubbing alcohol, foam dots, Glue N Seal - Ranger, 1 1/4" circle EK Success, non-stick Craft Mat - Ranger, heat gun, chipboard mini houses - Maya Road.

Thursday, February 27, 2014

Waltzingmouse February Release - Sneak Peek Day 3

Welcome friends to day 3 of the Waltzingmouse February Release Sneak Peeks!  Today, Claire has charged us to show how the new sets Gift Card It and Gift Card It Dies, can be used for projects other than gift cards!  Well, we all love a challenge right?!  So here are 3 cards I made using the gift card rectangle die as a panel on my creations along with some sentiments from Gift Card It.

For this card - I added washi tape, a sentiment strip, enamel dots and a key charm to the Gift Card It Die and layered it onto the card base with foam dots.  The NEW Home sentiment is from Gift Card It
I used the Paper Players Sketch for my card and I used metal (key charm) for this weeks Less is More challenge.
For my next card I die cut the gift card in black and scored it on an angle down the whole length of the panel.  I also scored a frame on the white panel.  I stamped the sentiment from Gift Card It on a sentiment strip and adhered it to a striped straw.
Close up of the scoring on the black. 
I'm  linking this card up to this weeks' Waltzingmouse Fanatics Challenge - For the Boys and 
the Split Coast Stampers  -Love Fest Challenge -  Let's Score sponsored by ScorPal.

And for my third and final card today, I die cut and overlapped two of the gift cards.  I stamped a portion of one of the sentiments from Gift Card It (the full sentiment says For Lovely You from Lovely Me) on the panel and stamped the little bouquet on a punched circle coloring it with Copics.  After putting the pieces together, I embossed the whole panel and then the base panel with mixed dots.

My design for this card was this weeks' Seize the Sketch
 I hope I've given you some ideas on using the Gift Card It Stamps and Dies - They're not just for Gift Cards!   Now let's go check out the rest of the Design Teams creations!!

Claire Brennan - Owner
New Home
Stamps:  Gift Card It - Waltzingmouse
Paper:  white - PTI
Ink:  Archival Jet Black
Accessories:  Gift Card It Dies - Waltzingmouse, enamel dots - My Minds' Eye, Sentiment strip die - MFT, key charm - Marks' Finest Papers, washi tape - Michaels, blue eyelet, Crop a dile, Ocean twine - The Twinery, foam dots.

Congratulations
Stamps:  Gift Card It - Waltzingmouse
Paper:  white, true black - PTI
 Ink:  Archival Jet Black
Accessories:  ScorPal, Gift Card It Die - Waltzingmouse, striped straw - Michaels, ScorTape, thick foam dots, Sentiment Strip die - MFT.

For Lovely You
Stamps:  Gift Card It - Waltzingmouse
Paper:  White, Vintage Cream, Simply Chartreuse - PTI, Tempting Turquoise - SU, DP Sidwalks - October Afternoon
Ink:  Memento Nautical Blue and Tuxedo Black.
Accessories:  Caribbean Blend sequins - Avery Elle, Copics - YG95, B21, B05, Circle Nestability, circle punch, Gift Card It Die - Waltzingmouse, Dots embossing folder - Darice