Showing posts with label CAS Watercolour. Show all posts

Tuesday, August 3, 2021

August CAS Christmas Challenge - Decorations

How can it already be August? Have we had summer yet??
At the CAS Christmas Card Challenge, we are also looking way ahead to Christmas and the August Challenge has just posted today!
Cathy is our creative hostess this month - and this is her challenge.

So I made a card featuring tree decorations -   ornaments hanging on a pine bough.

I used a lovely image and die from Rubbernecker Stamps called Ornament Branches.  

I bought it at least a year ago but never got around to using it and I just LOVE how it looks!  I ended up making 5 cards while I had all the supplies out.   

I put the stamp in my Misti, colored the parts of the image with Ranger Distress Markers (which are water based), spritzed the stamp lightly with water and pressed it onto a panel of water color paper.  If the color wasn't dark enough in any area, I went over the area again with the appropriate color marker and pressed it onto the watercolor panel again.  

I die cut the image with the coordinating die and layered it over a panel of textured linen paper (unknown brand) with foam dots.   I stamped the sentiment  from Christmas Cuts Sentiments (retired) from PTI with black ink.

So what Christmas decorations will you feature on your CAS Christmas design?   You'll find lots of inspiration from the rest of the Design Team along with our talented August Guest Designer Lucie, over at the CAS Christmas blog!


Stamps:  Ornament Branches - Rubbernecker Stamps, Christmas Cuts: Sentiments (retired) - PTI.
Paper:  Watercolor paper - Canson Cold Press, Linen Texture paper - unknown, white card base - PTI.
Ink:  True Black - PTI
Accessories:  Ornament Branches Die - Rubbernecker Stamps, foam dots, Ranger Distress Markers Peeled Paint, Barn Door, Faded Jeans, Ripe Persimmon, Mowed Lawn, Walnut Stain, water mister, Misti, foam dots.

Friday, May 15, 2020

May Mid-Month Reminder - CAS Stencil and CAS Watercolor Challenges

Today I'm here to remind you that you still have time (until May 24th!) to link up your CAS Stencil and CAS Watercolor card challenge entries!
For my stencil card, I used Altenew's beautiful Layered Dahlia A and Layered Dahlia B stencils
I watched the video linked over at CAS Stencil -  Layered Stencils by Jennifer McQuire using her Ink and Impress technique.
I brushed some Clear Glitter Wink of Stella over the darker orange parts of the petals.
Here's how I made this:  I first laid Stencil A over a piece of yellow card and sponged using a lighter orange ink.  Then I laid Stencil B over the panel and sponged with a darker orange ink.

Then I ran it through my Big Shot.
Here's the sandwich - base 1, cutting plate, Silicone Rubber pad, Stenciled panel, stencil lined up over stenciled paper, a paper shim if you need it (trial and error), cutting plate.
You can see the impression from the back
 and from the front -  cool right??!
And here is my watercolour challenge card -  Night Sky
I first brushed water over a panel of watercolor paper and then brushed on a watery purple water color paint in the center and then a light and dark watery blue over the rest of the panel.  I added a little watery black along the bottom.  I adhered tiny silver stars in the sky and a die cut stamped bunny colored with a grey copic.
We hope you'll join us in one or both of these fun CAS Challenges!  
The links are open through May 24th!


 You'll find the CAS Stencil Challenge here.           You'll find the CAS Watercolor Challenge here.


Stenciled card
Stamps:  Direct Messages - Papertrey Ink
Paper:  Harvest Gold, White, Orange Zest - Papertrey Ink
Ink:  Chamomile, Marigold, Obsidian - Altenew
Accessories:  Layered Dahlia A Stencil, Layered Dahlia B Stencil - Altenew, Clear Glitter Wink of Stella, Direct Messages Dies - Papertrey Ink, Silicone Rubber Pad - Sizzix, sponge pad and applicator - Ranger.

Night Sky card
Stamps:  Upon a Star - Lawn Fawn
Paper:  White, True Black - PTI, watercolor paper - Canson.
Ink:  Obsidian - Altenew
Accessories:  Upon a Star Dies - Lawn Fawn, Kuretake and Ruby Mountain water color paints, Star Confetti - Honey Bee Stamps, W0 Copic, Ultrabond adhesive - I Craft, foam dots, paint brush, water.

Saturday, May 2, 2020

May CAS Watercolour Card Challenge - Night Sky

Hello everyone and welcome to May.
I hope you are all managing ok through this Coronavirus Crisis.
I know crafting has helped me cope with staying at home.  I can spend a whole day working in my craft room.
And now there's a new Watercolour CAS Card challenge up on the blog.   Jenny is our creative hostess this month and she would like us to watercolor the Night Sky!
I water colored a dark night sky behind a cityscape die cut layered over the sky with foam dots.  I embossed the HOPE in silver as well as the rest of the sentiment below the image. I layered the panel to a slightly larger panel of metallic silver card.
One photo of my process.  I just purchased the Boku-Undo Shadow Black watercolor paints (thank's for the enabling Nancy!)  I used the Bluish Black on the top of the panel and the Purplish Black along the bottom.  I started by brushing water over the watercolor panel and then brushed on the inks.
The card echos the worlds' feelings as we hope for the lessening of the Coronavirus spread and the return of being able to gather with others.
So please join us this month.  You'll find more inspiration from the Design Team as well as our talented Guest DT Tina - over at CAS Watercolour.
We can't wait to see your CAS watercolored night skies!

I'm also  linking my card to:
The Library Challenge
The main character spent a lot of dark and scary nights trying to figure everything out - but always hoped she would find the answer and her own self worth.
 

Stamps:Guiding Lights - PTI
Paper:  White,  True Black - PTI, watercolor paper - Canson, Kraft Metallics Silver - Tim Holtz/Idea-ology.
Ink:  Versamark
Accessories:  Silver Embossing Powder, City Scape Dies - Impression Obsession,  Bluish Black and Purplish Black Boku-Undo Shadow Black Water color paints, foam dots, water, paintbrush.

Wednesday, April 15, 2020

April Mid Month Reminder - CAS Watercolour and CAS Stencil

I'm here today with my April mid-month reminder cards for both CAS Watercolour and CAS Stencil!
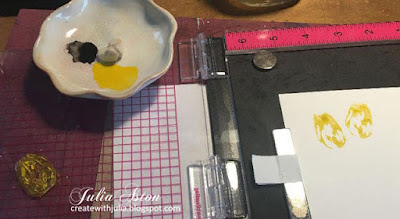
I used the Exotic Tulip stamp set from Altenew which has 3 layers of stamps for each tulip - I just used one of the detail bud tulips and a stem here.  I mixed yellow water color paint with water and brushed it right on the stamp and stamped it 3 times using my Misti
Here I'm showing how I place the clean stem on the panel where I wanted it to stamp
And here I've brushed over the stem with watery green paint, which I then flipped the Misti cover over onto the card panel and pressed down.
 I added some white watercolor splatter and 3 Frosted Flower Sequins from Honey Bee Stamps and adhered the panel to a white card base..

Here is my reminder card for Cathy's challenge to use Gilding Flakes with Stencils.  I was so excited to learn ways to use Gilding Flakes this month!
Look at the gorgeous mix of colors in these Autumn Leaves Cosmic Shimmer Gilding Flakes!
I used Matte Gel for the adhesive, spreading it over a panel of black card stock with a plastic palette knife.
I carefully removed the stencil from the panel- not wanting to disturb any of the gel.
 I waited just a couple of minutes before placing the panel onto a piece of computer paper inside a pizza box (to contain all the flying gilding flakes!) and covered the panel with Autumn Leaves Cosmic Shimmer Gilding Flakes. 
 (if you wait too long, the gel will dry and the flakes won't adhere to it)
I laid another piece of computer paper over the panel and pressed down with my hand over the whole panel to press the flakes into the gel.  I removed the top piece of computer paper and left the panel to dry for several hours. (you can leave it over night)
I used a sponge to rub over the panel to remove the loose gilding flakes and was left with a beautiful panel of stenciled gilding!  You can really scrub with the sponge to get the flakes off the black spaces as the gilding is really stuck to the gel and won't get rubbed off.  I put the brushed off flakes back into the jar of Gilding Flakes to use again later. 
(Don't put any flakes that are sticky with adhesive back in the jar.)
I die cut the panel with an older Movers and Shapers Mini Cabinet Die from Tim Holtz.  I adhered the die cut piece to a black panel and cut around it leaving just a small edge of black showing.  I stenciled lightly on a white card base using Antique Linen Distress Ink through the same AALL and Create Stencil and adhered the gilded panel over the stenciling.  I gold embossed the sentiment on an MFT die cut sentiment strip and adhered that over the panel with foam dots.

 You have until 4/24 to link up your cards to either challenge - so please join us!

See the CAS Watercolour Challenge here.     See the CAS Stencil Challenge here.


I'm linking my tulip card to:
My tulip card is Clean and Simple


Watercolor Card
Stamps:  Exotic Tulips - Altenew, Sentiment Staples: Birthday - PTI
Paper: Water color paper - Canson, white - PTI
Ink:  Obsidian - Altenew
Accessories:  watercolor paints yellow, green and white


Happy Anniversary Card
Stamps:  Hero Arts
Paper:  True Black, Whi - PTI
Ink:  Versamark, Ranger Distress Antique Linen.
Accessories:  Stencil #58 Autour de Mwa - Aall and Create, Autumn Leaves Cosmic Shimmer Gilding Flakes, 3D Matte Gel Transparent - Finibar/Art Basics, Movers and Shapers Mini Cabinet Die - Tim Holtz/Alterations, Sentiment Strip Dies - MFT, Gold Embossing Powder, foam dots, sponge.

Thursday, April 2, 2020

April CAS Watercolor - Spring Flowers

The CAS Watercolour Challenge for April has just posted!  Susan is our lovely hostess this month and she would like us to watercolor spring flowers - she's looking for SPRING flowers - not just any flowers.  So please think snowdrops, daffodils, tulips, crocuses, apple and cherry blossom, dogwood, etc.
 I water colored die cut snowdrops from Alexandra Renke for my card
 
Here are a few process photos.
I wanted to layer several cuts of the Snow Drops since they are so intricate.  So I adhered an adhesive sheet to the back of a panel of watercolor paper.  Then I die cut the snow drops, placing the dies on the watercolor paper side.  I peeled off the back of the pieces and easily layered them together .
I water colored the stems in two colors of green water color paint - Sap Green and Viridian and left the blooms the color of the paper.
Using a light blue watercolor paint with lots of water, I painted a background circle for the snow drops and then adhered them over the circle.
I die cut the card base using Noted A2 Scalloped die from PTI (no longer available). The sentiment is from Happy Snippets by Penny Black.
I have lots of crocus in my gardens but no snowdrops - I think I'm going to have to buy some for next spring - they are so pretty!
 You will find the challenge as well as lots of inspiration by the Design Team and our talented April Guest Designer Vicky here.  
The challenge is open through 4/24/20.  

 Please join us with your CAS water colored spring flowers!

I'm also linking my card to:

Happy Little Stampers watercolour Challenge

Try it on Tuesday
The Beauty of Nature


Stamps:  Happy Snippets - Penny Black
Paper:  Watercolor - Canson
Ink:  Obsidian - Altenew
Accessories:  Snow Drops Die - Alexandra Renke, Noted A2 Scalloped Die - PTI, Easy Cut Adhesive Sheet - Thermo Web, blue watercolor tray paint,  Kuretake watercolor paints Sap Green Viridian.