Thursday, March 28, 2019

A Vintage Journey - March Tag Friday

Whenever there is a 5th Friday in the month, we celebrate with Tag Friday over at A Vintage Journey!

I'm already in Easter mode so I decided to make Easter Tags!
First I gathered supplies I wanted to use to create my tags.  Critters Dies, Tag Sale Quilted die, Nestability Egg die (discontinued), Wall Flowers Paper Stash, Gold Gansai Watercolor paint, Happy Easter sentiment stamp and die from A Good Egg by Waltzingmouse (retired), Distress Inks in Gathered Twigs, Spun Sugar and Weathered Wood.
 To create an aged vintage look, I sponged the edges of the patterned paper and tags cut from Rustic Cream with Gathered Twigs
I die cut the bunny head from both blue and pink Kraft Core-dinations, sponged the edges with Gathered Twigs and assembled the pieces. 
I die cut eggs out of Rustic Cream card and sponged them with either Gathered Twigs, Spun Sugar or Weathered Wood.  I sponged the edges of the eggs with Gathered Twigs then flicked water on them.  They look so pretty - I love just looking at them!
 I loosely painted the edges of the tags and patterned papers with Gold paint, then splattered some on the eggs and papers by flicking the paint brush over them.
So then I adhered all the pieces together - popping up the bunny head and sentiment banner on foam dots.  I brushed over the bunnies and the sentiment with Clear Glitter Wink of Stella - so there is a little shimmer IRL (doesn't show in photos)
I added bright satin ribbons to the top and a square of patterned paper to the back to give it a finished look.
The most time consuming bit was putting all the pieces of the bunny heads together!
They look so pretty all laid out!
 
I made a total of 11 tags and will hopefully sell most of them at my church Easter sale.
The tags can be tied on the handle of a basket, placed inside a basket, or given as a card by itself!
So please hop over to A Vintage Journey and be inspired by all the beautiful tags the Creative Guides have created this month!   We'd love for you to link up a tag that you've created recently as well!

I'm linking my card/tag to:


Stamps:  A Good Egg - Waltzingmouse (retired)
Paper:  Rustic Cream - Papertrey Ink,  Kraft Core Core-dinations, Wall Flowers Paper Stash - Tim Holtz/Idea-ology.
Ink:  True Black - Papertrey Ink, Ranger Distress Gathered Twigs, Spun Sugar, Weathered Wood.
Accessories: Critters Side Kick Dies - Tim Holtz/Sizzix, Nestability Egg Die, Good Egg sentiment strip die - Waltzingmouse (retired), Tag Sale Quilted Die - Papertrey Ink, Gold Gansai Water color paint, foam dots, Tombow Glue, blue and pink Satin Ribbon, Clear Glitter Wink of Stella.

Friday, March 22, 2019

Spring Tulips

Well, we can always hope for Spring right?!!   I do have two little crocus' blooming in my front garden and my daffodils are coming up in the sunny spot near my side door!  I also have spring on my card today!  

I hit 4 of the weekly challenges over at Splitcoaststampers with this design  - 
Ways to use it: Something to plant in your garden, 
Free 4 All - use some of your favorite colors,   
Wednesday sketch and 
Mix-Ability Challenge - use tulips, daffodils or pansies with at least 2 mixed media.
I stenciled my background with a FABULOUS stencil from Altenew called Weave Builder - I sponged over the stencil with one color - flipped the stencil over - lined it up with what was already colored and sponged with another color and it actually looks like 3D cubes (do you see them?)!

I put 4 1/2" wide Dotted washi tape from Altenew over a panel then die cut the oval from it. I die cut the tulip, stem and leaves, also from Altenew - Exotic Tulip - then stamped them. The tulip stamp set comes with three layers to stamp and the leaves come with 2 layers - I just used one on my tulip today but I did use 2 layers on the stems.

I put it all together layering a lot of it on foam dots. I white embossed the sentiment from PTI on black. I brushed over the tulip and leaves with Clear Glitter Wink of Stella - which I hope you can see on the close up below?!

I'm also linking my card to:

Stamps:  Exotic Tulip - Altenew, Sentiment Staples: Thinking of You - PTI 
Paper: White, True Black, Lavender Moon - PTI 
Ink:  Purple Wine, Bamboo, Olive, Puffy Heart, Rose Quartz - Altenew, Versamark  
Accessories:  Weave Builder Stencil - Altenew, Exotic Tulip Dies - Altenew, Pierced Feature Frame: Ovals - PTI, white embossing powder, Dotted 4 1/2" wide washi tape - Altenew, foam dots, white embossing powder, Clear Glitter Wink of Stella

Tuesday, March 19, 2019

Easter Daisies

I'm madly making Easter cards to both sell at my church as well as send out to relatives and friends.  Today I have a floral card (rather than eggs or bunnies) with an Easter sentiment, since in my part of the world, Easter comes at springtime!
I used a watercolor technique to stamp my Dancing Daisies onto vellum.  I placed the stamp in my Stamp Platform, colored over the stamp areas with 4 colors of Ranger Distress Markers (Victorian Velvet, Aged Mahogany, Shabby Shutters and Forest Moss), spritzed with water lightly (as I was stamping on vellum that obviously won't absorb the water!) and pressed it onto the vellum. 
I let the vellum panel dry, then I die cut the vellum panel as well as a white panel using Scallop Stackers: Small from PTI.  I adhered the two die cuts together using 1/8" Scortape just around the outside edge and adhered that panel to a white card base.   I stamped the sentiment from Easter Alleluias from PTI onto a punched oval and adhered that directly onto the panel.

I'm linking my card to several challenges:


my sketch fits accept for the one daisy that goes off to the right!

Stamps:  Dancing Daisies - Penny Black, Easter Alleluias - PTI
Paper:  vellum, white, Lavender Moon - PTI
Ink:  Autumn rose - PTI
Accessories:  Ranger Distress Markers Victorian Velvet, Aged Mahogany, Shabby Shutters, Forest Moss, Stamp Platform - Tonic/Tim Holtz, water mister, 1/8" ScorTape, oval punch - SU.

Monday, March 18, 2019

Mid Month Reminder - March CAS Stencil - Ghosting

I'm here today to remind you there's still time to join us in the March CAS Stencil Ghosting Challenge!  Mr. Linky is open until 3/24!
I am happily hosting the challenge this month so I really hope you will join us and show us how you create a CAS card design using Ghost Stenciling!
For my reminder card I decided to use Ranger Distress Inks for my base. 
I sponged Salty Ocean, Twisted Cintrol and a little bit of Hickory Smoke over a 4"x 5 1/4" panel of watercolor paper.
I laid my Intersecting Brick Circles stencil from Stencil Girl over the panel - taping the edges to hold everything in place.  
The stencil is bigger than the panel so I could decide what design I wanted on my panel - I set it slightly off center.  I thought it would be a little more interesting that way!
I took a baby wipe and rubbed over the stencil removing some of the exposed ink.  Be sure your baby wipe isn't too wet - or it will remove all the color as well as soak the paper!
And here is my Ghosting of the stencil.  I dried the panel with a heat tool and that actually made the colors look a little brighter when it was dry.
I cut my panel in two horizontally and was able to make two cards.  
I added a die cut balloon that I stamped with stars (die and stamps from Birthday Balloons PTI) and tied a piece of black jute around the base of the balloon.  It's interesting to see how different a look you get just by the curve of the jute! 
The sentiment is from Penned Elegance II from PTI
These will work well for all those guys we need birthday cards for!

You will find Mr. Linky, lovely inspiration from the Design Team, as well as links to technique videos over at the CAS Stencil blog here.
Please join us!!


I'm also linking my card to:
I was inspired by the colors


Stamps:  Birthday Balloons,  Penned Elegance II - Papertrey Ink
Paper:  watercolor paper - Canson, white, true black, Tropical Teal - PTI
Ink:  Hero Hues Black, Ranger Distress Salty Ocean, Twisted Cintron, Hickory Smoke
Accessories:  Intersecting Brick Circles Stencil - Stencil Girl, Birthday Balloon Die - PTI, black jute, foam dots, Baby Wipes.

Wednesday, March 13, 2019

A Galaxy Christmas

I work on my Christmas cards all year long so I have a box full when the season rolls around - one less stress right?!  

So today I made a card with Santa and his reindeer flying through interstellar space on Christmas Eve!  

I used a wonderful 4 1/2" wide Galaxy washi tape from Altenew for the background.  I adhered the washi tape to a 4 1/4" x 5" panel of white card and then die cut it with Pierced Feature Frames: Rectangles.   
I find that sometimes washi tape will peel off if it's not wrapped around the edge - so cutting it with this die with the stitched edge holds it on to the panel! 
I adhered the outside of the frame to the card base with foam dots and adhered the inside piece recessed inside the frame.  The Santa in his sleigh is from the Make it Market Kit Fairy Tale Christmas from PTI and is layered over the galaxy with foam dots.  Then I added the sentiment - a Metallic Sticker/Holiday Talk from Idea-ology. 
I'm linking my card to:

anything goes


Paper:  White - PTI
Accessories:  Pierced Feature Frame Dies - PTI, Santa on sleigh from Make it Market Kit Fairy Tale Christmas - PTI, Galaxi Washi Tape - Altenew, foam dots, ScorTape, Metallic Stickers/Holiday Talk - Idea-ology.

Tuesday, March 12, 2019

Easter Stained Glass

I was excited to try the Faux Stained Glass technique when I saw it on the CAS Mix Up Card Challenge this month and I finally got some time to play!
I made an Easter card with two little bunnies either looking in the window from outside - or looking through the window from the inside?!
I've had these Window Pane dies for quite a while - almost forgot I had them - but found them when I was looking for a die that would work for Faux Stained Glass -  I guess a window is the perfect die!  So these dies just cut the window not an outside edge  (so you could actually cut a window in a panel if you were making a wall in a house or something) so I cut 4 rectangles out of watercolor paper 2" x 1 1/4" then placed the die on one piece at a time and die cut the window..
I took a 2" x 1 1/4" panel of Lupo Alcohol Translucent Paper and dabbed Aqua, Citrus and Coral Alcohol Inks over it with the felt pads and applicator tool.
After the alcohol inks were dry (they dry quickly!) I glued 3 of the window frames together and glued them over the Yupo panel.  I squeezed Glossy accents into each section of the window till they were full and I let it dry overnight.  Then I glued the last piece of the window on top.
 Here's a close up of the window.
I die cut the white panel using Mix and Mat Confetti Die.  The little bunnies (paper and die) are from the Make It Market Kit Fairy Tale Christmas .  The sentiment is from Easter Alleluias.  All from Papertrey Ink.
I love how my faux stained glass came out and will be looking for more dies I have to use with this technique!


I'm linking my card to:
I used faux stained glass, stamping and die cuts

Wednesday Challenge - Create a Scene

Stamps:  Easter Alleluias - PTI
Paper:  Watercolor paper - Canson, white and Spring Rain - PTI, Yupo Alcohol Translucent paper - Ranger.
Ink:  Cornflower Blue - Wendy Vecchi Make Art Ink, Alcohol inks Coral, Citrus and Aqua - Ranger.
Accessories:  Window Pane Dies - Simon Says Stamp, Mix and Mat Confetti Die - PTI, bunnys from Make it Market Kit Fairy Tale Christmas - PTI, foam dots, scor-tape, felt pads and applicator - Ranger, Glossy Accents - Ranger.

Monday, March 11, 2019

Easter Place Card Treat Boxes

All this month Eileen Hull's Inspiration Team will be posting creations using Eileen's Sizzix Dies with a Spring Things theme.

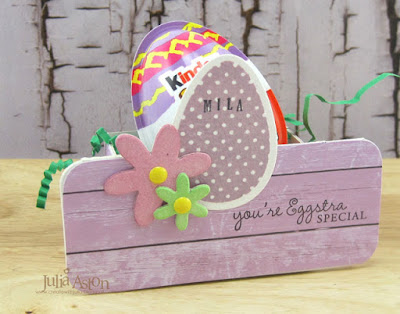
This was the perfect opportunity for me to make place card treat boxes for my grandnieces and grandnephews to have at their seats at the Easter Sunday table!

I used Eileen's Stacking Drawer die and her Place Card and Flowers die.

Landon is 8 and his sister Mila is 6 - children of my niece Katie
James is 7 and his sister Madelyn is 4 - children of my niece Christie
Here are a few photos showing how I put these together.

I cut out the pieces of each die from mat board
I used just the drawer piece from the stacking drawer die
(not the wrap around piece shown at the bottom of the photo)
as I wanted an open box to put treats in.
I cut apart the place card die-cut at the score line in the center so I could make two place cards from one die-cut (since I didn't need to have the place card stand up on its own) - the patterned paper and the egg cover up both the extended flower and the negative cut-out of the flower.  I die cut a piece of patterned paper - placing the paper just over the bottom half of the place card die - and adhered the paper to the mat board die cut.
I stamped the dotted eggs on watercolor paper and die cut them with a Nestability Egg die.  I sponged the flowers from the place card die in spring colors, stamped their name on the egg and added enamel dots to the centers of the flowers.
I adhered the egg onto the place card piece and layered the flowers over the egg.
I cut pieces of patterned paper to fit 3 sides of the drawer (one 2 3/4" x 1 1/2" and two pieces 2" x 1 1/2"), leaving the notched side plain as it would be glued to the back of the place card piece.  After gluing the sides together, I glued the bottom onto the drawer.  Then I glued the plain front of the drawer to the back of the place card.
I added paper grass to each box.  Here's the side view.
and the view from the back.
I placed a Kinder Joy egg in each box.
(the kids LOVE these and I was happy to see new Easter ones in the stores as they seem to already have all of the toys in the older eggs!)
They love to have things personalized with their names.


These will be a festive addition to the table at Easter Dinner!  
I'm already thinking about what I could put on them instead of an egg for other holidays!  

Here's a photo of me and the kids last Easter when I had brought Easter mazes I found on line and chick and bunny head pens that lit up like strobe lights when you tapped them on the table!!
Madelyn, Mila, Landon and James.
Please check out Eileen's blog during the month of March where you will see all of the Inspiration Teams Spring Things  projects gathered!


Stamps:  Spring Baskets, Nestie Eggs - Waltzingmouse (retired, no longer in business), Alphabet stamps - Karen Foster (retired)
Paper:  Little Sizzles Matboard - Sizzix, Wood Grain Paper Pad - Joann,  watercolor paper - Canson.
Ink:  Limeade Ice, Lovely Lady, Vintage Jadeite, Lavender Moon, Hibiscus Burst, Spring Rain, True Black - PTI.
Accessories:  Box Stacking Drawers die, Place Card and Flowers Die - Eileen Hull/Sizzix,  Nested Eggs die - Nestabilities/Spellbinders, enamel dots - Altenew, Tombow Glue.