Showing posts with label Watercooler Wednesday. Show all posts

Monday, November 8, 2021

Thanksgiving Treat Box

 This month Eileen Hull's Inspiration Team is using her dies to create seasonal projects for fall, Thanksgiving or Christmas.

I have made a Thanksgiving treat box for everyone's place at the table using Eileen's Box Ornament die as well as the leaves from her older Journaling Cards: Flowers and Leaves thinlit dies.  

The box is 3" high x 3" wide x 2" deep.  

(I got the sweet milking stool at Michaels half price a few weeks ago.)


Front and side view
Back and side view

Here are a few creation photos.
I took a 6"x6" piece of Silver Aluminum Metal Adhesive Backed Sheets by Sizzix and adhered it to a 6" x 6" piece of white card to make it sturdy.  
Then I applied Alcohol inks in Cloudy Blue and Caramel using a felt pad and applicator.
I die cut the sheet using the leaf die from Eileen's older Journaling cards thinlits.  
After choosing the DP (Ink Drops: Vivid 6x6 pad from Craft Consortium) shown below on the circles, I realized I wanted to add a little Wild Plum Alcohol Ink to the leaves to pull out the gold and purple colors in the paper.
I adhered the circles to the box piece of the Box Ornament using Scortape
I die cut the DP with a 3" circle die that perfectly matched the ornament die cut 
(easier than trying to cut a piece of DP to just cut the circle on the Bigz die) .  
I cut 2 pieces of the DP  2" x 1 3/4" to cover the sides of the box

The leaves and sentiment strip are all popped up on foam dots.  
I trimmed of just a tad off the circles along the bottom so the box would stand and not roll!
A pretty treat box for the Thanksgiving table in rather non-traditional colors for fall.

Please visit Eileen's blog every Wednesday this month for lots of holiday inspiration using many of her Sizzix dies!


I'm linking my project to:

The Paper Players


Path of Positivity Challenge


Water Cooler Wednesday


Stamps:  Mini Strips - Harvest - Taylored Expressions
Ink:  Cocoa Bean - Papertrey Ink, Alcohol Inks - Cloudy Blue - Ranger, Caramel and Wild Plum - Adirondack.
Paper:  Little Sizzles Matboard - Sizzix, white card stock - Papertrey Ink, Aluminum Metal Sheets Adhesive Backed - Silver - Sizzix,  DP Craft Papers - Ink Drops Vivid - Craft Consortium.
Accessories:  Box Ornament Die, Journaling Cards: Flowers and Leaves Thinlit die - Eileen Hull/Sizzix, 3" Nestability Circle die, Mini Strips Die - Taylored Expressions,  foam dots.

Monday, July 19, 2021

Grand Slam Birthday Truck

 All this month, Eileen Hull's Design Team members are creating using her new Chapter 3 dies.  Today I have a project to share using her wonderful new Truck Box Die and I also used the large circle die from her Ornament Box die for the giant baseball I put in the truck!

Wouldn't this be a fun gift box for a baseball players' birthday?! 

The inside box measures about 6" x 1 1/4" x 1".

I filled my truck box with mints, but you could put in a gift card, cash, or small presents!
The sentiment stamps are from 7th Inning Stretch by Papertrey Ink but are now retired.


Here's how I put it together.
I die cut all the truck pieces twice out of matboard.  Then I cut two of the truck piece out of Rinea Star Struck red foil paper - cutting both pieces at once being sure the fronts of each piece of foil were facing each other so the right side would show when adhered to the truck piece.  
I got the baseball image from the computer and just sized it to 3", printed them on white cardstock and die cut them with Spellbinders Circle dies. 
I had printed some smaller baseballs as well as I wasn't quite sure how I was going to use them on the truck at that point.
I glued the truck sides to the box piece and held it with clothespins until it dried.
Then I glued the foil paper to each side of the truck
I glued the end pieces of the box to each end - again holding the glued tabs with clothespins.
I drew baseball stitching on the tire 'hub caps'.
I blackened the 'tires' by pressing them into a black ink pad.  Then glued the hubcaps on top and glued them to the truck body being sure the 'stitching' on the hubcaps were all pointing forward.
I glued the die cut baseball images onto the matboard circles I cut using Eileen's Ornament Box die.  They are about 3" diameter.  
I adhered the large baseballs to each side of the truck bed with a strip of foam tape so it held them slightly away from the outside of the truck.  See the foam strip on one of the sides below.
Then I pressed the baseballs onto the foam tape.
I used Versamark pressed onto the fender pieces to adhere Eileen's Polished Silver Molen Dimensions Powder.  I had to keep adding powder to the piece as I heated it, as some of the powder blew away when I used my heat tool to melt it but I finally got good coverage after several layers. 
 (I solved the problem below when I embossed the doors and end panels!)
I glued the fenders over the tires.  I was happy with all the 'dings' as I liked my truck looking used and well loved!
After I had embossed the fenders, I decided to use the cut out of the window for a door panel and I wanted to emboss them with the same molten powder -  this time I used my Emboss It Dabber as it puts a thicker coat of Versamark on the piece and holds this chunky powder better.  
It worked perfectly with one coat!
I cut a piece of vellum paper to fit behind each of the truck windows and glued them in place.  I glued the 'door' piece I made from the cut out of the window (and embossed as shown in the above photo) just below the window.
I die cut two more pieces of the end panel of the box, cut off the tabs and embossed them using the Emboss it Dabber and the Molten Dimensions
I clued the panels over the front and back ends of the box just to give it a more finished look.

The giant baseball in the back of this truck really cracks me up every time I look at it!  
It came out just as I had envisioned it - which doesn't always happen!

Eileen has posts on her blog every Wednesday sharing the projects from the Design Team members using her new Chapter 3 dies this month.  You can check it out here.

I'm also linking my truck box to:
Creatalicious Challenge -  Anything goes - optional travel/transport

Simon Says Wednesday Challenge - Simon Says Emboss it.


Stamps: 7th Inning Stretch - Papertrey Ink.
Paper: Little Sizzles white Matboard - Sizzix, Red Star Foil - Rinea, Vellum and white paper - Papertrey Ink.
Ink: Obsidian - Altenew, Emboss it Dabber - Ranger, Versamark.
Accessories: Truck Box Die, Ornament Box Die - Eileen Hull/Sizzix, circle die - Spellbinders, baseball image from computer, Micron 01 black pen - Sakura, Fude Ball 1.5 red marker - Ranger, foam tape, heat tool, Polished Silver Molten Dimensions Embossing Powder - Eileen Hull/Emerald Creek, Ultra Bond Adhesive - iCraft.

Friday, September 25, 2020

A Linky Birthday Party for Nancy

Today, Loll is hosting a linky birthday party for Nancy Littrell who is turning 75 today!  I have known Nancy for many years as we both participate in challenges over at Splitcoaststampers and also are on Design Teams for Loll's CAS Challenges.  What a milestone of a birthday!  She is certainly a very YOUNG 75, as she is so active: hiking, gardening, preserving and canning the crop from her garden, camping and, of course, stamping!

So with this card I'm wishing Nancy a very Happy Birthday!

I did a watercolor wash for the background on watercolor paper that I had masked the edges on and then flicked watery orange re-inker over it.  I added a little sparkle to it by flicking some Clear Glitter Wink of Stella over the panel.    You can hopefully see the sparkle a little better on the close up below (the white splatter?!)

 
If you'd like to add your birthday card to the Linky party or just see lots of inspiration for birthday cards -  you'll find it on Loll's blog here!
The linky is open for two weeks. 

I'm also linking my card to:
 
200th challenge
I was inspired by the watercoloring and splatter


Stamps:  Forest Floor: Autumn - PTI, Just Sentiments: Birthday Stamp Set - Ink to Paper, Karen Foster Snap alphabet and number stamps - (retired)
Paper:  Water color paper - Canson, White - PTI
Ink:  Obsidian - Altenew, Really Rust, Soft Sky, Mellow Moss - SU Reinkers, Pure Poppy, Fine Linen, Classic Kraft, Orange Zest, Cocoa Bean - PTI 
Accessories:  
brush, water, heat tool, Forest Floor-Autumn Dies - PTI, Clear Glitter Wink of Stella, foam dots, 5/8" circle punch - EK Success.

Friday, April 24, 2020

A Socially Distant Hug

Those of us living through this pandemic will certainly never forget it and we'll be telling the stories to our children and grandchildren about schools and shops closing and having to stay at home, and not being able to find toilet paper!

There are also many products we can purchase having to do with these times and the fun stamp and die set, Hang In There, recently released by Honey Bee Stamps is one of those things.
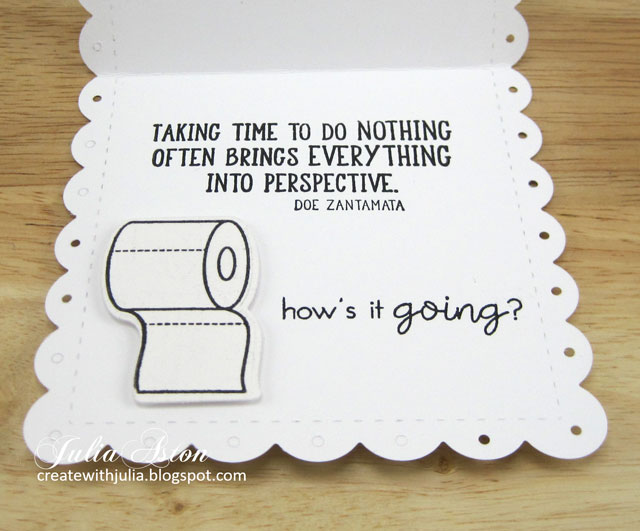
Inside, I couldn't help myself, I had to use the fun toilet paper roll included with the set.  
The quote sentiment is from Impression Obsession and the How's it Going stamp is from PTI.  
The roll of TP is popped up on foam dots. 
The pretty floral papers are from the Spring Fling 6x6 Paper Pack from Lawn Fawn.
 The bunnies are colored with Copics and popped up on foam dots.
I made 8 of these cards and have sent them to some people in my church - just to keep in touch while we are not able to meet on Sundays.

I'm linking my card to:

My scallop edge has dots in it, and there are dots in the DP as well as the cheeks of the bunny!

Simon Wednesday Challenge

Inspired by the cover florals and there are always bunnies in gardens!

Style - Clean and Simple


Stamps:  Hang in There - Honey Bee Stamps,Taking Time - Impression Obsession, Ways to Say: Hello - PTI
Paper: Strathmore Bristol Smooth Surface, White - PTI, DP Spring Fling 6x6 paper pad - Lawn Fawn
Ink: Obsidian - Altenew
Accessories:  Noted: Scalloped Suare die - PTI, Hang In there dies - Honey Bee Stamps, Copics RV21, W2, RV23, foam dots