Showing posts with label Travel. Show all posts

Wednesday, October 2, 2024

Sept 2024 Card Chain Challenge Reveal of Cards Exchanged

 Today's the day we see all of the cards exchanged for the September Card Chain challenge.  I sent a card to Jo in England and I received a card from Kath in England!

Each month there are options for sketch, colors, themes, and products/techniques. You can use one suggestion - or you can use them all!   

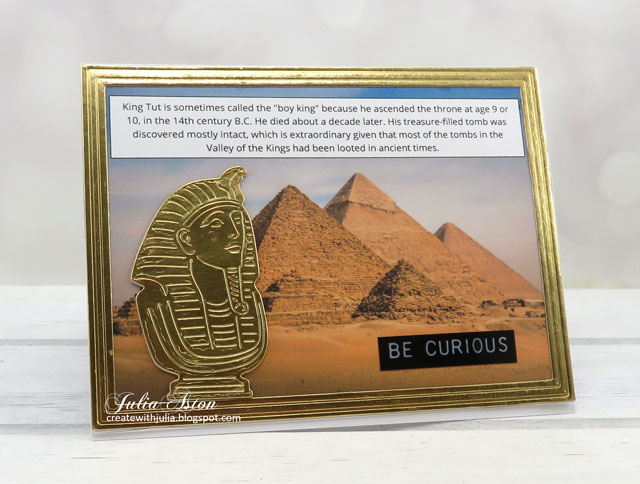
This month I just used one of the suggested themes - Egypt.

Kent and I went to a traveling exhibition of King Tut when it stopped in Boston a couple of years ago.  I knew of King Tut - but not all the particular details of his life and times - it was a wonderful education on this Boy King and his short reign.  He actually wasn't historically well known until they found his tomb in 1922.

So after we saw the exhibit - as a crafter - I went searching for stamps/dies that might be out there - and sure enough  I found Museum Busts Die set by Hero Arts (no longer available but there are some available on Amazon!  It has King Tut, Queen Nefertiti (King Tut's stepmother and mother in-law as he married her daughter, Tut's half sister, Ankhesenpaaten!) and two Grecian busts as well as a column stand.

Please check out this fun Card Chain challenge and join in for October - you have until Oct 6th to sign up!  


I'm also linking my card to:

world card making day ends 10/31

Lady Strange - something different

800 challenge - anything goes. ends 10/4


Paper: White - PTI, Metallic Kraft Gold - Tim Holtz/Idea-ology
Accessories: Text box generated on computer and laid over photo, Pyramid photo found Googling "Egypt" and printed on card stock, Museum Busts Dies - Hero Arts (retired but some on Amazon), Border Bling: Embossed Skinny Frames - PTI, Be Curious - Label Stickers: Thoughts - Tim Holtz/Idea-ology.

Saturday, August 26, 2023

Inkspirational #297 - Word Prompt: Clothing/Closet

 A fun challenge over at Inkspirational today -  #297 Word Prompt: Clothing/Closet.


I found this cute stamp set in my craft room -  unopened, unused (yet) - and perfect for today's challenge!  I just knew I might want it someday!   It's from Hampton Arts and I got it quite some time ago on sale at Michaels. 
 
The theme of the set is London (I also bought the Paris themed set while I was at it! Still unopened) - so this is a London fashion girl sporting high heels with bows at the ankle, a mini skit, wide brimmed hat, clutching a cup of coffee in one hand and her purse in another. 

Makes me start singing:  "There she was just a walkin' down the street, singin' do wah diddi, diddi dum diddi do" 
(I actually have a stamp with these words on it!! and you are singing it now too right??)

The set also includes the London phone booth, double-decker bus, Big Ben, the Metro symbol and a couple of other sentiments.

I stamped this lovely fashion icon onto hammered white cardstock (that comes from Britain via Amazon!) and colored some bits of her with Copics leaving it mostly black and white.

My card is a small slimline card - measuring 3 1/4" x 6"

So we hope you will join in - and show us your Clothing/Closet creations!  You'll find Mr. Linky and lots of wonderful inspiration from the rest of the talented DT over at Inkspirational!

You have until the end of Sept 8th to link up your card!

I'm also linking my card to the following challenge:

First time using this stamp set


Stamps: Hampton Arts
Paper: Hammered white card - Amazon, True Black - Papertrey Ink.
Ink: Nocturne - Versafine Clair
Accessories: Copics - E00,E33, R29

Saturday, July 15, 2023

Inkspirational Challenge #294 Moodboard - Paris Skyline

 There's a new challenge up over at Inkspirational #294.


I was inspired by the tan/blue colors, the Eiffel Tower and surrounding buildings. 


I used an Elegant Writer Speedball Calligraphy pen Fine Tip 2.0 mm to create the blue/pink haze over the city and around the buildings and sentiment.

You can look up Elegant Writer Calligraphy pens on YouTube to see how they work and how to use them.  Most show drawing with the pen and then using a water pen to activate the colors.  But I used it with stamps and a wet paint brush!

I stamped my Paris skyline with Nocturne Ink onto watercolor paper as well as the Paris sentiment and dried it with my heat tool to be sure it was really dry.  Then I used the Elegant Writer to outline the edges of the images - top and bottom edges as well as some inside lines on the buildings.  Then I used a paintbrush dipped in water and washed over the areas I had used the Elegant Writer on.  

At first it creates puddles of darker blue but when you blot it with a paper towel - it creates the pink and lighter blue look.  It's fun to play with it to see what it does!

I added a rub on sentiment "what a view' below the stamped Paris and a little black clay heart to the i on Paris. (it's not attached yet on the photo above!)

I bought this Elegant Writer years ago after seeing it used on Splitcoaststampers - tried it once then never used it again. (?)  I don't think I liked whatever I did and didn't try playing more with it. (Duh)
 
Something about the look of the photos on the Moodboard made me think of this watery result so I got the pen out to give it another try!

So show us how this Mood Board inspires you and link up your card over at Inkspirational!  You have until July 28th to enter.  Check out the blog where you'll find lots of other DT inspiration!  

Linking my card to:
We Love Stamping - anything goes option


Stamps:  City Scapes - Tim Holtz/Stampers Anonymous, "Paris" from Hampton Arts set.
Paper:  Watercolor paper - Canson Cold Press
Ink:  Nocturne Versafine Clair.
Accessories:  Elegant Writer 2.0 mm - Speedball, What a View Rub On - Tapelogy.com, paint brush, water, Tuxedo Heart - Honey Bee Stamps.

Tuesday, August 17, 2021

Faraway Places

 Today I'm joining in with the Paper Players Challenge 


A one layer card in black and white, stamped with 3 images of capital cities, Paris, Sydney and London along with a simple sentiment.  I think this qualifies as a masculine card with it's architectural buildings.


Stamps: City Scapes, Tiny Text - Tim Holtz/Stampers Anonymous
Paper: white - PTI
Ink: Obsidian - Altenew 

Monday, April 22, 2019

Three Little Notebooks - Eileen Hull's New Sizzix Notebook Die

Today I'm sharing 3 projects I made using Eileen Hull's fun new Sizzix Notebook Die!
It has JUST been released.
I made 3 little Notebooks -  an Address Book, a Travel Book and a Photo Book.  Each theme was inspired by the papers that I bought at Joann when I was shopping for design ideas!

They are easy peasy to assemble once you've decided on the purpose for your notebook!
All of them were made in the same basic way.
Here are a few photos of how I put them together.
I die cut the Notebook out of matboard and then cut two panels 8" x 5" out of patterned paper to cover the inside and outside of it.  For the pages I cut 15 panels of kraft card, each 7" x  4 3/4" and folded them all in  half to make 3 signatures of 5 pages each. 
(which when folded makes 10 pages in each signature!)
 I glued the paper to the front and back of the Notebook, smoothing the paper over the matboard and then folding them at the binding area and smoothing again where any 'pull aways' might have happened! Sometimes you have to trim a little off the edges after it dries if they don't quite match up!
  I tied 3 pieces of round elastic cord around the middle of the notebook - knotting them on the inside.  I slipped a signature under each of the elastics to hold them in the Notebook.
 Here is how it looks on the outside
 I die cut 26 small tags using Eileen's Credit Card Sleeve and tags die and stamped each one with a letter of the alphabet.
 I adhered one tab to each page. 
 Here's the view from the back.  I added a kraft border piece to the edge of the front and back. 
 Not only is that a design look - but also covers up any white showing if the patterned paper doesn't quite cover the matboard edge!
 I added a piece of white round elastic cord as a closure for the journal - knotting it around the binding cords so it won't fall off when untied!
The next two Notebooks were made pretty much in the same way as the first one above.

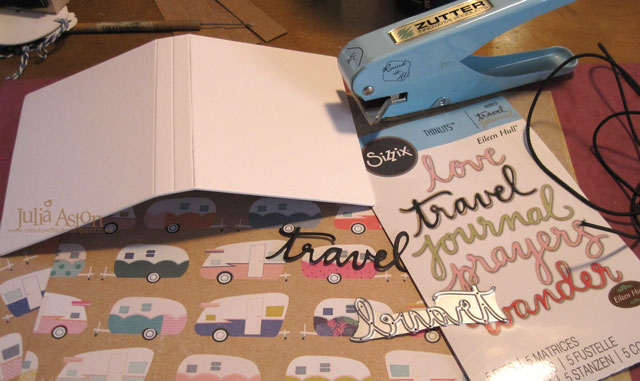
I used some fun camper paper (a nod to Eileen's camper Scotty!) for my Travel Notebook. I die cut the word 'travel' from Journaling Words for the cover.
 I cut some credit card pieces from Credit Card Sleeve and tags to use on a couple of the pages (shown below)
 I used two signatures in this Notebook, again using kraft paper cutting 8 pieces 7" x 4 3/4"and folding in half.  Each signature has 8 pages (4 folded in half)
 I again used a piece of white round elastic cord for the closure, knotting it around the bindings.  I added strips of colored cardstock on the edges.
 I slipped an Idea-ology map panel into this Credit Card sleeve (trimmed down) and added an 
Idea-ology 'play' Flashcard to the front.
On another page is a vintage Idea-ology Photo Booth photo slipped into a Credit card sleeve as well as an Idea-ology Pocket Card envelope and Idea-ology 'friend' Flashcard layered on the front.
 My third Notebook is for photos - using this fun camera patterned paper adhered to the inside and outside of the Mini Album die cut out of matboard.
On this album, when I folded it after adhering the pattern paper - the paper split along the binding as I had let it dry too much before bending it at the scoring (just the paper split not the matboard) -  so I  added a piece of black card stock to cover the binding area.  I added this cute photo of my 5 year old grandniece Mila enjoying an ice cream cone last summer framed in a die cut Polaroid Frame. 
I added a black round elastic cord as a closure on this album - knotting it through the binding.
I just added one signature of 4 white pages cut to 7" x 4 3/4" and folded in half - 8 total pages.
 A final view of my 3 little Notebooks! Pretty quick to cut and assemble!
These 3 Notebooks will also fit quite nicely inside of Eileen's new Treasure Box Die - a great way to keep them all together! 

Check out Eileen's blog all month where she is gathering all of the notebook projects created by the Inspiration Team!

I'm linking my Address Book to:


Address Book
Stamps:  Karen Foster Snap Stamps Alphabet - retired
Paper:  matboard, Kraft Paper Stack - Joann's, Ocean Tides - Papertrey Ink, Houses DP American Crafts - Joann's.
Ink:  Archival Jet Black
Accessories:  Mini Album Die, Credit Card Sleeve and Tags Dies - Eileen Hull/Sizzix, round elastic cord - Joann's, Tombow Glue, Word Window Punch - SU, Zutter Corner Rounder.

Travel Notebook
Paper:  matboard, Kraft Paper Stack - Joann's, Hibiscus Burst and True Black - Papertrey Ink, Camper DP American Crafts - Joann's, DP Bitty Big Blueberry Sky - Papertrey Ink.
Accessories:  Mini Album Die, Journaling Words, Credit Card Sleeve and Tags Dies - Eileen Hull/Sizzix,  Photo Booth, Flash Cards, Pocket Cards - Idea-ology, round elastic cord - Joann's, Tombow Glue, Word Window Punch - SU, Zutter Corner Rounder

Photo Notebook
Stamps: Karen Foster Snap Stamps Alphabet - retired
Paper:  matboard, white and True Black - Papertrey Ink, Camera's  DP American Crafts - Joann's.
Ink:  Archival Jet Black
Accessories:  Mini Album - Eileen Hull/Sizzix, Polaroid Photo Frame Die - Jillian Vance, round black elastic cord, Word Window Punch - SU, Tombow Glue, ScorTape, Zutter Corner Rounder.

Monday, June 25, 2018

Eileen Hull - Wrapped Journal Die - Wander

Eileen Hull has some wonderful new dies available now at your local retailer and available at Sizzix on July 5th.  They are called  Book Club Chapter 2 Collection.  Today I'm sharing a travel journal I made using her Wrapped Journal #662816 Sizzix Die.
I also used Eileen's new Journaling Words dies for 'wander' on the cover
and 'travel' and 'journal' on the first page
I tied an Idea-ology Word key (Journey) onto the jute binding.
I used Idea-ology Linen Ribbon for the journal closing allowing extra ribbon to accommodate the fattening as things were added to the journal pages!
I used ScorTape to adhere the ribbon to the back of the journal so it wouldn't get lost when untied.
Here's how the wrapped journal looks when opened up
Here's how I made it! 
 I cut the journal out of matboard and sponged the binding sides and all edges with Ranger Distress Salty Ocean.
I used blue ink to coordinate with the map pieces (from a National Geographic Magazine) that I cut to fit the cover pieces.  I sponged the edges of the map pieces with Gathered Twigs Distress Ink.
Then I adhered the panels to the cover.
I made 4 signatures of 4 pages each -  each page is 7" x 5" and folded in half (giving a whopping 64 pages to the journal!) cut from Wendy Vecchi Newsprint paper and Paper Stash/Correspondence by Tim Holtz.  I lined up the folds in the pages with the holes in the cover, marked where the holes were and punched through the pages.  I used Idea-ology black jute string (4 pieces of 17" each) to bind each signature to the cover, tying the knots on the outside of the journal.
Here are photos of all the pages.
Pockets for pressed flowers or photos


 Here is the center of the first signature where you can see the jute binding it to the cover.
 More pockets
 cards for notes

I used tags cut from Eileen's new Credit Card Sleeve and Tags die on some of the pages where I had envelopes or pockets so they could be found easily.  I looped a piece of twine through the holes on the tags.  Two of the tags are on the top of the pages, two are on the sides.


 Library pockets with ATC trading cards slipped inside for notes.
 Glassine envelope for small treasures
 Card stock pockets


Even with bits sticking out past the pages, you can still cleanly close the journal and nothing falls out!
The wrapped cover design gives lots of room for expansion as things are added to the pages.
I brushed Gel Medium over the map pieces to give the cover some protection from all the handling it would get while traveling!
Now I just need to go somewhere!!
 Please check out Eileen's blog where you will find lots of inspiration from the Inspiration Team using these fun new Book Club Chapter 2 Collection of dies!
They are available NOW at your local retailers and will be available at Sizzix on July 5th!

I'm also linking my book to:


Stamps:  Road Trip - Inkadinkado, Passport Please and The Place You Left and My Favorite Thing - Uptown Design Co., Scenic Route - Inky Antics, Journaling and Story of Me - Clear Art Stamps, Happy Trails and Take Note and Journaling Lines - Papertrey Ink, Journal du Jour - Art Stamp.
Paper:  White Little Sizzles Mat Board - Sizzix,  maps from National Geographi Magazines, Paper Stash/Correspondence - Tim Holtz, Newsprint Paper - Wendy Vecchi, Brushed Silver - Stampin Up.
Ink:  Ranger Distress Salty Ocean, Gathered Twigs, Black Hero Hues, Archival Jet Black.
Accessories: Wrapped Journal Die, Journaling Words Dies, Credit Card Sleeve and Tags Dies - Eileen Hull/Sizzix, Plane Die - Tim Holtz/Movers and Shapers/Sizzix, Wild Flowers Dies - Tim Holtz/Sizzix, Lead the Way Arrows Dies - MFT,  Idea-ology Black Jute String, Photo Booth Pocket Cards, Flash Cards, Word Keys, Linen Ribbon, Mini Brown Bag - Michaels, Glassine Bags - Papertrey Ink, Artist Trading Cards - Hampton Arts, Gel Medium - Dina Wakley, ScorTape, Quick Dry Tacky Glue - Aleenes, Bakers twine - the Twinery. Crop A Dile.