Showing posts with label Stamping Bella. Show all posts

Wednesday, February 28, 2024

Group of Seven Cardmakers - February 2024 Technique - Masked Stenciling

Today I'm sharing my cards made for the Group of Seven Cardmakers February technique - Masked Stenciling.

The technique was used by our Guest Designer Pat (Colorful Craft Creations) and you will find her card as well as instructions and samples from the rest of the Group of Seven team over at the GO7 Blog.

Here are the cards I created using the Masked Stenciling Technique.

I die cut an egg out of white card stock and adhered it over a panel of light pink cardstock with double sided tape to hold it in place.  Then I laid a Pebbles stencil over the panel and taped the edges of the stencil down to hold it in place.   I inked over the stencil with a blender brush using a slightly darker pink than the card.

I removed the stencil and then the egg mask from the panel.   I stamped the sentiment and added a floral rub-on above the sentiment.  

I added a tiny puffy chick sticker below the egg shape and edged the panel with Gold Pigment Ink.

Here are two more I made the same way but with Robins Egg cardstock, a darker blue ink and a Lavinia Charming stencil on the card on the left, Pebbles stencil on the right.


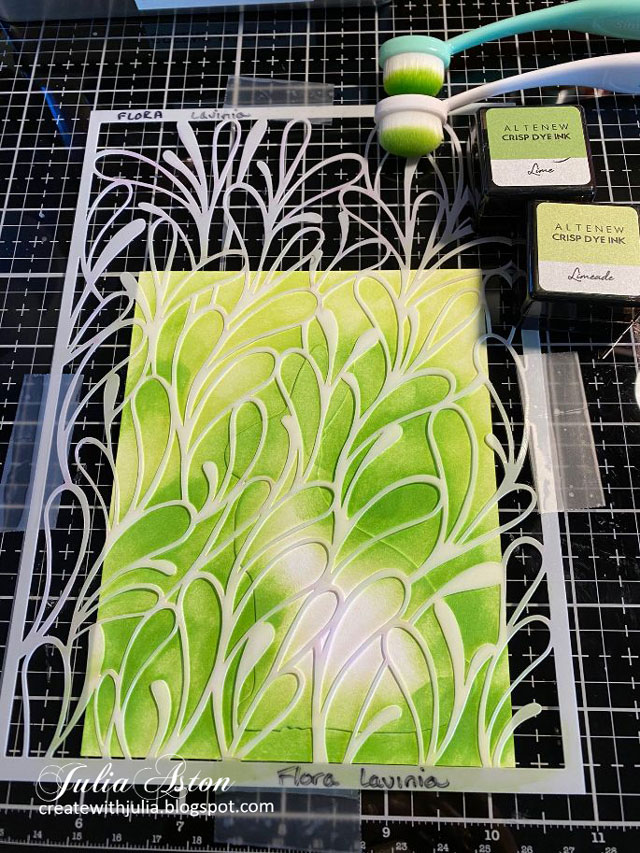
For my final card, I die cut a rabbit out of white card, laid it over a white panel, laid the Lavinia Flora stencil over the panel and inked through the stencil with two shades of green.  
I die cut the bow out of chocolate card and covered it with Glossy accents.
 I added two little die cut bunnies in Dark Chocolate card on the inside.


Here are photos of the 4 steps I used for all my cards below.  1) Die cut the rabbit (egg) out of white card and layer it over the white (blue or pink) panel, 2) lay the stencil over the panel with the mask on it, 3) ink through the stencil, 4) remove the stencil and the die cut mask.

The bonus of masking with a figure shape is that you get a partially stenciled mask die cut that you could use on a card!

NOTE:   in order to see the defined edges of the die cut egg and bunny mask - I used outline stencils that cover the whole panel.   
Example: This stencil below did not work with the bunny mask! 
(although it looks good on the bunny!)

We hope you will give this Masked Stenciling technique a try and that you'll link your card up over at the Group of Seven Cardmakers blog so we can see them! 

The GO7 team have used many different kinds of masks for this technique.

also linking this card below to 

Inspired by white flowers  
ends 2/28 11:55 pm  PST

Used Pebbles stencil  ends 3/2


Spotlight it  - Egg shape is spotlighted  ends 3/5

I'm linking this card below to:
Something beginning with B - Bunny and Bow  ends 3/17


Easter Egg Cards
Stamps:  Nestie Eggs - Waltzingmouse (retired)
Paper:  Pale Rose, Robins Egg - Bazzill
Ink:  Blush and Mountain Mist - Altenew, Gold Pigment Ink - Colorbox, Nocturne - Versafine Clair.
Accessories:  Egg die - Nestabilities, Floral Rub-On - Taperlogy, Little Chick Puffy Stickers - Nekoni. Pebble and Charming Stencils - Lavinia

Bunny Card
Stamps:  Chocolate Bunnies - Stamping Bella
Ink:  Lime, Limeade, Dark Chocolate - Altenew
Paper:  White - PTI
Accessories:  Flora Stencil - Lavinia, Easter Elements Bigz Die - Tim Holtz/Sizzix,  Enamel Dot - Altenew, Glossy Accents, foam dots.

Saturday, March 25, 2023

Inkspirational Challenge #286 Egg-stra Special

 It's time for a new challenge over at Inspirational #286 and it's a fun mood board for spring (spring IS coming right?!)

I was inspired by the pretty blue eggs!  
I cut my eggs using Tim Holtz/Sizzix Bird and Egg Colorize die set.   The little daisies are from the Bunny Games die set also from Tim Holtz/Sizzix.  I made my ship lap background using Shiplap Builder Dies from The Greetery.   The sentiment is from Stamping Bella stamped on a frame die cut with a Simple Stacker Frame die from Penny Black.

I adhered the shiplap strips to my card base using a sheet of Peel N Stick double sided adhesive.  I inked the eggs by rubbing Ranger Distress Oxide Speckled Egg Ink onto my craft mat, spritzing with water and then rubbing a panel of water color paper onto the mat (smooshing!).  Then I die cut the egg layers out of the paper.  The front egg is up on foam dots. 

So check out how the rest of the DT was inspired by the board over at Inkspirational!

You have until April 7th to link up your Mood Board inspired card.  Hope to see you there!

I'm linking my card to:
inspired by eggs and blooms on wreath
March Theme Anything Goes
Anything goes


Stamps:  Easter Sentiment Set - Stamping Bella
Paper:  Water color paper - Canson Cold Press, White Papertrey Ink, Green leaf - Color Core Distress paper pad - Tim Holtz/Ranger, Peel N Stick Double Sided Adhesive Paper.
Ink:  Versafine Claire Nocturne, Ranger Distress Oxide Ink Speckled Egg.
Accessories:  Bird and Egg Colorize Dies, Bunny Games Dies - Tim Holtz/Sizzix, Shiplap Builder Die - The Greetery, Simple Stacker Frames - Penny Black, foam dots, YR65 Copic.

Sunday, July 17, 2022

July CAS Christmas Card Challenge - Reminder

 I'm here today with my reminder card for the July CAS Christmas Card Challenge.  

Barb is our hostess this month and she wants to see Santa on our cards!


I embossed the circles background on my card base using Pin Point Ring from Poppy.  I layered the die cut Santa over the rings with foam dots.  I stamped the sentiment centered below the Santa. 
I added 3 clear gems to the outside edge of the rings. 


Please join us and link up your CAS creations featuring Santa!  You have until 7/24.


You'll find the challenge here.

Also linking my card to:

Merry Little Christmas Challenge


Stamps: Holiday Fun Sentiments - Stamping Bella
Paper: White, True Black - PTI, Red Hots - Bazzill, Tan and white textured card - Parklane.
Ink: Obsidian - Altenew
Accessories: Cool Yule Dies - Tim Holtz/Sizzix, Pin Point Ring - Poppy, foam dots, clear gems.

Wednesday, February 14, 2018

Surprise Pop Up

Last week the Technique Challenge over at Splitcoaststampers was to make a Surprise Pop Up Card.
I was so excited about it - I ended making 2 of them.
Here's how it looks closed
Then you pull the tab at the top and this happens!
How cute would this be sitting on a shelf or table? I colored little Hoppy Poppy with Tombow Markers - spreading the color around with Clear Glitter Wink of Stella so there's lots of sparkle 
(that you can't see in the photo!)
Then I needed a birthday card for a friend and had this King of the Grill stamp and die set that I have never used since purchase, probably 4 years ago??  I thought it was perfect for a male card.  This set is so fun with stamps for all the layers - burger, cheese, lettuce, ketchup and even an olive stuck in the bun!  I popped up the bun pieces on foam so it's quite dimensional!
And here's the surprise when you pull the tab.
You'll find the technique tutorial on YouTube here.


Thank You Card
Stamps:  Thank You Hoppy Poppy - Stamping Bella, "Pull" stamp from Jumping for Joy Set - PTI
Paper:  White, Pure Poppy, Spring Rain, DP Nostalgic Notions Collection - PTI, Bristol Smooth Surface
Ink: Hero Arts Black
Accessories:  Scor Pal, ScorTape, Cutter, circle punch foam dots, Pretty Panels #2 Die - WMS (retired)

King of the Grill card
Stamps:  King of the Grill - PTI, pull stamp from Jumping for Joy - PTI 
Paper: Dark Chocolate, Canyon Clay, DP Text Style Autumn Abundance - PT 
Ink:Simply Chartreuse, Classic Kraft, Canyon Clay, Cocoa bean - PTI 
Accessories:   foam dots, circle punch, Scor Pal, ScorTape, Cutter,    

Tuesday, July 14, 2015

A Girl and her Penguin

It's the middle of summer and I have another Christmas card to share!  I bought this Stamping Bella stamp, Mr. Penguin goes for a ride,  over a year ago because I thought it was SO cute!  Which it is -  but I keep forgetting that I really don't like to color very much (!) so this is the first time I've inked it up.  I colored the image with Copics.  I thought a little girl like this would have a sweet little pink winter coat with accents of purple - so my color pallet was decided!   I die cut the image with a Stitched Edges Rectangle die from Waltzingmouse and layered it over a piece of patterned paper with foam dots. The sentiment is from Nutcracker Sweets from WMS.
The tree has little round ornaments on the stamp but I decided to glue flower sequins over them.  Since this card is hot off the press - you can still see the glue in the centers - when it dries that will be clear!  They add a lovely shine to the card as well as a little dimension!
I'm linking my card to the Merry Monday Challenge - create a Christmas card with a penguin on it (this is the ONLY stamp I have with a penguin!)
 Deep Ocean Challenge Blog -  Christmas in July
 
Stamps:  Mister Penguin Goes for a Ride - Stamping Bella, Merry Christmas from Nutcracker Sweets - Waltzingmouse.
Paper:  White, DP Text Style Bitty Stars - PTI
Ink:  Archival Jet Black
Accessories:  Stitched Edges Rectangle dies - Waltzingmouse, Copics, Flower Sequins - Cartwrights, Scotch Quick Dry Adhesive, foam dots.

Monday, October 5, 2009

A Day of Card Making

Sit down with your cup of coffee for this one! I participated in the World Card Making Day over at Split Coast where they issued 12 challenges! Each challenge was posted by a Stamp Company that is affiliated with SCS. I was busy all day Saturday and couldn't stamp - so I had to get to work on Sunday - I only got 9 out of 12 done and posted by the midnight deadline - so here they are!

The Flourishes challenge was to use this sketch. I used stamps from the Halloween Party set by Waltzingmouse Stamps

Stamps: Waltzingmouse Stamps: Halloween Party
Paper: Ripe Avocado, white: PTI, DP SU
Ink: Memento Tuxedo Black, Ripe Avocado: PTI
Accessories: foam dimensionals, circle punch scallop circle punch,, sponge, orange zest twill: PTI, rectangle nestability

The challenge from Hanna Stamps was also a sketch. I used Cupcake Riley for mine.
Stamps: Hanna Stamps: Cupcake Riley
Paper: Scarlet Jewel, White: PTI, DP Basic Grey Bittersweet
Ink: Memento Tuxedo Black, Sweet Blush: PTI
Accessories: Prima flower, sponge, foam dimensionals, pinking circle nestibility, circle nestability, scarlet jewel ribbon: PTI


The Crafty Secrets World Card Making Day Challenge was to make something with dimension, to make it pop. I made a little journal book based on Lisa's tutorial here . The J in Journal, the glittery button and the inkwell are all popped up on foam dimensionals.
Stamps: Clear Art Stamps: Journaling
Paper: Vintage cream, scarlet jewel, DP Holiday Cheer: PTI
Ink: Chai: PTI, Memento Tuxedo black
Accessories: crop a dile, copics: G20, G21, R21, Y26, Y02, E51, E53, E35, BG10, Lacey punch: EK success, Scarlet Jewell Twill: PTI, Vintage button: PTI, Twine: PTI, glue dots, foam dimensionals


The Unity challenge was to use a quote on your card.
Stamps: Unity: Perfect in Every Way
Paper: Vintage cream, Rustic White: PTI, DP Cosmo Cricket/Earth Love Recycle
Ink: Dark Chocolate, Spring Moss: PTI
Accessories: Sponge, scor tape, glue dots, labels Eight Nestability, lace, twine: PTI, Vintage Button: PTI


This World Card Making Day challenge was from Stamping Bella and we had to show what we do with our girlfriends for fun - shopping of course!
Stamps: Charlotte Ketto: Stamping Bella
Paper: Pure Poppy, Ocean Tides, Vintage Cream: PTI, DP Cosmo Cricket/Early Bird Sunrise
Ink: Memento - Tuxedo Black, Dandelion
Accessories: dotted satin summer sunrise ribbon: PTI, foam dimensionals, glue dots, fence punch: Marth Stewart, Sakura Black glaze pen, oval nestabilities, sponge, dew drops, copics: R37, E51, RU11, R20, C1

Jenn and Biate's Split Coast challenge was to use chocolate or other browns, their sketch and to make it a thank you card.
Stamps: Autumn Abundance: PTI
Paper: Rustic White, Dark Chocolate, DP Bitty Dot Basics: PTI
Ink: Dark Chocolate;PTI
Accessories: foam dimensionals, sponge, square nestability, Labels 3 Nestability, copics: Y38, E35, E13, E59, YR24


This challenge by Verve was to use the colors in a country's flag (they showed us a web site of flags) - I used blue and white which are on the flags of Greece, Israel, Honduras and Antarctica.
Stamps: Verve Winter Wonder
Paper: Pacific Point: SU, White, DP Bitty Box Basics: PTI
Ink: Memento Tuxedo Black, embossing pad
Accessories: argyle Cuttlebug folder, hot gun, white EP, Rhinestone stickers, circle punches, foam dimensionals.

This World Card Making Day Challenge from Magnolia Stamps was to make an ornament. I used a Magnolia Tree for mine, decorated it with dew drops and glittered it with Dazzling Diamonds - this really sparkles IRL! not so much on my pic here!
Stamps: Magnolia Tree
Paper: Bazzill Green, White: PTI
Ink: Brilliance Pearlescent Ivy, Colorbox Dark Brown
Accessories: Dazzling diamonds: SU, foam dimensionals, crop a dile, eyelet, dew drops, satin ribbon pure poppy: PTI, glue dots, quickie glue pen


And finally - the My Favotite Things challenge was to use pink, black, white and bling. I used silver ribbon and silver stickles for my bling.
Stamps: MFT: Flopsy FLowers
Paper: WHite: PTI, pretty in pink: SU, DP Black & White basics: PTI
Ink: Memento Tuxedo Black
Accessories: Silver ice stickles, silver ribbon: PTI, foam dimensionals, copiics: T2, R32, R20, ribbon tag trio spellbinders, rectangle nestabilities
Thanks for looking all the way to the end here today!