Showing posts with label Addicted to Stamps. Show all posts

Monday, November 2, 2026

October 2026 Card Chain Challenge Reveal

 Today's the day all the cards sent world wide for the October Card Chain Challenge are revealed over at the blog.  Twenty nine cards were exchanged.

For October, I sent my card to Arlene in California and I received a lovely card from Linda in Michigan!

We are given design suggestions to help us get creative.   You only have to use one of the suggestions or you can combine as many as you like!

This month I used the suggested colors and one of the theme options - Fall.


And here's my card.

I created the circle using an acetate circle mask from Lavinia.  I sponged inside the circle with Ranger Distress Inks - Speckled Egg and Abandoned Coral.    Then I stamped the cabin stamp from Stamp Scapes using Portabello - Versafine Clair Ink.   I stamped and die cut the sentiment from Taylored Expressions and popped it up on foam dots beneath the image.  

I cut the white panel to 4" x 5 1/4" and layered it over an A2 white card base.

We invite you to join us for the November Card Chain Challenge -  you will find all the instructions on how to join in over at The Card Chain Challenge blog here.

Sign up for the November Challenge ends on November 6th.

Also sending my card to:

ends Nov 13th

ends Nov 10th


Stamps:  Rustic Structure Set - Stamp Scapes, Mini Strips Stamps: Harvest - Taylored Expressions.
Ink:  Speckled Egg, Abandoned Coral - Ranger Distress, Portabello and Nocturne - Versafine Clair.
Paper:  White - Papertrey Ink.
Other Supplies:  Acetate Circle Masks - Lavinia, Mini Strips Die - Taylored Expressions, foam dots, sponge inkers - Ranger.

Monday, August 4, 2025

Fairy Birthday Wishes

I have so many Lavinia stamps that I decided to get them out and make a bunch of cards for my stash and here is one of them!


I stenciled the background with Light Carnation ink from Gina K Design and I stamped the images with Morning Mist from Versafine Clair.    All the stamps are from Lavinia. I added pink enamel dots and heart.  The sentiment is up on foam dots.

I'm sending my card to the following challenges:

ends 8/14

inspired by the circles and pink colors
ends 8/15
week 1 - ink

ends 8/12


Stamps: Seasonal Tree, Quinn, Heart Felt Verses, Fairy Charms, Orchard Grass - Lavinia.
Ink: Light Carnation - Gina K Designs, Morning Mist - Versafine Clair.
Paper: White - Papertrey Ink.
Other Supplies: Semi Circles Mid Century Modern Stencil - Claire Brennan Design (retired), enamel dots and heart - Altenew, foam dots.

Saturday, April 12, 2025

Inkspirational Challenge #339 - Mood Board Decorated Eggs

 Hello everyone!  It's time for the newest Inkspirational Challenge #339 and, just in time for Easter and Spring - it's a lovely Mood Board of decorated eggs!

I was inspired by the red and blue eggs - using stamps from Nestie Eggs by Waltzingmouse (retired).

I stamped the large egg on red card with black ink and used blue and white POSCA pens to add those colors.  I stamped the smaller egg on Soft Stone card with Arctic Ink and added the pink with a POSCA pen. I die cut the eggs using Nested Eggs from Nestability.  I embossed the Soft Stone background using Feather Spiral Embossing Folder from Simon Says Stamp. All the die cuts are up on foam dots.

How do these decorated eggs inspire you?!  We'd love to see your inspired cards over at Inkspirational - where you'll find some lovely inspiration from the rest of the DT!

This challenge ends April 25.

Also sending my card to:


Easter   ends 4/13

Floral and spots  ends 4/23

Center Horizontal - any color - Free - Embossing
 Ends 4/24


Stamps: Nestie Eggs - Waltzingmouse (retired.)
Ink:  Nocturne and Arctic - Versafine Clair.
Paper:  Soft Stone, Pure Poppy - Papertrey Ink.
Other Supplies:  Feather Spiral Embossing Folder - Simon Says Stamp, Nested Egg Dies - Nestabilities,  blue, white and pink POSCA pens, Oval Punch - Stampin' Up, foam dots.

Saturday, September 28, 2024

Group of Seven Cardmakers - Stencil Monoprinting - Sept 2024

 It's time for the Group Of Seven Cardmakers September post.  This month we are playing with the technique of Stencil Monoprinting.  You will find links to how to videos over at The Group of Seven Cardmakers blog.

You can create beautiful backgrounds or focal points for your cards, depending on the design of the stencil.  Basically you are using the background of the stencil to create your panel.  You can leave it as is on your card, or you can place the stencil back over top to add different ink colors or embossing paste to fill in the design.

Due to the larger/longer sizes of the stencils I used, I made all my cards Mini Slimline size - 3" x 6".

Rosette Stencil from Tim Holtz/Stampers Anonymous - Salty Ocean Ranger Distress Ink
Gondola dies are Alexandra Renke
Illusion Twist Stencil from Altenew - Scorched Timber Ranger Distress Ink
Succulent Stencil from Stencil Girl - Mowed Lawn and Forest Moss Ranger Distress Inks
A few photos of how I made my backgrounds.
  
Rub water reactive ink (like Ranger Distress inks) over stencil and spritz liberally with water. For this panel I used two colors - Mowed Lawn and Forest Moss.  
This stencil is  6"x6" so I was able to make 2 mini slim line cards from it (3"x6")
Flip the stencil over onto a panel of watercolor paper and press over the stencil to help the watery ink absorb into the paper.
Remove the stencil and again press over the panel with paper towel or cloth to absorb any pools of watery ink.

We hope you'll give this stenciling technique a try!  We have a Mr. linky over at The Group of Seven blog so you can share your card with everyone.  We'd love to see what you create!


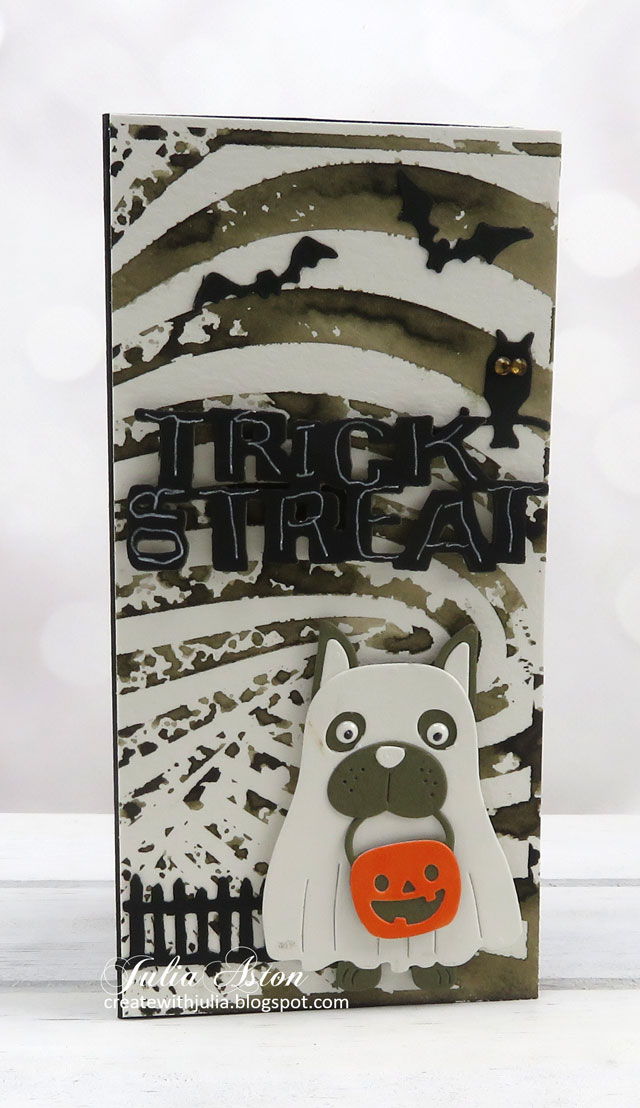
I'm linking my Halloween card to:
Fall Frenzy - anything Fall ends 9/28

First time using the ghost dog die


Linking my Gondola card to:
red and blue colors
ends 10/1

Linking my plant card to:
ends 10/2


Gondola Ski Christmas Card

Stamps: Two Feet Deep - PTI (retired)
Paper: Watercolor - Canson Cold Press, White, Pure Poppy, True Black - PTI
Ink: Salty Ocean - Ranger Distress, Nocturne- Versarine Clair
Accessories: Rosette Stencil - Tim Holtz/Stampers Anonymous, Die - Small Cable Car - Alexander Renke, foam dots, twine, paper towels or cloth, water mister.

Dog Ghost Halloween Card

Paper: Watercolor - Canson Cold Press, Olive Twist, True Black - PTI, hammered white (on ghost) - Amazon.
Ink: Scorched Timber - Ranger Distress.
Accessories: Illusion Twist Stencil - Altenew, Ghost Dog die - Amazon, Halloween Shadows - Tim Holtz/Alterations, orange Copic, foam dots, tiny gold gems - Gina Marie Designs, white enamel dots - Altenew, Black sharpie pen (pupil on eye), water mister, paper towels or cloth.


Succulent Cards

Stamps: Plant Kindness - Stampotique, Way to Grow - The Greetery.
Paper: Water color - Canson Cold Press.
Ink: Mowed Lawn, Forest Moss - Ranger Distress, Nocturne - Versafine Clair
Accessories: Succulents Stencil - Stencil Girl, Dimensional Plant Stickers - Recollections, water mister, paper towels or cloth.

Saturday, September 7, 2024

Inkspirational #324 - Designer's Choice - Using Markers

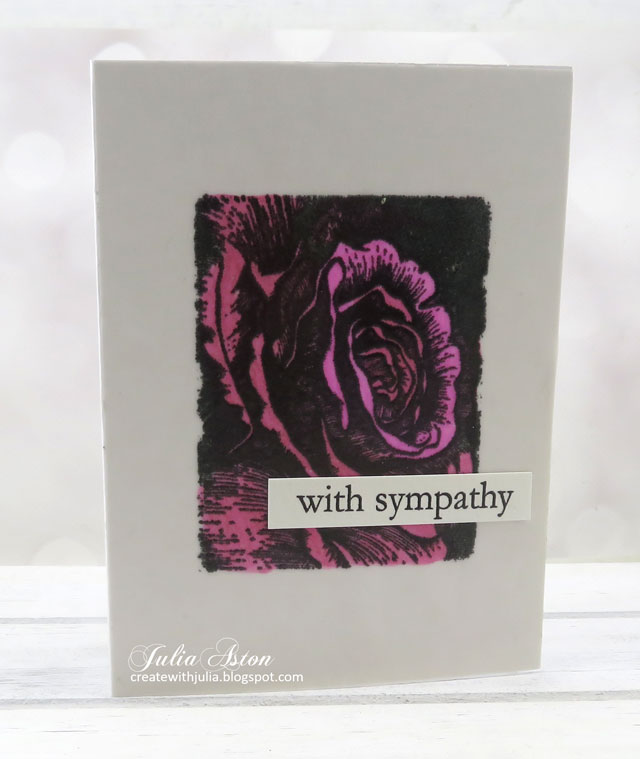
 Here's my DT card for the newest Inkspirational Challenge #324 Designer's Choice  -  Nonni is the Designer  this time and she chose - Make Your Mark - use markers on your card design.   


I used a coloring on vellum technique I learned last month as a member of the Group of Seven Cardmakers - see my post here to see other ways to use vellum.

I stamped the images onto panels of vellum using Nocturne Versafine Clair Ink which I then heat embossed using clear embossing powder.  Then I flipped the panel over and colored over the open spaces with Copics.  I adhered the vellum to the white card base using  an Adhesive Sheet from Sizzix.

This shows the vellum panel flipped over after stamping in black and clear embossing.  Then I just colored over the clear spaces.  Because it's vellum - I went over the colors several times and kept checking the front to be sure the colors showed through dark enough.   
The Bold Botanicals stamp set I used has 4 images - 3 floral and one a pinecone and pine sprigs so I tried each stamp coloring with different colors.
The photos below show how I colored on the back of the vellum panels with Copics.
This pinecone one will be a Christmas card!
Here's the coloring on the back.

So how do you use markers on your cards??  Please join us over at Inkspirational!  

The challenge ends on 9/20.

I'm also linking my card to:

1st time using the Bold Botanicals

Hand Colored Image ends 9/30

Linking my pine cone card to
ends 9/18

ends 9/17

ends 9/25


Stamps:  Bold Botanicals - Tim Holtz/Stampers Anonymous, With Sympathy from Beyond Basic Borders - PTI (retired)
Paper:  vellum, white card base - PTI
Ink:  Nocturne - Versafine Clair
Accessories:  Copics: E19, G28, YR23, YR09, RV06, RV19, YR23, Clear Embossing Powder, heat tool,  Adhesive Sheets - Tim Holtz/Sizzix