Showing posts with label Camping. Show all posts

Friday, September 5, 2025

Another Year of Adventure

 A friend asked me to make her a card to send to friends who go camping in a trailer.

I pulled out some barely used older stamp sets to create this camping in the forest scene.  She will write her own note inside the card.

The background is DP from Forest/Stamperia.  The stamps and die cuts are from Happy Camper and the sentiment is from Peek A Boo Pals Camp Wanna stamps from Avery Elle. The camper and wagon are popped up on foam dots.

I'm sending my card to:


Ends 9/10

week 1  Ink/Color medium 
I used Copics to color the images


Stamps: Happy Camper - MFT (out of business), Peek a Boo Pals/Camp Wanna - Avery Elle.
Ink: Nocturne - Versafine Clair.
Paper: White - PTI, Watercolor Paper - Canson Cold Press, DP - Forest/Stamperia.
Other Supplies: Happy Camper Die Set - MFT (out of business), foam dots, COPICS YR09, YG23, E35, E33, C6, T2, BG10.

Thursday, July 17, 2025

Camping in Summer

A friend asked me to make an anniversary card for her to give to her husband this year.  They have an RV and always travel in the summer in it so I thought these camping chairs and the road sign were appropriate!


Sending my card to:

Summer Holidays  ends 8/18

anything goes  ends 7/31

First time using these dies and stamps


D=dies


Stamps:  Lifes Great Advventures - PaperTrey Ink.
Paper:  White - PTI,  DP Forest - Stamperia.
Ink:  Nocturne - Versafine Clair, Sand Dune, Heart Beat, Rocky Shore, Dark Chocolate - Altenew.
Other Supplies:  Lifes Great Adventures Dies - PTI, foam dots, computer generated sentiment.

Wednesday, April 7, 2021

Blog Hop - Eileen Hull New Chapter 2 Sizzix Dies

Today Eileen Hull's Design Team members are having a blog hop highlighting her wonderful new Chapter Two Sizzix Dies!

 I'm sharing two projects I made using her Card: Waterfall and Tags Die set, one project using her Bookbinding and Label Die Set and one super fun 3D Camper!

I used the tag dies from Card: Waterfall and Tags set for this project as well as two of Eileen's dies from past releases:  Folio Page  Pocket and Flowers, and Bookplate Hinges and Labels.  
I made 3 sizes of pretty gift tags.
I will have a tutorial on how I put my tags together here on my blog in two weeks.
I used some beautiful shiny foiled papers from Rinea for my tags - layering the foil onto white card
The flowers are die cut out of Sculpting Foam from Sizzix and molded using a heat tool and molding tool.

Here's my 2nd project using the Waterfall Dies from Card: Waterfall and Tags set.   This time I made a waterfall of photos of my grandnephews and grandnieces from Easter 2019.  Such a fun way to display special photos!

My base is made from Eileen's Display Stand Die from a previous release and the scalloped edge along the top is from her Gift Box Scalloped Edge die

I will have a tutorial of how I put this together on a post here next week.
See all supplies listed below.

For my third project today, I used the Bookbinding and Label die inside a journal made using her older Passport Die!

The bookbinding die is a way for you to attach your pages inside a journal.  
This is what it looks like - die cut, fan folded and glued.
I trimmed it down to just 3 ridges to fit the width of the binding in the Passport Journal,
 and adhered it inside my journal along the binding piece.  
Then I glued the binding to the front and back cover pieces.  
Here's the front cover in.
I adhered two pages together along each ridge that sticks up.
  There was enough room inside the journal to add a little notebook on the back cover.
These are my pages adhered to the bookbinding die cut.


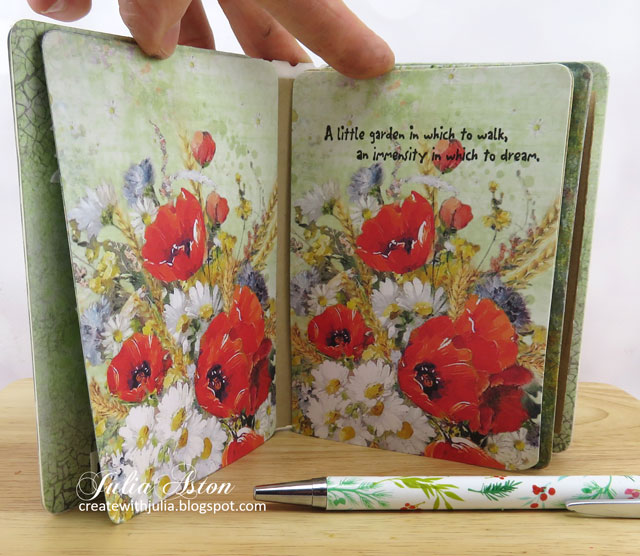
Here's the outside of my Passport Garden themed journal.  
I used a piece of soft black leather for the binding!
I will have a full tutorial of how I put this journal together on my blog here in a few weeks.
See all supplies listed below.

And finally, my happy little camper!  Views from both sides and the side where you can see the mints inside the little trailer!   This cute 3D camper box measures about 5 1/2" x 3 1/2".
I will have a tutorial on my blog in a few weeks.  
See all supplies listed below.


Gosh - are you overloaded with inspiration from these fun new dies??!  
Sorry I kept you so long!

Here's the list of designers participating in the hop - please check out all of the fun projects!  It starts with our fearless leader who explains the hop and prizes that can be won! 


Check out the Inspiration and Educator Teams’ takes on these dies! Click through the list below and see what they have come up with. Make sure to leave a comment on each of the designers’ posts and be eligible to win a $25 gift certificate in Eileen’s Etsy Shop! Join us on Facebook Live and YouTube Live for an up close and personal look at the team’s projects. ðŸ™‚ Eileen will also demo how to use the new dies during the show.

Don’t forget to join Eileen and special guests for a Facebook Live on Wednesday, April 7 at noon Eastern. Comment and be eligible to win $25 gift certificates in Eileen’s Etsy Shop! Winners will be announced on the Facebook Live show on April 13 at 6:00 EST. We appreciate your love and support, friends!


Tags
Stamps:  Sweet Celebrations - My Favorite Things, Birthday Basics - Papertrey Ink
Paper:  White - PTI, Double Sided Foiled Paper Starstruck and Glossy Textures - Rinea.
Accessories:  Card: Waterfall and Tags Dies, Folio Page Pocket and Flowers Die, Bookplate Hinges and Label Dies - Eileen Hull/Sizzix, Sculpting Foam - Sizzix, heat tool, molding tool, wrinkled seam tape.

Easter Waterfall Photo Display Stand
Paper:  Little Sizzles Matboard - Sizzix, White, Hibiscus Burst - Papertrey Ink, DP Cottontail 6x6 Pad - Authentique.
Accessories:  Card: Waterfall and Tags die, Display Stand Die, Gift Box Scalloped Edge Die- Eileen Hull/Sizzix, Easter die - Waltzingmouse (retired), Alphanumeric Dies - Tim Holtz/Sizzix, Bunny Ears Die - Impression Obsession, ScorTape

Garden Theme Journal
Stamps:  Stampotique, Tiny Text - Tim Holtz/Stampers Anonymous.
Ink:  Obsidian - Altenew, Ranger Distress Twisted Cintron
Paper:  White Little Sizzles Matboard - Sizzix, Kraft cardstock - Papertrey Ink, DP - Under the Tuscan Sun - Ciao Bella.
Accessories:  Bookbinding and Label Die, Passport Die - Eileen Hull/Sizzix, Wildflower Stems #1 - Tim Holtz/Sizzix, Ragged Daisiy Die - Poppy Stamps, Pebble Stencil - Lavina, black leather - Sizzix, UltraBond Adhesive - iCraft, Scortape, black elastic cord from stash, floral pen - The Greetery.

Camper Box
Paper:  Little Sizzles white Matboard - Sizzix, Star Stuck Metallic papers - Rinea, Silver Holograph Paper pad - JoAnn, Black Kraft Stock - Tim Holtz/Idea-ology, Vellum, Brushed Silver - SU, Dark gray from stash.
Accessories:  Camper 3D Die - Eileen Hull/Sizzix, Alphanumeric Tiny Type Upper - Tim Holtz/Sizzix, cat dies - Memory Box, Crimped Frame Die - The Greetery, door handles from Dashing Through the Snow Pick Up Truck Die - PTI, foam dots, ScorTape, Ultra Bond Adhesive - iCraft.

Tuesday, September 1, 2020

Life is Better Around the Campfire

This month Eileen Hull's Inspiration Team is creating Celebrate the Great Outdoors projects using her dies. 

For my project I've created a vignette of a Camp Site - using her retired (unfortunately!) Travel Trailer  Die. (you may find it on Ebay or Amazon).  I used her House Pocket die for the windows and door on the trailer and her Gift Box Scalloped Die to make the base and back piece of the scene.    

I have tons of photos I'm excited to share.

Here first, are views of my finished camp site.


Here are some photos of how I put it together. 
I die cut the pieces of the trailer out of Sizzix Mixed Media Board as well as Kraft Stock Metallic Paper from Tim Holtz.  I trimmed off the tabs on the silver pieces as they are just glued to the inside of the trailer.  I sanded the silver to make it a little less shiny.


 I cut additional 'tires' out of black cardstock and punched smaller circles of silver for hubcaps.  Then I adhered the tires on the inside of the trailer as shown below.


 Here it is from the front, you can see the tires


 I folded up the tabs and adhered one end to the trailer as shown, curving it to fit the edge.


I pressed  down on the top until the glue took hold.


Here it is with both sides adhered.  Then I put glue on the top tabs and pressed the other side of the trailer onto the tabs, adjusting them to the edge before the glue dried.
 

  Then I adhered the piece with the trailer hitch to the bottom
and here's the little trailer all ready to have it's windows or other decorations put on.

I die cut windows and a door out of silver metallic paper using Eileen's House Pocket Dies.  They are a perfect size for the trailer, but I could have just cut squares and rectangles if I didn't have these dies
I placed a piece of tape behind the windows and die cut more windows out of a light blue paper (it looks white here) I placed the blue 'glass' inside the frames held by the tape, then trimmed the tape off any edges.

I thought it would be nice to make a step up into the trailer and after fiddling around with a piece of silver metallic paper, I came up with this simple design

Here's a view from the side

And here it is on the trailer.  I glued the 1/4" end piece to the bottom of the trailer under the door.

I used Eileen's Gift Box Scalloped Edge die to create the base and back board for my scene.  I cut 3 of the box sides out of matboard and covered them with paterned paper. I wanted the front piece to be the sandy beach and the lake (or ocean) that the campsite was on.  I taped the two bottom pieces together with packing tape and then decided to add a full piece of cardboard to it for extra support.  I glued the bottom edge of the back piece onto the grass piece angling the sides in to create an enclosure.

I die cut trees from Tim's Village Landscape Sizzix Die and painted them with watercolor paints.  I die cut a camp fire and a coaster to put under the steps so no sand would get tracked into the trailer! (I ended up using a different piece of DP for my final mat.


To add a little dimension to my scene, I added some stones to the waterline, a deer and mushrooms around the trees, and I brushed Crackle Accents over the waves.   I removed the trailer for these photos so you could see the background.  The image panels are from Forest/Stamperia, the sentiment is from Taylored Expressions.

The white rocks are Art Stones from Prima and worked perfectly along my shore line.
The fire pit was made by die cutting two circles out of black fun foam and then cutting them again with a slightly smaller circle die and gluing the two pieces together.   The fire is a die from Taylored Expressions.  The mushrooms and flowers are from Field Notes Ephemera Snippets Pack from Tim Holtz.
I would love to be staying in this sweet little trailer right on the water!


You can see the crackle on the waves below.


I hope you have enjoyed seeing my little campsite - I really had fun creating it.   

Please check out Eileen's Blog every Wednesday in September to see what the rest of the Inspiration Team has come up with for our Celebrate the Great Outdoors projects!


Stamps:  Paddle Out - Taylored Expressions.

Paper:  Mixed Media Board, White Little Sizzles Matboard- Sizzix, True Black, Pure Poppy, Dark Chocolate, Orange Zest - PTI, Kraft Stock Metallic Silver - Tim Holtz/Idea-ology, Clouds and Grass Paper Pad - Joann, Cottage Stripes and Dots Paper Pad - Memory Box,  Beach Vibes Paper Pack - Honey Bee Stamps, River Rock Paper Pad - Provo Craft.

Ink:  Obsidian - Altenew

Accessories:  Travel Trailer Die, House Pocket Die, Gift Box Scalloped Edge Die - Eileen Hull/Sizzix, Circle Nestabilities, S'more than a Feeling Die - Taylored Expressions, Coaster Die - The Greetery, Bigz Die Village Landscape - Tim Holtz/Sizzix, plastic deer from stash, Neutral Candy Dots - SU, Black fun foam, Art Stones - Prima, Crackle Accents - Ranger, Beacon 3 in 1 Glue, Packing tape, Kuretake Water color paints, Ultra Bond Adhesive - iCraft.