Today I have a special Comfort and Joy Journal to share with you!
Eileen's design and education teams decided we all needed some fun in our lives right now so we put our heads together and came up with an event that you can participate in as much or as little as you'd like.
It's a challenge of sorts and we'd like to see you make a Comfort and Joy Journal for this season using any of Eileen Hull's Sizzix journal/book/box dies. Your journal could include activities, photos, recipes, shopping lists, daily thoughts, etc. Really, it can include anything you want; after all, it's your journal!
Every Monday, Wednesday, and Friday between November 27th and December 23rd there will be a post in the Eileen Hull Fan Club from one of Eileen's team members with a prompt for a journal page.
These prompts are meant to get your creative thoughts flowing and give you page ideas for your Holiday Journal. It might be in the form of a blog post, Facebook Live, recorded quick video, or a Facebook post in the group. It's up to you to take it from there and we can't wait to see what you come up with, so please share your covers and pages with us in the Eileen Hull Face Book Fan Club. So my prompt for Day 4 is to:
DOCUMENT SPECIAL ORNAMENTS
Those ornaments we put on our tree each year that have special meaning - perhaps inherited from our parents or they document special events over the years - children born, trips taken, home made, etc!
Sorry in advance - LOTS of photos!
First I'll show you how I made the shaker ornament - and then I'll show you how I put the Wrapped Journal together AND the ornaments I've put on the first few pages.
I happen to have these
Basic Cut Tag and
Window Cut Tag dies from Papertrey Ink - but you could use any ornament or circle dies to create this. You just need a solid back and the same size front that you cut out a 'window' . I cut out both a cardstock piece and a patterned paper piece for front and back. The backing piece will show through the window so chose your design to fit in the window.
(the red house will show through on mine)
Then I die cut a solid piece out of clear acetate for the window of the shaker
I glued the acetate to the back of the window piece and then put foam tape all around the opening and put in the various glitter items I wanted in the shaker window.
(I also put two pieces of foam along the bottom to support the open space when you put two pieces together)
I removed the covering on the foam tape and carefully placed the back piece over the front and pressed around the window opening to be sure the foam was sealing the edges.
And there's your shaker ornament!
And now to the journal - I used Eileen's
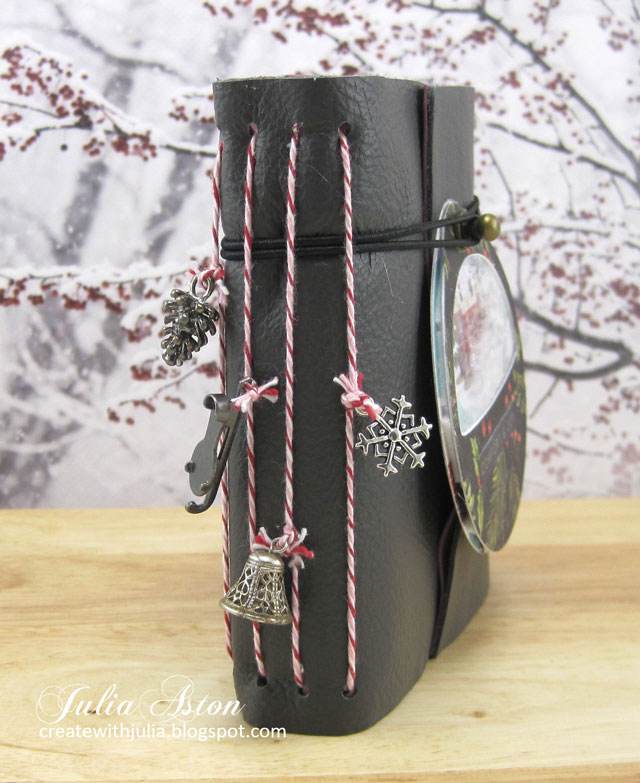
Wrapped Journal because with the 'wrap' design, the journal can expand as you add things to your pages that make it thicker.
I had some luscious soft dark grey leather purchased on Amazon that I used for the cover. I also die cut the cover out of
Sizzix Sculpting Foam to line the journal. It gives a little bit of firmness to the leather without being as stiff as matboard.
I glued the two pieces together with Beacon 3 in 1 Advanced Craft Glue. I laid the die over the glued pieces to hold them firmly while the glue dried.
I cut pages for my journal out of Rustic Cream cardstock. I cut 16 pieces, each one 8 1/2" x 4 1/4", scored them at 4 1/4" on the long side and folded in half to give me 32 pages. I made 4 signatures as there are 4 holes in the binding area of the journal.
I tied each signature into the journal with a 17" piece of Peppermint Twine, tying the knots on the outside of the binding.
(you can also knot them on the inside if you prefer a smooth look on the outside binding.)
I wanted to show you how the left cover piece is shorter than the pages - but that's ok because the right side 'wraps' over the pages which also allows for more thickness if you add items to your pages.
Here you see the covers wrapped over each other.
To adhere the ornament to the cover and to create a place for the elastic cord closure, I punched a hole in the top flap and screwed in a Hitch Fastener from Idea-ology.
This shows the screw on the Hitch Fastener going through the cover and the hole in the ornament.
(I later took off the twine as it was too 'busy' with the hitch and elastic cord!)
I cut a 24" piece of black round elastic cord. I tied the two ends together in a tight double knot.
I placed the knot end around the screw of the Hitch Fastener as I screwed the top on so the fastener would hold the elastic cord
Before tightening it completely, I slid the cord so the knot would be on the back of the journal and not so noticeable.
I brought the looped end of the cord around the back, under the binding strings and hooked it over the Hitch Fastener on the front.
This way, when you pull the loop off the hitch, the journal flap on the right can open and the cording stays on the journal so it can be easily closed again!
I added charms to the binding twines - a pinecone, an ice skate, a bell and a snowflake!
And now for the ornament pages in my Comfort and Joy Journal.
I stamped the front page using
Quoted: Favorite Things Stamp Set from PapertreyInk. I added an ornament sticker on a foam dot and framed the panel with DP and red cardstock.
I'm going to journal on my pages about the ornaments but haven't done that part yet!
I have to practice my neat printing skills!
My first ornament to document is one my father (who was born in 1914) had on his family tree growing up. I'm not sure if it was one his parents had from their families or if it was new as my father grew up. He passed unexpectedly at the age of 67 in 1981 so this has been particularly special over the years.
I store it in a separate box in my big ornament box as it is paper thin and has lost most of it's bright red color!
This little stocking (2"x2") was made by my son, Joshua, in 1983 when he was 6 years old. My sister and I always did crafts with our kids and this is one we made out of a flour craft dough (flour, Elmers Glue and I forget what else!) cut with a cookie cutter, baked and painted.
Somehow this one has survived the years without crumbling apart!
I'm glad I thought to put the date on the back!
This angel is actually a vintage gift tag that my mother-in-law, Marge, put on a present to me one Christmas - she saved everything, buttons off old coats, pieces of broken jewelry and boxes of old cards/tags which she would repurpose! I was lucky enough to inherit her button/jewelry box.
She passed in 2012 at the age of 97 so it's nice to have a memory of her on our tree.
Kent and I purchased this cute boat ornament from Mystic, CT which was one stop on our Honeymoon in 1997. A happy 2nd marriage for both of us.
In the past, I often bought Christmas ornaments when I was on vacation, no matter what time of year it was!
This is another one of my dad's family ornaments dating at least to 1914 - my sister had this one for her tree and when she passed suddenly 4 years ago, I luckily found it in her Christmas box when my nieces were clearing out her home. Another fragile one kept inside a specially labelled box!
Here are my 4 signatures inside my journal bound with the twine.
So I hope I've inspired you to create a Comfort and Joy 2020 Journal - and perhaps you have some special ornaments or decorations that you'd like to document on some of it's pages?!
Remember, you'll find page prompts every Monday, Wednesday and Friday over at
Eileen Hull Fan Club Facebook where you need to join but you just need to request it.
I hope everyone is finding some Comfort and Joy in this wonderful season of Christmas even though it is so different this year!
Stamps: Quoted: Favorite Things Stamp Set - PapertreyInk.
Paper: White, Rustic Cream, Pure Poppy, Pine Feather, Clear Acetate - PapertreyInk, DP Christmas Paper Stash - Tim Holtz/Sizzix
Ink: Obsidian - Altenew
Accessories: Eileen Hull Wrapped Journal - Sizzix, dark gray leather - Amazon, Blossoms Set Sculpting Foam - Sizzix, black elastic cord, Metallic Stickers: Holiday Talk, Adornment Skates, snowflakes and Pine Cones, Hitch Fastener - Idea-ology, bell charm from stash, Basic Cut Tag Die, Window Cut Tag Die - Papertrey Ink, 3D ornament sticker - Paper House, Peppermint Twine - the Cat's Pajamas, foam tape, photos of ornaments, Beacon 3 in 1 Advanced Craft Glue, Frosted Flower Sequins - Honey Bee stamps, Iridescent Mini Star Confetti - Pretty Pink Posh, Snow Crystals - PapertreyInk.


.webp)
.jpg)
.png)