Thursday, October 29, 2020

A Vintage Journey - Tag Friday

It's the 5th Friday in October and whenever there is a 5th Friday in a month -  we celebrate by having a Tag Friday over at A Vintage Journey!

My skater got a little lost with the matching colors of the background - so I outlined him with a White Stabilo Pencil to give him some definition.  I actually did cut him out of several different colors to try but this looked the best to my eye.  (He is ONE with the forest!)

Here are a few process photos.

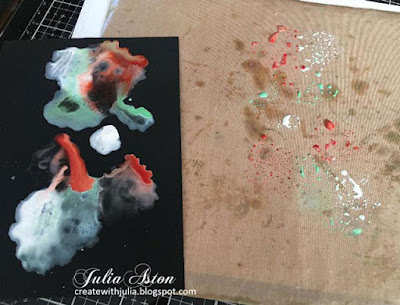
I scooped small amounts of spray inks out of the bottles onto my craft mat leaving some distance in between the colors.  I used Dylusions White Linen Spray Ink and Distress Oxide Spray inks in Cracked Pistachio and Fired Brick.

I pressed a panel of Matte Black Yupo paper onto the colors and rubbed over the panel not moving it around, just wanting to spread the circles of color.  This is how it looked when I lifted it up after the first press.

Then I pressed the black areas, one at a time, into what was left on the craft mat and ended up with this.  You never really know how a panel will look at the end - each time it comes out differently!

I die cut my panel with Tim's Tag and Bookplates die.

Then I die cut the trees and my skater from Tim's Thin Ice Die - cutting the skates and hat again out of the pink.  I cut a holly and berries using dies from Winter Wardrobe to decorate his hat and scarf.


I splattered the trees with black water color paint, colored the skate blades with a Krylon Silver Leafing pen and also added circles of the Krylon to the background for a little shimmer.  I added white berries and skate lace holes using Nuvo Simply White Crystal Drops and a Clipping Stickers:Christmas sentiment!  I adhered my tag to a slightly larger piece of the pink paper and tied a piece of wrinkled seam tape through the hole.  The skater is popped up on foam dots.

Come and see all the beautiful tags the Creative Guides have to share with us over at A Vintage Journey -  you'll find the post here!


Paper:  Kraft Stock Classic Paper Pad - Tim Holtz/Idea-ology, Matte Black Yupo Alcohol Ink Paper - Ranger, white - Papertrey Ink.

Accessories:  Tag and Bookplate Bigz Die, Thin Ice Thinlit Dies, Winter Wardrobe Thinlit Dies - Tim Holtz/Sizzix, Distress Oxide Spray Ink Cracked Pistachio and Fired Brick, Dylusions White Linen Ink Spray, Craft Mat, black water color ink, water, brush, Nuvo Simply White Crystal Drops, Krylon Silver Leafing Pen, White Stabilo Pencil, Clipping Stickers: Christmas - Tim Holtz/Idea-ology, Ultra Bond Adhesive - iCraft, foam dots.

Wednesday, October 21, 2020

Zoom Class Using Embossing Folders Blog Hop

I recently met on Zoom for a creative craft class with some of my fellow CAS Christmas Card Challenge design team friends - Loll, Marcia, Coleen, and Linda to learn some fun techniques using Embossing Folders.   Nancy was unable to join our zoom but did work with the techniques we discussed.

Here are the cards I made.

Embossing Folder Stamping

For both cards below, I inked the inside top of the embossing folders with a Distress Oxide Ink, spritzed liberally with water  then laid a panel of watercolor paper over the watery inking.  I put a piece of computer paper over the water color panel on the open EF and rubbed gently over the whole piece so the water color panel would absorb the watery ink.  Then I lifted the water color panel off the EF to see how it looked.  Some embossing folder designs work better than others so it can be a hit or miss.   

For the card above I used Peeled Paint DOX ink pad and Holly EF from Provo Craft.  I love how the ink pooled creating darker areas in some spots. You can't control how it will look so it's always a surprise and never the same twice!
For the card above, I used Vintage Photo DOX ink pad and Tall Pines EF from Tim Holtz/Sizzix.  Love how the ink on this one shows bare patches and swirls of lighter and darker color.

Double Dry Embossing

For this technique I embossed a white panel with one embossing folder and then embossed it with another one.  Again you have to play with your various embossing folders to see which ones work best when layered over each other.

For the card above, I embossed with 3D Texture Lumber EF from Tim Holtz/Sizzix and then embossed with Holly EF from Provo Craft.
For the card above, I embossed with Script EF from Provo Craft and then embossed with Tall Pines EF from Tim Holtz/Sizzix
For the card above, I embossed with Dots EF from Darice and again used the Tall Pines EF.  The pines seem to work well as they have a blank space on the right so you can really see the first embossing.
 
I die cut all three cards using Pierced Feature Frames Rectangles from PTI.  And used Small Talk: Occasion Stickers from Tim Holtz/Idea-ology for the sentiments.

Embossing Toilet Paper

We never would have tried this technique in March when there was no TP available!   

I folded over toilet paper to make 4 layers (4-6 layers work well).  I spritzed water over the top of the folded pile, flipped it over and spritzed over the other side and then put it aside to dry thoroughly. Then I embossed it.  It comes out feeling and looking like home made paper!  

I used the same embossing folder on both of my cards using this technique.  The embossing folder is Flower Heart Doodle from Sizzix.   I left the top card plain.   I sponged over the bottom card with Ranger Distress Seedless Preserves and Tumbled Glass.
 

Faux Patina

For this technique you choose 3-4 colors of ink pads to use - I used a light tan ( River Rock - SU), a blue (Taken with Teal - SU), and a green (Always Artichoke - SU).  

First you rub your light ink pad over the inside of the top piece of your embossing folder put a panel of white card in the folder and emboss it.   Then you sponge over the embossing with the other 2 or 3 colors you have chosen.  The last step is to press Versamark ink lightly and randomly over some raised areas and then emboss with gold or silver embossing powder.  

Note: Be sure the ink is dry on your panel and go over it with a powdered Embossing Buddy pillow before putting on the Versamark and embossing powder.  You can brush off any powder that sticks in areas you don't want the gold/silver on before using your heat tool.

Below shows the layers after using each ink -  on the left is the result inking the inside of the EF cover and running the panel of white card in the EF through your machine.  The panel on the right shows the 2nd step of sponging lightly over random areas with the blue.
Below, the left the panel has now been sponged with the darker green.  On the right it has been heat embossed in random areas with gold embossing powder and it's done!
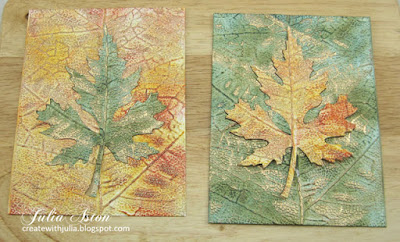
As a variation, I made two more panels using Leaf Veins 3D Embossing Folder from Sizzix. I used Ranger Distress Scattered Straw, Wild Honey and Fired Brick (in that order) on the panel to the left below. I used the same inks as my FA LA LA card on the panel on the right.
Then I used Layered Leaf Die from Sizzix and cut out a leaf on each panel - I tried to line up the center vein on the panel with the center of the leaf as best I could.
Then I laid the green leaf inside the cut out on the yellow panel and the yellow leaf inside the cut out on the green panel.
I really like how both cards look!
I layered both the panel and the gold embossed sentiment strip to metallic gold card

I hope you have found new ways to use your embossing folders here today and will get some of your own EF's out and make some cards!  

You'll find inspiring samples from the other ladies on their blogs linked here!

Loll

Linda

Colleen

Marcia

Nancy


Thursday, October 15, 2020

Winter Wonderland - Oct CAS Christmas Mid Month Reminder

Just a quick reminder from me to you today - there's still time to make a CAS Christmas Card for Christine's CAS Christmas Birds challenge!
I used the same cardinal stickers I used for my first card this month - but this time he is perched on a branch in a sparkly winter woods!
Another CAS design using a recently rediscovered Winter Woods Cover Plate die from PTI hidden in with the stamp set of the same name!   I die cut it out of white Glitter Cardstock and adhered it to my white card base.   I added the cardinal with the foam dot that is already on his back.  The sentiment is a Small Talk sticker adhered to a strip of black card.

A lot of sparkle IRL!

You have until 10/24 to join us with your Christmas Bird CAS card!  Here's the link!


Paper:  White, True Black - PTI, White Glitter Cardstock - Michaels
Accessories:  Winter Woods Cover Plate Die - PTI, Cardinal 3D Stickers - Michaels, Small Talk/Occasions Stickers - Tim Holtz/Idea-ology, foam dots.

Monday, October 12, 2020

Tea Cup and Post Box Tutorials - Eileen Hull's New Chapter 4 dies

 I'm back today to post tutorials on how I put together my projects using Eileen Hull's new Chapter 4 Sizzix Dies -  3D Tea Cup and Post Box that I posted here two weeks ago for the release party.


First I die cut all the pieces and then cut one more cup so there's a front and back.  I didn't use the tea bag tag from the die.
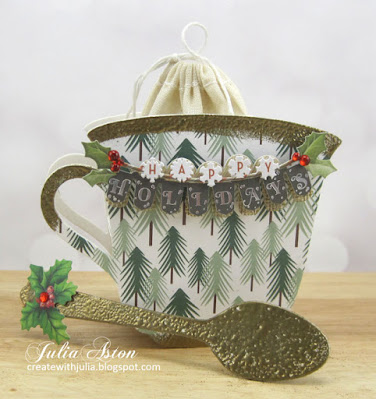
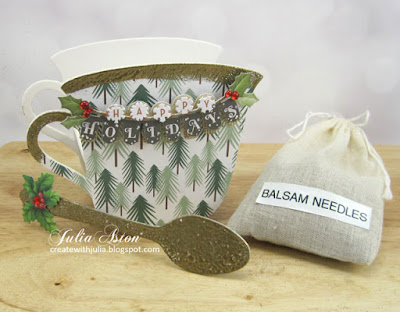
I die cut two pieces of patterned paper to cover the fronts of the cups.  If the pattern of your paper  is directional like mine (the trees have to be right side up and the handle on opposite sides) be sure you lay the paper the correct way before cutting!  I just measured and cut the two pieces for the sides of the box piece and did not cover the center part that will be on the bottom.  Again, be aware of the direction of your paper pattern.  I embossed the spoon and edges of the tea cups using Eileen's Golden Rod Molten Dimensions embossing powder
I had a bag of Balsam Needles that I got at a garden shop (Amazon has some as well) and put some in a little muslin bag I got on line to put inside my teacup.   I added a Happy Holiday banner Sticker to the top of the cup.  I cut out a holly from another cardboard sticker I had in my stash to put on the end of the spoon.


And here's how I put together my Notes for Santa Post Box.

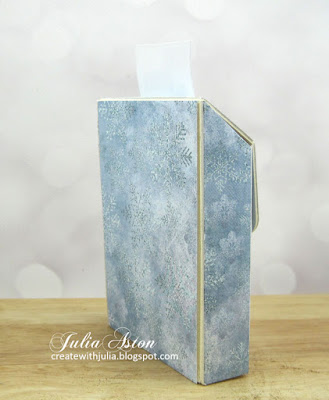
From the back.
This goes together in minutes!  
I die cut the one-piece box out of Little Sizzles Matboard, then I die cut the box out of patterned paper.  I cut the patterned paper into sections before adhering it to the matboard as sometimes I find that if you use a solid piece of paper - it can tear a bit when you fold on the score lines because it's stretching to bend. I adhered each piece with glue to the mat board, folded on all  the score lines and adhered the tabs that overlap to make the box.  You want to put the adhesive on the inside of the pointed tabs shown on the right bottom of this photo adhering them to the tabs on the back portion of the box.  That puts the fold of the tabs on the front and looks better.
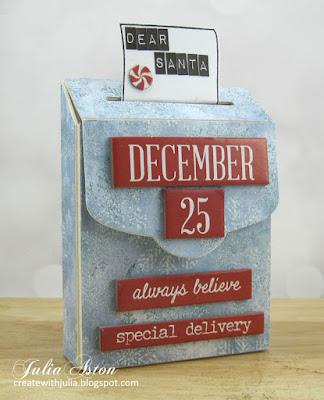
I had the perfect stamp to use for my note to Santa -  it fit perfectly in the slot.  I stamped it and cut out just the paper piece close to the edge so it looked like a curvy piece of notepaper. I attached it to the inside of the slot with a piece of tape.  I could have just cut a strip of paper and used that as well! 

I added a little strip of sticky back Velcro under the flap to hold it closed.  I adhered the Quote Chips to the front as well.  An easy to make little box for gift cards, a place to put prayers, small gifts, letters to Santa  - I'm sure you can think of even more uses!?!  

The box measures 3 1/4" x 4 3/8" x1 1/8"

Please check out Eileen's blog every Wednesday this month - to see all of the projects and tutorials using these exciting new dies!

Are you a member of the Eileen Hull Fan Club? Join over 5,000 other members to share ideas, inspiration, sources, challenges and make some fabulous friends – make sure to answer the questions! Watch her Facebook Live at Eileen Hull Designs on Tuesdays at 6:00 Eastern and Thursdays at 4:00 to for project ideas, techniques, inspiration and creative community. Additionally, you can also find Eileen on FacebookInstagram and Pinterest.


3D Tea Cup

Paper:  Little Sizzles White Matboard - Sizzix, DP - Patterns and Pine 6x6 Paper Pad - Catherine Pooler.

Ink:  Versamark

Accessories:  3D Tea Cup Die - Eileen Hull/Sizzzix, Happy Holidays Stickers - Jolees Boutique, Holly sticker - K and Co., Golden Rod Molten Dimensions embossing powder - Eileen Hull/Emerald Creek, Heat Tool, Balsam Needles - Garden Shop or Amazon, Muslin Bag - purchased on line, Ultra Bond Adhesive - iCraft.

Post Box

Stamps:  My Type - Hero Arts

Ink:  Obsidian - Altenew

Paper:  Little Sizzles White Matboard - Sizzix, DP North Wind 6x6 Paperpad - Craft and You.

Accessories:  Post Box Die - Eileen Hull/Sizzix, Tombow Glue, Quote Chips: Christmas, Label Letters - Tim Holtz/Idea-ology, Chipboard Peppermint sticker - K and Co.

Saturday, October 3, 2020

October CAS Christmas Card Challenge - Christmas Birds

Today I have a card to share for the October CAS Christmas Card Challenge.  Christine is our creative and talented hostess this month and she wants to see Christmas birds!
I used a cardinal for my Christmas bird - one of my favorite birds summer or winter, but they do look so lovely with their bright red against the sparkle of snow!  
This cardinal is from a 3D sticker set I found at Michaels.  There are 9 cardinals in the package, two different sizes and some facing left, some facing right - they are plastic and the wing is popped up on a foam dot.  I love their little feet too!  I bought them months ago just because I loved them - and this little cardinal was perfect for this months challenge!
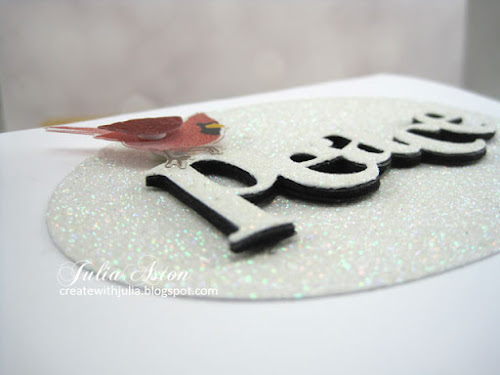
I die cut the oval and the Peace (both from PTI) out of white Glitter Card stock from Michaels.  I die cut another PEACE out of  black Fun Foam and glued the glitter Peace on top of the foam - this gave the word depth and also defined the edge so it can be seen being white on white.  I added an extra foam dot to the one that came on the cardinal since it's popped up on the thick word. I used glue on the dot as well as the back of the PEACE so it would stick to the glitter card.
 
I love the cardinals little feet perched right on the P!  This card is very sparkly IRL but it does not show up well in the photo.
Here are some close ups


This was such an easy card to make but looks quite impressive I think?!!

So please join us in getting those Christmas cards done before the rush (it's already October people!!), and share with us your Christmas Birds on your CAS design cards!

You'll find lots of inspiration from the Design Team as well as our October Guest Designer over at the CAS Christmas Card Challenge here.


Paper:  white - PTI, White Glitter Cardstock - Michaels.
Accessories:  Pierced Feature: Ovals die,  Wonderful Words: Holiday - PTI, foam dots, black Fun Foam sheet - Darice, Cardinal Stickers - Michaels, Ultra Bond Adhesive - iCraft.

Thursday, October 1, 2020

Eileen Hull's Chapter 4 Sizzix Dies Blog Hop - 3D Tea Cup and Post Box

Eileen Hull's Inspiration Team is so excited to share the news that Eileen has two new Chapter 4 Sizzix Dies being released soon - and we are joining in a blog hop and a FB Release Party to show you lots of ways to create with them!


The new dies are 3D Tea Cup and Post Box -and will be available in October. Here are the projects I made using each one.  I made mine for Christmas time!

I made a little holiday gift  using the 3D Tea Cup Die - perhaps for a hostess gift or a little present for a friend or loved one.   

The teacup has a front, back and sides to make it a box and measures 4 1/8" x 3 3/8" x 1 3/4" 

You can also just use the teacup front on a card, create a garland or use it as a book cover.

I filled a muslin bag with pine needles (purchased at a garden shop also available on Amazon)  and placed it in the teacup!  Not to drink (!) but to give that lovely pine smell when it's picked up and squeezed!

I used the new Post Box Die to make a little 'mail box' for a child (or an adult!) to put their note to Santa in.  

This cute box measures 3 1/4" x 4 3/8" x 1 1/8".

I used Velcro to hold the top flap closed.

Next week I'll be posting brief tutorials on how I put these two projects together (they were both very simple!), here on my blog, so I hope you'll check back -  but for now we'd love you to go on the blog hop!

Here are the links to the Design Team's blogs participating in the hop. 

 Leave a comment at each stop and at 12 noon EST on FB live at Eileen Hull Designs for a chance to win one of the new dies!  Two random comments will be chosen!

Eileen Hull

Tonya Trantham

Elizabeth Robinson

Julia Aston:  you are here!

Pam Bray

Maggi Harding

Lisa Hoel

Anna-Karin Evaldsson

Karen Bearse

Susie Bentz

Jenny Marples

Mitsyana Wright

Jennie Atkinson

Anita Houston

Madeline Arendt

Sarah Lizzie Dodd

Sue Eldred

Debbie Bankston


3D Tea Cup

Paper:  Little Sizzles White Matboard - Sizzix, DP - Patterns and Pine 6x6 Paper Pad - Catherine Pooler.

Ink:  Versamark

Accessories:  3D Tea Cup Die - Eileen Hull/Sizzzix, Happy Holidays Stickers - Jolees Boutique, Holly sticker - K and Co., Golden Rod Molten Dimensions embossing powder - Eileen Hull/Emerald Creek, Heat Tool, Balsam Needles - Garden Shop or Amazon, Muslin Bag - purchased on line, Ultra Bond Adhesive - iCraft.


Post Box

Stamps:  My Type - Hero Arts

Ink:  Obsidian - Altenew

Paper:  Little Sizzles White Matboard - Sizzix, DP North Wind 6x6 Paperpad - Craft and You.

Accessories:  Post Box Die - Eileen Hull/Sizzix, Tombow Glue, Quote Chips: Christmas, Label Letters - Tim Holtz/Idea-ology, Chipboard Peppermint sticker - K and Co.