Sunday, August 18, 2019

August Mid-Month Reminder: CAS Stencil - Sprays

Hi all!  I'm here today with a reminder post about the CAS Stencil Challenge - you still have time to join in!  The challenge ends on 8/24!

Robyn is our wonderful hostess this month - and she wants to see us use our Spray Inks!  We all have them right?!!  Let's get them out and use them with our stencils! 
You can make your own ink sprays by adding water to some reinker in a spray bottle, or adding anything like Brushos to water in a spray bottle.  Experiment with what you have!
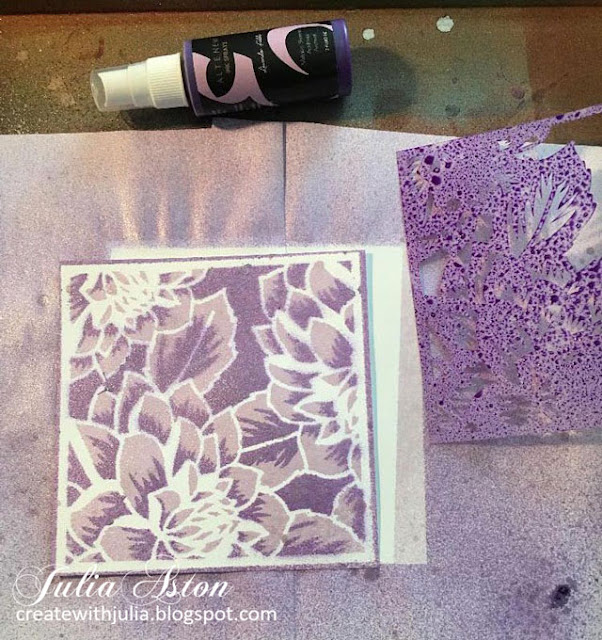
So for my reminder card -  I decided to use these beautiful Layered Dahlia Stencil A and Layered Dahlia Stencil B from Altenew.
The A stencil has more open space on it - so you ink that one first and you use a lighter color.  I used Altenew Soft Lilac Metallic Ink Spray over Stencil A.
(I use an old pizza box lined with some computer paper to contain the spray!)
(I tried making a monoprint by pressing the inked stencil onto a clean panel of card stock - but it didn't give a good result - I think because the stencil is so open - the lines did not give any kind of recognizable design.)

I let the first spray dry (didn't take long and you can also hit it with your heat tool), then I laid Stencil B over the panel matching up the image and sprayed over it again, this time using Altenew Lavender Fields Metallic Ink Spray, and just look at this gorgeous result!  
These metallic ink sprays have a shimmer to them that I try to show with an angled photo of my card further below.
So, to make it CAS - I hated to cut the 6"x 6" panel into smaller panels and  I made two cards.  The bloom was so large that I couldn't make it any smaller than this without making it an abstract print!  
I added a die cut hugs and stamped the first part of the sentiment on a punched strip.
Here's a tilted view to hopefully capture the pretty metallic shimmer to the colors
The lovely Quilted Backdrop Die is from Lawn Fawn.

So show us how you use all those sprays you have in your craft room with your stencils!  You'll find links to technique videos as well as lots of inspiration from the creative design team, along with our two Guest Designers this month -  Hilary and Amy over at the CAS Stencil Blog!
The challenge is open until August 24th!

I'm also linking my card to:
my occasion is sympathy

Inspired by the colors


Stamps:  Casual Comfort: Cas-ual Fridays Stamps.
Paper:  White, Lilac Grace - PTI
Ink:  True Black - PTI,  Metallic Spray Inks Soft Lilac and Lavender Fields - Altenew
Accessories:  Quilted Backdrop Die - Lawn Fawn, Scripted Words Dies - Altenew, foam dots, Tombow Glue, word window punch - SU. 

Sunday, August 11, 2019

Life is Better with Flip Flops!

All this month, Eileen Hull's Inspiration Team will again be posting projects using her new products.  Today I used the cute tag house from her House Ornament Die as well as some her new Blends 2 Inks to color the houses!
I used an actual photo that my niece Katie took of a beach on Cape Cod that she visited this summer.  I love that seagull in front and the fences in the background and all that sand covered in foot prints!

   I sponged the Blends 2 ink in Stop, Frog and Beach onto the beach huts.  When they were dry I added clapboard lines with a grey Copic.  I added little enamel stars from Altenew in the peak of the roof.  I glued 3 little shells  that I picked up on Sanibel Island several years ago, next to the hut.  I die cut the photo using Pierced Feature Die from PTI and layered the outside piece onto the card base using foam dots.  The red beach hut is layered over the other two with foam dots.  I adhered a piece of vellum behind the windows. The sticker flip flops are from Michaels.  The sentiment is from Flipping Out by PTI.

I know the houses, shells and flip flops are not to scale with the photo but took some artistic license to create this fun beach scene!

Please check out Eileen's blog to see what others on the team have created this month!

I'm also linking my card to:
Time Out Challenges
Try it on Tuesday
Wish You Were Here


Stamps:  Flipping Out - Papertrey Ink
Paper:  White, Vellum -  PTI, Little Sizzles Matboard - Sizzix.
Ink:  Blends 2 in Stop,Frog and Beach - Eileen Hull/Color Box,  True Black - PTI.
Accessories:  House Ornament Die - Eileen Hull/Sizzix, Pierced Feature Frame - PTI, Sentiment Strips - MFT, enamel stars - Altenew, shells from Sanibel Island, foam dots, Tombow Glue, W6 Copic, flip flop stickers - Michaels.

Sunday, August 4, 2019

August CAS Stencil Card Challenge - Sprays

Welcome to the middle of summer to all those in the nortern hemisphere!  It's time for the August CAS Stencil Card Challenge!  Robyn is our hostest with the mostest this month and she wants us to use Sprays!
There are some links to videos using sprays over at CAS Stencil if you need some inspiration!
I have lots and lots of sprays and I hardly use them! (and to tell you the truth, I don't particularly like the results when I try to use them!)  So I was happy to get them out, give them a shake and experiment using them with my stencils!  Some were so old they no longer mixed, or just clogged up the sprayer so I got a tiny little purge of the old craft room in the process! 
I finally settled on using my newest sprays - Ranger Distress Oxide Sprays -  and I got out Fired Brick.   I sprayed it through my Scribbles Stencil from Tim Holtz/Stampers Anonymous - it's called scribbles but it looks like roses to me!
After I sprayed through the stencil, I lifted up the stencil by the edge, I removed the stenciled panel from my pizza box spray area (!)  got out another white card panel and laid it inside the pizza box , flipped over the stencil that still had all the sprayed ink on it - and pressed it onto the white panel to get a negative print of the stencil. (see photo below!)

I stenciled on white cardstock panels measuring 4 1/4" x 5 1/2" so when I cut them to create a CAS design I was able to make 4 cards (two from each panel!).  
I layered the stenciled panel over a stitched edge die cut white card panel - and I used that same stitched edge die to cut my stenciled piece so it  had the stitched edge across the top and also fit perfectly on the panel!

The birthday sentiment is from Sentiment Suite: Birthday from the Greetery and the sympathy sentiment is from Words of Comfort from PTI.  The sentiment banner die is from Sentiment Suite: Basics from the Greetery and the Enamel Heart is from Altenew.

So show us how you use all those sprays you have in your craft room with your stencils!  You'll find links to technique videos as well as lots of inspiration from the creative design team, along with our two Guest Designers this month -  Hilary and Amy over at the CAS Stencil Blog!
The challenge is open until August 24th!

I'm linking my sympathy card to:

I'm linking my birthday card to:
flowers


Stamps:  Sentiment Suite: Birthday, The Greetery, Words of Comfort - PTI.
Paper:  White - PTI
Ink:  True Black - PTI
Accessories:  Scribbles Stencil - Tim Holtz/Stampers Anonymous, Ranger Distress Oxide Spray Fired Brick,  Stitched Edge Rectangle Dies - Waltzingmouse (retired), Sentiment Suite: Basics Dies- The Greetery, Enamel Heart - Altenew, foam dots.

Thursday, August 1, 2019

A Vintage Journey Challenge - August: A Cup of Tea for Your Art

Welcome to the heat of summer everyone!  We're in the midst of a heatwave here in MA, so it's a glorious summer if you are on vacation or you don't have to do anything outside (!)

It's also time for the August A Vintage Journey Challenge.  Jennie is our lovely and talented hostess this month and her challenge is "A Cup of Tea for Your Art"

Here is her description of the challenge: "Pour yourself an extra cup of tea and use it in your project. In your cup you could dye lace, ribbon, wood, paper and flowers, or use it to create splashes or cup rings on your project. And don't just limit yourself to "ordinary tea" - there's green tea, yellow tea, black tea, herbal teas and fruit teas - whatever you've got in your cup! Just remember to ensure that you create in one of our preferred styles of vintage, shabby, mixed media, art journaling, industrial, timeworn or steampunk.

I decided to make a card using tea themed stamps.
I added a vintage lace strip to serve as a table cloth for the teapot to sit on.  I added a little teabag charm to the pot - rubbing it with a bit of Prima Bronze Age Metalique Wax to tone done the shininess of it.
 I adhered some pink 'tea roses' to the die cut frame and beside the teapot, adding enamel dots to their centers.
A few process photos:
I brewed some strong tea using tea Kent and I purchased when we were on Safari in Kenya way back in 1998.  Who knew Kenya was one of the major tea growers in the world?  It is delicious tea and I was glad I brought some home with me!  And, as you can see, I still have some left after all these years as seen in the bag. 
So I boiled just about a half cup of water and poured it into a teacup.  I added a lot of tea so it would brew dark.  I have two panels of watercolor paper at the ready for staining with the tea!
After letting the tea steep a while, I strained the tea into another cup and, since I was in the kitchen and had forgotten to bring a paint brush down from my craft room - I used a baster to brush the tea over the watercolor paper!   I took the panels back up to my craft room and dried them with my heat tool.
I die cut the Tiny Tattered florals and some leaves out of Kraft Core-dinations paper in pink and green.  Here's also one of the stamps I used - this is from Stampendous.
I die cut the frame out of one tea dyed panel, stamped the Keep Calm sentiment on the oval and layered it all over a Vintage Cream card base. I popped up the oval frame piece on foam dots.  I die cut and stamped the teapot out of the 2nd tea dyed panel and layered it in the corner, adding the charm on a foam dot.  I adhered the lace, flowers and some dew drops.
So we hope you will join us for A Cup of Tea this month!  You'll find lots of inspiration from the Creative Guides over at A Vintage Journey.  The challenge is open until Sept 5.

I'm linking my card to:


Stamps:  Kettle On - Stampendous, Tea for Two - Papertrey Ink.
Paper:  water color paper - Canson, Vintage Cream - PTI, pink and green Kraft Core-dinations.
Ink:  Wendy Vecchi Archival Potting Soil, Cocoa Bean - PTI.
Accessories:  brewed tea, brush, vintage lace from stash, Two for Two Dies, Pierced Feature Frames: Ovals - PTI, tea charm - Custers Last Stamp Prima Bronze Age Metalique Wax, Tiny Tattered Florals die and quill tool - Tim Holtz/Sizzix, enamel dots - Altenew, October Sky Dew Drops - Honey Bee Stamps, foam dots.