Tuesday, July 14, 2015

A Girl and her Penguin

It's the middle of summer and I have another Christmas card to share!  I bought this Stamping Bella stamp, Mr. Penguin goes for a ride,  over a year ago because I thought it was SO cute!  Which it is -  but I keep forgetting that I really don't like to color very much (!) so this is the first time I've inked it up.  I colored the image with Copics.  I thought a little girl like this would have a sweet little pink winter coat with accents of purple - so my color pallet was decided!   I die cut the image with a Stitched Edges Rectangle die from Waltzingmouse and layered it over a piece of patterned paper with foam dots. The sentiment is from Nutcracker Sweets from WMS.
The tree has little round ornaments on the stamp but I decided to glue flower sequins over them.  Since this card is hot off the press - you can still see the glue in the centers - when it dries that will be clear!  They add a lovely shine to the card as well as a little dimension!
I'm linking my card to the Merry Monday Challenge - create a Christmas card with a penguin on it (this is the ONLY stamp I have with a penguin!)
 Deep Ocean Challenge Blog -  Christmas in July
 
Stamps:  Mister Penguin Goes for a Ride - Stamping Bella, Merry Christmas from Nutcracker Sweets - Waltzingmouse.
Paper:  White, DP Text Style Bitty Stars - PTI
Ink:  Archival Jet Black
Accessories:  Stitched Edges Rectangle dies - Waltzingmouse, Copics, Flower Sequins - Cartwrights, Scotch Quick Dry Adhesive, foam dots.

Sunday, July 12, 2015

CAS and Masculine

Hopping in really quick tonight to sneak in two cards for two challenges I didn't want to miss!  
First I have a CAS masculine card.
The die is from Sizzix Thinlets - Shape Strips - and the sentiment is from Free Spirit Sentiments by Waltzingmouse.
I'm linking this card to CAS-ology Cue Card Repeat
My second card is also masculine but a little more involved.  I stamped the mountains and cactus strip from Way Out West along with the cowboy from Back in the Saddle on the card base.  All the stamps are from Waltzingmouse.  I die cut a piece out of the brown Bazzill card stock using a Thinlits Labels Die from Alterations and laid the brown panel over the card base so the desert scene showed through.   The sentiment from Back in the Saddle is stamped on another die cut using a Labels Die.
Here's a close up of the scene framed by the label cut out. I used Ocean Tides, Scarlet Jewell and Smokey Shadow inks from Papertrey Ink and sponged over the whole area with Ranger Distress Tea Dye Ink.
I'm linking this card to Cardz4Guyz - sketch challenge.

I'm off to bed - back to work tomorrow - vacation is over  : (


Way to Go
Stamps:  Free Spirit Sentiments - Waltzingmouse
Paper:  White - PTI
Ink:  Smokey Shadow - PTI
Accessories:  Dies:  Sizzix Thinlits - Shape Strips 

Happy Trails
Stamps:  Back in the Saddle and Way Out West - Waltzingmouse
Paper:  Brown Bazzill; Rustic Cream and True Black - PTI
Ink:  Ranger Distress Tea Dye; Ocean Tides, Scarlet Jewel and Smokey Shadow - PTI
Accessories:  Dies - Thinlits Labels - Alterations, star punch - Fiskars, foam dots.

What do you do when you are 3?

I always make special cards for my grandnephews and grandnieces - and this weekend we are celebrating Mila's 3rd birthday (her b'day is in August but her mum is having her party a little early as they hired a "Music Man" to come and entertain the kids and this is when he was available!)
I decided to make a little photo book for Mila.  I've been wanting to use my Sizzix die -  Album, Mini designed by Eileen Hull and this was the perfect opportunity! I cut it out of Little Sizzles Mat board so it's nice and sturdy.  It measures 5 1/2" wide by 5" tall when folded.
 I cut 3 pieces of Vintage Cream card stock 10 1/4" x 4 3/4" and folded each piece in half - giving me 6 pages to put photos on.  I stenciled the Wendy Vecchi Stencil - Check Mate on the covers (inside and out) using Archival Inks Tiger Lily, Violet and Pink Peony.
After printing the photos I wanted to use I picked out coordinating DP for each page - cutting the paper 4 1/2" x 4 5/8".  
I die cut each photo with Stitched Edge Rectangle dies from Waltzingmouse.  I printed the sentiments on my computer and cut them into banners.
Here is the center of the book - and you can see how I punched holes in the center of the pages, matching them to the holes already die cut on the cover binding and looped a piece of wrinkled seam tape through to tie on the outside (see photo below).
My niece, Katie, puts all her photos of Mila and Landon on Snap Fish - so I had tons of recent photos to choose from.
I just love these sweet pics of Landon and Mila walking together..brother and sister.  Landon will be 5 in Sept.
This photo of Mila eating a cupcake from cousin James' recent birthday was perfect for the last page in her birthday book.
I couldn't resist adding one more photo - the only spot left was on the back cover. When I babysit for them I usually bring a craft to do.  They both enjoy them!  (that's the remnants of a wash off tattoo on her hand and a piece of paper towel protecting her outfit!)
Here's a side view showing the binding. 
The black plastic numbers are Alpha Parts.  The sparkly green letters are Thickers (remember those!!?? I have a drawer full!) The little chipboard Mini Doll is Julie Nutting/Prima colored with Copics and the 'is' are Idea-ology Label Letters.
I think this will be a nice keepsake for Mila to remember when she was a sweet beautiful 3 year old!
I'm linking my photo album to the July Art with Heart Challenge - Make it 3D

Friday, July 10, 2015

Love is not only something you feel....

I have another frame card to share today (see this post for my first).   I die cut the frame out of white Little Sizzles Mat Board from Sizzix.
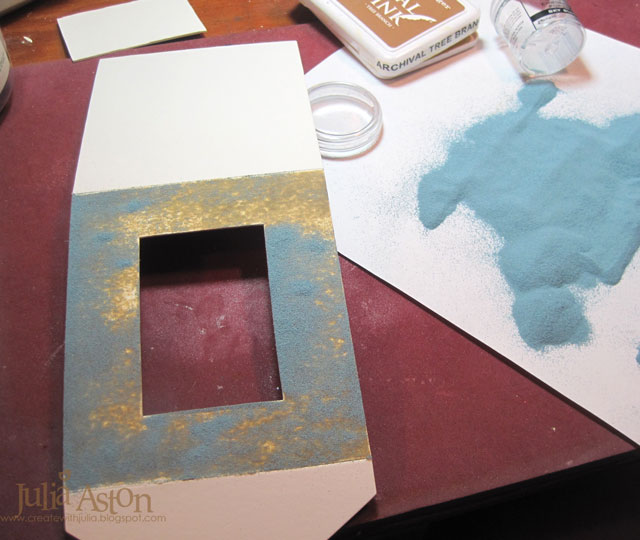
I used the Sizzix Frame/mailable die and this time I used the opening to frame my sentiment.  I embossed the frame panel using WV Archival Tree Branch ink and WV Sky Blue Embossing Powder.  The ink soaked into the matboard in spots so the embossing powder didn't stick, giving the frame a lovely aged look.  I reinked along the top where a lot of brown still showed, sprinkled it with powder and embossed it again.
I cut a panel of Rustic Cream cardstock, laid it behind the frame, traced the opening and then stamped the sentiment from Handwritten Thoughts by Tim Holtz.  I erased the pencil markings and sponged the panel with Old Paper Distress Ink.  Then I spritzed it with water to create some waterspots (which didn't show up too much!).  I ran adhesive along the backside of the frame and adhered the sentiment panel facing out.
I added some Industrious Stickers/Frames and Trims to the edges of the frame.  Although they are sticky backed - I added some Scotch Quick Dry adhesive to secure them to the glossy embossed surface.   I added some tiny seashells that Kent and I picked up on the beaches while on a vacation to Sanibel Island several years ago. (I knew I'd want them someday!!)  I also added some dew drops.  The embossing is REALLY shiny IRL.
I die cut a starfish out of the mat board using the Sand and Sea Die from Alterations.  I embossed it with Frantage Shabby Blue Embossing Powder.  I added some sand that I had in a container saved from Tim's recipe in his July 2014 Tag.  Basically, I mixed Antique Linen Distress Glitter, Antique Linen Distress Embossing Powder, Clear Utee, and Glossy Accents.  But, as I said, I had mine in a cup left over from last year's tag - and it was VERY dry - so I squeezed some Scotch Quick Dry adhesive along the place I wanted the sand and sprinkled it on - pressing the 'sand' a little into the adhesive - and let it dry.  I added the shells and starfish with foam dots.
Here's a side view showing how the frame stands up - and it will fold up and fit into a regular A2 envelope as it measures 4 1/4" x 5" - although my little star fish will probably loose one of her arms since it sticks over the side.  I layered a piece of Coredinations paper on the inside where I can write or stamp a sentiment -  maybe Happy Anniversary -  or  Happy Wedding Day -  whatever I decide to use my pretty beach theme love card for!
 I'm linking my frame card to the following challenges:
Anything but Cute - Summer Romance
The Mixed Media Monthly Challenge -  Summer Days - I was inspired by the beach theme and sea shells

Frilly and Funkie Challenge - Something to Say (I think my project can be considered Vintage?!)

Stamps:  Handwritten Thoughts - Tim Holtz/Stampers Anonymous
Paper:  Little Sizzles Matboard - Sizzix, Rustic Cream - PTI
Ink:  Archival Jet Black, Ranger Distress Old Paper, Wendy Vecchi Archival Tree Branch.
Accessories:  Frantage Shabby Blue Embossing Powder - Stampendous, Sand and Sea Die - Alterations, Frame - Mailable die - Eileen Hull/Sizzix, Wendy Vecchi Soft Sky Embossing Powder, Antique Linen Distress Powder, Antique Linen Distress Glitter, Thick Utee - Ranger, Black Embossing Powder, Glossy Accents, Industrious Stickers/Frames and Trims - Idea-ology, shells from beach, dew drops, glue dots, Scotch Quick Dry Adhesive.

Tuesday, July 7, 2015

Memories are Magical Moments

Happy Tuesday everyone -  it's the 2nd official day of my vacation - we are having absolutely gorgeous summer weather here - sunny in the 80's.  Today Kent and I went to IKEA to look at tables that might work well in my craft room - I've seen so many bloggers using furniture from IKEA but to get to the closest store to us, we have to drive through Boston and down the South Shore (we live on the North Shore) a drive I hate to do because you never know how bad the city traffic will be.  Luckily, we were traveling during the middle of the day so missed the heavy commuter traffic and only hit a few slow downs.  We got there in about 45 minutes which wasn't too bad.  And, boy - what a place - it was GIANT!!  Kent and I kept walking and walking following the arrows on the floor - after a while I didn't really know where I was and we actually had trouble finding out how to get to the exit when we were exhaustedly ready to leave!!   I didn't purchase anything today but got a lot of ideas - and I did bring home a catalogue ;)

Today I have card art to share that I made using some fun Art Parts - Hearts,Love and Stars.  I embossed the big heart in Sky Blue Embossing Powder, the star in Tiger Lily and the LOVE in Violet.  The little heart is a Tiny Shapes die from TH and I embossed that in Red Geranium - all Wendy Vecchi powders
Next I stamped over the shapes - using Spatter background on the blue heart, Ornate Dots on the star and dots from Large Collage on the LOVE.  The sentiment and black lines on the heart are from Wendy's Discover Art set and the flourish is from Say it with Art.
I cut a panel of Vintage Cream Cardstock and stamped the Ornate Dots background (I LOVE this stamp!) on it with Tiger Lily ink. The stamping didn't quite fill the panel so I inked up the Reverse Dots Background stamp and pressed the top and bottom edges of the panel onto the inked stamp. I love how that border looks!
I layered my creation onto an Eileen Hull Sizzix Die called Frame-Mailable.  The die cuts a rectangle out of the center of the front panel where you can place a photo.  I chose to use the die cut as a stand up 'easel' to display my Art Parts creation.  You can fold up the base piece and the frame (5" x 4 1/4") fits in a regular A2 size envelope - although with my Art Parts being thick and going over the top edge - I'd have to use a larger envelope if I wanted to mail this!
To cover the frame opening on the inside - I adhered a stamped panel like the one on the front.
I'm linking my creation to the following challenges:
Frilly and Funkie Challenge - Something to Say (oops, sorry it has to be Vintage or shabby Chic so this doesn't qualify for the challenge!  better read the instructions better!)
Stamps:  Ornate Dots, Large Collage, Spatter, Discover Art, Reverse Dots, Say it With Art - Wendy Vecchi/Stampers Anonymous.
Paper:  Vintage Cream - PTI, Little Sizzles Matboard - Sizzix
Ink:  Wendy Vecchi Archival Tree Branch and Tiger Lily, Adirondack Snow Cap
Accessories:  Wendy Vecchi Embossing Powder Tiger Lily, Sky Blue, Violet and Red Garanium, Frame-Mailable die - Eileen Hull/Sizzix, Tiny Shapes Movers and Shapers dies - Tim Holtz, Art Parts Hearts, Love and Stars - Wendy Vecchi.

Monday, July 6, 2015

Birthday Wishes Tag Card and Catastropy Averted!

After a little humungous scare yesterday, when I couldn't access my blog (it was there but it didn't recognize my sign in!!) I finally got access again this morning.  I thought I was going to have a heart attack not being able to post  - I could see my blog - but couldn't sign in! I went through Google help page after help page not being able to figure out what to do - and not finding anywhere to contact Google directly other than looking at all the suggestions that didn't apply!   In the process I think I've created another Google account that is out there in cyber space somewhere that does not associate with my blog  -  but at least I'm back and able to post!
So finally after a sleepness night worrying about my blog  -  I have a sweet tag card to share today that I was trying to post yesterday!
First, I stamped the leaf on the Stitched Tag (WMS) and colored it with Brushed Olive Distress Marker, going over it with my waterbrush. I colored the background by rubbing Salty Ocean Distress Ink on my craft mat and then using my waterbrush to pick up the color and watercolor the tag. After I dried the background with my heat tool, I stamped the text from Text It (WMS) in Classic Kraft Ink.   
I stamped the flower from Flower Garden (Tim Holtz) on a scrap of watercolor paper, colored it with Ranger Distress Markers (Spun Sugar and Worn Lipstick) then went over it with a waterbrush to blend the colors.  I cut it out and layered it over the stem with a thick foam dot. I covered  the head of the cone flower with Glossy Accents- but you can't really see the shine in the photo.
I think this is the first time that I've looped twine on a card - love the look!  I stamped the sentiment from Fancy Phrases (WMS) on a Sentiment Tag (MFT) and layered it over the tag with foam dots.  Then I added sequins and flowers from Shaker Mix Vanilla Frost (WMS) around the tag.
 I die cut the patterned paper (Correspondence/Paper Stash/Tim Holtz) with a Stitched Edge Rectangle (WMS), layering it to Sweet Blush and then to the Vintage Cream card base. 
I'm linking my tag card to the following challenges:
and reminding everyone about the July Mixed Media Card Challenge

Stamps:  Text It and Fancy Phrases - Waltzingmouse, Flower Garden - Tim Holtz/Stampers Anonymous.
Paper:  Watercolor Paper;  Vintage Cream, Sweet Blush - PTI; Paper Stash/Correspondence - Tim Holtz Idea-ology.
Ink:  Archival Jet Black, Ranger Distress Salty Ocean, Classic Kraft - PTi
Accessories:  Ranger Distress Markers - Spun Sugar, Worn Lipstick, Brushed Olive; Dies - Stitched Tag and Stitched Edge Rectangles - Waltzingmouse, Sentiment Strip Die - MFT,  Shaker Mix Vanilla Frost - Waltzingmouse, Wrinkled Seam Tape - Prairie Bird Boutique Etsy Shop, Button Twine - Waltzingmouse, Foam dots, waterbrush - Ranger.