Saturday, December 13, 2014

A Vintage Journey - Secret Santa Reveal

The Creative Guides of A Vintage Journey decided to do a "Secret Santa" this year.  We were each sent a name to be kept secret until our creation arrived when it would be revealed as the receiver opened their package!  How fun!!

Well today is our big reveal - we've all sent and received our surprise creations - you will find a post of all the creations over at A Vintage Journey.  Brenda is having Christmas Giveaway and to be eligible for the draw - readers have to leave a comment on all of our blogs and link to the post over at AVJ 
See all the details at the bottom of my post.

I was Secret Santa to the awesomely talented Astrid who lives in Edinburgh, Scotland - a place I visited about 20 years ago and loved (seeing the Military Tattoo in the Edinburgh Castle being one of the highlights!) so I can envision her surroundings a bit.   I decided to decorate a small muslin bag and slip a tag/card inside it.    
So - here's how I stamped, stenciled and decorated one side.
and here's how I stamped, stenciled and decorated the other side.
Here's how the little 3"x5" bag started out.  I inserted a piece of card stock inside the bag so if any of the ink soaked through it wouldn't bleed onto the other side!
First I stenciled both sides using Wendy Vecchi's Check Mate stencil with Archival Cornflower Blue Ink
On one side I then stenciled trees with Wendy Vecchi'sHappy Holidays stencil with Archival Leaf Green ink.
I inked two Idea-ology Mirrored Stars with Archival Dandelion ink and adhered them to the top of the trees and stamped a sentiment from For the Arts by Wendy Vecchi with Archival Jet Black ink..

To finish off this side -  I used a Trinket Pin to secure a Heart Charm in the top corner and slipped a piece of Tinsel Twine through the loop.
On the other side I inked part of Tim's Festive stencil using Archival Leaf Green, Red Geranium and Potting Soil
I added enamel dots for the holly berries, adhering them with Glue N Seal.
I pinned a Snowflake Adornment that I inked with Archival Cornflower Blue Ink, slipping a little piece of Tinsel Twine through the loop for a touch of glitter!
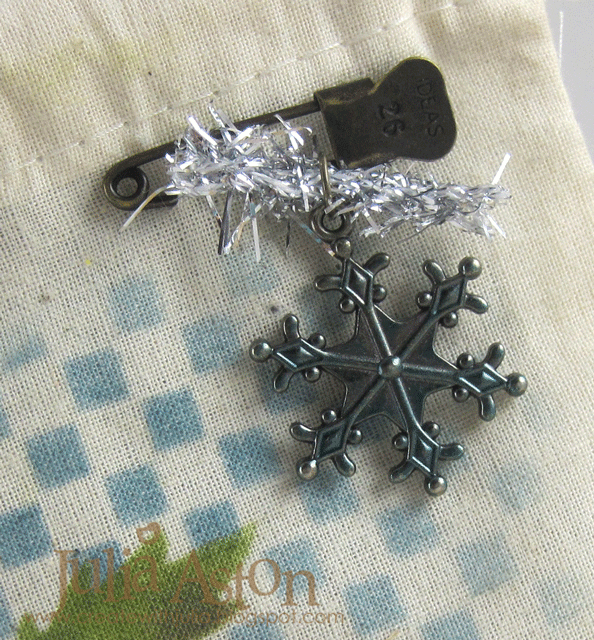
I stamped a sentiment from Tim's Mini Holiday 5 set with Archival Jet Black in the bottom corner.
To make the little tag/card -  I die cut a piece of Rustic White cardstock using the Alterations Artful Dwelling die.  First I sprayed the tag with water using my Mini Mister.  Then I sprayed the tag with both Tea Dye and Iced Spruce Distress Spray Stains and dried the tag with my heat tool.  I stamped the caroler and sentiment from Tim's Mini Holidays 5 set with Archival Jet Black Ink.
And finally -  I sprayed the tag with Brushed Pewter Distress Spray Stain - doesn't it look like a snowy sky?!
I had the perfect stamps for the back of my Secret Santa tag -  they are from Waltzingmouse - Santa was Here set and Compliments of the Season.  I knotted a piece of black Jute String and Tinsel Twine through the hole in the tag.
And here is the lovely creation I received from MY Secret Santa Alison!  I hope you don't mind but I have to show you all of these photos of her gift so you can appreciate how beautiful the tag/card Alison made is -with all the texture, the die cuts, the embossing, pastes and inks. 
Here's the front


The inside
The backs of the tags
the beautiful misty forest you see when the tags are removed.


and the back!
I am thrilled and honored to be the recipient of this wonderful creation Alison - thank you SO much!


This was such a wonderful event for us - the Creative Guides - making a secret surprise to send and receiving a secret surprise in the mail - thanks so much Brenda for organizing this for us!

 A Vintage Journey wants to thank all those who travel on their creative journey with us, with a chance to win your own present! -  here are all the details from Brenda.
We would like to give each and every one of you who enter our challenges and who read our blog posts a Christmas gift and the nearest we could think of doing this is to offer our Christmas Give-Away.
This is a lovely present to one lucky person.
Now just to be friendly we would like you to -
1. Visit all the blogs of the Creative Guides and leave them a comment.
2. Come back the the AVJ blog and leave a link-up on the Linky to a post on your blog where you have mentioned our Give-Away and linked it back at AVJ - this might be a new post just with the Give-Away info in it or you could include it in a post you are writing for something else - just like you would if you were entering a challenge.
If we have more than 30 links there will be a second Give-away added and if we get more than 50 links there will be a third..
Make sure you have linked by 23:55 on Sunday the 21st of December which is when the Linky closes. The winner will be chosen by Random Org and announced on our following challenge post which will be on the 26th December.

Good luck everyone, enjoy the hop and thank you in advance for taking part.
You will find the list of all the Creative Guides as well as the link over at A Vintage Journey

Muslin Bag
Stamps:  For the Arts - Wendy Vecchi/Stampers Anonymous, Mini Holidays 5 - Tim Holtz/Stampers Anonymous
Ink:  Archival Jet Black, Wendy Vecchi Archival Leaf Green, Cornflower Blue, Fern Green, Potting Soil, Dandelion, Forget Me Not
Accessories:  Stencils - Wendy Vecchi Check Mate, Happy Holidays; Festive - Tim Holtz; jump ring, Glue N Seal, Idea-ology - Mirrored Stars, Heart Charms, Adornments - Snow flake, Trinket Pins; home made enamel dots from Perler Beads, 3" x 5" Muslin/cotton bag - Pouchmart.com

Tag:  
Stamps:  Mini Holidays 5 - Tim Holtz/Stampers Anonymous, Santa Was Here and Compliments of the Season - Waltzingmouse
Paper:  Rustic White, Smokey Shadow - PTI
Ink:  Archival Jet Black
Accessories:  Distress Spray Stains- Tea Dye, Iced Spruce, Brushed Pewter, Idea-ology - Jute String, Tinsel Twine, Mini Mister - Ranger, Artful Dwellings Die - Alterations/Tim Holtz

Friday, December 12, 2014

WMS Team Talk Post - Sending Thanks

It's my turn to post over at the Waltzingmouse Team Talk Blog
I've posted 3 Thank You notes to help with our post holiday needs!
I'd love if you'd take a peek over there!

Stamps:  Simple Sprig and Say It Loud - Waltzingmouse
Paper:  white, vintage cream, Blueberry Sky - PTI
Ink:  Royal Velvet - PTI
Accessories:  Simple Sprig Die Set - Waltzingmouse, foam dots

Thursday, December 11, 2014

A Vintage Journey #21 - Let's Celebrate

Another two weeks have sped by - getting ever closer to Christmas (!) and it's time for another  A Vintage Journey Challenge -  this week Nikki is our host and here is her challenge:
#21 Nikki - Let's Celebrate - You can make something to celebrate Christmas if you wish but lets not forget about those December birthdays, anniversaries, Hanukkah and New Years. It may be fun to focus on celebrations other than Christmas, it's up to you.
Well, I decided to make a Christmas decoration using the boxes that come inside Tim's Configuration Box.  I used the box for my last AVJ project but not the little boxes inside.
Here's how I put this together.  First, I gathered some supplies that I thought I would use on my project.

I embossed the Letterpress letters using Wendy Vecchi Archival Fern Green ink and embossing powder.  After they cooled - I stamped them with Wendy's Spatter stamp using Snow Cap Ink.  Wendy has shown this technique on her blog.

First I painted the boxes with Fired Brick Distress Paint and then embossed them using Wendy's Red Geranium ink and embossing powder. I cut pieces of Merriment paper to line the inside of the boxes but you really can't see much of it after I filled the boxes!

I altered  a Woodland Tree by spraying it with Mowed Lawn Distress Stain and a Woodland Wreath sprayed with Iced Spruce. Then I dabbed  Wendy Vecchi white embossing paste all over to look like snow. using Tim's techniques so you can read about it there!   I can't reveal it as I'm also joining in on the CC3C with this project.

I painted the skates with Picket Fence Distress Paint, sanded them a bit when dry - and rubbed some Latte Alcohol Ink over them.  I died a piece of Crinkle Ribbon with Picked Raspberry Distress Spray Stain to make a bow to hang the skates on with an Jump ring.

I cut the village using Tim's Townscape Die from a piece of Merriment paper layered to white card stock to give it strength.  I layered some orange paper behind the windows to look like lights inside the houses. Then I sponged the edges with Ranger Distress Walnut Stain Ink.   I sponged the Mirrored Stars with Dandelion Archival Ink and added them to the box edges and the tree.

I adhered a Plaquette to the center of the wreath and tied a bow using Natural Red/Cream Trimmings.  I added red rhinestones and some 'snow'

Here you can see how I stamped Wendy's Spatter stamp on the sides of the boxes - but then I pretty much covered them up so you don't see much of it! 

I was going to adhere the boxes to each other but then decided I might want to keep changing the configuration so I left them unattached.

And here it is - sitting on a side table in my living room - saying "Let's Celebrate!"
What will you create to illustrate "Let's Celebrate"??  I can't wait to see what you link up!

Our challenge sponsor is Country View Crafts.  They are offering one winner, chosen by the Creative Guides, a £10 voucher to spend in their on-line shop.  

 I hope you will be inspired to play along with us -  you have 2 weeks - you will find all the details at the A Vintage Journey Blog - along with some wonderful "Let's Celebrate" inspiration by several of my very talented fellow Creative Guides!
 
 
I'm linking my creation to the Compendium of Curiosities 3 Challenge #17 - Woodlands and Tinsel Twine. Tim shows us some techniques on  Page 60 of his Compendium of Curiosities IIIInspiration Emporium is sponsoring this CC3C challenge.

I'm also linking my creation to the Mixed Media Monthly Challenge
I  covered 2 lines:   Star/Patterned Paper/Ribbon and Die/Stamps/Ribbon

Stamps:  Spatter Background - Wendy Vecchi/Stampers Anonymous.
Paper:  Summer Sunrise - PTI, DP - Merriment Paper Stash - Tim Holtz.
Ink:  Wendy Vecchi Archival - Fern Green, Red Geranium, Potting Sol and Dandelion; Ranger Distress Walnut Stain; Adirondack Snowcap.
Accessories:  Wendy Vecchi White Embossing Paste, inside boxes from Configuration Box - Ranger, Idea-ology - Letter Press, Woodlands, Plaquettes, Mirrored Stars, Adornments/Skates, Trimmings/Natural Red/Cream, Jump Ring, Crinkle Ribbon, Thick Zotts, Ranger Distress Spray Stains - Iced Spruce, Mowed Lawn and Picked Raspberry, Ranger Distress Paint - Fired Bricked and Picket Fence, Wendy Vecchi Embossing Powders - Fern Green and Red Geranium, Scotch Quick Dry Adhesive, Townscape Die - Alterations, Adirondack Alcohol Ink - Latte. 

Christmas in the Mountains

I'm slipping in perhaps my final Christmas Card today -  I've already mailed my cards -  but you know how you always end up needing a few more - to include with a gift - or someone sends you one that you didn't expect so you want to send one out to them!
I used my most favorite Embossing Powders on this -  Frantage Powders from Stampendous - Aged Gold, Aged Silver. They look SO good - thick and mottled with other little specs of color mixed in.  The alps die is from Waltzingmouse - the village die is Memory Box
 I added Mirrored Stars that I inked with Archival Coneflower Blue ink.  I dry embossed the background with a circles folder from Darice and then wet  embossed it with Frantage Shabby Blue embossing powder. The Christmas is a die from Alterations.
I'm linking my card to these lovely challenges:
Just Us Girls - Word Week "Sparkle
 
Virginia's View - Distressed (I sponged the edges and the embossing looks distressed as well)
 Merry Monday - Use Gold, Silver, white and a 4th color


Inkspirational Colour Challenge - Anything Goes with Gold.


Just a reminder - you have until 12/25 to load up your cards to the Mixed Media Card Challenge!

Paper:  White, Enchanted Evening - PTI, Blue Coredinations Ranger Distress.
Ink:  Versamark, Archival Cornflower Blue
Accessories:  Dots Embossing Folder - Darice,  Dies - Alpine Christmas Die Set - Waltzingmouse, Holiday Words/Script - Alterations, Country Landscape - Memory Box; Mirrored Stars - Idea-ology, Frantage Embossing Powders - Aged Gold, Aged Silver, Shabby Blue - Stampendous, Scotch Quick Dry Adhesive, Foam Dots, ScorTape.

Wednesday, December 10, 2014

Holiday Coffee Lovers Blog Hop

Amy Tsuruta, THE original and most passionate Coffee Lover!!, thought it might be fun to have a Holiday Coffee Lovers Blog Hop - and I happened to get invited to join in with her along with several hundred others (ok, maybe not that many - but there are A LOT of people participating!) 
Luckily I recently purchased a really cute coffee theme stamp set from Art Impressions appropriately called Cathy Caffeine!  I colored her with Copics and cut her out with a stitched mat die.  I ripped the top layer off a panel of recycled cardboard to expose the corrugation and used it for the background.
And I just had to stamp a splatter over the sentiment - we coffee lovers always spill don't we??  The odds are much greater that we will since we always have a cup in our hands or on our desk right??!  I also scattered some brown and tan sequins around my card.

So we are all linking up our coffee lovers creations over at Amy's blog today -  lots of people are posting blog candy so you might want to check it out! 
  
Instead of 'candy' I am sharing a recipe for Chocolate Covered Coffee Beans -  as I decided to make some this year for holiday gift giving.
Since I haven't made them before (!) I googled - Recipe Chocolate Covered Coffee Beans - and a plethora of them showed up -  I printed out a few different ones - they are pretty much the same - with a few added hints or slightly different ingredients here and there -  so I just took what looked good to me and tried it out -  here's the recipe I ended up with:

Chocolate Covered Coffee Beans Recipe

3/4 cups Dark Chocolate Nestle Toll House Morsels
1 cup whole espresso beans 
(I used  Starbucks Espresso Roast whole bean that I found in our local supermarket)
2/3 cup Hershey's Unsweetened Cocoa
1. Using a double boiler melt the chocolate morsels over boiling water.  When smooth - remove from heat and stir in the espresso beans.
2. Put the cocoa in a small bowl.  Drop a couple of spoonfuls of the chocolate covered beans into the cocoa powder and mix with a fork - lightly separating any beans that are stuck together. (a lot of them do!)
3. Place a mesh strainer over another small bowl and pour the beans with the cocoa on them into the strainer.  Shake the strainer so just the covered beans remain in the strainer.
4. Spread the covered beans onto wax paper to cool.
5.  Continue steps 2 - 4 until all the beans are done -  adding additional cocoa to the bowl as needed.
Allow the beans to cool and package them up!

Now - I have to say - they aren't as chocolatey tasting as the ones you purchase -  there's a lot more chocolate around the bean on the store bought ones -  so you taste more of the coffee bean with these.  But I think any coffee lover will love 'um!
I put the beans in a clear bag - and will make labels for them before gifting!
Now, let's all grab a 'cuppa' and check out all the other coffee lover cards linked up over at Amy's blog!

Stamps:  Splat That - Waltzingmouse, Cathy Caffeine Set - Art Impressions
Paper:  White - PTI, piece of repurposed cardboard from a box.
Ink:  Archival Jet Black, Grout Grey - Color Box/MFT
Accessories:  Stitched Mat Rectangle Dies - Lil Inker Designs, Glue n Seal - Ranger, Copics - E00, E07, E35, E37, E44, B05, B21, R02, R05, Chocolate Sundae Sequins - My Craft Spot.