Sunday, June 15, 2014

Happy Father's Day - Waltzingmouse Team Talk Blog Post

Happy Father's Day to everyone celebrating with your dad or the men who are special in your lives today in the US.

Today is my day to post over at the WMS Team Talk Blog -  and I've posted a special Father's Day Project  here.

You will see more pics and details of my project at the Team Talk Blog - I hope you'll check it out!

Waltzingmouse products used:
Stamps:
Man of the Hour
My Kind of Guy
Dies:
Gift Card It Die set
Folding Tag Die
Gift Card  Envelope Die

Friday, June 13, 2014

A Santa Hat Times Two!

As soon as I saw this week's Merry Monday Inspiration photo
I knew I had to print out the photo my niece, Katie, took of her son (my grandnephew!) Landon, last December -  can you see why???!!!   But then I had to think of how to add Santa's hat somewhere -  and, believe it or not,  I DON'T HAVE A SANTA HAT STAMP!!   I was pretty sure I had one (in the million stamps that I have!!) but I think it went into some boxes of stamps I sold.... 
Anyhoo -  you can see that I did solve my problem!  I had a full figure of good ole' Santa in rhinestones by Prima-  and I just snipped off his hat!   Can you believe how perfectly it was sized to Landon's head??  It was meant to be!! 
The sentiment is Amuse. and I cut the picture with a stitched mat rectangle die.  The star is from the same Prima set as the Santa.
And while I was searching for this photo on my thumb drive where I save all my photos -  I also found this one that my sister had taken of Landon last year (or maybe the year before?!) when he was visiting her one day.  Another perfect photo for the challenge!  I cut the Polaroid frame with a jillian vance designs die and trimmed the picture to fit - than stamped the sentiment (no company name on wooden stamp) and adhered it to the 4 1/4"x4 1/4" card base at an angle.  Too CUTE!
I've been home from work for 2 days with a cold -  getting a lot of sleep luckily and starting to feel better - and finding some time to stamp (of course!) - it's been raining both days so it was nice not to have to go out into it!

I'll be back on Sunday with a cute project for Father's Day using some Waltzingmouse Stamps and dies -  I hope you'll be able to stop by!


Thursday, June 12, 2014

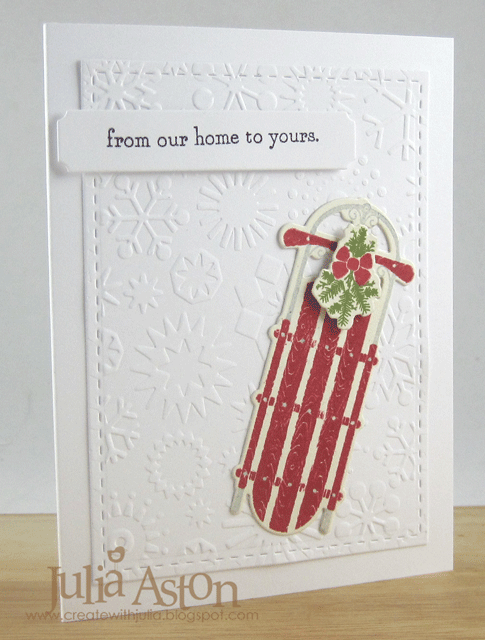
From Our Home to Yours

Yes folks,  I am daring to post yet another Christmas card when the wonderful warm summer has finally come upon us here in Massachusetts!

I actually have two cards to share -  because I thought I was going to use both images on one card - but when I die cut them - it looked too crowded having both together.

On my first card I used the lovely skis, pine bough and sentiment from the Two Feet Deep set from PTI.  I used the coordinating dies for the skis and bough. 
 I embossed the stitched mat die cut panel with the Snowflakes embossing folder from Provo Craft.  The sentiment is on a die cut sentiment strip from MFT.
 And here's the 2nd card - with the exact same layout but using the sled instead of the skiis.
My cards were inspired by two challenges:
Darnell's new NBUS challenge: to use never before used 'schtuff' with a friendship theme -  I bought the PTI stamp and die sets months ago and this is their virgin debut - and my card is being sent from our home to yours (friend!)
And the Festive Friday Challenge - you can see what inspired me here!
Stamps:  Two Feet Deep - PTI
Paper:  White, Rustic Cream - PTI
Ink:  Archival Jet Black, Red Geranium, Fern Green Tree Branch; Memento London Fog
Accessories:  Stitched Mat Rectangle Die - Lil' Inker Designs, Two Feet Deep Die Collection - PTI, Dienamics Sentiment Strips - MFT, foam dots.

Wednesday, June 11, 2014

Creations by AR - June Release - It's a Beach Hop!

Welcome to the Creations by AR June Release!  If you aren't quite ready for summer yet -  you will be after you get your hands on these wonderful templates.
I took advantage of having some sweet pics of my 21 month old grand niece, Mila's, first day at the beach to adorn my projects, that I made using some wonderful papers from Tim Holtz Paper Stash Wallflower.
Look at this wonderfully shaped shovel that Adela designed -  I tied it onto the woven pail handle with some Tim Holtz Linen Ribbon
Mila's brother, Landon (3 1/2) was also at the beach that day - having lots of fun shoveling in the sand.  I printed the pics from my computer on Sticky Back Canvas, cut them out with pinking shears, and sponged them with Ranger Distress Tea Dye ink.  I added some Idea-ology Chit Chat Stickers on both pics.
And then we have the coordinating Beach Bucket Card.  It stands in a cleverly designed base that folds up completely flat for mailing!  Here's the bucket, tucked into the base with the removable shovel slipped into the pail!  I added a white fish button to my base so mine won't be flat when folded but I'll be hand delivering this to my niece, Katie - the mother of these beautiful kidletts!
Here are the 3 pieces separated.  I made the ocean waves with a die from MFT
Here's the clever base open
and here it is folded - if I hadn't put the thick fish button on the 'sand' this would fit into the envelope with the card and shovel!
Instead of putting a message on the shovel that you'd see when you pulled it out -  I put my sentiment on the handle and put sand in the shovel as well as the base.  It's actually Tim Holtz Antique Linen Distress Glitter.  I covered the pieces with Glue N Seal, poured on the Distress Glitter, let it dry then brushed it off a bit  - it looks just like sand!   I slipped my pail into the base at an angle - the way it might be in real sand - tilted a bit.  But you can put it in straight up of course!
and just look at this sweet little bathing beauty -  with her hair in 3 ponytails and the pacifier in her mouth!   TOO cute... strike a pose!
and just so you don't strain your eyes trying to see all the details of the kids pictures printed on canvas -  here are the original photos. (am I a proud great aunt or what!?!)  And they were perfect to adorn my wonderful beach bucket projects today!
And here, once again, are the wonderful Beach Bucket templates - so easy to put together because Adela designed them SO well!  I used my Silhouette Cameo to cut mine - but you can also print the pieces and cut them out by hand.  She includes files for both methods with her templates.  I filled my Beach Bucket with  Peppermint Puffs - I thought they looked like little beach balls!
You can win one of these super beach bucket templates!  Here's how!

PRIZE: Winner will win one of the new templates.  There will be two winners:
ONE winner chosen from comments left on the Design Team blogs and ONE winner chosen from FB

Beach Bucket Card
Sandy Beach Bucket

HOW TO QUALIFY TO WIN:
Leave comments
• at each DT blog
• at Creations by AR FaceBook

Comments accepted until Saturday, June 14, 12:00 noon Eastern
One random winner will be announced June 15 at these two places
Creations by AR FB:
Creations by AR Website: 

Here are the links to the Design Team blogs:
Paper:  Sticky Back Canvas - Claudine Hellmuth, Paper Stash Wallflower - Tim Holtz
Ink:  Ranger Distress Tea Dye
Accessories:  Scor Tape, Glue Pen, Chit Chat Stickers and Linen Ribbon - Tim Holtz Idea-ology, photo printed from computer, pinking shears, Brads - Flat Broke/Bazzill Basics, Silhouette Cameo,  Creations by AR Template/Sandy Beach Bucket.
Beach Bucket Card:
Stamps:  Rosies Road Show
Paper:  Sticky Back Canvas - Claudine Hellmuth, Paper Stash Wallflower - Tim Holtz, Blueberry Sky - PTI
Ink:  Ranger Distress Tea Dye, Archival Jet Black
Accessories:  Linen Ribbon, Antique Linen Distress Glitter - Tim Holtz, Catch a Wave Die - My Favorite Things, Glue N Seal - Ranger, Pinking shears, ScorTape, glue pen, plastic fish button - from stash, thick glue dot, Silhouette Cameo,  Creations by AR Template/ Beach Bucket Card.

Sunday, June 8, 2014

Tim Holtz 12 Tags of 2014 - June

Today I'm sharing my June Tag for Tim Holtz 12 Tags of 2014.  You can find Tim's tag here.
I didn't have his butterfly stamp set -  but I do have the same butterflies in sticker form from the Salvage Stickers/Crowded Attic.  
They are a shiny sticker in sepia color and I wasn't sure if I could ink over them - but it worked - I just brushed the ink pad over it, rubbed it a bit with my finger to spread the ink out, and heated with my heat tool to help dry it.  Each butterfly is adhered with a piece of foam tape along the middle of it's body so they are popped up - and I bent the wings up for some dimension. I added a Vial Label with two Chit Chat Stickers layered on it on the bottom corner.
I used the Harlequin stencil with Ranger Distress colors of Mustard Seed, Spiced Marmelade, Peacock Feathers and Picked Raspberry mini ink pads.  The technique Tim showed us was to ink the back of the stencil with multi-colors, spritz with water, then press on a watercolor card stock panel, blotting with a paper towel as we pressed the stencil against the panel to absorb the excess watery ink.  I laid my stencil on the rough side rather than the smooth side of the watercolor paper - so I think it didn't soak in as much as his did - but I like the look I got so I used it! 
I love how pretty the Crinkle ribbon came out inking it with the same colors as the Harlequin background.  I added some sprocket gears and a game spinner to the top corner and some Remnant Rubs/Botanicals above each butterfly.
I still have to do the tags for March and April that I missed (I just started the tags in May - I'm a slow starter!)
Are you playing along with his monthly tags?   You'll find them all - over at Tim's blog!  He chooses several winners each month to receive some Tim/Ranger goodies!

I've been at the Stamping/Scrapbooking show at the Exposition Center in Springfield, MA all weekend - working at the Rubbernecker Booth with my stamping buddy, Anne Harmon (jdmommy on Splitcoast).  I've scheduled this post to go live before I get home - I'm sure we had a great time - and I'm sure I'm exhausted - just sayin'!  So I'm a little behind in my visiting all of your blogs!  Hope to catch up tonight!

Paper:  #8 Manilla Tag, Watercolor Paper - Ranger, True Black - PTI
Ink:  Ranger Distress - Mustard Seed, Spiced  Marmelade, Peacock Feathers, Picked Raspberry, Gathered Twigs.
Accessories:  Mini Mister, Harlequin Stencil - Ranger, Idea-ology - Game Spinners, Sprocket Gears, Remnant Rubs/Botanicals, Crinkle Ribbon, Salvage Stickers/Crowded Attic, Vial Labels, Chit Chat; foam tape

Friday, June 6, 2014

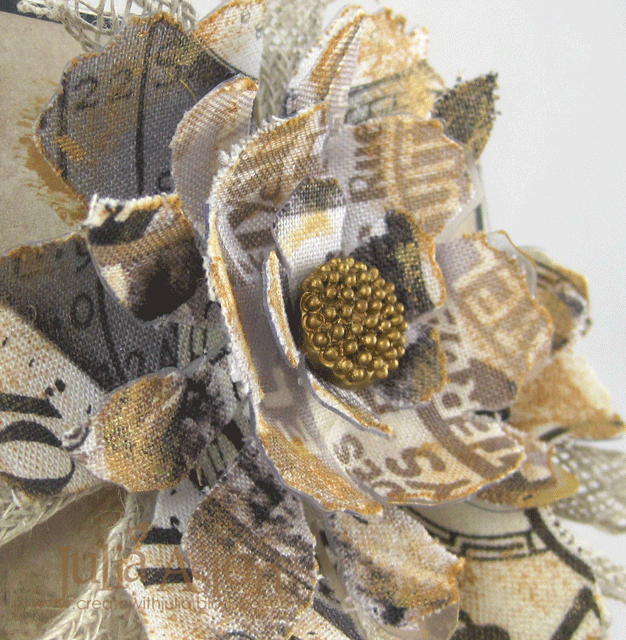
eclecic Paperie Post - Altered Fabric Flower

Today is my day to post over at the eclectic Paperie Blog.  I made a project for this month's ePlay challenge hosted by Andie - - Altered Fabric.

I made a flower using Eclectic Elements Fabric adhered to Art Parts Clearly for Art Modeling Film
I adhered it to a box I made with a Sizzix box die. (ATB)
Here are pics of each of the 4 sides of my ATB (Artist Trading Box)


You will find more pictures and details on just how I put this together over at the eclectic Paperie blog - I hope you'll take a peek!
And you'll find this month's Altered Fabric challenge post here.

Today I'm off to the West Springfield Rubber Stamp and Paper Arts show at the Big E in Springfield, MA -  my stamping friend, Anne Harmon, and I are working at the Rubbernecker booth Sat and Sunday.  I'm hoping to meet Eileen Hull, the designer of this sweet ATB box die.  She's going to be there in her traveling trailor!


Paper:  Little Sizzles 6" x 13" matboard - Sizzix, 12x12 Nature Walk Tags Panel - 7 Dots Studio
Ink:  Ranger Distress Pumice Stone
Accessories:  Eclectic Elements Fabric - Tim Holtz, Idea-ology - Chit Chat Stickers, Word Bands/Observations, Adornments/Arrows, Sprocket Gears and Linen Ribbon,  thick foam dots,  Gold Berry Center Flower  -Studio 490 Blossom Bucket, Adirondack Metallic Acrylic Paint Dabber Gold, Glue N Seal - Ranger, Tattered Floral Die - Alterations, Art Parts Clearly for Art Modeling Film, Sizzix Blocks/cubes die

Thursday, June 5, 2014

Fusion Card Challenge - June 5th

Hi all - can you believe it's time for another Fusion Challenge AND that it's already June??!!! -  we had so many lovely entries for the last challenge with the red/white/dots/music theme and fun sketch!  Thanks so much for playing along!
  Today we're jumping into the summer garden with this lovely inspiration photo - and simple linear sketch!
Here is the card I created for the challenge this week -  I definitely used the photo and 'sort of' used the sketch -  I have a line of dotted washi tape along the left side - but it's mostly covered by my florals! (see the dots to the left of my yellow bloom?!)
I made my flowers using an older Sizzix big die called Charms, Flowers #1.  It has 4 different shaped blooms.  I folded some tissue paper 4 times then die cut it - giving me 16 layers of blooms for each flower.  I punched a hole in the center of each stack and held them together with a brad.  Then I just kept fluffing the layers until they looked full.  My panel is made with a piece of Tissue Wrap - Melange from Tim Holtz that I layered to a piece of white card stock and die cut with a stitched edge mat rectangle from Lil' Inker Designs.  I added a strip of white/black dotted washi tape to the left side.   My sentiment is made with stamps from Saying Stuff from Tim Holtz/Stampers Anonymous (I got it at Michael's for 40% off!).  I used Archival inks - Jet Black and Dandelion. 

What will inspire you this time?  the photo?  the sketch?  or will you 'FUSION' the two?!  Can't wait to see what you link up over at the Fusion Blog - you have almost two weeks to do so!

In the meantime - there's lots of inspiration from the Fusion Design Team linked below!

Sindhu
Stephanie Severin

Stamps:  Saying Stuff - Stampers Anonymous/Tim Holtz
Paper:  White - PTI, Tissue paper from stash, Tissue Wrap/Melange - Ranger/Tim Holtz
Ink:  Archival Jet Black and Dandelion
Accessories:  Sizzix die (older) - Charms Flowers #1, foam dots, brads, Stitched Mat Rectangle die - Lil' Inker Designs, Washi Tape - OmiYage.ca