Friday, September 9, 2016

Marbled Dragonfly Sympathy

I have yet another card (actually 2) to share that I made for the Sept CAS Mix it Up Card Challenge.  When I practiced the technique - I tried using different papers - gloss, manila tag and regular card.  I wasn't happy with how it worked on the regular cardstock and didn't use those.  I had better success with the Gloss card , making 3 different panels 2 of which I'm using today - one panel came out dark and the 2nd panel came out lighter.
Here's the darker panel.
 I stenciled on the white card base using Wendy Vecchi Lots of Dots Stencil with Green Parakeet Ink from PTI.  I stamped the marbled panel with a Tim Holtz stamp from Classics #1 set using Archival Jet Black Ink.  I adhered the panel to the card.  I stamped the sympathy sentiment from Simply Stamps on a strip of Green Parakeet card and popped it up over the panel with foam dots.
Here's a close up of the marbling.
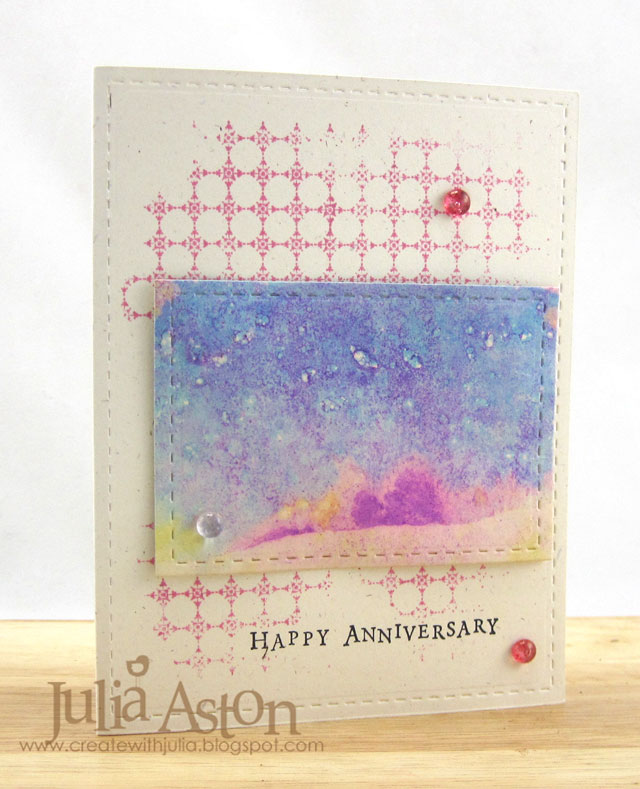
Here is my second card using the marbling panel that came out lighter - I also made the sentiment strip smaller.  
In case you missed my other posts using this Floating Alcohol technique -  I dropped Alcohol inks in Sail Boat and Citrus into a bowl of water.  Then I dipped my panels in and out of the water.  The alcohol inks float on the water - so they adhere to the panel as the paper goes into and out of the water.  You can see Andy Skinner's video of this technique here.
Although I stamped the dragonfly off the edge - the stamp is the full image of the dragonfly along with some more text.  Here's a close up of the lighter marbling on this panel.
I really love how both of these cards came out using this fun new technique.  
Here's the link to the CAS Mix Up Challenge.

Stamps:  Sympathy - Simply Stamps, Dragonfly -  Classics #1 set -Tim Holtz/Stampers Anonymous
Paper:  Gloss Card - Ranger, White and Parakeet Green - PTI
Ink:  Parakeet Green - PTI, Archival Jet Black, Adirondack Alcohol Inks - Sailboat Blue and Citrus.
Accessories:  Lots of Dots Stencil - Wendy Vecchi/Stampers Anonymous, foam dots, water, bowl.

Thursday, September 8, 2016

Marble Anniversary

Well, I don't think there is a "Marble" anniversary (!?) but today I have an anniversary card to share - where I used the marbling technique on the panel!
My card is another entry into the CAS Mix Up Challenge - and the challenge is to use stamps, marbling, and your choice.    I stamped the background with Ornate Dots Background Stamp by Wendy Vecchi in Hibiscus Burst and the sentiment From Hero Arts in Archival Jet Black. I used Andy Skinners marbling with alcohol inks technique shown on his video here.  I used Stitched Mat dies from Lil Inker Designs on the card base and the panel, (the panel is popped up on foam dots)  and I added 3 dew drops.
This time I used a manila tag with the marbling. (see another card I made here using gloss card.) The technique is to drop 3-4 colors of alcohol inks into a bowl of water and then dip the panel you want colored in and out of the water.  The inks float on the top and catch on the material as you dip it  - there's not much controlling of the design you will end up with - I love the patterns of color that I got here!  I used Adirondack Alcohol Inks in the colors of Bright Sail Boat Blue, Wild Plum, Butterscotch and Bright Citrus.
This anniversary card is going to my good stamping buddy - Ann Harmon and her husband, Jay, who are celebrating their 53rd anniversary today!  
 
Here's the link to the CAS Mix Up Card Challenge

Stamps:  Ornate Dots - Wendy Vecchi/Studio 490/Stampers Anonymous, Happy Anniversary - Hero Arts.
Ink:  Archival Jet Black, Hibiscus Burst - PTI, Adirondack Alcohol Inks - Sailboat Blue, Wild Plum, Butterscotch, Citrus.
Paper:  Manilla tag - Ranger, Rustic Cream Card - PTI
Accessories:  water, bowl, Stitched Mat Rectangle Dies - Lil' Inker Designs, foam dots, Dew Drops.

Tuesday, September 6, 2016

Best Costume Ever

This month, Eileen Hull has asked her design team to create holiday projects using her Sizzix dies. I decided to use her Index Card Holder die to create a place to hold photos of my sweet grandnephews and nieces in their various Halloween costumes over the past few years.    
Here are a few photos of how I put this together.  I die cut the Index Card Holder out of Little Sizzles Black Matboard.  Then I cut pieces from Idea-ology Paper Stash/Regions Beyond for the panels - inside and out.  I got out  Idea-ology Bands, Adornment Oddities and Remnant Rubs that I thought I might use on my project.
I rubbed some Picket Fence Distress Paint on the metal pieces.  I used Remnant Rubs/Curiosities and Small Talk/Occasions on the front and back.  I used my Cropadile to make holes for the Band and Adornment Oddities - adding Jump Rings to put through the holes.
The matboard has a white core so I used a black sharpie to color the white that shows up when you fold on the score lines of the die cut.  
(In these photos I have the band going top to bottom but realized after the photos were added - I needed to have the band go left to right to hold the photos inside the folder!)
I went through all the photos on my computer of the kids to find the ones of them in their Halloween costumes over the past few years -  Landon is 6, James is 5, Mila is 4 and Madelyn is 2.  They are the children of my nieces, Katie and Christie.
The photos needed to be 3"x5" to fit in the holder (index card size) -  so I cut a piece of Kraft card 3x5 for each photo , then used that to trace over my photos centering them over the images.  I cut the photos on the lines I drew - then used my paper cutter to make them 1/4" smaller on each side. Then I adhered them to the kraft card so they were all uniformly neat and sized!
We all get together every Halloween at Katie's house, as she lives on a road that is a circle and off the main streets so it's safer for the kids - and they all have such fun walking house to house together - it's a great tradition for both kids and adults!
Here are all the photos stacked up and placed in the folder.
A close up of the left side.  I tied a piece of wrinkled seam tape in a bow around the Jump Ring on the Spooky adornment.
and a close up of the right side!
Here's a side view showing the photos inside -  there is still room to add several more.
I cut a label from one of the papers  from Paper Stash/Regions Beyond and added the kids names using Label Letters and  'best costume ever' from Small Talk/Occasions.  I added a cat from Remnant Rubs/Curiosities.  You can see here how I tied a knot in the band so it held tightly around my folder.
 I will keep this little photo holder at my house where the kids will enjoy looking through it when they visit -  they always LOVE seeing photos of themselves - and I sure have tons of them! 
 I guess I should make one for Christmas photos as well!!!

 Remember to check out Eileen Hull's blog throughout September for more great holiday ideas using her Sixxiz dies!
Paper:  Little Sizzles Black Mat Board - Sizzix, Kraft card - Papertrey Ink, Paper Stash/Regions Beyond - Idea-ology/Tim Holtz.
Accessories:  Idea-ology Bands, Adornments/Oddities, Remnant Rubs/Curiosities, Small Talk/Occasions, Label Letters, Jump Rings,  Cropadile, wrinkled Seam Tape - Prairie Bird Boutique Etsy Shop, Black Sharpie, Scotch Quick Dry Adhesive.

Monday, September 5, 2016

Happy Birthday to Me!

Happy Labor Day to everyone in the USA.  Today is also my birthday -  and I just wanted to share some of the lovely cards I received from family and friends.  Six are hand made and four are store bought with lovely messages on all.
My son, Josh, is taking me to lunch to celebrate and I met a friend on Saturday at the mall for lunch and shopping.  About every 5 years my birthday falls on Labor Day -  and just about as often it fell on the first day of school!
I am looking forward to early retirement this coming January - so I expect by the time my next b'day rolls around - I will have had a very different year - hopefully with more adventures, more time to craft, more time to exercise, more time to clean out closets and more time to better organize my craft room!

Thank you to Deborah, Katie (Landon, Mila and Greg), Elizabeth,  Chris (James, Madelyn, and Nate), Anne, Cilla, Flo and 3 friends from SCS who sent me BRAK's (Birthday random acts of kindness!) for the cards above.


Friday, September 2, 2016

This is the Day

So many wonderful monthly challenges have started with the beginning of September!  Today I'm joining in with Loll and Bonnie in their CAS Mix Up Challenge.
I decided to try marbling using the floating alcohol ink technique that Loll used - here's a video by Andy Skinner showing the process.
I used Adirondack Inks Sail Boat Blue and Butterscotch on Gloss Paper from Ranger for my background.
I embossed the stamped Psalm from Phrases and Praises set by PTI in black.
I added 3 Wood Veneer stars, adhered the panel to a slightly larger black card panel and adhered that to the white card base with foam dots so it pops up a bit.
I was happy to learn this new technique for marbling - but I found that many of the colors of Alcohol Inks that I have were too light when added to the water.  I tried card stock, glossy card and a manila tag - and the tag really took the watered ink the best - I may post another project using the tag soon!
You'll find the CAS Mix up Challenge here.

I'm also linking to:
marbling with alcohol inks is a new technique for me

this is the first time I've used this stamp set even though I purchased it several releases ago from PTI!


Stamps:  Phrases and Praises - PTI
Paper:  White, True Black - PTI, Gloss Paper - Ranger
Ink:  Versamark, Adirondack Alcohol Inks - Sail Boat Blue, Butterscotch
Accessories:  dish of water, wood veneer stars - American Crafts, Black Embossing Powder, heat tool.

Thursday, September 1, 2016

A Vintage Journey - September Challenge - Create within a frame

This month, I am the challenge hostess over at A Vintage Journey - whoo hoo!!   and my challenge for the Creative Guides AND for YOU is to Create within a Frame!  Here's the official wording of the challenge: 
For this month’s challenge we would like you to create something inside a frame. Whatever you use show us how you have incorporated a frame on your vintage; shabby; mixed-media; art journaling; industrial or steampunk project. We can't wait to see all of your creative framing ideas!
I had several ideas rolling around in my head for creating inside a frame - but when I finally sat down at my work table - I went in a totally new direction because I had just received Tim's Lost Zombie die in the mail a few days ago and wanted to use it right away!   So here is what I started out with:
 I decided to use a Cabinet Frame (Although I ended up using a different one than pictured above as I added some paint to it and didn't like it!) Here is my finished project:
I have some photos to show you the steps in my creative process.  
First, I knew I wanted to rust up my die cut pieces.  I read about this technique on someone's blog but neglected to write down whose I'll edit my post here if I find it! 
 ETA: Amanda used this technique hereand Brenda has lots of rusting techniques including this one here!
I simply painted some brown acrylic paint randomly over the black cardstock die cuts, sprinkled cinnamon over them while they were still wet - then pressed down on the cinnamon to bond it - and let the pieces dry!  My kind of technique -  SIMPLE and impressive!  I have finished the process on the top piece below - and have just put the paint on the 2nd piece
 (I didn't end up using the Iron Gate die cut piece on my project so now have it to use another day!)
Here are all three pieces all dry and ready to use (they dried within 15 minutes)
First I inserted a piece of patterned paper from last years Paper Stash/Regions Beyond inside the frame.  Then I started layering the die cut, rusted pieces.  
 I wanted to create "inside the frame" so as I tucked the graveyard piece under the left edge, it bowed out in the middle and I thought "wow - that looks cool!- so I tucked one end under the left side piece of the Cabinet Card Frame - adhered two thick foam dots together and placed it under the middle tombstone to hold the bend out and cut the strip so it would tuck under the right edge of the frame.
I played around with the placement of the On the Fence Die and decided to layer it over and a little below the tombstones.  For this piece - I just stapled the picket on each end - the card stock is sturdy enough to keep the bow in it without foam dots.  The Mini Attacher staple didn't quite go through all the layers of the frame - so I also added a dot of glue under the end pieces of the fence.
I had masked and sponged the Lost Zombie die cut using Distress Inks in Peeled Paint (for his skin), Frayed Burlap (for his pants) and Antique Linen (for his shirt)  I wrapped a piece of twine around his waist twice and tied it in a knot
 (this is basically how the image that comes with the die was done so no creativity on my part!)  
Again, I fiddled around with the placement of him and liked the look of one leg outside the fence and one leg inside.  His body and head are held with double thick foam dots and his left arm is adhered with one thick foam dot.
 Then I added some Remnant Rubs/Curiosities and a Small Talk/Occasions sticker.
The bats and owl are from the Halloween Shadows die.   I added the Jolee White Pumpkin to the fence after sponging it a little bit with Distress Frayed Burlap.
I added an easel to the back so my frame could stand up - using Tim's Small Easel Die
And here are a few photos showing how popped up everything is.
 And here is my finished creation once more!
I hope you will join us this month and 'Create within a Frame'!  You will want to check out the Creative Guides inspiring creations over at A Vintage Journey - where you will also find all the challenge details! 
There is a lovely prize to be won by a randomly chosen winner from this months gracious sponsor: DecoArt
The Creative Guides will  also be choosing 3 pinworthy projects.  You have until October 6th to link up your creation  -  Can't wait to see them!!


Paper:  White, True Black - PTI, Paper Stash/Regions Beyond - Idea-ology.
Ink:  Ranger Distress Frayed Burlap, Peeled Paint and Antique Linen.
Accessories: Idea-ology Cabinet Card Frame, Remnant Rubs/Curiosities, Small Talk/Occasions, Burnt Umber Acrylic Paint, Cinnamon, Tiny Twinkles - Taylored Expressions, Alterations Dies - Lost Zombie, On the Fence, Graveyard, Halloween Shadows (bat and owl), thick foam dots, twine, Jolees White Pumpkins, black Stabilo Pencil, Mini Attacher - Ranger.